 |
|
 02-04-2019, 11:23 AM
|
#41
|
|
Bus Geek
Join Date: May 2016
Location: Eastern WA
Posts: 6,401
Year: 2002
Coachwork: Bluebird
Chassis: All American RE (A3RE)
Engine: Cummins ISC (8.3)
Rated Cap: 72
|
Mine appear to be plastic of some sort.
Anyone here with an early 2000's Bluebird here that has cut into theirs to see what is underneath?
|

|

|
|
02-04-2019, 11:58 AM
|
#42
|
|
Bus Geek
Join Date: Sep 2014
Location: Eustis FLORIDA
Posts: 23,764
Year: 1999
Coachwork: Thomas
Chassis: Freighliner FS65
Engine: Cat 3126
Rated Cap: 15
|
Quote:
Originally Posted by Sleddgracer

how much more damage would be done when a tire blows apart if wheel well clearances were a bit less than standard, especially if extra heavy gauge metal was used in the modification?
|
IDk. An 11R weighs over a hundred pounds, most of which is in the tread. When it separates it often causes a good bit of bodywork damage in the area.
The more room the better. But I'm not trying to create any worry or make a mountain of a molehill.
I've had two buses with flat tire damage though.
I'd say as long as the tires clear and everythings welded up porperly there's no real problem. But I'd definitely go on the thick side and make sure its sturdy.
|
|
|
|
|
02-04-2019, 11:59 AM
|
#43
|
|
Bus Geek
Join Date: Sep 2014
Location: Eustis FLORIDA
Posts: 23,764
Year: 1999
Coachwork: Thomas
Chassis: Freighliner FS65
Engine: Cat 3126
Rated Cap: 15
|
Quote:
Originally Posted by PNW_Steve
Mine appear to be plastic of some sort.
Anyone here with an early 2000's Bluebird here that has cut into theirs to see what is underneath?
|
Look from under the bus. Knock on the wheel well and you should be able to tell what its made from. Often there's something over them inside. Rubber, plastic, linoleum...
|
|
|
|
|
02-04-2019, 04:16 PM
|
#44
|
|
Bus Geek
Join Date: May 2009
Location: Columbus Ohio
Posts: 18,846
Year: 1991
Coachwork: Carpenter
Chassis: International 3800
Engine: DTA360 / MT643
Rated Cap: 7 Row Handicap
|
Quote:
Originally Posted by PNW_Steve
Mine appear to be plastic of some sort.
Anyone here with an early 2000's Bluebird here that has cut into theirs to see what is underneath?
|
thats mine.. unless they are metal thats been Heavily coated with fiberglass or other hard plastic-like covering..
thats on my 00 bluebird..
-Christopher
|
|
|
|
|
02-04-2019, 04:30 PM
|
#45
|
|
Mini-Skoolie
Join Date: Feb 2016
Location: Asheville, NC
Posts: 52
Year: 2001
Coachwork: Blue Bird
Chassis: International
Engine: Dt 466e
|
So I have been debating cutting my wells for a while. I would like to second EastCoastCB on the words of warning. I have an 01 bluebird body on air-ride rear suspension. I have removed the plastic covering on the wheel wells and it does, in fact, reveal a metal layer underneath. In my case the metal wheel well is the same gauge as the rest of the flooring.
I have a gash in the rear driver side well that must have been caused by a tire failure at some point. It's a small puncture but it was powerful enough to come through both the metal and plastic cover. I don't have the plastic covering anymore but I'll be sure to take pictures of the metal to post here.
|
|
|
|
|
02-04-2019, 04:36 PM
|
#46
|
|
Bus Geek
Join Date: Sep 2014
Location: Eustis FLORIDA
Posts: 23,764
Year: 1999
Coachwork: Thomas
Chassis: Freighliner FS65
Engine: Cat 3126
Rated Cap: 15
|
Quote:
Originally Posted by naes14
So I have been debating cutting my wells for a while. I would like to second EastCoastCB on the words of warning. I have an 01 bluebird body on air-ride rear suspension. I have removed the plastic covering on the wheel wells and it does, in fact, reveal a metal layer underneath. In my case the metal wheel well is the same gauge as the rest of the flooring.
I have a gash in the rear driver side well that must have been caused by a tire failure at some point. It's a small puncture but it was powerful enough to come through both the metal and plastic cover. I don't have the plastic covering anymore but I'll be sure to take pictures of the metal to post here.
|
I've got a totally rippled wheel well on the Thomas. Feels like 14ga. Thank goodness they doubled up. Can't see the damage from inside the bus, it only got the first layer underneath. 100lbs spinning at highway speeds can do a lot of damage real fast. My old Ward had a bunch of bodywork totally replaced on the curbside rear wheel area. A flat had taken out a couple square yards of steel.
|
|
|
|
|
02-04-2019, 06:02 PM
|
#47
|
|
Bus Geek
Join Date: Sep 2017
Location: Swansboro,NC
Posts: 2,988
Year: 86
Coachwork: Thomas
Chassis: Ford B700
Engine: 8.2
Rated Cap: 60 bodies
|
taller bump stops?
What happens when an air bag gives up and the tire has no where to go and your on the road and don't know it until it's to late?
1/4" plate or 3/8" aluminum diamond tread pointed down and grade 8 bolted to the frame not the floor and sealed with access in the design to replace later.
But in your bunk bed design?
Are you planning on a mattress straight on the floor?
I used my wheel well areas as storage under my kids beds.(less than normal bed height) Easier to work clothe folding around an object than it is the whole re- design of the structure.
KISS there is no reason to cut them? Design around them?
Shure flatten them a little if need be.but don't delete them.
I even have 1000lb cargo nets in my kids beds cause that's where they want to ride and be on there phone so I made them net up instead of a seatbelt and I definetly built there bunks as strong if not stronger than the bus itself.
If I ever have a problem on the road they might get jostled around a more than the seatbelt I provided for them but they will a appreciate a seatbelt after a skoolie tumble
Not saying it will? But I built for it to happen?
|
|
|
|
|
02-28-2019, 03:42 PM
|
#48
|
|
Mini-Skoolie
Join Date: Sep 2018
Location: Elizabeth City, NC
Posts: 47
Year: 1998
Coachwork: Freightliner/Thomas
Chassis: FS65
Engine: Caterpillar 3126
|
Quote:
Originally Posted by EastCoastCB
I've got a totally rippled wheel well on the Thomas. Feels like 14ga. Thank goodness they doubled up. Can't see the damage from inside the bus, it only got the first layer underneath. 100lbs spinning at highway speeds can do a lot of damage real fast. My old Ward had a bunch of bodywork totally replaced on the curbside rear wheel area. A flat had taken out a couple square yards of steel.
|
I'm kind of late to this discussion, but I'm planning to lower my wheel wells as much as possible.
You make a great point about blowing a tire, but isn't a ton of damage going to happen either way? It sounds like reinforcing the wheel wells is a good idea in general, so lowering it could be that opportunity.
Say you shave off 4" and add 3 layers of 14ga steel...wouldn't that give you both a lower floor AND a stronger than stock wheel well?
|
|
|
|
|
02-28-2019, 03:56 PM
|
#49
|
|
Bus Geek
Join Date: Sep 2014
Location: Eustis FLORIDA
Posts: 23,764
Year: 1999
Coachwork: Thomas
Chassis: Freighliner FS65
Engine: Cat 3126
Rated Cap: 15
|
Quote:
Originally Posted by blissout
I'm kind of late to this discussion, but I'm planning to lower my wheel wells as much as possible.
You make a great point about blowing a tire, but isn't a ton of damage going to happen either way? It sounds like reinforcing the wheel wells is a good idea in general, so lowering it could be that opportunity.
Say you shave off 4" and add 3 layers of 14ga steel...wouldn't that give you both a lower floor AND a stronger than stock wheel well?
|
Just make sure you can shave off 4".
|
|
|
|
|
02-28-2019, 04:05 PM
|
#50
|
|
Bus Geek
Join Date: Mar 2011
Location: Houston, Texas
Posts: 8,462
Year: 1946
Coachwork: Chevrolet/Wayne
Chassis: 1- 1/2 ton
Engine: Cummins 4BT
Rated Cap: 15
|
I could no doubt have lowered mine a fair amount but only Notched" one side to provide a little room for some wet bath construction. But I did go thru the same process of measuring axle travel to the bump stop then confirming wheel clearance as you would for dropping or eliminating any wheel well.
|
|
|
|
|
02-28-2019, 11:58 PM
|
#51
|
|
Bus Geek
Join Date: Sep 2015
Posts: 3,856
Year: 2002
Coachwork: Thomas Built Bus
Chassis: Freightliner FS65
Engine: Caterpillar 3126E Diesel
Rated Cap: 71 Passenger- 30,000 lbs.
|
You really do some fine fabrication work, Tango!
|
|
|
|
|
03-11-2019, 10:13 PM
|
#52
|
|
Bus Nut
Join Date: Jun 2016
Location: Lafayette, Indiana
Posts: 332
Year: 2003
Engine: DT530
Rated Cap: 84
|
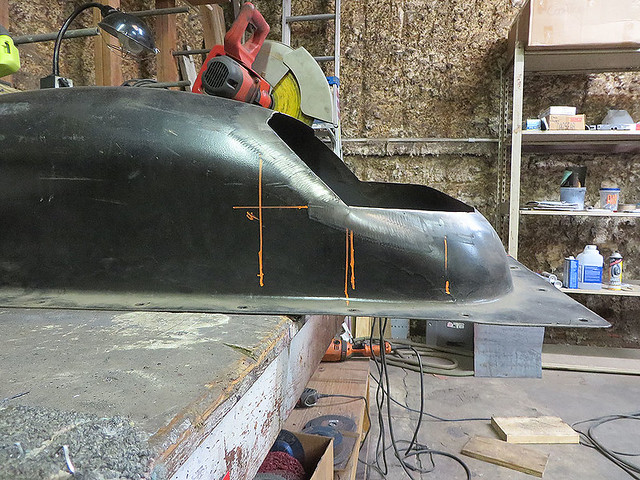
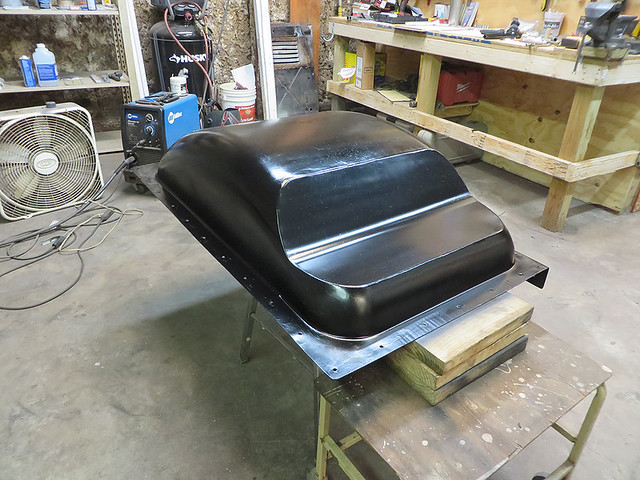
I decided to remove the rear wheel wells. I explained the process with lots of photos on my bus build thread.
https://r.tapatalk.com/shareLink?url...2&share_type=t
Hope the link works.
|
|
|
|
|
08-19-2022, 10:53 AM
|
#53
|
|
New Member
Join Date: Jul 2022
Posts: 1
|
Quote:
Originally Posted by Native
I have lowered the wheel well in our bus. We had a rust-out on the driver side in front of the wheel well, so we had to repair that. In the process, I decided to lower the wheel well. I cut the wheel well off at the floor. With the air suspension deflated and the frame resting on the axle stops, I put an arrangement of 2x4's on the tires which provided about 3" of clearance. I rested the cut off wheel well top on the 2x4 support and attached the top back on the floor, with additional floor supports as well.
With this arrangement, we have enough room to add snow chains if needed.
Only one side has been completed as the passenger side had no real rust damage. There was a leak in the driver side window that was not caught by the school district maintenance which made the hole. I will lower the passenger side after we get done using the bus as a moving van for our household goods. I have a TON of pictures and will see what I can find (easily) to post here.
|
How has the wheel well removal and construction worked for you? We would love to cut ours down but havent been able to find any videos online about the process. Is there a link you can share or do you have video of your process?
Thanks so much!
Amy
|
|
|
|
|
08-19-2022, 11:15 AM
|
#54
|
|
Bus Nut
Join Date: Oct 2021
Location: Jacksonville, FL
Posts: 728
Year: 2003
Coachwork: BlueBird
Chassis: TC2000 28ft
Engine: Cummins ISB 5.9 24v, MD3060
Rated Cap: 14
|
Quote:
Originally Posted by amyrose
How has the wheel well removal and construction worked for you? We would love to cut ours down but havent been able to find any videos online about the process. Is there a link you can share or do you have video of your process?
Thanks so much!
Amy
|
How far do you have until your bumpstops hit the frame? How far do you have between the top of the wheel and the bottom of the wheelwell?
I have 7 inches from the top of the wheel to the bottom of flat floor on my bus. I have 2 inches from the bump stop to the frame. This leaves me with 5 inches to spare, so im welding in a flat 1/8 treadplate from the bottom. Im about halfway through it working in the evenings around the Florida rain.
I doubt youll be able to go flat if you have a normal bus. Mine is lifted and had flat floor rear already. You can probably follow the guide posted here and shorten the tops of them. If the weel well is in good shape, then you can just cut the top off square and weld a flat plate to it.
|
|
|
|
|
08-19-2022, 11:45 AM
|
#55
|
|
Bus Nut
Join Date: Dec 2021
Location: Iowa City, IA
Posts: 642
Year: 2006
Chassis: IC CE300 (PB105)
Engine: DT466e @245hp | Allison 3000PTS
Rated Cap: 66
|
Thanks for bumping this thread... This was a modification I hadn't even considered!
Now I gotta head down to my shop and bust out the tape measure and drawing pad 
|
|
|
|
|
|
 Posting Rules
|
You may not post new threads
You may not post replies
You may not post attachments
You may not edit your posts
HTML code is Off
|
|
|
|
 » Recent Threads
 |
|
|
|
|
|
|
|
|
|
|
|
|
|
|
|
|
|
|
|
|
|
|
|
|
|
|
|
|
|
|
|
|
|
|
|
|
|


 Linear Mode

