Journey with Confidence RV GPS App RV Trip Planner RV LIFE Campground Reviews RV Maintenance Take a Speed Test Free 7 Day Trial ×


Reply
 
Thread Tools Display Modes
 
Old 01-29-2016, 12:35 PM   #1
Bus Nut
 
onenationundergoat's Avatar
 
Join Date: Mar 2015
Location: Statesville, North Carolina
Posts: 467
Year: 1993
Chassis: Thomas
Engine: International Navistar DT360
Rated Cap: 60
Easy Black/Grey/White Water Tanks

I thought I might share our water tank system with Skoolie, because it's easy to make, cheap, and holds up well. Most of this is copied over from my build thread. (Haulin' Oats)

I bought 30-gallon food-grade High Density Polyeurethane drums. The bottom is not removable, and the top is molded to the drum permanently. It has two 2" screw-in plugs on the top. Our system currently uses three of them. 1 for black, and 2 for gray water. I will be adding two more for fresh water later.

For our tanks we took 30-gallon food grade polyeurethane syrup drums and mounted them with laser-cut cradles. My dad drew up a design for flat aluminum, sent it off and had it laser cut, then used tools at his shop to bend it into shape.


We had six of them made; two for each tank. We installed two tanks for grey water, and one for black water.


Here Dan is drilling holes in the bottom of the bus to bolt the cradles to. Our floor is made entirely of small sheet metal panels that are curled on the edges and welded together to make ribs. The cradles bolt directly to one of the ribs.


Here's how the barrels fit in the cradles.

To attach the barrels to the cradles we used hurricane straps. They cost $13 for a 35 ft strap at Lowes, and can support something ridiculous like 1500 lbs. They're zinc coated, and are very flexible. After cutting the correct size pieces, each end was bent around a stub of metal rod and riveted back on itself, making a sort of eye. The metal rod stubs were hexagonal, and had two holes drilled in each. Hexagonal rods make it so that when the holes are drilled the rod can lie flat on the table and the drill bit won't slide around. One end's holes were tapped with threads, and the other end was just drilled. Then to attach the barrels, the straps were laid flat in the cradles, pulled around the barrels, bolts were inserted into the rod holes on one end and screwed into the rod holes of the other end, which tightened the strap on the barrel. Long bolts were used first, and then replaced by shorter and shorter bolts to make the strap as tight as possible.


This machine cut the hexagonal rod into little chunks of equal size so that I could use the drill press to put in the tapped and drilled holes that had to match up exactly for the bolts to fit correctly.


Close up of the rod chunks.


Dan ground down the sharp edges to avoid damaging the plastic barrels and so that the pieces would lay down flat on the drill press.

I don't have any more pictures of this at the moment. This is a new computer so I'm missing all of my old pictures until I can figure out how to move them over.

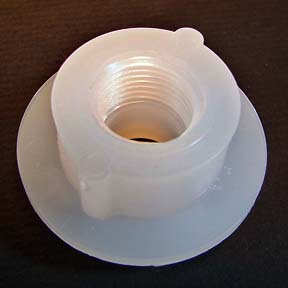
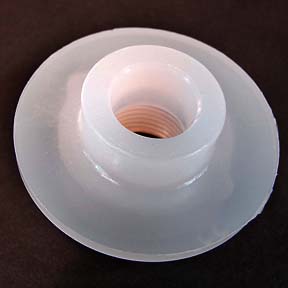
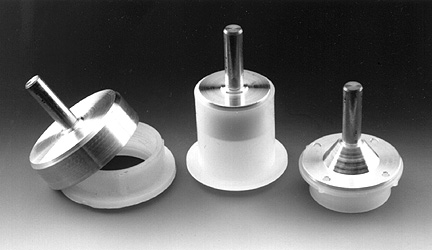
Plumbing the tanks was another matter entirely. If you're interested in the specifics about how we rigged up our system, read on. Before cinching up the black water tank, we had to drill a very specific sized hole in the right place for the toilet to flush into and insert a 3-inch rubber grommet to fasten the pipe from the toilet flange. Polyeurethane cannot be glued or sealed. The only way to bond it is either by plastic welding or a very expensive special glue that costs $70 per ounce and must be applied with a specialized $170 applicator. The tank grommet was the prefect solution. It's just rubber and works by mechanical pressure. When the pipe is inserted into the grommet, the rubber edges are squeezed against the sides of the hole and are mechanically sealed. It cost $12 per grommet. The black tank has one grommet on top for incoming business, and one on the end at the bottom with the valve coming out of it. The two grey water tanks were easier. Our grey water system uses 1.5" pipe, and it just so happened that the tanks originally had two threaded drains on the top. Our sink and tub are plumbed together with a wye inside the bus, and go to a P-trap just under the floor. Then there's T with a cleanout plug on one side in case we need to unclog any hair, that goes to a cross fitting. The cross fitting has one tank on each end by way of those original threaded drains, and then the last part of the cross has a fitting that increases the pipe size to 3" for our grey water valve. This way we can attach our 3" black water drainage hose to empty our grey water second and sorta clean it before hosing it out at the dump station.

__________________
My build thread:https://www.skoolie.net/forums/f11/build-thread-for-haulin-oats-and-goats-11237.html#post113500
A gal, a guy, three cats, two dogs, one rabbit, and one goat, traveling the country together.
onenationundergoat is offline   Reply With Quote
Old 01-29-2016, 01:50 PM   #2
Bus Crazy
 
Join Date: Nov 2011
Location: Sault Ste. Marie, Ontario
Posts: 1,793
Year: 1997
Coachwork: Thomas
Chassis: B3800 Short bus
Engine: T444E
Rated Cap: 36
I'll just add an anecdote of my experience with HDPE tanks:

When I purchased a square HDPE tank it didn't have the fittings in the location I needed them. I purchased 3/8" FPT spin-weld fittings for cheap (I think it was 5 for $20).


Instead of purchasing the router bit that fits on the wings of the fittings (as can be seen in the first picture), I made my own bit. It consisted of a 3/8" NPT pipe that was cut down to only the threads and a bolt. I welded both together and ended up with a slightly off-balance router bit that could screw into the threads on the fitting. Once the router got up to speed I was able to plunge it against the tank and weld the fitting on. It only takes a second.

If someone had a metal working lathe they could make a well balanced bit quick. Here are some from www.spinwelding.com.


Cheers
__________________
My build page: Armageddon - The Smell of Airborne Rust
jazty is offline   Reply With Quote
Old 01-29-2016, 02:03 PM   #3
Bus Nut
 
onenationundergoat's Avatar
 
Join Date: Mar 2015
Location: Statesville, North Carolina
Posts: 467
Year: 1993
Chassis: Thomas
Engine: International Navistar DT360
Rated Cap: 60
Thanks for the input Jazty!

I should also mention that our system has held up well through freezing temps and 8000 miles of bumpy bus leaf springs on washboarded dirt roads as well as massive potholes throughout Louisiana at full speed where we thought the whole bus was going to explode.
__________________
My build thread:https://www.skoolie.net/forums/f11/build-thread-for-haulin-oats-and-goats-11237.html#post113500
A gal, a guy, three cats, two dogs, one rabbit, and one goat, traveling the country together.
onenationundergoat is offline   Reply With Quote
Old 01-29-2016, 02:14 PM   #4
Bus Crazy
 
Join Date: Nov 2011
Location: Sault Ste. Marie, Ontario
Posts: 1,793
Year: 1997
Coachwork: Thomas
Chassis: B3800 Short bus
Engine: T444E
Rated Cap: 36
Quote:
Originally Posted by onenationundergoat View Post
massive potholes throughout Louisiana at full speed where we thought the whole bus was going to explode.
Haha! We had a similar experience driving through Louisiana last winter! With the number of potholes in the roads around Shreveport we might as well have been off-roading through a field at 60mph..
__________________
My build page: Armageddon - The Smell of Airborne Rust
jazty is offline   Reply With Quote
Old 01-29-2016, 09:56 PM   #5
Bus Geek
 
EastCoastCB's Avatar
 
Join Date: Sep 2014
Location: Eustis FLORIDA
Posts: 23,764
Year: 1999
Coachwork: Thomas
Chassis: Freighliner FS65
Engine: Cat 3126
Rated Cap: 15
The "Goat" bus has held together well... I've seen its offroad prowess firsthand.

They did a GREAT job on those tanks!
EastCoastCB is offline   Reply With Quote
Old 01-31-2016, 11:17 AM   #6
Bus Crazy
 
roach711's Avatar
 
Join Date: May 2010
Location: Farmington Hills, Mi (Detroit area)
Posts: 1,968
Year: 2000
Coachwork: Eldorado Aerotech 24'
Chassis: Ford E-450 Cutaway Bus
Engine: 7.3L Powerstroke
Rated Cap: 19
I did something similar but being a woodworker used plywood instead of metal. I glued and screwed the plywood box then sprayed it with undercoating to keep water away. Not as elegant as OneNation's solution but it works fine so far. My tank is 15 gallons.

Here's the box and aluminum straps. All thread rods attach the whole mess to the plywood bus floor.


Inside the box


Mounted in place.

roach711 is offline   Reply With Quote
Old 01-31-2016, 01:26 PM   #7
Bus Nut
 
onenationundergoat's Avatar
 
Join Date: Mar 2015
Location: Statesville, North Carolina
Posts: 467
Year: 1993
Chassis: Thomas
Engine: International Navistar DT360
Rated Cap: 60
Wow! That's a nice way to do it as long as you don't have any wood rot problems. Which with the way you did it shouldn't happen for a long time! We were gonna try to make wooden cradles for the oddly-shaped jet ski gas tanks I was going to use, but it was a nightmare.
__________________
My build thread:https://www.skoolie.net/forums/f11/build-thread-for-haulin-oats-and-goats-11237.html#post113500
A gal, a guy, three cats, two dogs, one rabbit, and one goat, traveling the country together.
onenationundergoat is offline   Reply With Quote
Reply


Posting Rules
You may not post new threads
You may not post replies
You may not post attachments
You may not edit your posts

BB code is On
Smilies are On
[IMG] code is On
HTML code is Off
Trackbacks are Off
Pingbacks are Off
Refbacks are Off


» Featured Campgrounds

Reviews provided by

Powered by vBadvanced CMPS v3.2.3

All times are GMT -5. The time now is 01:22 AM.


Powered by vBulletin® Version 3.8.8 Beta 4
Copyright ©2000 - 2024, vBulletin Solutions, Inc.