 |
|
 04-29-2015, 10:52 AM
|
#1
|
|
Bus Nut
Join Date: Feb 2015
Posts: 258
|
How to Fiberglass
Maybe a kind admin will sticky this some day?  Tools Required
- Rubber squeegees. In a pinch, you can cut a pair from a coffee can lid - that soft plastic is about the right strength. Round the corners so they don't drag. It needs a smooth edge.
- Wide popscicle mixing sticks. eBay, $4.
- 2" wide Disposable "chip" brushes. Harbor Freight, $12.
- Disposable scissors. Harbor Freight, $0.99. (Get a few!)
- Mixing cups. Make sure they have NO wax - those sold for "hot" applications are fine. I like the wider, shallower ones and usually get the 36-pack of 12oz soup cups from Costco for like $9.
- Hair dryer. Do NOT try to use your wife's! Walmart, $10.
- Nitrile gloves. Harbor Freight, $9.
- 3mil plastic sheet, on a roll with no crease. $20 online, but one roll will last you forever.
- Dremel or (better) Black & Decker rotary tool. You ought to own this anyway.
- A few dozen sanding drums and the little raspy cutter thing - the one they sell for drywall.
- 12-pack of bi-metal hacksaw blades. No hacksaw required, just the blades. $9 at Home Depot. Cheaper at Harbor Freight but I think they mean a different pair of metals because they don't last nearly as long!

- 100-pack straight edge razor blades. Harbor Freight, $4.
Sounds like a lot, but tool-wise most of you readers probably have a lot of this lying around. Fiberglass fabbers are famous for re-using all kinds of things in a pinch. When the epoxy is just about to set up on you, you'll grab anything to spread it if you can't find your squeegee. Try to avoid grabbing your credit card!
|

|

|
|
04-29-2015, 11:10 AM
|
#2
|
|
Bus Nut
Join Date: Feb 2015
Posts: 258
|
Materials Required
[LIST=1][*]Epoxy kit. I did some online searching and found that buying your first run separately probably doesn't make sense. Get the "West System Epoxy Kit" from a place like Jamestown Distributors. This is a gallon kit that may last the life of your project or more if you aren't making a lot of stuff. It includes the resin, hardener, pre-measured pumps, mixing sticks, squeegees, etc. You can knock off some of the tools above if you get this. $150.[*]BID cloth. Cloth is sold in weights. My preference is 8oz because I'm used to it, but you can do 6-10. 6oz is $55 for 10yds x 3' wide right now - if you watch eBay and poke around sometimes you can find it cheaper. When you measure, remember that you usually need two layers so double your estimates.[*]UNI cloth. Totally optional. Costs about the same.[*]Microballoons, 1lb. $10.[*]Cotton flock, 1lb. $4.[*]Foam substrate if necessary. Prices vary by type.
Choosing Fiberglass
BID is called that because it stands for "Bi-Directional". It has 50% of its fibers along the X-axis, and the other 50% along the Y-axis. So its strengths run that way, too. BID is the most flexible option and is usually easy to get to go around curves when necessary (you lay the cloth at 45-degrees to the curve).
UNI is uni-directional (mostly). 90% one direction (the long axis), 10% the other.
There are also oddballs like tri-ax, carbon fiber, etc. If you know enough to choose cloths you probably aren't reading this so stick with BID.
Choosing Foam Substrates
There are lots of options here. The most common for making sheet-type goods (skins, frames for cabinets, etc.) is H45 PVC, sometimes called "Divinycell". 3/8" is a common thickness. This cuts easily with a razor blade, shapes mostly-easily with 24-grit sandpaper (or very easily with a router/power rools), etc.
The second option is styrofoam - usually not the white kind you're used to in cups, but a blue variant that's denser and more rigid. If you're a scrapper, look for boat docks. They're commonly used as floatation blocks in these and you can often find them for free. The outside will be nasty, but trim it off and the inside will be perfectly fine. Styrofoam is hard to shape with sandpaper but very easy to cut with a "hot wire" so it's often used to make things like wing shapes in airplanes where you stick templates on the sides and run a hot wire across them.
The third most common option is urethane, either from (not as common) pour foam or (more commonly) bought in blocks. Urethane is light super-weak sandstone. You can shape it with a fingernail, or very light passes of 150-grit. It shapes like butter, so it's perfect for making weird things like duct tubes around a heater core. It's very hard to get epoxy to stick to it, though, so usually you cover it with duct tape then pop it off the form once it's cured.
|
|
|
|
|
04-29-2015, 11:21 AM
|
#3
|
|
Bus Nut
Join Date: Feb 2015
Posts: 258
|
Making Thin Sheets
This couldn't be simpler. It's good practice to start here, and you can use the pieces you made as material for things like electrical switch panels or tank access hatch covers.
- Lay out sheet plastic on a flat workbench - make sure it's clean because any imperfections will imprint onto the layup!
- Cut and lay out a layer of cloth the size you want to make the sheet. (Put down one of cloth at a time.) If you need multiple pieces for a big sheet, overlap their edges 1"-2".
- Mix a cup of epoxy VERY well. Don't mix more quantity than you need - it'll "kick off" (set up) too soon and you'll waste it. You should see NO swirls or patterns once mixed - if you can tell the resin and hardener apart in any way, keep mixing (if you think it's mixed in 10 seconds - keep mixing). Scrape the sides of the cup as you do this so it's thorough.
- Using a chip brush, apply small quantities to "wet out" the cloth. Once you do this the first time you will immediately know what I mean by "wetting out". The fiberglass will go transparent.
- Use the brush to "stipple" (tap vertically) the surface to work the epoxy around and get out any air bubbles you can see. Make sure the cloth is fully wet out.
- If you have more layers of cloth to add do it now while the first is still wet. Lay the cloth out and repeat the steps above.
- If the epoxy starts to get stiff and hard to work, hit it with the hair dryer. It's beautiful - it will flow like water. I ALWAYS use a hair dryer whether I need it or not.
- Apply a final layer of plastic to the top and use the squeegee GENTLY from the center out to work out any air bubbles. You don't need this 100% perfect... but try for it.
- Once cured, remove plastic and cut to shape.
Most layups require 2 layers of cloth. 4 layers will make it extra strong and I do this for things like switch panels or stuff that will take abuse. The Cozy MKIV landing gear "hard points" are 25 layers, and will take sledgehammer blows without breaking.
It sounds like a lot of steps but it goes quickly. With practice, you can make a 1'x2' switch panel or hatch cover in about 20 minutes.
|
|
|
|
|
04-29-2015, 12:08 PM
|
#4
|
|
Bus Nut
Join Date: Feb 2015
Posts: 258
|
Laying up over foam
Foam substrates do three things:
- Provide shape. Foam is easily shaped with sandpaper, carving tools, knives, etc. When people say they like fiberglass vs. metalworking, they usually mean they like shaping the FOAM.
- Provide rigidity. Not strength, but flex resistance. Using the same principle as honeycomb adds to cardboard, you can take two thin sheets of fiberglass that bend and flex a lot, put foam between them, and have a super-rigid panel that you can barely bend with a vice.
- Provide "crush resistance". Fiberglass is very strong in tension (pushing on a sheet, trying to bend a sheet, etc) but an unsupported sheet can still sag/crush. Foam spreads this load so it doesn't dent.
When working with foam, you can choose whether you want the foam to become permanently part of the project or not. When used as a form, cover the foam with duct tape before doing the layup, and you'll be able to "pop" it off the mold later. (Wax helps if it's a super-complex shape.)
When you want the foam to stay put you need to fill its pores or it soaks up epoxy and makes a poor adhesion between the two. This can cause the fiberglass skin to "delaminate". This is bad. The fix is simple, though. Make "micro" first by adding microballoons to a cup of epoxy until it's very thick, like lukewarm honey. Spread this on the foam and force it into the pores with a squeegee, then squeegee off any excess on the surface (you're only filling the pores, not applying a layer to the surface). This micro slurry provides excellent grip from the fiberglass to the foam without adding much weight.
- Cut the foam to size, then shape as desired with sandpaper, cutting tools, power tools - whatever seems appropriate.
- Prepare the surface of the foam as described above with duct tape or micro.
- Do the layup exactly as described above for "sheets" but with no plastic underneath, only on top. The cloth goes right on the foam, obviously. Let it hang over the edges a bit.
|
|
|
|
|
04-29-2015, 12:22 PM
|
#5
|
|
Bus Nut
Join Date: Feb 2015
Posts: 258
|
Taping
You can attach two fiberglass components together by using... more fiberglass! Following the same rule as big sheets above, you need a 1-2" (2" is standard) overlap. The only difference here is that since that's all you need, you typically do it with a 4" wide strip (called "tape" but it's just a strip of cloth that wide, nothing special). Also, since the pieces have usually cured by now, you have to prep them first. You do this by sanding both sides for the width you'll be taping, usually fairly aggressively (although not all the way through).
If the pieces to be joined are perpendicular (or any other angle than on the same plane) and parallel) you also need to make a fillet between them because fiberglass doesn't bend at perfect right-angles. You need about a 1/4"-1/2" radius to fill the corner of the joint. This is usually done with a slurry of flox, rather than micro, because flox produces a structural joint. It's made exactly the same way, just use the flox rather than the micro when mixing.
- Prep sand both surfaces to be mated. Sand down until you see fiber, but preferably not through it. If you sand too far, no biggie! Just sand (more carefully) a wider width, and apply a thicker/wider BID tape. Fiberglass is super easy to repair.
- Wet out the surfaces being taped with a thin layer of epoxy.
- Apply the first layer of BID tape to that area and press gently to get the epoxy to hold it there.
- Do the rest of the layup as described earlier - epoxy the first layer, stipple, apply more cloth, repeating as many times as necessary (usually 2 is enough).
- Plastic over the top and squeegee to get a clean finish.
If you're going to be doing a lot of taping, experienced glassers will make the tape on their workbench. You do the plastic-cloth-epoxy-plastic trick exactly like making a thin sheet above, but:
- Do the plastic-cloth-epoxy-plastic dance as described earlier to make a 2-layer BID tape a little wider (5") than required.
- Don't wait for it to cure. While still wet, use scissors to trim it to width. You can get a super nice cut edge at this stage.
- Wet the surfaces being taped with epoxy just like above.
- Peel the back layer of plastic off the tape you made and press it into place. Squeegee to work out the air bubbles.
Taping is a 30-minute job once you're experienced at it.
|
|
|
|
|
04-29-2015, 12:22 PM
|
#6
|
|
Bus Nut
Join Date: Feb 2015
Posts: 258
|
I will post pics and hopefully videos later, but hopefully the above gave anybody who might have been thinking about doing this a starting point.
|
|
|
|
|
04-30-2015, 09:29 PM
|
#7
|
|
Bus Nut
Join Date: Feb 2015
Posts: 258
|
A few photos to get the ball rolling. This first one is a demo layup I made for a friend, just a few square inches of cloth on foam. It was done exactly as described above - squeegee micro into the foam pores to fill them, then add two layers of cloth and epoxy.
The surface here is very smooth because I did something else, totally optional but it makes beautiful output: I used something called "peel ply". This is just a synthetic fabric, usually something like a polyester or nylon from the craft store or you can spend $ on the same stuff from a fiberglass materials shop. The epoxy soaks through this but doesn't stick to it. When you peel it off layer, it shears off the surface to make a perfectly flat, textured surface. You can use a high-build primer and paint this right away, or do another layup on it without sanding.

Side view of the same layup. This is very thick foam, 1". This foam is used in the seat back and other structural sections of the Cozy MKIV aircraft. At this thickness it's currently $77 for a 3'x4' sheet. Most projects use much thinner foam. The thinnest, 1/8", is great for things like body panels and instrument clusters, and is only $17 for the same size sheet.
You don't need to use exactly this foam. But for structural work this one makes a very strong product.
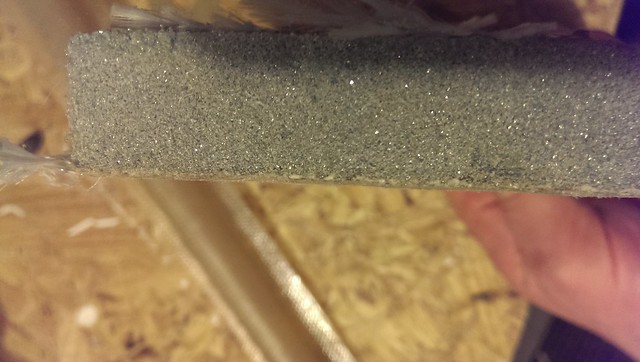
Note the shaped profile here. This is also common, and should make it obvious how easily you can make shapes and profiles. You just shape the foam to whatever form you want the finished product to take and then do the layup over it. In this case it was just a 45-degree angle with a radiused edge, but you can do all sorts of things.
|
|
|
|
|
04-30-2015, 09:45 PM
|
#8
|
|
Bus Nut
Join Date: Feb 2015
Posts: 258
|
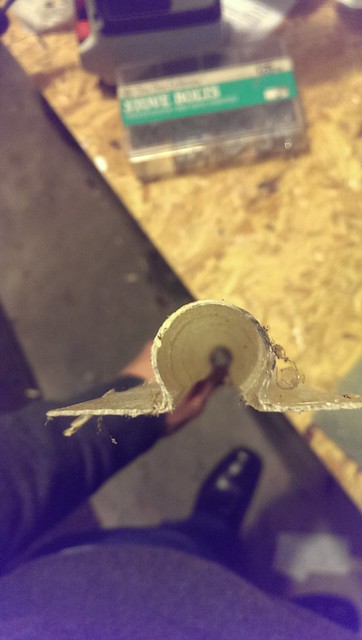
This second set shows an electrical channel I made for covering wires. I made two pieces but only needed one so I saved this for some future project. I installed the first one with pop rivets through the flanges you see. I also have a length that I cut one flange off of. Fiberglass is very springy when it's thin, so I was able to make a section where I can stuff the wires in the side and they stay put, but I can get them back out by bending the loop open and pulling the wires out.
I made this by wrapping a piece of EMT electrical conduit in duct tape, clamping that on my workbench on top of a sheet of plastic, and doing a layup on top, two plies of BID. I made it a bit oversized and cut/trimmed the flanges to get the neat cut line you see here. That's standard practice with fiberglass - leave some overhang and trim.
Here you can clearly see the surface weave. I didn't use peel ply or plastic on the top of this. It wasn't going to be a visible/finished surface so there was no need to do that.

In this edge view you can see some delamination in the inside corners. No big deal - this isn't structural. It's because I just stuffed the fiberglass around the conduit by hand. BID can bend around a corner, but it doesn't hold a tight radius very well. If I actually cared about this, I could have put aluminum foil on top. Epoxy won't stick to that, either, like plastic - and foil holds it to a shape when you need that.
|
|
|
|
|
04-30-2015, 09:47 PM
|
#9
|
|
Bus Nut
Join Date: Feb 2015
Posts: 258
|
This is a mounting tab I made for a storage bin I wanted to "pivot" on a 1/2" dowel. The bin was going to hold some weight so I made it with four plies of BID. But otherwise it's the simplest of the bunch. It's just four plies laid up on a sheet of plastic on my work table, then cut and drilled to the shape you see. It took all of 5 minutes to lay up, and another 5 to cut/drill. Note how I didn't bother with a perfectly straight line - this wasn't going to be visible so I just did it by hand.
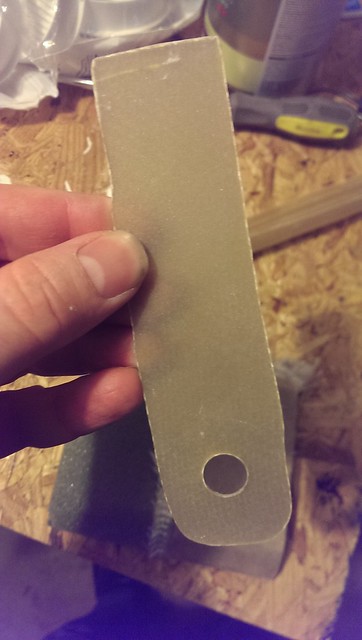
For plies of BID are noticeably thicker than two. If you do your layups right they should be exactly twice as thick:
|
|
|
|
|
04-30-2015, 09:52 PM
|
#10
|
|
Bus Nut
Join Date: Feb 2015
Posts: 258
|
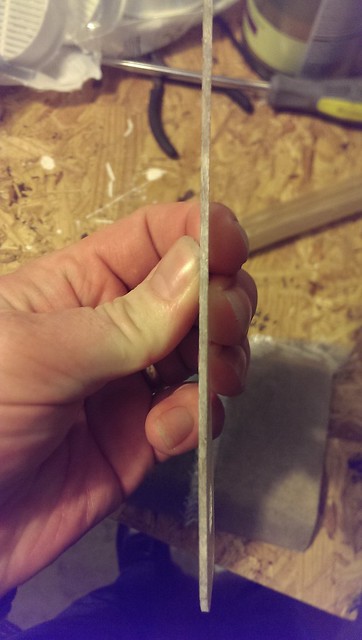
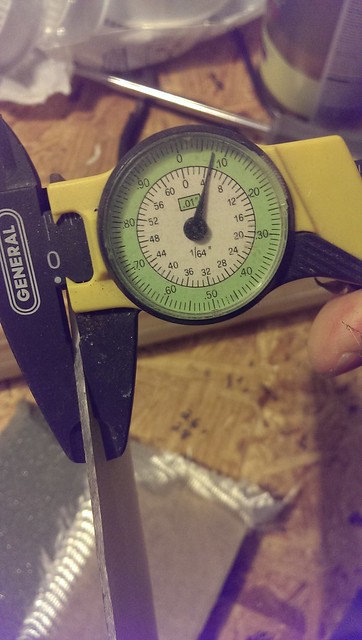
To prove that out I grabbed my analog calipers. I really love my digital ones but the battery keeps dying and I can't be bothered to keep replacing its odd button cell. So I almost always end up using these. It's perfectly accurate, despite costing all of a few bucks.
In case you're wondering, yes, the calipers are tightly against the piece. There's a weird shadow from the camera on the right that makes it look like there's a gap, but it's just the lighting and angle. Hard to hold camera and calipers at the same time...

Same story here - the calipers are placed correctly, I just couldn't hold it all to get a good shot. I did OK. This isn't EXACTLY twice the other one (two plies was .035" and four was .075") but .005" is really good tolerance for this kind of work.
|
|
|
|
|
04-30-2015, 09:55 PM
|
#11
|
|
Bus Nut
Join Date: Feb 2015
Posts: 258
|
I have a bucket full of various types of foam that I saved. I'll post some pics of that tomorrow. Then I'll try to post some videos of the actual work involved.
I thought of something I forgot to mention earlier: save your fiberglass scraps! Even small scraps only a few inches wide are useful for all kinds of things - repairs, patching holes, doing tiny layups, etc. I've made all kinds of useful things with finger-sized bits, like mounting tabs for things like radios.
You don't need to go crazy with organization. I threw all of mine in a plastic grocery store bag. Just keep dust and oil/grease of any kind FAR from your cloth. If you're spraying WD-40 in the shop, make sure your cloth is covered/protected. That stuff travels really far and will totally ruin a layup.
|
|
|
|
|
05-10-2015, 12:50 AM
|
#12
|
|
Mini-Skoolie
Join Date: Dec 2014
Location: Virginia
Posts: 11
Year: 1999
Coachwork: Blue Bird
Chassis: TC2000
Engine: Cummins 5.9L 24V isb
Rated Cap: 78 (14 window)
|
I am wondering if it would be possible to make a fiberglass understorage box 12' 3" long x 30" deep x 30" high. one section would hold a 40 gal/320lb fresh water tank and one section would hold a 400lb battery bank?
__________________
A good traveler has no fixed plans, and is not intent on arriving. ~ Lao Tzu
https://www.facebook.com/groups/251241675069180
|
|
|
|
|
05-10-2015, 09:18 AM
|
#13
|
|
Bus Geek
Join Date: Aug 2011
Location: Stony Plain Alberta Canada
Posts: 2,937
Year: 1992
Coachwork: Bluebird
Chassis: TC2000 FE
Engine: 190hp 5.9 Cummins
Rated Cap: 72
|
Cool stuff tankswap.
Thanks for taking the time to share.
Nat
__________________
"Don't argue with stupid people. They will just drag you down to their level, and beat you up with experience."
Patently waiting for the apocalypses to level the playing field in this physiological game of life commonly known as Civilization
|
|
|
|
|
05-10-2015, 02:40 PM
|
#14
|
|
Bus Nut
Join Date: Feb 2015
Posts: 258
|
Thanks guys. I'm packing to sell my house so I haven't had time to video any demos, but I'll try to do some soon. This is also that time of year for me that, like Nat_ster, I have a million "things I do to make money" all starting at once.
Quote:
Originally Posted by Rayzer69

I am wondering if it would be possible to make a fiberglass understorage box 12' 3" long x 30" deep x 30" high. one section would hold a 40 gal/320lb fresh water tank and one section would hold a 400lb battery bank?
|
You can definitely do this, but for something that long you may want to think about whether it's cost-effective (and worthwhile) to have the box itself support those items. You can make structural shapes like channels and beams just like you can get with steel - and they do exactly the same thing. The Cozy's front-seat floor pan is just 2-BID (each side) over 1" PVC foam and supports two adults side by side. I'd double the fiberglass to provide some extra crush resistance, but this isn't that hard to set up.
But... batteries need to be serviced so you're going to want to be able to slide them out. That means some type of tray or drawer, which you could mount to the bottom of the bus with a simple frame of bolted angle-iron. You can do the same thing with the water tank, and that doesn't really even need to be serviced so you can just support it with steel straps up to framing members.
Then if you still want a box you can do it just to provide a sealed environment for the above. But now it doesn't need to be structural - it's just a simple shell. That means you can use very thin (cheap) foam and only 2 plies of fiberglass. That would give you a sealed-environment box for much less cost and work (and worry?) than wondering if you got the structure right on your first "go".
If you want to do the structural work with fiberglass (for fun or ...?) I have a different kind of fiberglass that's confusingly called "tape" even though it bears little resemblance to the thin stuff you use to bond two panels together.
I'll post a photo of this later today - the one here in this link sucks, but it's this stuff:
UNIDIRECTIONAL FIBERGLASS TAPE from Aircraft Spruce
This stuff is incredibly thick - I think it's like 1/8" thick (which is very thick for fiberglass) and it's strong as hell. The Cozy main wing spars contain "I" beams made of this stuff. You don't need much - a single layer can be used to make a "strap" that has the same strength as a steel one. A pair of straps made of this will easily support a 400lb water tank.
One drawback to this stuff is you can bend steel, but not this. You need about 1" radius on any corners it has to go over. But... it'll never rust...
|
|
|
|
|
05-10-2015, 03:21 PM
|
#15
|
|
Mini-Skoolie
Join Date: Dec 2014
Location: Virginia
Posts: 11
Year: 1999
Coachwork: Blue Bird
Chassis: TC2000
Engine: Cummins 5.9L 24V isb
Rated Cap: 78 (14 window)
|
Thank you very much for replying. Yes, I want to have the understorage enclosed and sealed as I will also have a section for electrical/electronics; inverter/charger, breakers, fuses, as well as sections for personal items that cannot get wet/dirty.
I had thought of building it with steel angle and sheet metal but the cost was very high. I thought fabricating the with fiberglass would be cheaper than steel, in the short term, material cost, and in the long term, increased fuel milage do to being lighter than steel. I plan to have one 12' box on each side between the front and rear wheels and one 8.5' box on each side btween the rear wheels and rear bumper. That would require over 300' of angle at .80/ft. With shipping, that is almost $400.00. Then sheet steel is $100.00/ 4'x8' sheet. It would require at least 10 sheets.
I am starting to think there is no affordable solution to our need for understorage.
__________________
A good traveler has no fixed plans, and is not intent on arriving. ~ Lao Tzu
https://www.facebook.com/groups/251241675069180
|
|
|
|
|
05-10-2015, 04:09 PM
|
#16
|
|
Bus Nut
Join Date: Feb 2015
Posts: 258
|
It depends what you mean by affordable. Fiberglass isn't really the go-to thing to save money over steel - in fact, steel is usually cheaper. Its advantage is being waterproof, rust-proof, etc, and usually lighter for the same strength. IMO that means it's still a good choice for basement storage - but not necessarily for everybody / every case.
My main concern here is you're starting basically with the hardest project - something structural and carrying heavy weight, exposed to "road rash", and HUGE. Steel has the advantage of being simple - you bolt it together, and there it is. With fiberglass, you ideally want to get into it thinking about multiple things you could use it for. I'm not sure you'd be happy just trying to make one huge box and be done.
Doing some math here, $100 for a 4x8 sheet of steel is pretty good. Even with a standard 2-BID layup on each side of a piece of foam, you're going to pay like $70 for the cloth, another $40 for the foam, and like $45 for the epoxy. Now, what you'll get out of it is going to be way stronger and rust-proof compared to steel... but the steel is cheaper.
If it was me, I would separate the STRUCTURAL requirements from the ENVIRONMENTAL ones. Figure out a way to attach the batteries and water tank to your bus, directly. Then if you want a fiberglass box you can build one around all that just as a protective cover, add some service hatches, and you're done. That would be much cheaper than trying to do the whole thing another way. And I bet you'd find that you would only need a fraction as much angle iron if all it was doing was supporting a water tank, rather than the whole basement bin...
|
|
|
|
|
05-10-2015, 08:16 PM
|
#17
|
|
Mini-Skoolie
Join Date: Dec 2014
Location: Virginia
Posts: 11
Year: 1999
Coachwork: Blue Bird
Chassis: TC2000
Engine: Cummins 5.9L 24V isb
Rated Cap: 78 (14 window)
|
Thank you so much taskswap for your information and advice. It has helped a lot as far as planning. Separating the structural from the environmental really helped break my paradigm and has given me some ideas.
__________________
A good traveler has no fixed plans, and is not intent on arriving. ~ Lao Tzu
https://www.facebook.com/groups/251241675069180
|
|
|
|
|
05-10-2015, 10:50 PM
|
#18
|
|
Bus Nut
Join Date: Feb 2007
Location: Middle Tennessee
Posts: 264
|
Good stuff. Make sure to get the scissors for free. There's always "free with purchase" HF coupons. And they actually last a long time (for me).
Since this isn't as critical as homebuilt airplanes, a cheap(er) source for cloth is Thayercraft and a cheap source for epoxy is USComposite.
__________________
Daddy, can we go on a trip again??
'85 Thomas SafTLiner RE
3208 NA CAT MT643
|
|
|
|
|
05-11-2015, 12:41 AM
|
#19
|
|
Bus Nut
Join Date: Feb 2015
Posts: 258
|
Good points, boojiewoojie. I'm going to keep talking about the materials that I know (mostly 8lb/yd cloths and 3lb foams with higher-grade epoxies) but there is DEFINITELY a lot of room for personal decision making here. If you're clever and are willing to do the math you can save quite a bit of $. You can also save $ by watching for deals and sales online. All of these materials are cheaper in bulk.
|
|
|
|
|
05-11-2015, 12:43 AM
|
#20
|
|
Bus Nut
Join Date: Feb 2015
Posts: 258
|
First video promised. I took it with a GoPro so it's very high-res but I should have zoomed in - you may want to watch it full screen right from YT. 1080p is available.
This one is about some of the common foams you can use as substrates.
First video with this camera so pardon the excessive white balance trouble from the open door (and the messy shop)!
|
|
|
|
|
|
| Thread Tools |
|
|
| Display Modes |
 Linear Mode Linear Mode
|
 Posting Rules
|
You may not post new threads
You may not post replies
You may not post attachments
You may not edit your posts
HTML code is Off
|
|
|
|
 » Recent Threads
 |
|
|
|
|
|
|
|
|
|
|
|
|
|
|
|
|
|
|
|
|
|
|
|
|
|
|
|
|
|
|
|
|
|
|
|
|
|


