 |
|
 01-27-2015, 01:21 PM
|
#101
|
|
Mini-Skoolie
Join Date: Jan 2015
Location: Winter Park Fl
Posts: 18
Year: 2001
Chassis: Ford E-350
Engine: 351ci triton v8
Rated Cap: 15
|
That is truly amazing. Nice work. I look forward to it coming along.
|

|

|
|
01-27-2015, 02:21 PM
|
#102
|
|
Skoolie
Join Date: Oct 2014
Location: Maple Ridge BC Canada
Posts: 200
Year: 1998
Coachwork: Blue Bird
Chassis: TC2000 Rear engine
Engine: Cummins 8.3; MD3060
Rated Cap: 84
|
Quote:
Originally Posted by aaronsb

Fantastic job друг, it's really coming together.
You and I have a very similar bus and the esthetics of the entrance door bugs me a little bit. Look at the left side and you'll note the slope down from the front of the nose towards the wheel well. on the right side, it's squared off (and lower) to accommodate the entrance door. I'm planning on shaving the body to be the same angle on both sides, with a slightly smaller (by a few inches) door.
The approach angle on the vehicle will be slightly better too.
What are your thoughts on door mods like that?
|
I tried to understand you ("Look at the left side and you'll note the slope down from the front of the nose towards the wheel well. on the right side, it's squared off") but I probably did have enough sleep last night.... The best if you just mark one picture and post it....
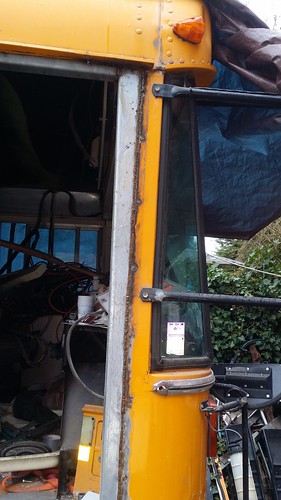
I completely removed old staircase ( was rusty) and build new one. I changed entrance opening by adding angle on top, angle on right (window side), angle on left sides. I noticed the opening wasn't square but I made it square now.
I will build new aluminum entrance (flat) door instead of heavy by-fold monster. New door will be a manual open/close. I will add a window to make driving and turning easier....
Here are some more detailed door opening pics:
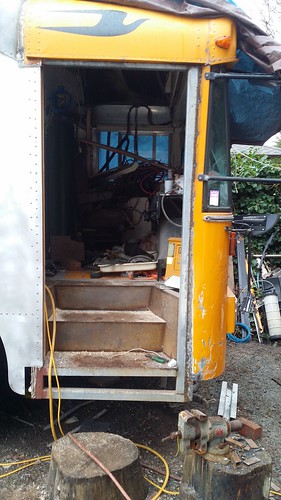
Staircase

Right side notice silver angle:

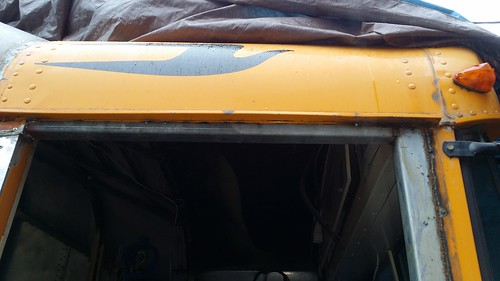
Top, notice silver angle:
The whole thing:
|
|
|
|
|
01-27-2015, 02:30 PM
|
#103
|
|
Bus Geek
Join Date: Aug 2011
Location: Stony Plain Alberta Canada
Posts: 2,937
Year: 1992
Coachwork: Bluebird
Chassis: TC2000 FE
Engine: 190hp 5.9 Cummins
Rated Cap: 72
|
Wow
You have created, and set a milestone in skoolie conversion slide outs.
I don't know of any other skoolie with a slide out nearly that big. 
Nat
__________________
"Don't argue with stupid people. They will just drag you down to their level, and beat you up with experience."
Patently waiting for the apocalypses to level the playing field in this physiological game of life commonly known as Civilization
|
|
|
|
|
02-17-2015, 12:18 PM
|
#104
|
|
Bus Crazy
Join Date: Feb 2012
Location: Salt Lake City Utah
Posts: 1,635
Year: 2000
Chassis: Blue Bird
Engine: ISC 8.3
|
The framework for the basement looks pretty good. It's something I've been wanting to do on my bus, but there's something I'm hung up on -- the access doors. I just don't have any good ideas (ie, functional and also manufacturable) how to shed water off the side of the bus so that it doesn't get into the basement. Then of course there's security, ease of use, and so on.... Do you have anything figured out yet for your basement access?
|
|
|
|
|
02-17-2015, 01:08 PM
|
#105
|
|
Bus Geek
Join Date: Mar 2011
Location: Houston, Texas
Posts: 8,462
Year: 1946
Coachwork: Chevrolet/Wayne
Chassis: 1- 1/2 ton
Engine: Cummins 4BT
Rated Cap: 15
|
Saw an old Bird years ago under which the chap had installed pre-fabbed, aluminum, supposedly weather proof work boxes made for tractor trailer rigs. They would still get some water inside, oddly, mostly when parked instead of on the road. He added "eyebrow" style drip rails above them and said it cured his problem. Apparently the weak spots were the top mounted hinges (?).
|
|
|
|
|
02-17-2015, 01:45 PM
|
#106
|
|
Bus Nut
Join Date: Jul 2014
Posts: 722
Year: 1998
Coachwork: Bluebird
Chassis: TC2000 RE
Engine: 8.3l Cummins
Rated Cap: 78
|
The hinges on a factory bluebird school bus basement appear to be an aluminum strip with a piece of rubber sandwiched between it.
I'm going to be applying truck bed liner to the basement surfaces, so hopefully that'll seal things in a little more. I may add some drain holes.
Quote:
Originally Posted by family wagon
The framework for the basement looks pretty good. It's something I've been wanting to do on my bus, but there's something I'm hung up on -- the access doors. I just don't have any good ideas (ie, functional and also manufacturable) how to shed water off the side of the bus so that it doesn't get into the basement. Then of course there's security, ease of use, and so on.... Do you have anything figured out yet for your basement access?
|
|
|
|
|
|
02-17-2015, 01:59 PM
|
#107
|
|
Bus Geek
Join Date: Sep 2014
Location: Eustis FLORIDA
Posts: 23,764
Year: 1999
Coachwork: Thomas
Chassis: Freighliner FS65
Engine: Cat 3126
Rated Cap: 15
|
I just love the angle on the front of the roof raise. I'm doin mine like that if I raise it. Leaning more toward doing it.
Keep the pics coming!
|
|
|
|
|
02-25-2015, 01:10 PM
|
#108
|
|
Skoolie
Join Date: Oct 2014
Location: Maple Ridge BC Canada
Posts: 200
Year: 1998
Coachwork: Blue Bird
Chassis: TC2000 Rear engine
Engine: Cummins 8.3; MD3060
Rated Cap: 84
|
Quote:
Originally Posted by EastCoastCB
I just love the angle on the front of the roof raise. I'm doin mine like that if I raise it. Leaning more toward doing it.
Keep the pics coming!
|
Most people who decide to raise the roof use one section between ribs for slope. I did the same way but because I raised the roof by 24" I didn't like steep angle. Later I cut one more opening and used one rib set in the middle of the slope. Now the roof slope looks more "natural".
You will need a huge piece of sheet metal to cover the slope. I used 3 pieces and tig brazed them together.
|
|
|
|
|
02-25-2015, 01:13 PM
|
#109
|
|
Skoolie
Join Date: Oct 2014
Location: Maple Ridge BC Canada
Posts: 200
Year: 1998
Coachwork: Blue Bird
Chassis: TC2000 Rear engine
Engine: Cummins 8.3; MD3060
Rated Cap: 84
|
Insulation..... takes more time than expected....
Here I got stuck on insulation project. It does take more time than I expected. But I slowly keep fighting....
Here are few pictures:

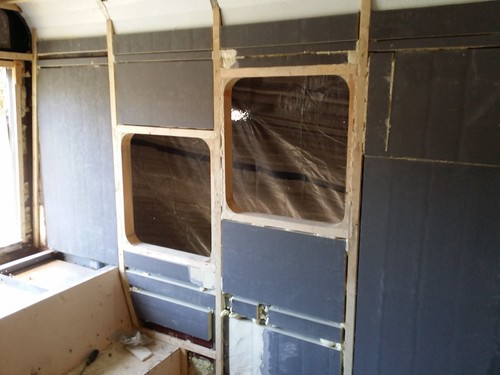

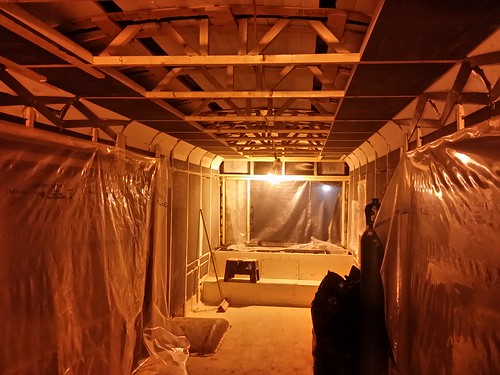
Now my plan is to spray a thin 1" foam over the styrofoam on roof. I bought a 600 board feet spray foam kit at HD. The problem is winter.....
I ran into another problem a few day ago. The steel roof is covered with black tar-like spray from inside. I glued styrofoam directly to this black tar and I noticed later some pieces started to fell off. I decided to add plywood strips to hold styrofoam pieces in place and spray foam over.... Here are plywood strips:
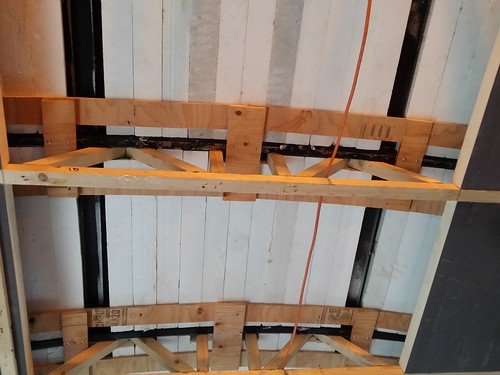
All this little things keep eating my time....
The show must go on.....
|
|
|
|
|
02-25-2015, 03:30 PM
|
#110
|
|
Bus Geek
Join Date: Aug 2011
Location: Stony Plain Alberta Canada
Posts: 2,937
Year: 1992
Coachwork: Bluebird
Chassis: TC2000 FE
Engine: 190hp 5.9 Cummins
Rated Cap: 72
|
I just love this build.....
That right there is why I will be filling my ceiling cavity full of spray foam, bonded right to the inside of the outer skin of the bus. Even if the foam released from the inside of the bus skin, the shape of it would hold it in place forever.
Keep at it, don't get discouraged.
Nat
__________________
"Don't argue with stupid people. They will just drag you down to their level, and beat you up with experience."
Patently waiting for the apocalypses to level the playing field in this physiological game of life commonly known as Civilization
|
|
|
|
|
02-25-2015, 04:40 PM
|
#111
|
|
Bus Geek
Join Date: Sep 2014
Location: Eustis FLORIDA
Posts: 23,764
Year: 1999
Coachwork: Thomas
Chassis: Freighliner FS65
Engine: Cat 3126
Rated Cap: 15
|
Quote:
Originally Posted by Vlad
Here I got stuck on insulation project. It does take more time than I expected. But I slowly keep fighting....
Here are few pictures:
Now my plan is to spray a thin 1" foam over the styrofoam on roof. I bought a 600 board feet spray foam kit at HD. The problem is winter.....
I ran into another problem a few day ago. The steel roof is covered with black tar-like spray from inside. I glued styrofoam directly to this black tar and I noticed later some pieces started to fell off. I decided to add plywood strips to hold styrofoam pieces in place and spray foam over.... Here are plywood strips:
All this little things keep eating my time....
The show must go on..... |
One reason I've spent a couple weeks slowly removing all that tar! Its been a real pita too.
|
|
|
|
|
02-25-2015, 04:46 PM
|
#112
|
|
Skoolie
Join Date: Oct 2014
Location: Maple Ridge BC Canada
Posts: 200
Year: 1998
Coachwork: Blue Bird
Chassis: TC2000 Rear engine
Engine: Cummins 8.3; MD3060
Rated Cap: 84
|
Quote:
Originally Posted by nat_ster
I just love this build.....
That right there is why I will be filling my ceiling cavity full of spray foam, bonded right to the inside of the outer skin of the bus. Even if the foam released from the inside of the bus skin, the shape of it would hold it in place forever.
Keep at it, don't get discouraged.
Nat
|
My situation is a bit different because I decided to have flat ceiling. I saved money on roof insulation by using styrofoam+ thin layer of spray foam but I will have 2" extra insulation (isoboard) above flat ceiling.
Spray foam is great but cost a bit.... Canadian Lowes just had 600 kit on sale for 589 CAD but I missed it by 1 day  . Tried to call their office and they said NO, so I was pissed and went to HD to meet and beat their price.... Freaking Canadian Lowes.... never loved it now just hate it....
It is too late to be discouraged.... to much $$$ spent.....
|
|
|
|
|
02-25-2015, 04:54 PM
|
#113
|
|
Skoolie
Join Date: Oct 2014
Location: Maple Ridge BC Canada
Posts: 200
Year: 1998
Coachwork: Blue Bird
Chassis: TC2000 Rear engine
Engine: Cummins 8.3; MD3060
Rated Cap: 84
|
Quote:
Originally Posted by EastCoastCB
One reason I've spent a couple weeks slowly removing all that tar! Its been a real pita too.
|
You are absolutely right black tar on roof is a real PITA. While roof was cold everything was ok but first warm and sunny day brought me a bad surprise. But you know we are all tough here we are used to deal with PITAs..... 
|
|
|
|
|
02-25-2015, 06:52 PM
|
#114
|
|
Bus Geek
Join Date: Sep 2014
Location: Eustis FLORIDA
Posts: 23,764
Year: 1999
Coachwork: Thomas
Chassis: Freighliner FS65
Engine: Cat 3126
Rated Cap: 15
|
I'm VERY interested in the spray foam DIY kit. Your plan sounds like what I've been envisioning doing.
|
|
|
|
|
03-01-2015, 07:58 PM
|
#115
|
|
Bus Nut
Join Date: Sep 2010
Location: Ocala, FL
Posts: 635
Year: 1995
Coachwork: Bookmobile body by Farber
Chassis: International 3800
Engine: Navistar DT466/Alison MT643
Rated Cap: 1
|
Quote:
Originally Posted by EastCoastCB
I'm VERY interested in the spray foam DIY kit. Your plan sounds like what I've been envisioning doing.
|
I don't know if you're aware of this, but I used a spray foam kit in my rig and posted a thread in the How-To forum: http://www.skoolie.net/forums/f10/ex...tion-8468.html
|
|
|
|
|
03-02-2015, 02:48 AM
|
#116
|
|
Bus Geek
Join Date: Sep 2014
Location: Eustis FLORIDA
Posts: 23,764
Year: 1999
Coachwork: Thomas
Chassis: Freighliner FS65
Engine: Cat 3126
Rated Cap: 15
|
Thanks a lot!
|
|
|
|
|
03-02-2015, 04:40 AM
|
#117
|
|
Site Team
Join Date: Jun 2014
Location: southwest lowsyana
Posts: 542
Year: 1988
Coachwork: ward
Chassis: international
Engine: dt360a
Rated Cap: 65
|
Quote:
Originally Posted by PDBreske
|
hey PD! hows it swingin man? you started on the resurrection yet?
|
|
|
|
|
03-02-2015, 10:11 AM
|
#118
|
|
Bus Nut
Join Date: Sep 2010
Location: Ocala, FL
Posts: 635
Year: 1995
Coachwork: Bookmobile body by Farber
Chassis: International 3800
Engine: Navistar DT466/Alison MT643
Rated Cap: 1
|
Quote:
Originally Posted by claydbal
hey PD! hows it swingin man? you started on the resurrection yet?
|
Thanks for asking. I'm doing better, but still unable to use tools. It's going to be at least several months before I can get back to work on my conversion. In the meantime, I've been remodeling my current floorpan to accommodate an addition person (my girlfriend) in the bus. She wasn't willing to sleep in the "coffin," as she calls it, so I'm adding bunk beds and will be towing (cringe) the Jeep instead of carrying it.
|
|
|
|
|
03-02-2015, 01:56 PM
|
#119
|
|
Bus Nut
Join Date: Jan 2015
Location: ...little north of Toronto Ontario
Posts: 606
Year: 2000
Coachwork: Thomsass
Chassis: FreightShaker
Engine: 5.9 Cummins 5 speed
Rated Cap: 2 ATV's and friends
|
Good to here on the rehab.
LMAO, funny how the women in our lives tend to change the original plans.
My wife only wants one thing, a washroom.
Vlad...great work! You must be a tin bender or a body man of some sort?
|
|
|
|
|
03-05-2015, 11:31 PM
|
#120
|
|
Skoolie
Join Date: Oct 2014
Location: Maple Ridge BC Canada
Posts: 200
Year: 1998
Coachwork: Blue Bird
Chassis: TC2000 Rear engine
Engine: Cummins 8.3; MD3060
Rated Cap: 84
|
A quick insulation update
Here is some progress:
I sprayed the foam on roof and some walls and air ducts:
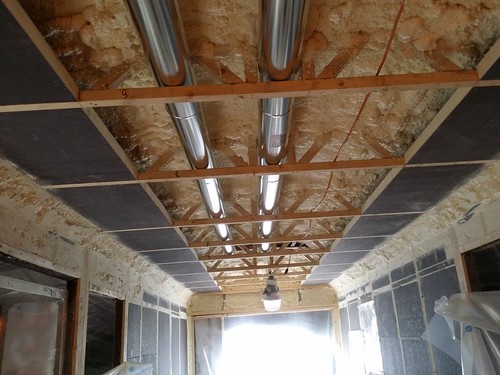
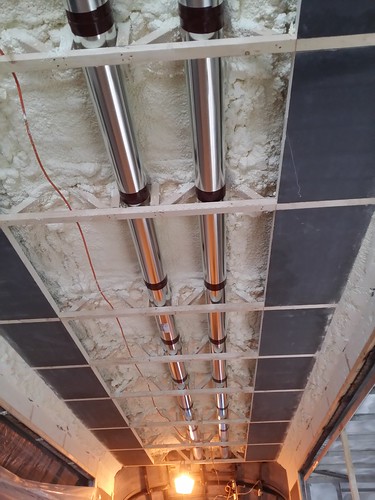
I installed 2 5" air ducts and sprayed them as well
Foam spraying was easy and straight forward. I did expect more coverage but this was my first time using spray foam, so I wasted some here and there by adding too much.
I covered all openings with 6 mil poly and used 5KW construction heater to get right temperature.
|
|
|
|
|
|
 Posting Rules
|
You may not post new threads
You may not post replies
You may not post attachments
You may not edit your posts
HTML code is Off
|
|
|
|
 » Recent Threads
 |
|
|
|
|
|
|
|
|
|
|
|
|
|
|
|
|
|
|
|
|
|
|
|
|
|
|
|
|
|
|
|
|
|
|
|
|
|


 Linear Mode

