 |
|
 08-15-2013, 09:43 AM
|
#41
|
|
Mini-Skoolie
Join Date: Aug 2012
Location: Quebec, Canada
Posts: 50
Year: 1992
Coachwork: BlueBird
Chassis: All Canadian
Engine: 8.3 Cummins
Rated Cap: 72
|
Re: A hippie with a not-so-minivan
Quote:
|
Originally Posted by Diesel Dan
Pulling up the floor is a miserable job, and whether or not you do it depends on how thorough you want to be, and how important it is for you to have peace of mind that you know what is going on down there. If you pull it all up, you may find that there is not a bit of rust in the other areas, or... you may find some surprises you will be glad you found. I suppose you could take the perspective that during the time you will own the bus, any rust that may be hidden in there will not reach a critical point. I personally cannot stand the thought that my vehicle might have hidden rust. But then I'm kinda OCD in that respect. If you do decide to continue, you might consider bigger pry implements. The most useful tools for me doing that job was a large cold chisel with hand guard, sledge hammer, and 5 foot steel pry bar:
The trick is to get big pieces to come up at once, rather than having it just splinter. But that may or may not happen for you.  |
No... I am like you... I want to make sure that I have a good foundation without surprises down the line that could have been avoided.
We would have loved to have a 5 foot pry bar. My neighbour did loan me a 3 foot one after this picture was taken and that helped a lot along with using the air chisel around the screws that we could not get out but were still helping the floor somewhat in place. I am going to try to find another one that is longer used if I can... The part that is out in the pics was all rotten and we were able to take it apart by hand... the rest though came out in larger pieces.
Anyone take out a TransAir unit? I checked around for tips but I could find anything.
|

|

|
|
08-15-2013, 03:15 PM
|
#42
|
|
Mini-Skoolie
Join Date: Aug 2012
Location: Quebec, Canada
Posts: 50
Year: 1992
Coachwork: BlueBird
Chassis: All Canadian
Engine: 8.3 Cummins
Rated Cap: 72
|
Re: A hippie with a not-so-minivan
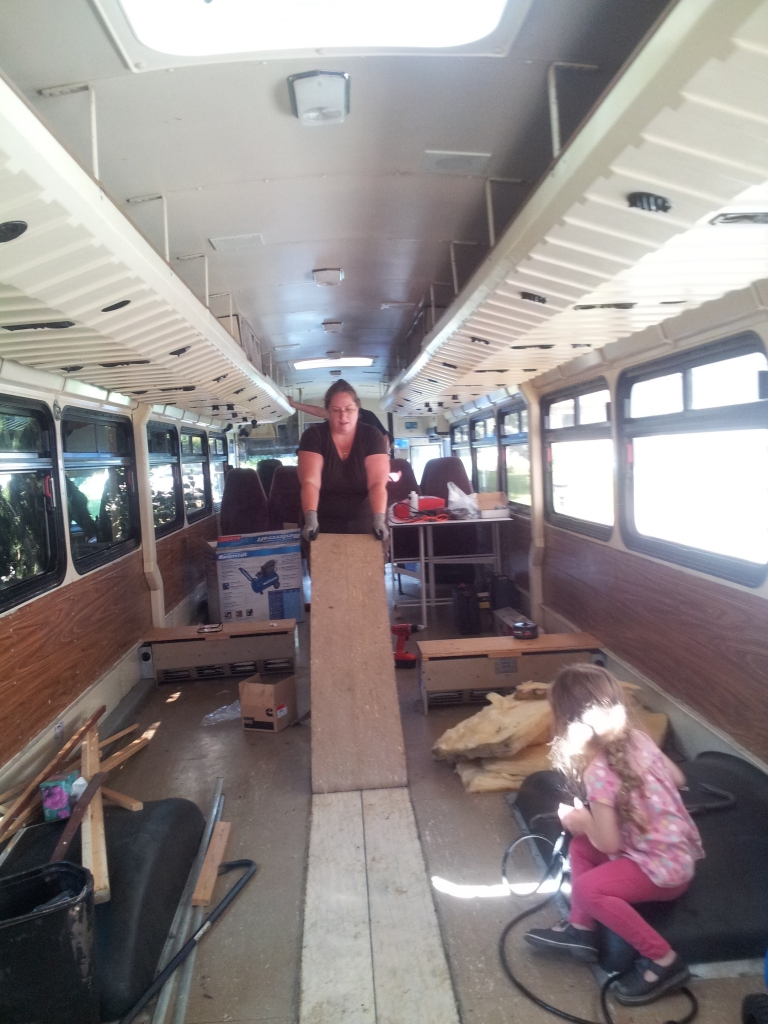
oh... This is looking good...
I just pulled out a bit of the middle isle and and started pulling up the rubber floor to see underneath and I got a pleasant surprise 
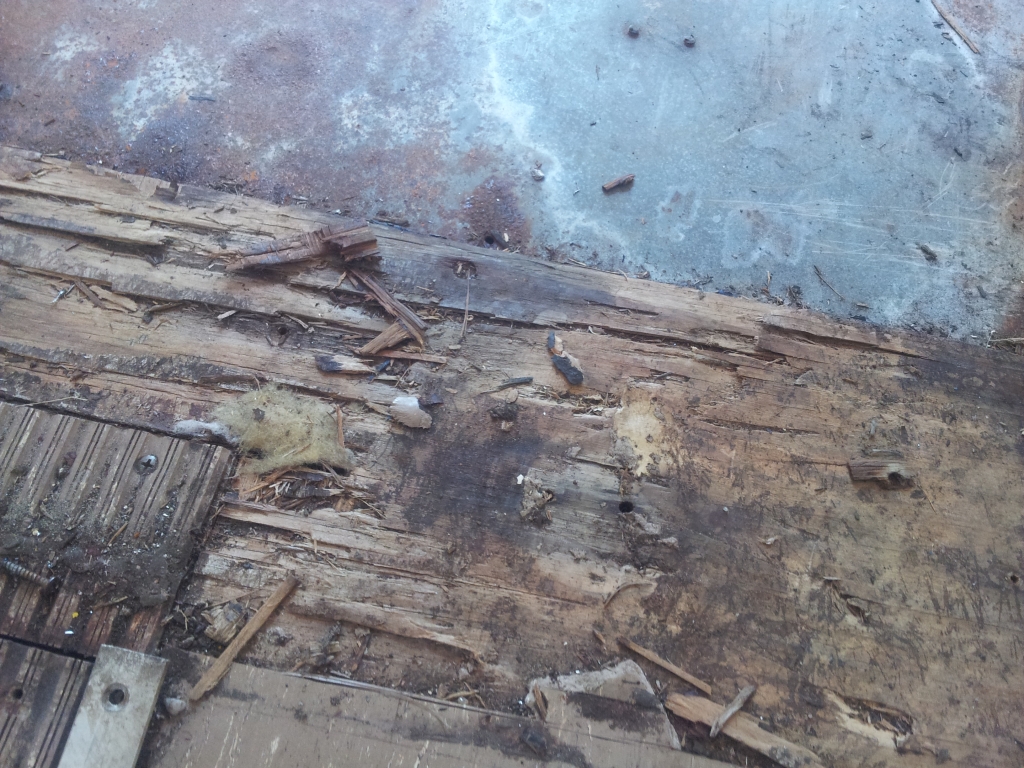
So after seeing the floor in the back section I was nervous about the condition of the rest of the floor though I did have a feeling that it would be better. So today I started to rip up parts of the rubber floor starting with the centre aisle. Most of the screws were stripped so I used the pry bar on most of it one screw at a time.
If you look at my last post of pictures just above... you can see what the section looked like yesterday in the centre aisle...
Rotten, moldy wood that smelled awful and was falling apart in our hands...
We had checked a small portion that was on the other side of the wall and saw that the wood was better but it still didn't look that great, especially the condition of the screws...
 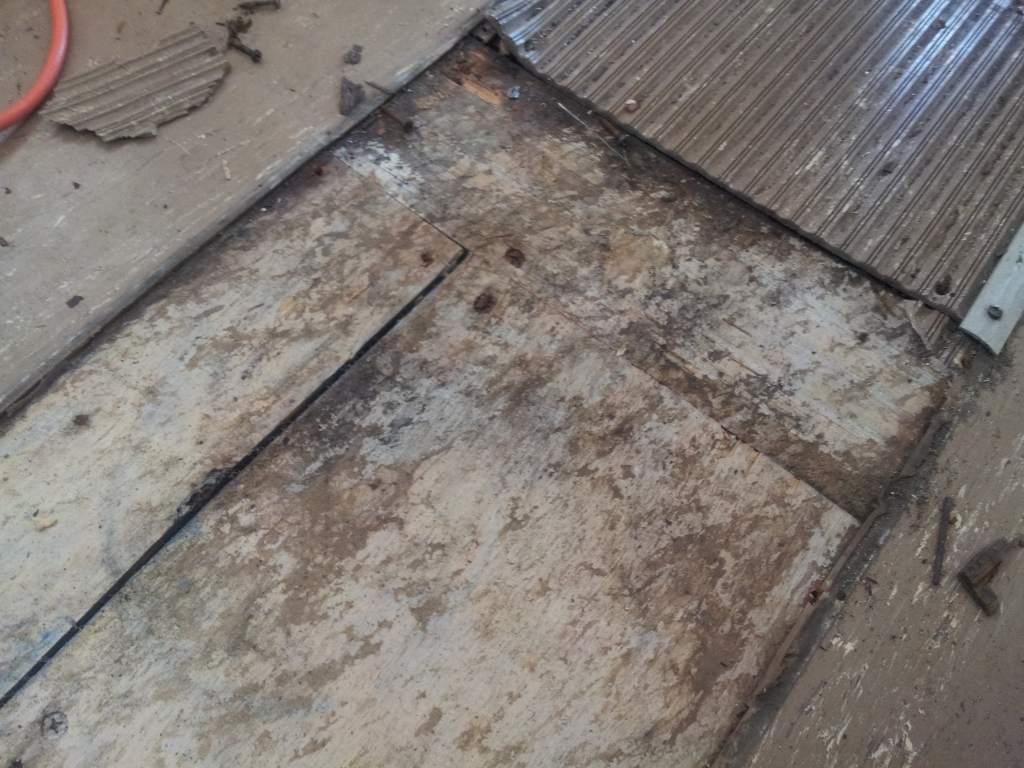
But then as I starting to pry the middle aisle rubber up I was able to grab a hold of it and start pulling and what was under is much more promising!
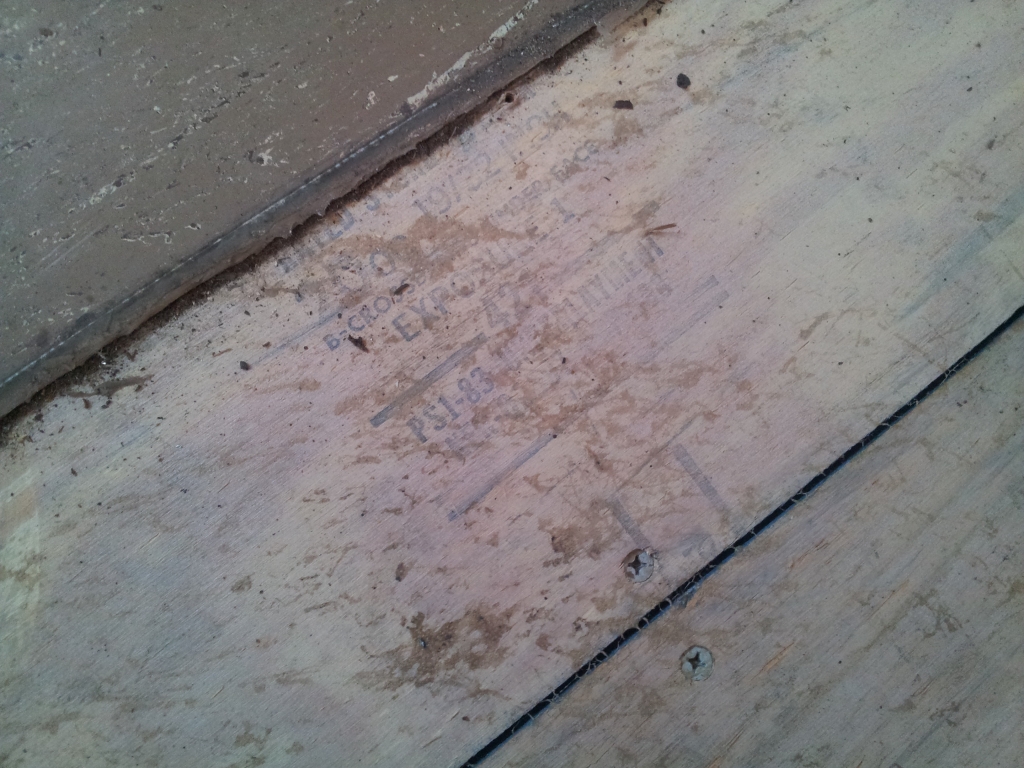
The Plywood is in great condition. You can even read the stamp on it.
Not only that, but the screws are also in great condition and I can take them out no problem!
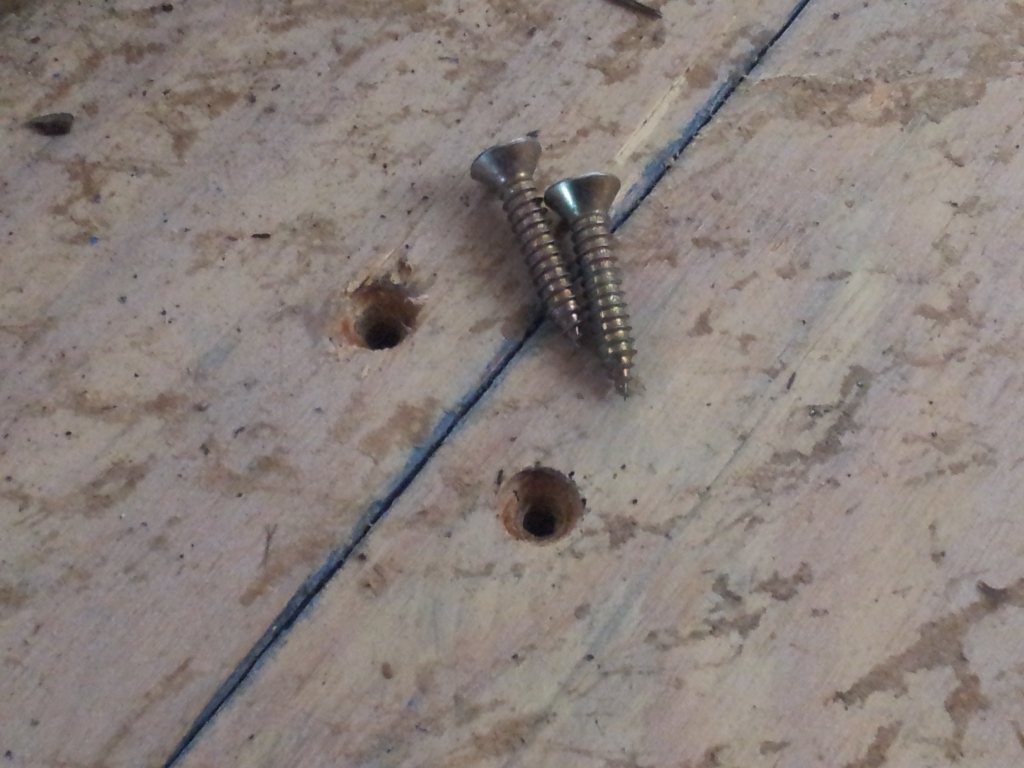
So, hopefully, I will not only be able to take them out easily but I will also most likely be able to reuse the plywood in most of the bus. I looked under a section of flooring that would have been at the feet of one of the rows of passengers and it also looks great. But not only that. As I was taking the floor off a few splinters came up with the glue and instead of the moldy stink that we had in the back and that was still lingering, It smelled like wood. And it actually changed the smell inside of the bus.
Next step is to move the heaters out of the way (we might keep them) and then remove the 3 seats in front to continue getting the floors out while salvaging as much wood as I can.
|
|
|
|
|
08-15-2013, 07:58 PM
|
#43
|
|
Bus Nut
Join Date: Jun 2013
Location: West Lafayette, IN
Posts: 832
Year: 1999
Coachwork: Thomas
Engine: 3126
Rated Cap: 72
|
Re: A hippie with a not-so-minivan
That is good news, especially if you can re-use the wood. I have a Thomas bus and have been told the rubber is glued to the steel, no plywood and very hard to get up. 
|
|
|
|
|
08-15-2013, 10:43 PM
|
#44
|
|
Skoolie
Join Date: Jul 2008
Location: Buffalo, New York
Posts: 191
Year: 1995
Coachwork: Bluebird, Model 3800
Chassis: International
Engine: T444E
Rated Cap: 42
|
Re: A hippie with a not-so-minivan
I was able to reuse some of the wood from my floor back over the insulation I put in (under where cabinets and benches and beds would go), and some more I chopped up to be platforms to park on in wetter area, since it was marine-grade plywood.
But I have to say, those screws looked new. That's awesome!
|
|
|
|
|
08-16-2013, 02:11 PM
|
#45
|
|
Bus Geek
Join Date: Jun 2004
Location: Roswell, NM
Posts: 3,588
Year: 1986
Coachwork: BlueBird
Chassis: 40 ft All American FE
Engine: 8.2LTA Fuel Pincher DD V8
Rated Cap: 89
|
Re: A hippie with a not-so-minivan
I used to wish we had wood under our rubber floor because it would have made a thermal break and the floor itself wouldn't be so hot/cold. After reading enough of you guy dealing with rotted wood makes me glad our floor is rubber on metal... and well stuck at that.
So..... nonny nonny boo-boo! :P
|
|
|
|
|
08-16-2013, 02:30 PM
|
#46
|
|
Bus Nut
Join Date: Dec 2009
Location: MN
Posts: 732
Year: 1991
Coachwork: Wayne
Chassis: International 3800
Engine: DT466
Rated Cap: 72
|
Re: A hippie with a not-so-minivan
LOL!! Mine was fairly brutal as well. It wasn't screwed down, it was NAILED. So much fun to tear up.
__________________
The journey is the destination...
Brutus
|
|
|
|
|
08-25-2013, 06:00 PM
|
#47
|
|
Mini-Skoolie
Join Date: Aug 2012
Location: Quebec, Canada
Posts: 50
Year: 1992
Coachwork: BlueBird
Chassis: All Canadian
Engine: 8.3 Cummins
Rated Cap: 72
|
Re: A hippie with a not-so-minivan
As you know... Getting the floors out of the bus is not a small task, just like most of the things that we need to do on the bus. As showed in my last post, the back of the bus had rotten plywood but the rest of the bus had plywood that looked almost new. I hurt my shoulder at one point last week so as Simon used the crowbar while I concentrated on the screws holding the plywood down on the metal. At one point when I was looking under the bus I saw just how far those screes so past the metal floors. They are thick also....

Some came up easy, some needed a little help, some made me go crazy and some were just impossible. Finally I found the best strategy.
- Use the right bit. ;)
Using the tork wrench, loosen the screw slightly
Use Jig-a-loo or another lubricant and spray the screw so that it can go under a bit.
Tap the screw with the hammer a few times.
Use the tork wrench or the power drill/screwdriver to get it out slowly work it out. If it doesnt work tap it a few more times and go onto the next screw while the lubricant gets into it a bit. Then come back to it.
There were even a few that didnt come out yesterday as much as I tried and pleaded but before heading inside I sprayed/tapped them one more time and in the morning they came out like butter.
A few didn't come up we will have to grind them later.
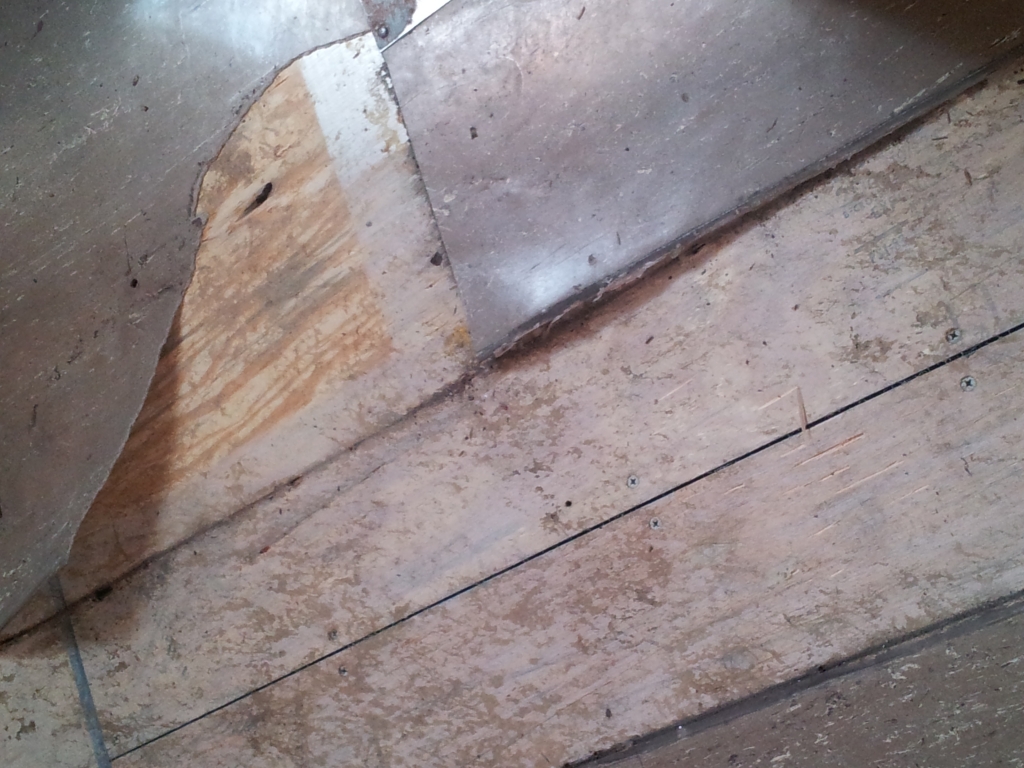
Here are the floors with most of the flooring off. Each piece of plywood was held by about 20 screws

A friend came over today and lent a hand and helped us get most of the plywood out. the pieces in back were a bit rotten but not as much as the other day and it came off in pieces that cant be reused but didnt fall apart either.
After that, the rest came out slowly
maneuvering around the wheel wells, the heaters and the thick layer of caulking that was still holding on for dear life.

There were a few spots of rust after that back section but most of the floors look like new. A very good thing.

We had to stop with the floor while we go the three remaining seats out (the kids wanted us to wait until the last minute because they like sitting there) and we will have to grind those brackets out, but it feels great to know that we almost have all of the floors out now.
Oh and see that sink? It was a garage sale find for 35$ with the faucet. It is nicer then the one in our house

Next steps:
- Grinding the three remaining seat bracket screws out
Getting the rest of the floor covering, screws and plywood out.
Getting the front rail and the separater that is behind the drivers seat out
filling the holes in the floor, using the wire brush on the rusty parts and then painting the floor with Rust-Oleum paint.
|
|
|
|
|
08-25-2013, 06:50 PM
|
#48
|
|
Bus Geek
Join Date: Nov 2011
Location: MNT CITY TN
Posts: 5,158
|
Re: A hippie with a not-so-minivan
Remember....only the BEST....for the BUS 
.
.
I constintly say "oh I have --- in the BUS"
.
They are truly an awesome "TACO" (vessel) 
__________________
Our build La Tortuga
Accept the challenges so that you can feel the exhilaration of victory.
George S. Patton
|
|
|
|
|
09-20-2013, 01:49 PM
|
#49
|
|
Mini-Skoolie
Join Date: Aug 2012
Location: Quebec, Canada
Posts: 50
Year: 1992
Coachwork: BlueBird
Chassis: All Canadian
Engine: 8.3 Cummins
Rated Cap: 72
|
Re: A hippie with a not-so-minivan
So we have not been doing much in the bus lately... Not-Going-Back-to-School time here with all of the fun activities that go with that including Camping and picnics etc. I LOVE celebrating our choice to not send our kids to school.
I did make a video though so I thought I would share that here... (made a small mistake in the intro to the bus though... oops)
http://youtu.be/M3_gJ8QK3c0
Also, we are going to start tackling the luggage racks and we are still debating about the ceiling and wondering about the air conditioners.
So my questions:
-Anyone take the air conditioners out? How does it work? what steps did you take?
-We are still debating about the ceiling. The insulation looks good still and even in FULL sun, the roof is cool to the touch except for a slight warmness at the ribs. It feels like SO much work to take the ceiling out if it is insluating well already. It is darn ugly though and it will be even worse after the luggage racks are out with all of the holes etc... Could it be painted? even if it has those little holes? What about the emergency hatches? Would taking out the ceiling and replacing it possibly make a leak?
|
|
|
|
|
09-20-2013, 03:38 PM
|
#50
|
|
Bus Nut
Join Date: Dec 2009
Location: MN
Posts: 732
Year: 1991
Coachwork: Wayne
Chassis: International 3800
Engine: DT466
Rated Cap: 72
|
Re: A hippie with a not-so-minivan
I did not have air conditioners, but I know how I would start taking them out. One part at a time It probably sounds like I'm tryin to be a smart ass, but I'm not. Things like that look overwhelming when you look at the project in it's entirety, but it's an example of when you need to see the trees, vs. the forest. Start removing the simple, obvious parts and keep going. Obviously, freon should be relesed first, but after that...game on! You will also need some muscles, I am guessing.
The ceiling... I left the ceiling in my bus for those very reasons. Is removing it and reinsulating the best? Probably. Is it worth the work? Maybe. For me, though, it wasn't. I coated my roof with bus-kote to keep it cool, I plan to apply 1/4" luan (as a sub-ceiling to go around all the ribs screw heads, etc...), and then cork to my ceiling for aesthetics and an additional thermal/sound barrier. I have 0 regrets on not removing my ceiling. As for the holes? Just a dab of latex caulking will do the trick for aesthetics. You'll barely see them once the bus is done, and you can absolutely paint the ceiling or finish it with another material.
Edit: We homeschool our 4 children as well. We aren't die-hards, as we kind of give our kids the option to either be home-schooled or go to public, but they have all chosen to be homeschooled, from my 8yr old to my 15yr old. We like to be spontaneous and this fits our lifestyle wayyy better. Once the bus is done, my goal is to shift my job so that I can do most of my work remotely. You'll have a tough time pulling us off the road at that point
__________________
The journey is the destination...
Brutus
|
|
|
|
|
09-20-2013, 03:52 PM
|
#51
|
|
Bus Nut
Join Date: Jun 2013
Location: West Lafayette, IN
Posts: 832
Year: 1999
Coachwork: Thomas
Engine: 3126
Rated Cap: 72
|
Re: A hippie with a not-so-minivan
Quote:
|
Originally Posted by JakeC
The ceiling... I left the ceiling in my bus for those very reasons. Is removing it and reinsulating the best? Probably. Is it worth the work? Maybe. For me, though, it wasn't. I coated my roof with bus-kote to keep it cool, I plan to apply 1/4" luan (as a sub-ceiling to go around all the ribs screw heads, etc...), and then cork to my ceiling for aesthetics and an additional thermal/sound barrier. I have 0 regrets on not removing my ceiling. As for the holes? Just a dab of latex caulking will do the trick for aesthetics. You'll barely see them once the bus is done, and you can absolutely paint the ceiling or finish it with another material.
|
This is where I disagree with JakeC.
The main reason people remove the ceiling and floor is to see if there is rust and mold to correct before building out the interior. I found a lot of mold behind the insulation in my roof and along the sides of the bus. I'm fixing the leaks and re-insulating. But it is everyone's choice.
|
|
|
|
|
09-20-2013, 04:35 PM
|
#52
|
|
Bus Nut
Join Date: Dec 2009
Location: MN
Posts: 732
Year: 1991
Coachwork: Wayne
Chassis: International 3800
Engine: DT466
Rated Cap: 72
|
Re: A hippie with a not-so-minivan
It's all good FWIW, I have a fancy ozone blaster machine which destroys all mold. Gives me a little extra piece of mind And the bus-kote does a lot to seal, as well.
Edit: I've been thinking more about this. Intended usage and amount of work you want to put into the bus may come into play. I am not considering this my permanent bus. This is my learning curve and the one i figure out what we need on, once we start using it. My goal is to use this one for 5 years. My permanent bus will be a H3-45 Prevost to convert If this was my permanent bus, i likely would be building it exactly like William.
__________________
The journey is the destination...
Brutus
|
|
|
|
|
09-21-2013, 06:59 PM
|
#53
|
|
Bus Nut
Join Date: Sep 2010
Location: Ocala, FL
Posts: 635
Year: 1995
Coachwork: Bookmobile body by Farber
Chassis: International 3800
Engine: Navistar DT466/Alison MT643
Rated Cap: 1
|
Re: A hippie with a not-so-minivan
I removed two ceiling air conditioners from my vehicle and it's not necessary to bleed off any coolant. All the pressurized coolant is contained in the roof section and there is no plumbing between the upper and lower sections.
The inner controls and vents come off first and this is fairly easy and straightforward. Four small screws hold the inner cover and once the cover is off, the exposed electrical connections can be accessed. Also, there are four very long bolts that connect the inner section to the roof section. These four bolts are the only mechanical connection holding the roof section on the bus (apart from the adhesive on the weatherstripping around the square opening). Essentially, the roof is sandwiched between the two parts of the air conditioner.
Make sure you have turned off or disconnected the power supply to the AC before opening the small box that contains the wiring. There is also a standard connector between the two sections that sends power to the fan and compressor on the roof.
Once the inner parts are removed and the wiring disconnected, the roof section is fairly easy, if somewhat cumbersome, to remove. Carefully pry it up from the roof (the weatherstripping may be tough to loosen) and lift it straight up out of the hole. It's heavy, so use two people to lift it and be careful when you lower it to the ground. You don't want to fall off the roof.
The opening is a standard 14" square and you can put in a Fantastic Fan or similar ceiling vent system, or just cover it with sheet metal. I attacked one of my holes with a reciprocating saw and made it big enough to install a roof access hatch. If you think about doing something like this, contact me for some tips that you should know before you begin.
For what it's worth, I sold both of mine to someone on craigslist. They had been either on the roof or in storage unused for over two years. The buyer called me the next day to say both of them were blowing ice-cold air within minutes of being installed in his project vehicle.
|
|
|
|
|
09-21-2013, 08:49 PM
|
#54
|
|
Mini-Skoolie
Join Date: Aug 2012
Location: Quebec, Canada
Posts: 50
Year: 1992
Coachwork: BlueBird
Chassis: All Canadian
Engine: 8.3 Cummins
Rated Cap: 72
|
Re: A hippie with a not-so-minivan
Thanks for the detailed description but I don't think that we have the same AC units.
What we have is the stock Trans-Air Units that came with the bus. You can see the fans on either side of me in the following picture... and everything goes down to the compressor etc that is under the bus in its own compartment.There is most likely coolant that goes through the pipes under each of those units (right under the fans in the picture along the wall)
Quote:
|
Originally Posted by paxye
|
Still debating about the ceilings... we want this to be our home for a while, so I am leaning on the side of taking them down... but the work involved... yikes!
so.... many.... rivets...
|
|
|
|
|
09-21-2013, 09:34 PM
|
#55
|
|
Bus Nut
Join Date: Jun 2013
Location: West Lafayette, IN
Posts: 832
Year: 1999
Coachwork: Thomas
Engine: 3126
Rated Cap: 72
|
Re: A hippie with a not-so-minivan
Hey look on the bright side. Working above your head for all that time will build you some very sexy shoulders, at least that's what the guys said when I was done.
|
|
|
|
|
09-22-2013, 12:10 PM
|
#56
|
|
Mini-Skoolie
Join Date: Aug 2012
Location: Quebec, Canada
Posts: 50
Year: 1992
Coachwork: BlueBird
Chassis: All Canadian
Engine: 8.3 Cummins
Rated Cap: 72
|
Re: A hippie with a not-so-minivan
Quote:
|
Originally Posted by JakeC
Edit: We homeschool our 4 children as well. We aren't die-hards, as we kind of give our kids the option to either be home-schooled or go to public, but they have all chosen to be homeschooled, from my 8yr old to my 15yr old. We like to be spontaneous and this fits our lifestyle wayyy better. Once the bus is done, my goal is to shift my job so that I can do most of my work remotely. You'll have a tough time pulling us off the road at that point |
I kind of wish that would ould give the kids the choice but for where we live it is unrealistic because once in the system, it is hard to do your own thing and we are unschoolers.
We have been tired of the house and job rut with a long commute and still living paycheck to paycheck. Sadly, or not sadly as hubby hates his job, he can not do it remotely... so he will need to find something... I can't wait to be on the road and being able to pick up an go. I don't have much of a local community but with unschooling I have many connections that have welcomed us with open arms to come spend time with them once we are on the road.
|
|
|
|
|
09-30-2013, 02:39 PM
|
#57
|
|
Mini-Skoolie
Join Date: Aug 2012
Location: Quebec, Canada
Posts: 50
Year: 1992
Coachwork: BlueBird
Chassis: All Canadian
Engine: 8.3 Cummins
Rated Cap: 72
|
Re: A hippie with a not-so-minivan
So I was about to post a question in another section and was about to say something very telling of me. I tend to overthink things and I have reservations of just jumping in at times. I I wrote that, I could hear myself telling myself that I can change that if I wanted to. I see that it holds me back at times. So instead of pressing submit, I went into the bus and decided to take another look even though I have been staring at it for weeks while we do other things.
So I was faced with these... ducted luggage racks.

There are Rivets holding the front... (out in this picture)
But then there are rivets in the back which are in a space that are too tight for my tools. Even with the front rivets out, it doesn't bend enough to get in that space.


So I was going to ask if anyone had done these before and if anyone had tips...
But then I decided that I should just go and try again.
I had taken the rivets out from a bottom seam and I had pried it open but not too much...

So I got in that seam and just pulled.

and continued to pull...

And pulled more...

Now I have a much clearer picture of how I am going to get these out. I am still wondering how I going to get to the back rivets but now I have more options.
Sometimes, you really do just have to jump in....
|
|
|
|
|
09-30-2013, 02:57 PM
|
#58
|
|
Bus Crazy
Join Date: Feb 2009
Location: Austin, TX
Posts: 1,489
Year: 1996
Coachwork: Thomas
Chassis: International
Engine: DT466/AT545
|
Re: A hippie with a not-so-minivan
I have two words for you: angle grinder. Let the sparks fly man! That thing will be down in short order.
|
|
|
|
|
09-30-2013, 02:59 PM
|
#59
|
|
Bus Geek
Join Date: Nov 2011
Location: MNT CITY TN
Posts: 5,158
|
Re: A hippie with a not-so-minivan
see picture
I would try to save the metal shelves and the brackets for re-use
__________________
Our build La Tortuga
Accept the challenges so that you can feel the exhilaration of victory.
George S. Patton
|
|
|
|
|
09-30-2013, 03:02 PM
|
#60
|
|
Bus Nut
Join Date: Dec 2009
Location: MN
Posts: 732
Year: 1991
Coachwork: Wayne
Chassis: International 3800
Engine: DT466
Rated Cap: 72
|
Re: A hippie with a not-so-minivan
Well done!! That is probably how I would have started. And yes, get as much weight off as possible, simply to make them easier to work with, and then break out the angle grinder. Done deal.
__________________
The journey is the destination...
Brutus
|
|
|
|
|
|
 Posting Rules
|
You may not post new threads
You may not post replies
You may not post attachments
You may not edit your posts
HTML code is Off
|
|
|
|
 » Recent Threads
 |
|
|
|
|
|
|
|
|
|
|
|
|
|
|
|
|
|
|
|
|
|
|
|
|
|
|
|
|
|
|
|
|
|
|
|
|
|


 Linear Mode

