 |
|
 11-15-2016, 08:09 PM
|
#1
|
|
New Member
Join Date: Jul 2016
Posts: 5
|
"Apollo" - 1967 Gillig conversion
Hi everyone!
My name is Jon and I am the proud owner of "Apollo". It started life as a 1967 Gillig school bus and went through some sort of profession conversion in the 80's. I believe it has had the ceiling raised, new windows, windshield, and doors installed, as well a a new Detroit Diesel 7.2L fuel pincher engine which only has 12k on it currently.
I have take Apollo on several long journeys since I purchased him in July 2016. In August I drove it from my home on the Oregon Coast to Burning Man in the Black Rock Desert of Nevada; more recently, I drove it to Seattle for my best bud's bachelor party. Before the Nevada trip, I had the local mechanic do a full filter and fluids tube up and I bought two brand new steer tires.


I have had some issues with the bus that have made these journeys quite adventurous. The biggest issue has been related to the belts on the engine. I'll post some more pictures tomorrow, but basically, there is a double belt that connects the diesel's oil pump, goes around an eccentric bearing, and then runs the bus's hydraulic pump. It's a pusher bus, so the hydraulics run the radiator fan and the power steering. I have been throwing a lot of belts on the highway, and it's no fun to loose those two systems going 65mph.
The second problem I have been struggled with is the pressurized air system. I have many leaks as you can see below:


Also, the air horn is leaking air and the the shape of the horns made it darn near impossible to pinpoint. Anyone have any bright ideas about the air wiper switches (and the air wipers they are attached to, also bearing working), the parking brake release switch that is broken off, or the low pressure indicator switch that is leaking like sieve? I tried putting new thread tape on everything but still the leaks persist.
I am excited to be part of this forum and look forward to giving everyone regular updates. I hope to do a major renovation, both interior and exterior, in the next year, and I hope to use this thread as a way to organize my plan and get feedback from some good people who have already screwed it up more times than I have. LOL. Feel free to post any questions and I'll do my best to answer them!

Sent from my iPhone using Tapatalk
|

|

|
|
11-15-2016, 08:43 PM
|
#2
|
|
Bus Nut
Join Date: Jul 2016
Location: Central Florida
Posts: 938
Chassis: GMC or Chevrolet, I hope
Engine: gasser probably
|
Welcome dude.
I can't provide much info cuz I'm a noob here. But other will.
Kool looking bus.
Sent from my BLU LIFE ONE X using Tapatalk
__________________
the more i learn, the less I know what to buy . . .
|
|
|
|
|
11-15-2016, 08:45 PM
|
#3
|
|
Bus Nut
Join Date: Jan 2015
Location: Gonvick MN
Posts: 339
Year: 1975
Chassis: Gillig
Engine: Cat 3208t/10 speed transmission
|
Welcome!
You have a very interesting bus.
Post more pictures.
Good luck with the air leaks. Ain't old stuff fun?
__________________
Remove hence to yonder place....
|
|
|
|
|
11-15-2016, 09:06 PM
|
#4
|
|
Bus Geek
Join Date: Apr 2012
Location: So Cal
Posts: 3,231
Year: 1935
Coachwork: Superior
Chassis: Chevy
Engine: 317 ci/tid / Isuzu
|
Keep posting here but get acquainted with http://i1075.photobucket.com/albums/...psmixwmmif.jpg. Someone on that forum will be able to answer your belt and air leak questions. Hope this helps. Jack
|
|
|
|
|
11-15-2016, 09:23 PM
|
#5
|
|
Bus Geek
Join Date: Mar 2011
Location: Houston, Texas
Posts: 8,462
Year: 1946
Coachwork: Chevrolet/Wayne
Chassis: 1- 1/2 ton
Engine: Cummins 4BT
Rated Cap: 15
|
Welcome...love those old Gillies! Best of luck sorting out any issues. Let us know how it goes.
|
|
|
|
|
11-15-2016, 10:22 PM
|
#6
|
|
Bus Nut
Join Date: May 2016
Location: Richmond Virginia
Posts: 932
Year: 1984
Engine: 366 Big block Chevy! :) w/ Stick shift
|
Welcome! Very charming bus. Good luck! 
|
|
|
|
|
11-16-2016, 01:08 AM
|
#7
|
|
Bus Crazy
Join Date: Jul 2011
Location: Winlcok, WA
Posts: 2,233
|
WOW! What a great looking bus.
I don't think what you have is a GM 7.2L Fuel Pincher. The only one with which I am familiar with is an 8.2L. The Fuel Pincher never came from the factory with a turbo. Putting a turbo on is not generally thought to be a very good idea as the bottom end and the pistons can't take the added pressure. It was designed as a low cost entry level diesel engine that was to be used and then thrown away.
In regards to throwing belts, you have one of the pulleys not lined up correctly. Something somewhere is causing the belts to ride up the side of the shivs and then they are gone. If you can reuse the thrown belts it means they are probably quite a bit out of line. If the belts are getting really chewed up on one side or another they are pretty close and instead of walking up and over they are scrubbing one side of the shivs and when they get chewed up enough they will walk off. Get a straight edge and figure out what isn't lined up correctly.
As far as the air wipers are concerned, they were a PITA when they were new. This many years later I would be surprised if they work at all. Luke @ US Coach in New Jersey should be able to set you up with either repair kits for the wiper motors or electric replacements. Neither option is cheap.
Your options for replacing your air brake parts are not bad in the Portland, OR area. As far as the air horns are concerned, the only time there should be air pressure at the horns is when the horn switch is activated. It is either a physical button on the floor, or an electric switch mounted in various places, or a physical hand pull. If it is leaking it is most likely the switch is gummed up and not closing completely.
I am not sure exactly what you mean about the low air switch leaking. If you are talking about the low air wig wag flag that drops when air pressure goes below 60-90 PSI it too could be all gummed up. If it is leaking at the joint where the air hose attaches to it, it most probably needs a new ferrule if it isn't a hard line with a flare on the end. If it is a hard line with a flare on the end, it most probably has not been seating properly with the flare snugged down tight into the seat. If it has been buggered up it may have to have the fitting replaced that is on the unit. You may find you have to replace the whole wig-wag.
I don't want to state the obvious, but the panel in front of the driver's left foot has a couple of latches on the inside that allows the panel to swing forward to access the back of the dash board. The driver side wiper motor is then very easy to service. Accessing the curb side wiper motor is a real PITA. You either have to remove the whole center section of the front of the bus or you have to dismantle all of the dash board, heater, and defroster units on the curb side of the bus.
The model number of your bus on the OEM data plate should tell you what the bus was originally. If it is a 190-12 it had the Cummins C-190 and was 12 rows long. If it is a 450-12 or 501-12 it had the IHC Red Diamond RD 450 or RD501 gas engine with 12 rows.
Again, it appears as if you have a really nice bus.
|
|
|
|
|
11-16-2016, 01:12 AM
|
#8
|
|
New Member
Join Date: Jul 2016
Posts: 5
|
Quote:
Originally Posted by cowlitzcoach

WOW! What a great looking bus.
I don't think what you have is a GM 7.2L Fuel Pincher. The only one with which I am familiar with is an 8.2L. The Fuel Pincher never came from the factory with a turbo. Putting a turbo on is not generally thought to be a very good idea as the bottom end and the pistons can't take the added pressure. It was designed as a low cost entry level diesel engine that was to be used and then thrown away.
In regards to throwing belts, you have one of the pulleys not lined up correctly. Something somewhere is causing the belts to ride up the side of the shivs and then they are gone. If you can reuse the thrown belts it means they are probably quite a bit out of line. If the belts are getting really chewed up on one side or another they are pretty close and instead of walking up and over they are scrubbing one side of the shivs and when they get chewed up enough they will walk off. Get a straight edge and figure out what isn't lined up correctly.
As far as the air wipers are concerned, they were a PITA when they were new. This many years later I would be surprised if they work at all. Luke @ US Coach in New Jersey should be able to set you up with either repair kits for the wiper motors or electric replacements. Neither option is cheap.
Your options for replacing your air brake parts are not bad in the Portland, OR area. As far as the air horns are concerned, the only time there should be air pressure at the horns is when the horn switch is activated. It is either a physical button on the floor, or an electric switch mounted in various places, or a physical hand pull. If it is leaking it is most likely the switch is gummed up and not closing completely.
I am not sure exactly what you mean about the low air switch leaking. If you are talking about the low air wig wag flag that drops when air pressure goes below 60-90 PSI it too could be all gummed up. If it is leaking at the joint where the air hose attaches to it, it most probably needs a new ferrule if it isn't a hard line with a flare on the end. If it is a hard line with a flare on the end, it most probably has not been seating properly with the flare snugged down tight into the seat. If it has been buggered up it may have to have the fitting replaced that is on the unit. You may find you have to replace the whole wig-wag.
I don't want to state the obvious, but the panel in front of the driver's left foot has a couple of latches on the inside that allows the panel to swing forward to access the back of the dash board. The driver side wiper motor is then very easy to service. Accessing the curb side wiper motor is a real PITA. You either have to remove the whole center section of the front of the bus or you have to dismantle all of the dash board, heater, and defroster units on the curb side of the bus.
The model number of your bus on the OEM data plate should tell you what the bus was originally. If it is a 190-12 it had the Cummins C-190 and was 12 rows long. If it is a 450-12 or 501-12 it had the IHC Red Diamond RD 450 or RD501 gas engine with 12 rows.
Again, it appears as if you have a really nice bus. |
Wow! I really appreciate you taking the time to to give so much advice. I will check on some of the things you talked about and repost some more pics tomorrow!!!!
Thanks,
Jonathan
Sent from my iPhone using Tapatalk
|
|
|
|
|
11-16-2016, 04:35 AM
|
#9
|
|
Bus Geek
Join Date: Sep 2014
Location: Eustis FLORIDA
Posts: 23,764
Year: 1999
Coachwork: Thomas
Chassis: Freighliner FS65
Engine: Cat 3126
Rated Cap: 15
|
Quote:
Originally Posted by AlmostFamous
Wow! I really appreciate you taking the time to to give so much advice. I will check on some of the things you talked about and repost some more pics tomorrow!!!!
Thanks,
Jonathan
Sent from my iPhone using Tapatalk
|
Cowlitzcoach is an amazing dude.
Also, for inspiration, check out FamousInternetJesus. That man is truly a hero. 
|
|
|
|
|
11-16-2016, 10:30 AM
|
#10
|
|
Bus Crazy
Join Date: Jun 2016
Location: Orange County, CA
Posts: 1,362
Year: 1990
Coachwork: Crown, integral. (With 2kW of tiltable solar)
Chassis: Crown Supercoach II (rear engine)
Engine: Detroit 6V92TAC, DDEC 2, Jake brake, Allison HT740
Rated Cap: 37,400 lbs GVWR
|
Great bus!
Air wipers aren't that hard to fix. Inside the housing is a shuttle that is pushed to and from by air pressure, and a valve to control airflow. I rebuilt my driver-side Sprague HP-200 a while ago because it was leaking internally - a few O-rings from my local hardware store and a few hours of work (half of that was cleaning it), and now it works perfectly. If the bores are worn, then it's time for a new motor: Rome Truck Parts in GA has wiper parts for pretty much any truck or bus, air or electric.
Low air pressure switches are cheap from eBay. I bought a Bendix LP-3 a year or so ago to fix my Fast Idle, and it was only a few dollars. I think they come in NO and NC versions, and there's different operating pressures, so buy the right one.
Older buses like yours are basically simple, even though it doesn't appear so when you're trying to track down weird problems! If you don't have any factory schematics for air or electrics, it's worth making your own as you work on different things. This way, if you have to go back to something a few years from now, you'll know what you did and why. Often the problems are with all the modifications and add-ons that were installed after it came from the factory - I've been steadily getting my bus back to the state it was when Crown made it - some of the school district's changes were not done the way I would have liked, so I'm trying to restore it to 100% factory condition or better. I try to put myself into the mindset of how the Crown engineers would have done things when it was made - does my work look like an obvious add-on or bodge, or does it look like it came from the factory that way?
Have fun.
John
|

|
|
|
11-17-2016, 08:57 PM
|
#11
|
|
Bus Nut
Join Date: Aug 2010
Posts: 352
Year: 1995
Coachwork: Thomas
Chassis: International
Engine: 466DT
Rated Cap: 65
|
That is a really cool old bus!! I love the look. Can't wait to see more pics.
Quote:
Originally Posted by cowlitzcoach
The Fuel Pincher never came from the factory with a turbo. Putting a turbo on is not generally thought to be a very good idea as the bottom end and the pistons can't take the added pressure. It was designed as a low cost entry level diesel engine that was to be used and then thrown away.
|
Cowlitz, I agree with you except the factory turbo setup. This is a pic of a genny at my work with the 8.2 with factory turbo. Also, the local fire department had a rescue truck for years, and it also had a factory turbo.
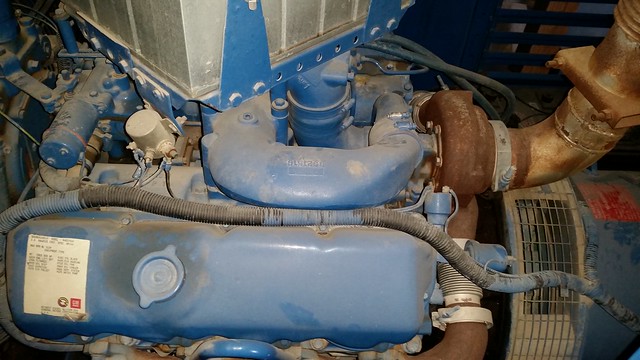 20161117_143927 20161117_143927 by Hvbuzz, on Flickr
|
|
|
|
|
11-17-2016, 10:53 PM
|
#12
|
|
New Member
Join Date: Jul 2016
Posts: 5
|
A tale of two belts:
So as I mentioned above, Apollo has a strong young engine. I've worked on tractors and backhoes before, but this is my first bus and I am still getting comfortable with diesel mechanics. That said, when I bought the thing on the other side of the state, I bought two brand new batteries, and the engine turned over on the first turn of the key.


I got about 45 minutes down the road when I lost communication with my buddy in the trail vehicle and so we pulled off at a rest stop. It was only then that I noticed that the temp gauge was is 214 and there was steam pouring out of the engine compartment.

We soon discovered that the belts that are connected to the hydraulic pump had snapped and Apollo's hydraulic cooling fan was no longer turning. The belts are apparently size AX60. They run from the main oil pump, around that eccentric bearing, and then around the pulley on the hydro pump. On this maiden voyage, we were lucky enough to have extra belts in one of the storage compartments. We changed the belts and made it all they way home (another 4 hours) with no other issues.
Since this trip we have been throwing those two same belts about every 500 miles. It only happens on the highway. Sometimes they will take out the alternator belt as well, but not always.

This picture shows the ends of the belts but the flat side of the belts looks pretty worn. One time, there looked like there was melted rubber on that eccentric bearing. I took the bearing off and took it to some truck repair places in Portland, but everyone I showed it to says that it seems to be fine.
So, I absolutely think you kind commenters are correct in that I am having belt alignment issues. The main oil pump pulley seems to have 5 possible slots for belts. I think all the belts are in the right slots, but I am not positive. Furthermore, while the hydro pump seems secure , it looks light it might not be lined up perfectly with their corresponding pulley slots. It almost looks like it is bent forward towards me as I'm facing it.

Here's my best try at taking a picture straight down the belt line

I worry that the belt to the alternator may not be the right size. I think I have a 25-7640 on there now, but I have written down somewhere that 25-16003 might be the right size. Maybe you can see in the labeled photo that the alternator is adjusted as far out as possible. Even more of a concern is that the alternator belt seems loose and is dancing around perilously close to the eccentric bearing while the engine is running. Any beltheads out there that can teach me about belt sizes??
I guess the main thing I'm hoping to figure out is how to measure belt alignment more carefully. I like the idea of measuring with a straight edge, but I don't quite know how to accomplish that.
Thanks again for all the support and advice. I've read through all your comments and will be trying to update you all as I start working on the various systems that you have given me such valuable advice (grammar, eek). More to come -Jon
Sent from my iPhone using Tapatalk
|
|
|
|
|
11-18-2016, 10:21 AM
|
#13
|
|
Bus Geek
Join Date: Mar 2011
Location: Houston, Texas
Posts: 8,462
Year: 1946
Coachwork: Chevrolet/Wayne
Chassis: 1- 1/2 ton
Engine: Cummins 4BT
Rated Cap: 15
|
That's quite a collection of belts! And unless they are aligned and tensioned just right, I can easily see how they could go south in a hurry. I would be suspect of the position of the hydraulic pump based on what is taking place. You "might" be able to shim that rascal but if the bracket is too far out of whack it may or may not help.
And, is the eccentric spinning freely? I just recently read a thread on a diesel site where the chap had similar mysterious issues. Took him months to finally figure out that his tensioner, which would turn just fine when cool, was locking up and seizing, but only after it got hot.
Best of luck with it.
|
|
|
|
|
11-18-2016, 10:43 AM
|
#14
|
|
Bus Geek
Join Date: Apr 2012
Location: So Cal
Posts: 3,231
Year: 1935
Coachwork: Superior
Chassis: Chevy
Engine: 317 ci/tid / Isuzu
|
I can recall a million years ago when Chrysler was using dual belts to turn their A/C compressors. They would pitch their belts unless the belts were a matched pair (they were sold only in pairs at the time). Someone smarter than me will know if matched belts are required on your set up. Also, I think Tango is probably right about the tensioner . I've seen dual belt tensioners heat and seize. I've also seen tensioners with worn bearings "tilt" on their rotational axis enough to make one belt looser than the other.
Let us know what you finally discover. Jack
|
|
|
|
|
11-18-2016, 10:58 AM
|
#15
|
|
Bus Geek
Join Date: Mar 2011
Location: Houston, Texas
Posts: 8,462
Year: 1946
Coachwork: Chevrolet/Wayne
Chassis: 1- 1/2 ton
Engine: Cummins 4BT
Rated Cap: 15
|
Also..."V" type belts tend to be much more demanding than the flat, grooved style when it comes to alignment. The 8 row that Cummins uses are very stable even if off a smidgen.
At least it doesn't make a 90 degree bend like the old Corvairs. You couldn't keep a belt on those things for fifteen minutes.
|
|
|
|
|
11-18-2016, 04:12 PM
|
#16
|
|
Bus Nut
Join Date: Feb 2015
Location: North carolina
Posts: 651
Year: 1986
Coachwork: Thomas
Chassis: Ford
Engine: Detroit 8.2
Rated Cap: 60 bodies
|
Alright man this is just a thought from looking at your pictures?
Let's follow the belt left from the alternator.
It looks like it is in the second groove of the next pulley/shiv on the next /top pulley/shiv and in the third groove on the bottom/crankshaft pulley/shiv? The other thing I see is that it looks like your alternator has a pulley to accommodate two belts instead of one.
. Just an observation from pics but I think your belt needs to be moved forward one groove on the crankshaft pulley?
|
|
|
|
|
11-18-2016, 07:53 PM
|
#17
|
|
New Member
Join Date: Jul 2016
Posts: 5
|
"Apollo" - 1967 Gillig conversion
Wow! I'm super thankful for all this info!! Thanks Alan for making sure I get my lingo straight.
Makes me curious about what's actually happening inside that engine. Any help you all could offer in terms of identifying this engine and tracking down schematics would be greatly appreciated!
Hoping to dive in to some belt work tomorrow. Thanks again!
Sent from my iPhone using Tapatalk
|
|
|
|
|
11-18-2016, 08:04 PM
|
#18
|
|
Bus Nut
Join Date: Jan 2015
Location: Gonvick MN
Posts: 339
Year: 1975
Chassis: Gillig
Engine: Cat 3208t/10 speed transmission
|
Roger may be right.
It appears from your pictures that the belts might be in the wrong grooves.
It's hard to tell.
Put a straight edge across the front of the hydraulic pump pulley down to the crank pulley ( what you are referring to as the oil pump).
This will help you to see where the belts should be.
With a setup like yours ( and mine) that is sort of homemade, deciding how to route the belts is just one of the many challenges.
Keep up the good work.
Keep us updated.
__________________
Remove hence to yonder place....
|
|
|
|
|
11-18-2016, 11:09 PM
|
#19
|
|
Bus Crazy
Join Date: Jun 2016
Location: Orange County, CA
Posts: 1,362
Year: 1990
Coachwork: Crown, integral. (With 2kW of tiltable solar)
Chassis: Crown Supercoach II (rear engine)
Engine: Detroit 6V92TAC, DDEC 2, Jake brake, Allison HT740
Rated Cap: 37,400 lbs GVWR
|
1. Get your belts sorted out, NOW! The consequences of broken belts could be your engine dying from oil starvation or overheating, or you dying from ineffective brakes because of low air pressure.
2. Have accurate and trustworthy gauges for coolant temperature and oil pressure, ideally also connected to alarms and lights. Speedhut makes some that would work well; I've put in two Speedhut gauges for coolant and transmission temperatures, and they work well.
3. Your engine should ideally have shutdowns for low oil pressure, high coolant temperature and low coolant level - if so, make sure they all work as intended, and if it doesn't have them you should try to install some. You may be able to connect them to a fuel shutoff Skinner valve, maybe?
John
|
|
|
|
|
12-12-2016, 05:26 PM
|
#20
|
|
New Member
Join Date: Jul 2016
Posts: 5
|
Getting rolling again:
Hi, everyone! I appreciate all your advice and am trying to experiment with the belts and routing soon. It's been stormy here in Oregon and haven't really been able to dig in recently.
I'm trying to fix my biggest air leak, my low air pressure switch. It is a bendix LP-3 style. I believe this one is set to 60PSI. It is the two-pole variety. The supply line seems to be two 1/4" copper lines, going in to a T-junction, which the actual switch screws into. The switch itself seems to be the male side, and has 1/2" threading.


I see the numbers 223 stamped on both the top and bottom, as well as 8067 on the top metal plate, and 239100-a on the bottom, near the threading.
Could anyone help me verify that the part in the following link might be a good replacement? There seems to be many options for this exact style of switch and I don't know how to get the exact part I need: http://www.anythingtruck.com/product/060-284833N.html
Looking forward to getting Apollo on the road again. Not too excited to have to fill up the diesel when he's rolling  just hoping to only have to buy this part once, and not having to deal with returning it over and over until I get the right one.
I look forward to more updates to follow shortly.
-Jonathan
Sent from my iPhone using Tapatalk
|
|
|
|
|
|
 Posting Rules
|
You may not post new threads
You may not post replies
You may not post attachments
You may not edit your posts
HTML code is Off
|
|
|
|
 » Recent Threads
 |
|
|
|
|
|
|
|
|
|
|
|
|
|
|
|
|
|
|
|
|
|
|
|
|
|
|
|
|
|
|
|
|
|
|
|
|
|


 Linear Mode

