 |
|
 07-08-2018, 10:53 PM
|
#21
|
|
Bus Nut
Join Date: Jan 2016
Location: Greater Boston
Posts: 504
|
I'm not sure what I would do about your floor. From an insulation standpoint, I wouldn't worry about it too much. If your floor is getting direct sun, then you've got MUCH bigger problems to worry about. 
Cool air from your AC tends to sink towards the floor anyways - I don't think anyone notices a slightly warm floor in the summer, and there are these things called socks and rugs for a cool floor in the winter. Wood itself isn't a great insulator, but it's not a terrible insulator either. I mean, the standard New York water tank is still 3-4inches of solid oak, and they don't freeze. If it's not a problem now, then I don't think it will be too bad later.
I'm honestly not sure what I'd suggest about the wood floor - the fact that it's nailed down means that removing it will treat any surface rust, but then the floor is full of holes. There's always the "glue and seal a penny over the hole" trick, but its still a lot of time and effort.
I think I might pull the walls first, and see what the walls and existing insulation say. I feel like if there's serious leakage, you'd see it in the walls as well as the floor. If there's leakage, there should be signs. If the walls are clean, then the floor could be clean too...
As for new insulation, the loose blown-in stuff won't work in a bus. The vibrations of driving down the road will eventually shift/shuffle all the little pieces tightly together at the bottom of the wall/cavity. (Its a problem in older houses too.) Batting-type insulation only really works when you're 100% sure you've filled the entire cavity its going into. (There's a reason its sized to fit exactly between the studs in a standard wall.)
I would go the route of gluing in solid foam board. Some metal tape and spray foam (just the stuff in the individual cans) can be used to fill the small loose nooks/crannies to make a tight fit. Rought-cut it to fit. Trim it smaller until it actually fits. Repeat.
If you want to go the spray foam route for the whole bus, you'd still have to drop the ceiling. Then you spray foam, then you knife/shave it back to being flush with the ceiling ribs, then you re-install the ceiling. (You wouldn't have a problem with foam dripping through the dimples. Not quite how it works.) People usually don't spray foam the floor, they still use the hard pink foam board.
|

|

|
|
07-09-2018, 12:00 AM
|
#22
|
|
Almost There
Join Date: Sep 2016
Location: Tenino, Wa (20 mi SE of Olympia)
Posts: 69
Year: 1989
Coachwork: Bluebird
Engine: CAT 3208
Rated Cap: 84 pass 36200 gvw
|
I had the same floor in my bus, I managed to pry it up and only destroyed about half a sheet of plywood. The primary tool I used is I think for digging fence post holes and tamping the dirt down after the post is in, it is a 1" bar of steel about 5' long with a ~2" disk on one end and a flat tapered tip about 2"-3" wide at the other. I used a dead blow hammer to drive the point under an edge of the plywood and pried up as much as I could without breaking the plywood and worked my way along the edge. I used various blocks so the tip was doing the prying instead prying against the edge. Most of the nails(same as yours) were pulled out by the wood, of course my plywood was 5/8" acx and my nails had 11 years more rust which may have made them easier to pull out. All but about fifty nails came out with the wood, It took me about two days to get it all out but it was a fairly clean job. (I'm one of the old fart on here so I can't work that hard for very long!)
Bob
|
|
|
|
|
07-09-2018, 12:29 AM
|
#23
|
|
Bus Crazy
Join Date: May 2018
Location: topeka kansas
Posts: 1,778
Year: 1954
Coachwork: wayne
Chassis: old f500- new 2005 f-450
Engine: cummins 12 valve
Rated Cap: 20? five rows of 4?
|
floor removal
If you dont have a circular saw, go to the pawn shop and buy one there. find a carbide tipped blade that fits the saw... need to be sharp and carbide tipped.
Set the depth of cut just shy of going all the way through the ply.
slice the hell out of the ply wood nailed to the floor. If there is a pattern to the nails of hell, slice so as to leave narrow strips with nails of hell. Tear up floor. use a sawz all, with long fine tooth 32tpi blade to cut under the wood strips with nails of hell. Then use a punch to knock out the nail stubs.
this might make things go faster.
easier to throw strips away. wear eye protection. stop hammering when you get tired. hold punch with vise grips or some sort of pinch vise made from a dowl, or board.
|
|
|
|
|
07-09-2018, 07:47 PM
|
#24
|
|
Skoolie
Join Date: Jun 2018
Location: Las Vegas, NV
Posts: 169
|
Quote:
Originally Posted by Mark_In_MA

I'm not sure what I would do about your floor. From an insulation standpoint, I wouldn't worry about it too much. If your floor is getting direct sun, then you've got MUCH bigger problems to worry about.
As for new insulation, the loose blown-in stuff won't work in a bus. The vibrations of driving down the road will eventually shift/shuffle all the little pieces tightly together at the bottom of the wall/cavity. (Its a problem in older houses too.) Batting-type insulation only really works when you're 100% sure you've filled the entire cavity its going into. (There's a reason its sized to fit exactly between the studs in a standard wall.)
I would go the route of gluing in solid foam board. Some metal tape and spray foam (just the stuff in the individual cans) can be used to fill the small loose nooks/crannies to make a tight fit. Rought-cut it to fit. Trim it smaller until it actually fits. Repeat.
If you want to go the spray foam route for the whole bus, you'd still have to drop the ceiling. Then you spray foam, then you knife/shave it back to being flush with the ceiling ribs, then you re-install the ceiling. (You wouldn't have a problem with foam dripping through the dimples. Not quite how it works.) People usually don't spray foam the floor, they still use the hard pink foam board. |
I think your right gonna go foam board on floor and spray foam walls ceiling. With the spray foam I was worried it would push out the holes if I tried to spray it up in the ceiling without taking down the panels. But ya gonna take it all down. I was worried that the cellulose stuff wouldnt hold up thanks for confirming.
|
|
|
|
|
07-09-2018, 07:51 PM
|
#25
|
|
Skoolie
Join Date: Jun 2018
Location: Las Vegas, NV
Posts: 169
|
Quote:
Originally Posted by snonut
I had the same floor in my bus, I managed to pry it up and only destroyed about half a sheet of plywood. The primary tool I used is I think for digging fence post holes and tamping the dirt down after the post is in, it is a 1" bar of steel about 5' long with a ~2" disk on one end and a flat tapered tip about 2"-3" wide at the other. I used a dead blow hammer to drive the point under an edge of the plywood and pried up as much as I could without breaking the plywood and worked my way along the edge. I used various blocks so the tip was doing the prying instead prying against the edge. Most of the nails(same as yours) were pulled out by the wood, of course my plywood was 5/8" acx and my nails had 11 years more rust which may have made them easier to pull out. All but about fifty nails came out with the wood, It took me about two days to get it all out but it was a fairly clean job. (I'm one of the old fart on here so I can't work that hard for very long!)
Bob
|
Bob,
Thats exactly what I did. I think its called a "tamper" at least thats what we always called it (or a persuader). Anyway got all the boards up and I aint no spring chicken either. It beat the crap out of me. That is the tool for the job though. Those nails just laughed at normal prybar, sawzall stuff.
Looks like this right https://www.sears.com/ludell-60-in-1...FdKPYgodc4gK9Q
|
|
|
|
|
07-09-2018, 07:55 PM
|
#26
|
|
Skoolie
Join Date: Jun 2018
Location: Las Vegas, NV
Posts: 169
|
Quote:
Originally Posted by magnakansas
If you dont have a circular saw, go to the pawn shop and buy one there. find a carbide tipped blade that fits the saw... need to be sharp and carbide tipped.
Set the depth of cut just shy of going all the way through the ply.
slice the hell out of the ply wood nailed to the floor. If there is a pattern to the nails of hell, slice so as to leave narrow strips with nails of hell. Tear up floor. use a sawz all, with long fine tooth 32tpi blade to cut under the wood strips with nails of hell. Then use a punch to knock out the nail stubs.
this might make things go faster.
easier to throw strips away. wear eye protection. stop hammering when you get tired. hold punch with vise grips or some sort of pinch vise made from a dowl, or board.
|
I tried the circular saw and the sawzall today. Those nails laughed at the sawzall. Used a metal cutting blade, big long demo blade (nail eater) and a weird SPX I think blade that had teeth on all sides. Those nails thought I was giving them a massage. 3-5 nails and the blades were toast. The circular saw was helpful on a couple boards I didnt want to mess up the fuel filler and such. Mostly brute force but the floor is out and I am wasted. Lot of work.
|
|
|
|
|
07-09-2018, 08:12 PM
|
#27
|
|
Skoolie
Join Date: Jun 2018
Location: Las Vegas, NV
Posts: 169
|
Help with last floor pieces?
Any chance we can change this bang head on wall  smilie to a bang head on the FLOOR?
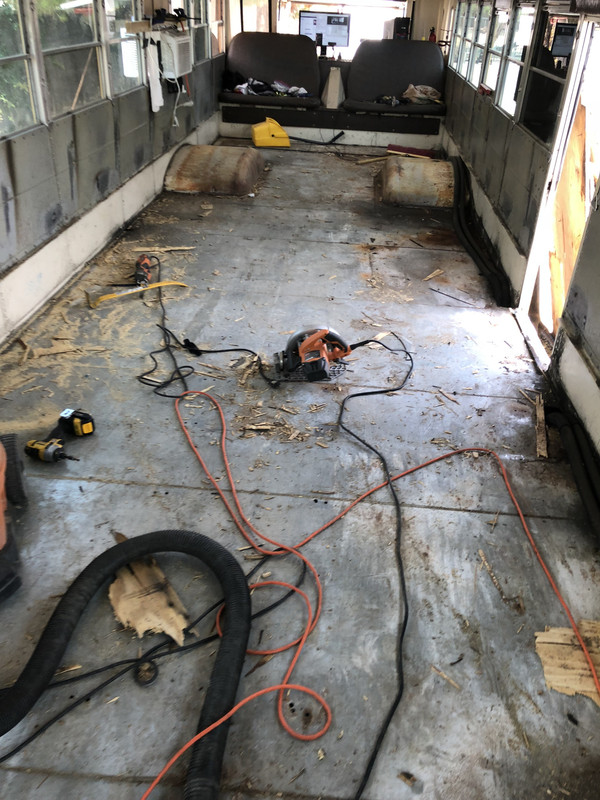
So, I took your advice and got the floor out. 6 hour live stream with about 4-5 hours of solid brute force work. I am completely wasted. Left it all on the bus floor as they say. BUT THE FLOOR IS OUT (ALMOST).
I was wondering about the area with the fuel filler cover. Under the cover and on the wood is a metal frame. Its really gummed in mine and by the time I got there I was pretty blurry. So I thought I would ask before ripping at it.
Is that metal frame just slid onto the wood or is it attached to the metal floor or filler?
If I pry up on the wood will it damage that part or the fuel filler or is it supposed to just come out attached to the wood?
I am really glad you guys pointed me in the right direction. I will say for anyone doing this PULL THE DAMN FLOOR! I dont care if the bus is brand new I still want to go under the floor. As clean as my bus is rust wise, big rust spots under the plywood. I thought i8t would be all surface stuff, but nope some big flakey cancer rust areas. I dont think I will have a through hole but still got to grind it away. Just like most people say, rear wheel area, wheel wells and under my heater hoses were all rusted up areas. I am sure I could have still gotten away without lifting the floor, but I feel much better having done it and now can address things properly.
BUT MAN THAT FLOOR KICKED MY ASS!!!!
By the last piece I was completely out of gas. Oh and I jammed the heck out of my thumb. You know like when you catch a basketball or football wrong? Oh well its not a skoolie unless you bleed a little right?
Back on tomorrow and will try to tackle the walls....I think.
What do I do with this piece here? Do I need to massage the frame out or just rip the whole chunk of wood?

Rust Rust Everywhere. Thanks again guys for the push.
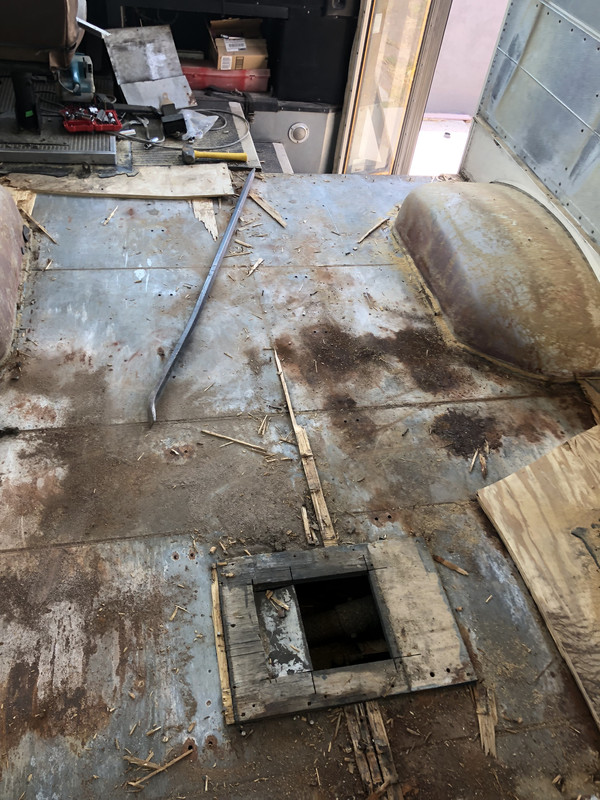
FLOOR IS OUT almost
|
|
|
|
|
07-09-2018, 11:50 PM
|
#28
|
|
Almost There
Join Date: Sep 2016
Location: Tenino, Wa (20 mi SE of Olympia)
Posts: 69
Year: 1989
Coachwork: Bluebird
Engine: CAT 3208
Rated Cap: 84 pass 36200 gvw
|
Quote:
Originally Posted by fadderall
Bob,
Thats exactly what I did. I think its called a "tamper" at least thats what we always called it (or a persuader). Anyway got all the boards up and I aint no spring chicken either. It beat the crap out of me. That is the tool for the job though. Those nails just laughed at normal prybar, sawzall stuff.
Looks like this right https://www.sears.com/ludell-60-in-1...FdKPYgodc4gK9Q |
Pretty close but mine had a round disk on the other end so I could really wallop it.
Bob
|
|
|
|
|
07-10-2018, 12:36 PM
|
#29
|
|
New Member
Join Date: May 2018
Location: Nevada
Posts: 9
Year: n/a
Coachwork: n/a
Chassis: n/a
Engine: n/a
Rated Cap: n/a
|
Woohoo! Another Nevadan doing the Skoolie thing. I spent most of my adult life in Las Vegas but now I've relocated to Northern Nevada to help take care of my mother. I'm following you on Twitch and I can't wait to watch your progress.

P.S. Kudos to you for tackling this in the Vegas heat. Whew!
|
|
|
|
|
07-10-2018, 01:19 PM
|
#30
|
|
Skoolie
Join Date: Apr 2018
Location: GA
Posts: 129
Year: 1998
Coachwork: BlueBird
Chassis: TC2000 RE
Engine: 8.3 Cummins
Rated Cap: 78
|
Had fun watching your progress this am.
|
|
|
|
|
07-10-2018, 02:01 PM
|
#31
|
|
Skoolie
Join Date: Jun 2018
Location: Las Vegas, NV
Posts: 169
|
Quote:
Originally Posted by Big BackYard
Woohoo! Another Nevadan doing the Skoolie thing. I spent most of my adult life in Las Vegas but now I've relocated to Northern Nevada to help take care of my mother. I'm following you on Twitch and I can't wait to watch your progress.
P.S. Kudos to you for tackling this in the Vegas heat. Whew! |
Thanks!
We lived up in Tahoe for a few. That whole Reno/truckee northern Nevada climate is awesome. The heat sucks down here. But lately its the rare monsoon humidity that kills it. Many laugh at us, but you know that 30-40% humidity is like Florida to us Las Vegans. It helps to start early. Thanks for the follow and best to your mom.
|
|
|
|
|
07-10-2018, 02:04 PM
|
#32
|
|
Skoolie
Join Date: Jun 2018
Location: Las Vegas, NV
Posts: 169
|
Quote:
Originally Posted by Tryonis
Had fun watching your progress this am.
|
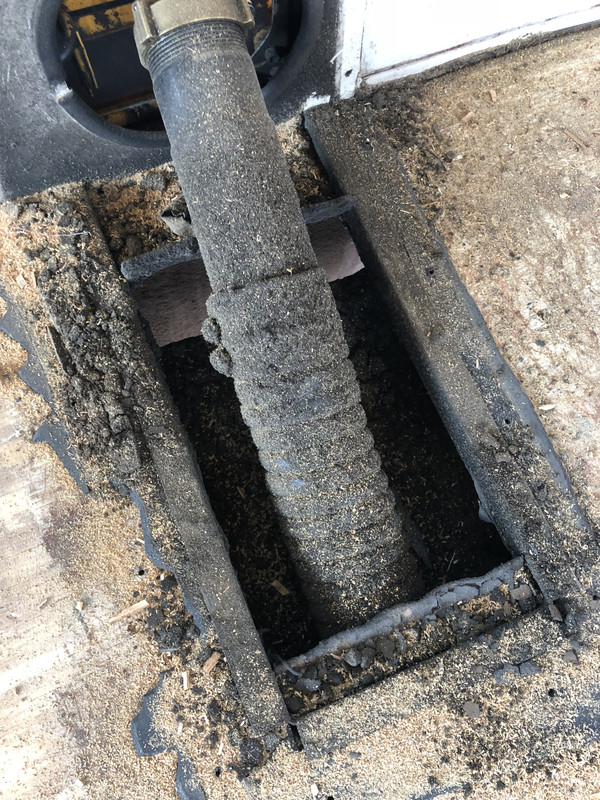
Thanks, and your tips are always highly appreciated. Us 99 RE 8.3 guys gotta stick together.
I wanna tackle that hose. You know what size it is? Pic if phone is working again? Thanks again for the help.
|
|
|
|
|
07-10-2018, 02:12 PM
|
#33
|
|
Skoolie
Join Date: Apr 2018
Location: GA
Posts: 129
Year: 1998
Coachwork: BlueBird
Chassis: TC2000 RE
Engine: 8.3 Cummins
Rated Cap: 78
|
No pic my camera is shot on my phone but if you climb under the bus right under where the hoses go back into the floor at the rear you can just unhook feed line going to the front and hook it back into the return. For my bus my return went back into a trans cooler so i just looped back into there. We have different transmissions so i am not sure how your's is routed.
|
|
|
|
|
07-10-2018, 03:50 PM
|
#34
|
|
Mini-Skoolie
Join Date: Jul 2018
Location: Palm City, FL
Posts: 38
Year: 2003
Coachwork: International
Chassis: RE3000
|
Hey man, new member here and just getting into the scene. Diggin your bus. Looks super clean. Mind me asking where you got from/how you found, and what you paid for her/him? Going to try to catch you on your twitch some!
|
|
|
|
|
07-10-2018, 08:20 PM
|
#35
|
|
Skoolie
Join Date: Jun 2018
Location: Las Vegas, NV
Posts: 169
|
Quote:
Originally Posted by Tryonis
No pic my camera is shot on my phone but if you climb under the bus right under where the hoses go back into the floor at the rear you can just unhook feed line going to the front and hook it back into the return. For my bus my return went back into a trans cooler so i just looped back into there. We have different transmissions so i am not sure how your's is routed.
|
Cool Im going to check it out tomorrow. So did you just cut a piece of the existing long hose to loop it back or is there a smaller hose on other side under the bus?
|
|
|
|
|
07-10-2018, 09:17 PM
|
#36
|
|
Bus Geek
Join Date: Dec 2017
Location: Dawsonville, Ga.
Posts: 10,482
Year: 1999
Coachwork: Genesis
Chassis: International
Engine: DT466/3060
Rated Cap: 77
|
You should be so thankful you did not try to foam the ceiling with the panels up. Not only would it expand right through all the holes if it's perf panels, and it would have expanded and completely distorted the ceiling. It would have been a nightmare of work to pull that ceiling and fix it.
|
|
|
|
|
07-10-2018, 09:40 PM
|
#37
|
|
Skoolie
Join Date: Jun 2018
Location: Las Vegas, NV
Posts: 169
|
Quote:
Originally Posted by ChrisFL
Hey man, new member here and just getting into the scene. Diggin your bus. Looks super clean. Mind me asking where you got from/how you found, and what you paid for her/him? Going to try to catch you on your twitch some!
|
Thanks Chris and welcome. I had the exact same questions when I started looking. If you search on here you will find lots of threads about this. Here is what I did.
eBay
Looked at ebay a bunch, but really if the seller wasn't near me I was not going to even bid. Never saw one eBay bus in person.
Craigslist
Looked on Craigslist every day. I looked local then spread the search out to about a 4-5 hour drive. For Vegas that includes Southern Utah, Los Angeles, San Diego and Phoenix, AZ. From Craigslist I went and actually looked at a bunch of local buses.
Bus Dealers
Looked up Bus Dealers online. There are a bunch. I found one local called Las Vegas Bus Sales and drove over. This was a good chance (and my first chance) to really see a bunch of buses all at once. I recommend this if you have a reasonably local bus dealer. Its a great way to figure out what bus you want. There is no substitute for actually physically IRL climbing into buses and checking them out. For me, this was the first step from dreaming to actualizing my bus.
Auctions
I looked at the auction sites like govdeals and publicsurplus. There are also others. Lots of google searches for School bus for sale, school bus auction and more. There are more auction sites.
I read a lot of posts on skoolie.net. I found people here very helpful. Lots of people are kind enough to offer their valuable knowledge if you ask about a certain bus you are looking at. Real good people on this forum, some of the best of any forum I have been a part of.
I had some time constraints so I wanted something quickly (as in weeks or a month at most).
I did not have the time to wait for an auction to come up. You might have time to wait or might be lucky to have an auction near you and when you want to buy. If so this seems to be the way to get a bus at the lowest price. With an auction though, you only have a chance of winning. You also need to factor in the trip to inspect the bus and then getting it. I would love to have gone to auctions and tried to outbid the competition on that perfect bus I wanted. But, I did not have the time to do this. I also don't think that the buses are as cheap as they once were at auction. It makes sense that as this bus thing becomes more popular, the demand at auctions becomes greater and prices go up. Still, cheapest way to go from what little I have followed them.
I looked at private party buses. Some of these I really considered. Its not the most efficient way to bus shop, since you only see one at a time. I also found that private party pricing was ALL OVER the place. People had all kinds of notions of what the bus was worth. This was for original condition and partially or fully converted buses. Some people have too much sweat into it. I understand how that feels, but my sweat isnt always a value to someone else. Some people just dont want my sweat (if you can believe it)? Some people are trying to be amateur bus dealers. They bought at auction or a dealer and then trying to sell at a profit. I heard a million other stories why someone was selling the bus. If I found the right bus from a private party and was at right price I would have bought in a minute, Just never lined up right.
So, in my situation the most sense ended up being a bus dealer. Im a grown up. I did not go in with any delusions that the bus dealer has better buses than the auction. They are the same buses, he just maybe bought 12 of them instead of 1. I also have no illusion that there is any warranty or any other kind of warm and fuzzy false security in buying from a dealer ( unless of course in explicit written form). For me it came down to a point in time that I needed to get a bus and get started. Dealers have lots of buses and lots of choices. I get that I paid for this convenience. Out of all the ones I looked at I ended up in Phoenix, AZ at a place called AAA Bus Sales. Most of the bus dealers I spoke with were helpful but I found these guys above and beyond. Spoke with Tony and Joe. Good guys and they are into the skoolie thing for real. Anyway, I went down to Phoenix with my kid and a commitment to buy a bus on this trip. I looked at some other local dealers and then AAA. They spent a lot of time with me (over 2 days) and had a lot of buses to choose from. He had 4 of the one I got, so I could take my pick. All in all they made it a good experience. Was it the cheapest I could buy that bus? Probably not. If I had gotten lucky or had time to watch auctions and craigslist, I most certainly could have gotten something similar for less. But, with my timeframe I got 96% of the bus I wanted (wish it had high ceiling) and these guys made it a fun experience. That to me was worth every penny. BTW I paid around 7K for the bus. I recommend these guys if you are in the Phoenix area or can make it out there. Going to their shop is much better than talking on the phone. These are skoolie people.
If you are just starting out, go see some buses in person. Craigslist, Local Dealer and if your lucky local auction. But go look at a bunch, try to drive some, soak it up. Immerse yourself in buses online and IRL. Then it will start to come clear:
What bus YOU want
Where YOU should buy it
How much YOU should pay
Then get it and move forward.
* Some resources I used in my search
VIN search
I used this with a bunch of private party deals if they didnt know a lot about the bus I could look up stuff by VIN
https://www.gates.com/us/en/ymm/sear...A62038E64865AD
Blue Bird Manual
Once I decided on the type these manuals helped me look stuff up or answer my own questions. Still using them
Service Manuals for Blue Bird School Buses
|
|
|
|
|
07-11-2018, 05:12 AM
|
#38
|
|
Mini-Skoolie
Join Date: Jul 2018
Location: Palm City, FL
Posts: 38
Year: 2003
Coachwork: International
Chassis: RE3000
|
Wow, thanks for the awesome response man! I really appreciate it. Great info
Wife and I are def getting excited about taking on a bus conversion. Not sure why though, I think its because we would like to be able to travel around Florida/South East and maybe west a little. Also she enjoys the process of building stuff, and I love the fabrication side (whether or not either of us is good at our roles, thats debatable).
Working on researching manufactures/engines/transmissions and bodies. This will be simply for traveling around or letting guests stay with us. And we're talking maybe 4 trips a year. I always want to go as big as possible, but then again I tell myself it may not be necessary. That being said, I think going to a yard with multiple buses would be ideal and allow us to get a feel of what space we really need
So far, my wants are:
- Able to stand (I'm just 5'9", was heart broken when I learned I wasnt 5'11" a few years ago
- "Master" bed for wife and I
- Two bunks for our one child + future
- Private toilet, no shower or sink
- Table to eat at, maybe expandable
- Some counter space/sink/induction cooktop
- Sofa (I make seats/divans for VVIP aircraft, think Kings and Presidents) and could probably snag one of our divans that berths out into a full bed once we're done testing at $0.00, so thatd be cool)
- A patio on the roof welded up to put a mini split A/C, possibly w/ two zone wall units
- Solar? Not sure if necessary, but eventually could be nice. Would mostly be staying at places with hook ups, not much boondocking I dont think
- Something with under floor storage already built in to save me some work
[LIST]I'll build/find storage inside throughout. I plan on doing a lifting bed, for example, to be able to tilt up and have plenty of space for boxes
What bus gives me that? Noooooo idea. 
|
|
|
|
|
07-11-2018, 06:45 AM
|
#39
|
|
Skoolie
Join Date: Apr 2018
Location: GA
Posts: 129
Year: 1998
Coachwork: BlueBird
Chassis: TC2000 RE
Engine: 8.3 Cummins
Rated Cap: 78
|
Quote:
Originally Posted by fadderall
Cool Im going to check it out tomorrow. So did you just cut a piece of the existing long hose to loop it back or is there a smaller hose on other side under the bus?
|
I just used the hose and fittings that was already underneath.
|
|
|
|
|
07-11-2018, 08:14 AM
|
#40
|
|
Skoolie
Join Date: Feb 2018
Location: Chattanooga, TN
Posts: 233
Year: 2000
Coachwork: Amtran
Chassis: Genesis
Engine: DT466
Rated Cap: 84lug
|
Good job! Looking good.
|
|
|
|
|
|
 Posting Rules
|
You may not post new threads
You may not post replies
You may not post attachments
You may not edit your posts
HTML code is Off
|
|
|
|
 » Recent Threads
 |
|
|
|
|
|
|
|
|
|
|
|
|
|
|
|
|
|
|
|
|
|
|
|
|
|
|
|
|
|
|
|
|
|
|
|
|
|


 Linear Mode

