2014 Update. Time has come to say goodbye to skoolie living. Building a home out of a bus and drivin' around the Northwest has been interesting and not something we'll forget. We've learned a lot from the experience. The time to settle down is approaching, gears are shifting. We'll be selling Fran this year and taking one last road trip around the NW and SW of the USA via truck+travel trailer before settling down on the homestead. So this thread is now, well, complete.
Maybe one day, once the kids are all out on their own I'll get a shorty and build a nifty, cozy just for two skoolie for weekend trips. Until then, thank you to everyone for the great tips, advice and inspiration!
*wave* And have a great new year!
-------------------------------------------------------------------------------------
She's a 95 International diesel DT466.
30' (that's 8 windows, not counting driver) bumper to bumper. 105k miles. Manual, so I thought, but checked again and nope, it is automatic. Hydraulic, not air brakes.
21' interior space from back of driver seat to back door.
*update* I turned the drivers area into my personal office. Desk folds over the stairwell and an office chair sits next to the driver seat. I've a shelf of supplies, books, and electrical gadgets. Works great. The table can slide forward so people can just slide under it and out the door or they can go use the back door. Very cozy and productive little space.
Seems to run fine, but time will tell. I'm reading up on diesel engines, something I know zip about.
*update* She runs great minus that annoying sticking to the tranny in 2nd gear, somtimes 3rd. Due to a lot of rust in the brake drum it does run through pads faster. Had to replace the brake lines and now keep spares with us at all time, including fluid. She does beep whenever we climb high elevations too fast, like doing 2k up, but when we stop for ten minutes she can do another 1k without a hitch. Yet we can't find any sign inside the engine that she's actually over heating. *shrug*
*update*
We started out a custom green but went aluminium Resto since the green is the color of many prison buses, which draws a LOT of attention from cops in our experience.
Family picked the name Sinclair from dino family the TV series Dinosaurs and the fact the bugger is a fossil eater, the gas stations Sinclair, etc. I've found I refer to it as a she constantly so I've renamed her to Fran Sinclair.
Also, consider checking out horse water tanks (caddies) for whatever needs. They come in a huge variety of shapes and sizes, and for custom built buses, they might be what you need. I like the triangle type ones to fit into corners.
Thanks all Week to go for delivery. Been messing around with the Rustoleum paint. This is the color we're going to test out, though still need to add thinner and um, yeah tap out those dang air bubbles.
State patrol wants it meeting conversion req's pronto so we're going to paint one coat of this dark green mix, do the lights, sign, seats then set a date for SP to come and verify we meet requirements. Will go back and paint later when temps are a bit kinder to the drying process, but before the huge trees around the house start dropping 100 layers of pollen.
On thinner... any suggestions on ratio? I've a quart of mineral spirits on hand.
Also started shopping for flooring-insulation materials. Anyone have suggestions on what to use to rip up the floor? I've a heavy duty ice pick thing. No crow bar. Have angle cutter, jigsaws, and might pick up a sawsall. . . .
There have been a number of ways mentioned to rip up flooring here. A circular saw will be more useful than a jigsaw or sawzall. A sawzall may pierce through and cut the metal sub-floor along with the wood. A jigsaw generally does not work where the end of the blade is not through the material. Jigsaws are not made to pierce 'blindly' into materials like a sawzall.
What you do with a circular saw is score the wood with multiple cuts almost all the way through so It looks like a Hershey Bar. Do this by setting the blade to stick out below its guide less than the thickness of the wood. For example, if you have plywood that is 3/4" thick, set the blade to about 5/8", so the blade is always 1/8" above the metal sub-floor. Then score the lines in the floor so you can snap out workable-sized pieces. For example, by making cuts 2 feet apart, a 4' x 8' piece of plywood would be marked into eight 2' x 2' squares. Then just snap out the smaller pieces with your bar, if they will come up intact.
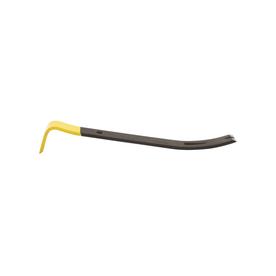
When you mention "crow bar," that can be a pretty generic term for all forms of pry bars. I would call this "ripping bar" a crow bar:
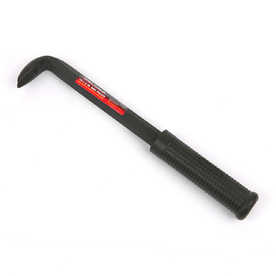
The long length gives good leverage, but in my experience it is often hard to get a 'purchase' on the object to be pried with this type of bar. The sturdy point is often too thick to start a crack to wedge itself into. If I could only keep one bar, it is what I would call a "flat bar," also known as a pry bar:
It is easier to get the ends under things that need to move, and either end can be 'encouraged' to go where it needs to by persuasion from a good heavy hammer. The other bar can be hammered, too; but this flat surface gives a better hammer target, and the lighter weight transfers more force to the object to be moved than getting a heavy bar into motion. These cost under $6 new, probably a fraction of that at a garage sale. Get one. Even if you get a ripping bar, you may find yourself using a flat bar to "get the foot in the door" by making an opening for the big bar to work with.
The last thing that will help with carpentry is a "cat's paw." This is for pulling up nails whose heads are sunk into wood. You put the points next to the head of the nail to be removed, hammer it into the wood under the head, and then rotate the handle back to pull the head up to a point where a flat bar or claw hammer can finish the job. It's a single-purpose tool, but when you need it there is nothing like it. You probably won't need it at all pulling up the floor, but might put one to use if you find yourself changing plans after partially constructing the interior:
By the way, congratulations on pulling the trigger on Ms. Sinclair. I will look forward to the pictures.
__________________
Someone said "Making good decisions comes from experience, experience comes from bad decisions." I say there are three kinds of people: those who learn from their mistakes, those who learn from the mistakes of others, and those who never learn.
I found this tool in addition to a 3lb short sledge hammer to be very useful:
I left my plywood whole and hammered that chisel under the board until I had some good tension on the wood, then I shoved one of these 5ft pry bars in there (see below) and pry up a corner, then wedge somthing in that space to maintain tension and continue prying elsewhere, more wedging, and ultimately popped the whole board up in one shot:
Okay, you need to have a fair amount of strength for this technique, and you need to be careful not to throw out your back or something like that, and I did splinter a few sheets of plywood, but overall I felt that this method worked pretty well. Afterwards I pulled out the remaining nails with the first crow bar that Redbear shows in his post above.
UPDATE
Talked with my mech and the dealership's mech. Seems the line popped and drained out some oil (8 of 30qts) which kicked in an "automatic engine shutdown" Now not sure what that is but the mechs say the engine is computerized to shut down when oil reaches a certain low point. They fixed that up, put in some nicer hoses, etc.
Decided to take a trip down again to check things out. Any tips on what to look for are welcomed
While there I'll be checking out the other buses as well, in case this one seems to have more trouble than they're leading on. With any luck I'll be brining home a functional bus this week. Running out of time.
Did pick up the pry bar. Thanks for the info on those
If that were me I would RUN from that as fast as I could, and find another bus.
__________________
The sun is the same, in a relative way, but you're older; shorter of breath, and one day closer to death.
Pink Floyd - Dark Side of the Moon
It has been a long arse week. I decided to head down to IL to Midwest Transit and I wasn't leaving until I had a bus. For this family (some disabled folks) that meant eight hours there. By time we got there we were tired, cranky and hungry. We checked out the original bus we're after then decided to get a hotel and come back in the morn, see a other buses, check that one out a bit more, etc. There are a LOT of buses there, but frankly they seemed in worse shape than the first one. I was stopping mechanics left and right asking questions. Sometimes it sucks to be so mechanic-ignorant.
Okay so after some debating I decided to go with the original bus. Had them replace some parts that looked worn. Drove the bugger around, inspected her repeatedly, and still failed to notice a few booboos. Hopefully those won't cost me a fortune to fix.
Booboos found after bought and paid for, left the lot: Engine temp gage stopped working or maybe it wasn't and I never noticed it. *hangs head* Battery gage did great but that night it showed near dead all the time and YUP... we had to jump start the batteries each time we stopped for fuel. *bangs head on wall* ABS light came on about 2 hours out from home. Oh, and one low beam doesn't work.
Things I noticed but decided to accept anyhow: Some rust here and there. See pics. Letting the engine downshift to first from second a bit hard (automatic, not manual). Two mechanics said its good to go, just old so shifts hard. O.O hmm. Doesn't miss the gear, and does always go into gear. Two front tires are going bald.
The engine is pretty clean, minus some older parts and rust. Took 10hours spread over two days to get home, took our time. Engine ran GREAT. No smoking, no clanks, clicks, oil eating, etc. All fluids stayed at perfect lvls, no signs of leaks. There are a couple small wet spots on the engines, will have to get pics to show since I don't know what engine parts those are.
She steers Great, though I'm sure somewhere down the line she'll need work since the assembly is rusty. She drives straight, is aligned nicely.
Brakes seem fine, not soft, no squish, not hard, no sticking or gripping. Brakes well.
Engine vapor (from oil cap thingy--technical eh?) is slight but clean and easy to see through once really heated up (3 hour run). Filters look clean. Had oil changed before leaving and it's still pretty clean and new looking.
She goes 65 and no faster. Fine by me. Moves well and without a hiccup on the interstate.
All I can think of at moment. Long week. I need coffee, rest, and a fresh look at what the hell I've gotten us into Just waiting for the management company of this property to come yelling about a bus park here.
A few more shots, think these show the rust. There are a few rivets (5?) scattered around that appear to be rusting out. One on outside that seems to be giving a slow leak on wall below window inside. Other than that, no leaks that we found during our rainy return home.
.. hey .. you got a free kid on your hood .. pretty kewl ..
... edit .. btw .. looks/reads like you already have started your project and your education on YOUR skewlie .. very kewl Seera .. now go knock 'em dead and make her the envy of us all ..
__________________
Chance favors the prepared mind. - L Pasteur
Luck is the residue of good planning. - B. Rickey
Travel is fatal to prejudice, bigotry, and narrow-mindedness ... - M. Twain
Congratulations on finally getting your bus! I think your most expensive repair will be buying the new front tires. That is assuming the transmission is okay. You will definitely want to get the temp gauge fixed though. The DT466 has a tendency to overheat so you need to watch it. Your battery may be dead, but then again your alternator may also be dead. Try charging the battery with a battery charger and see if it takes a charge. If so, I would suspect the alternator. A new alternator is fairly cheap for the DT466, I just got one for...can't remember...it's in my thread somewhere recent.
Thanks Dan
We have a chance to paint in good conditions Tuesday so are working fast to get rust, lettering and other tidbits done in order to paint. Having bit of trouble getting that dang stopsign arm off.
Regarding the gauge cluster. The entire cluster almost always goes bad on those Internationals. Do all the other gauges work ok? You might just have a couple isolated problems. (Alternator, bad temp sensor etc..)
Just the temp gauge.
We've managed to get her scrubbed, leaks plugged, de-rusted, primed, and everything required off minus the flashing lights. Wisconsin is a bit strick on those dang lights. Figure work on them today and set her up to paint tomorrow, granting the weather continues to hold. Then just have to wait for the state patrol to get here to approve her as a RV or truck (haven't decided yet). Last time I called about the topic they said it could be a week before they showed up Figure that will give me time to get more inside demo done
Once we get her lincesed (looking for 20th or so) I'll get started on the tires, that darn battery prob and the temp guage.
Anyone have suggestions for removing these buggers?
It's hard to tell what surface those are attached to. Is there a nut backing up those bolts, or are they lag bolts? If it's on a horizontal surface, I'd use penetrating fluid and an impact wrench or a breaker bar with an extension bar. You could just use an angle grinder of course, but I suspect you would have to cut each bolt twice: once to get the head off and remove the plate underneath, and then again to eliminate the protruding shaft of the bolt.
Work progressed on Fran today-- lots of seam filling, holes plugged, rust removed and taping up precious parts of her body in prep to give her a foundation layer ....


 Linear Mode


