Yeah! So Awesome, I have the same bus! Well, mine is a little older, 1994 Vista 3600, and with the DT 408 rather than the 466 but other then that very similar!
Had to comment seeing another of the same, it's such a strange body style that you don't see it very often.
I'm very interested to see what you're going to do with the gauges, my water temp is the only one of mine that is not working, after replacing the thermostat its still not back so I'm looking into the sending unit, gauge and panel now.
Excited to see what happens to your bus! if you wanna see mine just look at my Instagram, ScottC.C , I have to get around to posting on here more often!
So this is the first part of removing some non-used wires and components from the panel. So far, it still cranks and runs!
I had a Gatekeeper system with the cameras still in and all cables still left, but the DVR itself was removed as was whatever is supposed to be in the black security box in the front overhead panel. That sucker is hard to remove, still not got a single bolt out.
Anyways, the panel! I still have the 7000 series flasher unit in the panel, that's getting removed tomorrow. I removed the solenoid for the caution/warning lights (that activates the 7000). Decent amount of space freed up with that.
Second on the list was the security system wires. Many of them were cut off nearly completely, leaving only the ground remaining and attached. Five of these were a simply disconnect from the fuse bar, one was cut. The cut one was for the LED signals indicating if the ambers or reds are on.
I traced the GPS and cellular receiver to the roof, but had to pull the cables out the opposite way. I'm waiting until tomorrow to remove these units on the roof and seal up the holes.
I removed 37 feet of cables, and this is just from the drivers area to the outside fuse box. About 5 feet of each of the 5 cables I removed was just zip tied to remove slack, and stuffed into the plastic housing very badly. I have no clue how this system worked that long.
Installing Rear View Camera
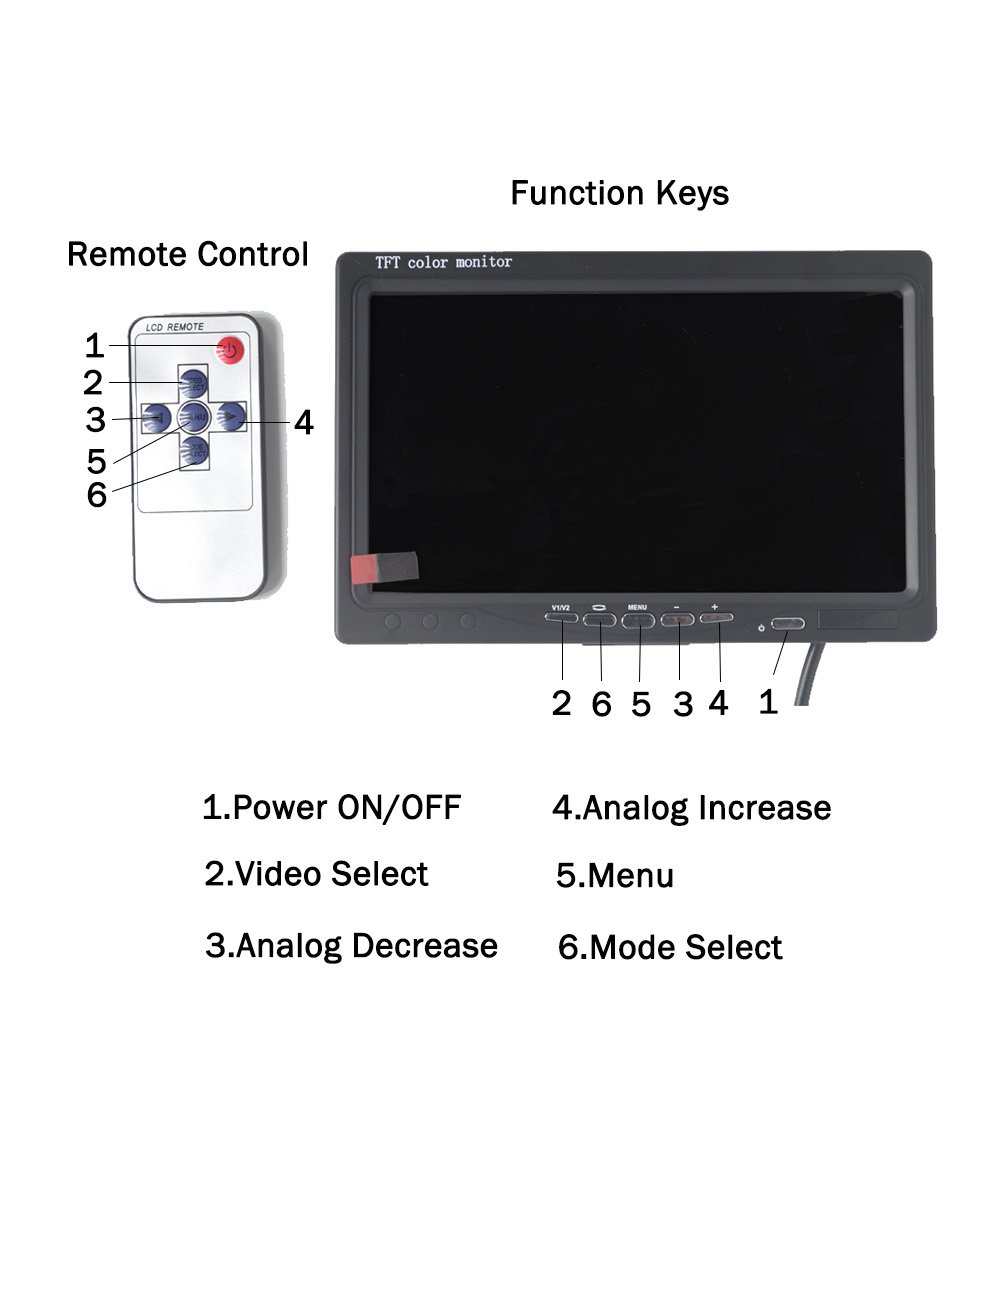
I set up a basic rear view camera system just to see how I'm going to mount everything. Wired it into the 12v on/accessory so the camera and monitor are powered whenever the bus is on.
I purchased the following items on amazon, pretty sure I'm going to end up keeping the equipment despite it being quite cheap and very off brand.
And some BNC to RCA adapters and a 50' cable for reaching the back of the bus from the front where the monitor is. Any BNC+Power 12v cable will do, just make sure you get a suitable length. I don't want 25' of slack, and going to end up getting a shorter cable for the rear cameras, and much shorter for the ones closer to the front.
The rear camera was placed right above the rear exit door, and I tested both near straight down positions and ~35 degrees. I'm going to end up getting a second camera for the rear - the first to view down to the bumper for backing up, and 35 degree one to view traffic behind me that my mirrors may not be able to see.
I'll have images up tomorrow, it's got far too dark already and I don't have much in terms of external lights.
Cool idea on 2 cameras! always seems like you need to see up high and down low both.. I just wish there was a solution for keeping things clean on the back of a bus.. maybe one of those spoilers.. the dirt on the windows alone esp in winter on the back windows is crap.. not to men tion what a camera lense would look like..
Cool idea on 2 cameras! always seems like you need to see up high and down low both.. I just wish there was a solution for keeping things clean on the back of a bus.. maybe one of those spoilers.. the dirt on the windows alone esp in winter on the back windows is crap.. not to men tion what a camera lense would look like..
EC - those are still too new to be showing up in the scrap-yards.. well at least the adoption rate of them is slow so I havent seen them anywhere except brand new thus far and they arent cheap.. they are made by 'SEE II' I dont know if anyone else makes them or not.. from people that have them in the bus driver groups I talk with, they apparently work pretty well for helping to keep the backl of the bus cleaner..
Got the flooring done, and quite a few other small items. The drivers side electrical rail above the windows was removed, and the security camera wiring has been completely gutted. The wiring panel had some work done to it, mostly making some room by removing the solenoid for the flasher system.
Next is to convert the eight signal lamps to turn signals / brake lights, and the two forwards red lights turned into spotlights (for when parked, never driving).
Got 1.3mm self adhesive vinyl planks to lay down, going to lay down 60 square feet (got it for $20 at lumber liquidators, so worst case I just pull up). If these work for the next week or so, I'll finish it in the same flooring. If anything in the slightest goes wrong, I'm going with Armstrong 12"x12" or 18"x18" commercial vinyl tile, the kind you see in hospitals and schools.
We also purchased that monitor from Amazon. Ours started behaving poorly after about 7 times plugging in the unit. I was wondering if you had any problems with it.
We also purchased that monitor from Amazon. Ours started behaving poorly after about 7 times plugging in the unit. I was wondering if you had any problems with it.
They are very hit and miss units, which is why I order from amazon for easy return. I've been using one for a few years as a camera viewer and it's never failed, I bought one to use as a multicopter fpv display and it went dead the first day.
It's certainly not permanent, just a drop in for the time being. I'd not recommend it for displaying anything that is critical.
I have 3 of them on my 28 foot step van, rear view and one down each side. Don't know if it's the monitors or the cameras but after about 4 years or so they seem to have become almost foggy. I figured, being exposed to the Texas heat and sun, and that they didn't really cost that much that they were really worth it. Mostly use them at night time anyways.
The fading in these are likely the cheap quality of parts, in this case the backlight.
I would not recommend the use of the camera linked above nor the screen for full time use in a skoolie as I have it mounted (put it in a flush mount panel for best results). This camera has been remounted a few times, and I'm using only a single camera straight wired to the LCD for finding suitable mounting points. So far it hasn't been very helpful during driving since it bounces too much.
Once I get the camera locations scouted, I'll be installing essentially a 12v DVR alongside a CBAT enabled security system using the same cellular connection. Cameras will be at least 1080p, the ones above claim 720p although I'm doubtful - but it has a somewhat standard FOV which is why it's being used. I'll also be using dome cameras that have the ability to lock into their position with screws/bolts.
The camera I linked isn't water resistant (despite it's claims, it's simply not), and it is not secure. Whenever the engine is running, the camera bounces so much in its housing that I not only get lines on the monitor matching the RPM/vibrations of the engine, but over the course of an hour drive it tilted down around 10 degrees. There is no mechanism to "lock" the camera dome in it's position, it's just friction from the plastic housing.
Got the flooring finished, but I'm gonna have to pull it up as it was cheap self stick vinyl plank, 1.3mm. But - only out $30 from lumber liquidators, and still have about 50 square feet left.
The good thing is that it comes up easily (often on its own!) and I already have latex painted on top of the wood and plenty to spare, so a couple of new coats and I can lay down much more suitable flooring.
For the time being, it'll stay down. Makes it look nice, even if it is peeling.
Also put down Armstrong vinyl tile in the front section where people get on/off, which will have a lot of turning with shoes and scuffs. So far, it's great.
Removed the dash panel that was giving me issues, resoldered all the connectors. Works perfectly now, except somehow I disabled a few of the backlights. I can't drive at night (or rather, don't like to) so not much harm. Going to install LED backlights at a later date anyways.
Pulled the light monitor out only to discover it is not a "smart" unit - just straight wired to the LED"s with some fuses.
Got a radio unit installed right below the light monitor, but not hooked up yet. Looks nice though.
We are doing ours with Alure ISO Core ... not sure if it will hold up. We have only put down the first 8 feet or so to act as our cab area. We'll use it a little like that and see how well it performs.
Leave the access to your fuel tank sending unit if that's something you care about.
Yep, that's the little door with brass hinges and locks on it.
Speaking of fuel senders, I actually did go ahead and make a cutout for the insulation and plywood (and crappy floor) so it can be opened anytime. However, I also ordered a new fuel sender, and started cleaning the old one off. I went hard on it, why not - I was replacing it anyways.
Well the darn thing works perfect. Gonna hold off for now for replacing it, and nice to know I have a spare on board.
As for today, just got the new dash panel with all the gauges I wanted. Not sure if I'm going to swap them out right yet (I will function test), but I like having spare parts just in case something happens down the road.
We are doing ours with Alure ISO Core ... not sure if it will hold up. We have only put down the first 8 feet or so to act as our cab area. We'll use it a little like that and see how well it performs.
It should work at least better than mine, which peels every day.
However, my crappy floor is 1.3mm with a 2 mil wear layer, 80 square feet for just over $30. Not the bottom of the barrel, this is the gunk up under the barrel.
The one you linked is a 6.5mm which if nothing else should be much more durable and honestly an actual brand. Not sure what the ones I bought were, but at that price I'm not sure they even could be a major brand name.
So far, our only real concern is that the planks are very picky as to their installation. There are a couple of places where the ends just will not come together. It is lucky for us that they are not in a place that really matters. It is all one big experiment afterall.
Got a radio installed along with speakers. Works pretty well when running, as much as can be expected with 5" speakers.
Also got a tool/material holder made in the back. Have to make something to secure the plywood and other 4'x8' sheets from sliding forwards, but otherwise seems to work quite well on my short test drive.
Also got a nice amazon delivery. Horn switch, usb/voltmeter that fits into a switch slot, 5 12v spdt relays, and a spst key switch. Plus a fusebox since I'm running out of spare locations in the electrical panel.


 Linear Mode


