 |
|
 08-25-2018, 03:25 PM
|
#101
|
|
Skoolie
Join Date: Aug 2017
Location: Kingston, WA
Posts: 111
Year: 1995
Coachwork: Thomas
Chassis: MVP
Engine: 8.3L Cummins Turbo
|
Quote:
Originally Posted by synestine

Nicely done!
I'm about to start this part of the project myself and it helps seeing how others have done it. I was also thinking about doing a "floating floor" like you have.
Any concerns building walls over this floor? Do you anticipate any settling or shifting as the insulation compresses?
|
So, when I lay out the walls, before I lay the floor, I'm going to put a row of #10 screws under each wall, about 6-8" apart. This should prevent any compression due to the weight of the walls. I haven't decided whether I also need this under the edges of all the cabinets..
All in all, I don't expect any issues, the screws are "just in case"...
|

|

|
|
08-25-2018, 03:42 PM
|
#102
|
|
Bus Geek
Join Date: Dec 2017
Location: Dawsonville, Ga.
Posts: 10,482
Year: 1999
Coachwork: Genesis
Chassis: International
Engine: DT466/3060
Rated Cap: 77
|
Quote:
Originally Posted by synestine
Nicely done!
I'm about to start this part of the project myself and it helps seeing how others have done it. I was also thinking about doing a "floating floor" like you have.
Any concerns building walls over this floor? Do you anticipate any settling or shifting as the insulation compresses?
|
I think insulation compression is a non issue. Rigid foam has between 15-100PSI compression strength. 15psi over a square foot would exceed a ton (2160). A wall 3.5" wide and 36" long would need more than 1890psi to compress the insulation. These numbers are adding weight directly to the insulation. If you add a plywood subfloor and then a finished floor, compression is compounded to non existent.
|
|
|
|
|
08-25-2018, 04:02 PM
|
#103
|
|
Bus Geek
Join Date: May 2016
Location: Eastern WA
Posts: 6,401
Year: 2002
Coachwork: Bluebird
Chassis: All American RE (A3RE)
Engine: Cummins ISC (8.3)
Rated Cap: 72
|
I have seen mention of placing flooring directly on the foam insulation a number of threads.
When I read the discussion it sounds reasonable but I am reluctant.
I have three residential shower pans (that I can recall) that were constructed of fiberglass or ABS over a foam base. On all of them, the foam compressed under the spot where I stood to shower. I weigh a bit over 140#. I have been as heavy as 190#. I don't think that my weight was the issue.
Is there anyone here that did flooring directly over foam and lived with it for a while?
What has your experience been?
|
|
|
|
|
08-26-2018, 01:59 AM
|
#104
|
|
Almost There
Join Date: Aug 2017
Location: Salt Lake City, UT
Posts: 74
Year: 1999
Coachwork: Blue Bird
Chassis: TC2000 (3904 RE)
Engine: Cummins 8.3TA
Rated Cap: 84
|
Quote:
Originally Posted by o1marc
I think insulation compression is a non issue. Rigid foam has between 15-100PSI compression strength. 15psi over a square foot would exceed a ton (2160). A wall 3.5" wide and 36" long would need more than 1890psi to compress the insulation. These numbers are adding weight directly to the insulation. If you add a plywood subfloor and then a finished floor, compression is compounded to non existent.
|
I'm not so sure, especially when time and repetitive motion (primarily shaking) are involved. I understand the numbers and the theory, but I also understand the difference between theory and practice. I plan on using my bus for a very long time, and would like to avoid costly repairs down the road. I'm new to bus building but have enough experience with other projects to understand that there are details you need to get right. I'd hate to have it settle and begins to wobble, possibly breaking pipes and wires.
I mean thanks for your input.
|
|
|
|
|
08-26-2018, 08:17 AM
|
#105
|
|
Bus Geek
Join Date: Nov 2016
Posts: 2,775
|
As long as the topmost layer is tough (resists punctures) and rigid (spreads loads over the underlying foam) should be no problem for many years.
Design for a bit of compression settling.
But eventually over decades, foam does break down and crumble.
|
|
|
|
|
09-23-2018, 11:06 AM
|
#106
|
|
Skoolie
Join Date: Aug 2017
Location: Kingston, WA
Posts: 111
Year: 1995
Coachwork: Thomas
Chassis: MVP
Engine: 8.3L Cummins Turbo
|
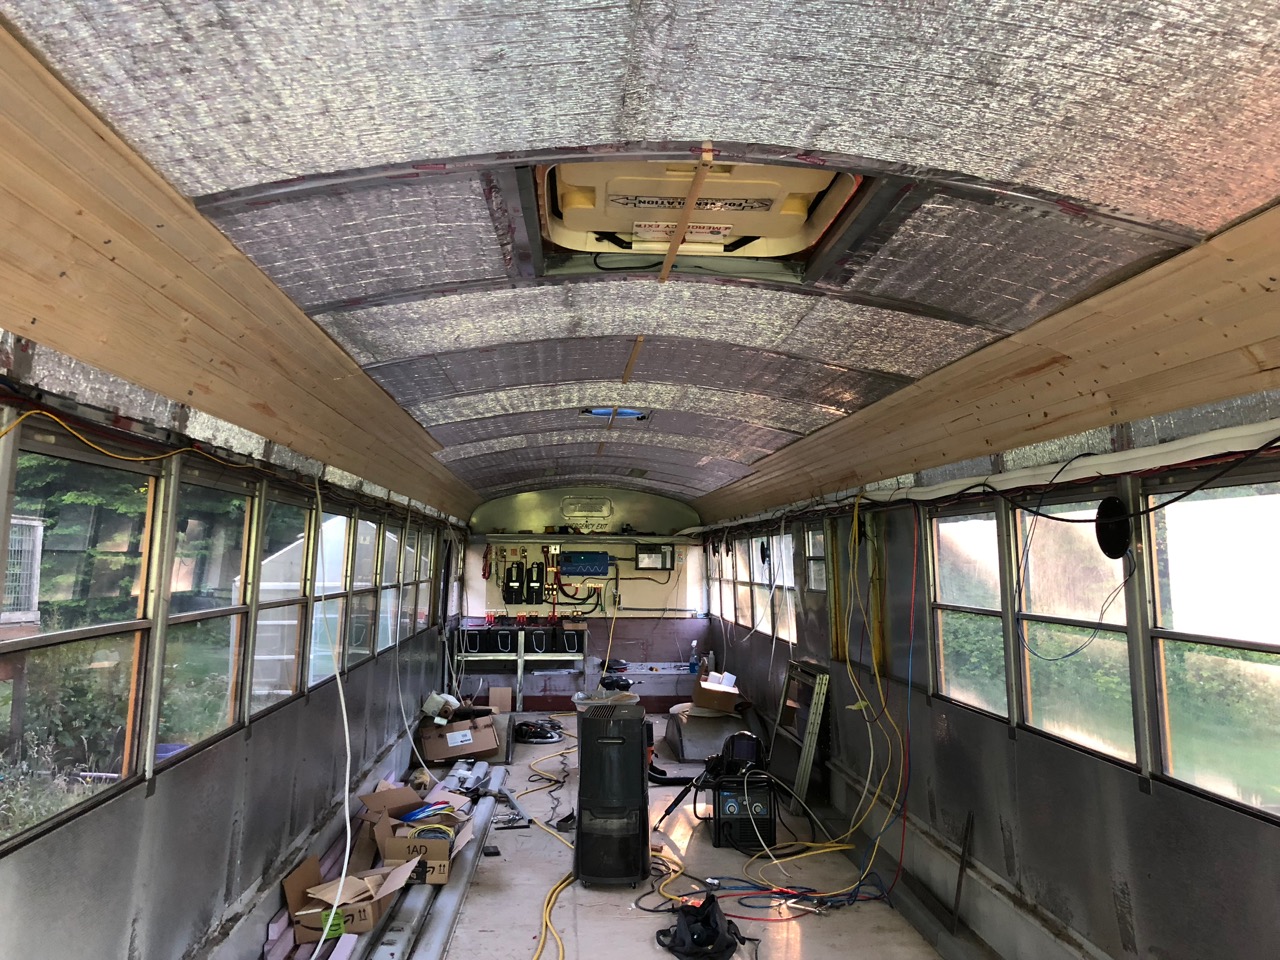
Walls
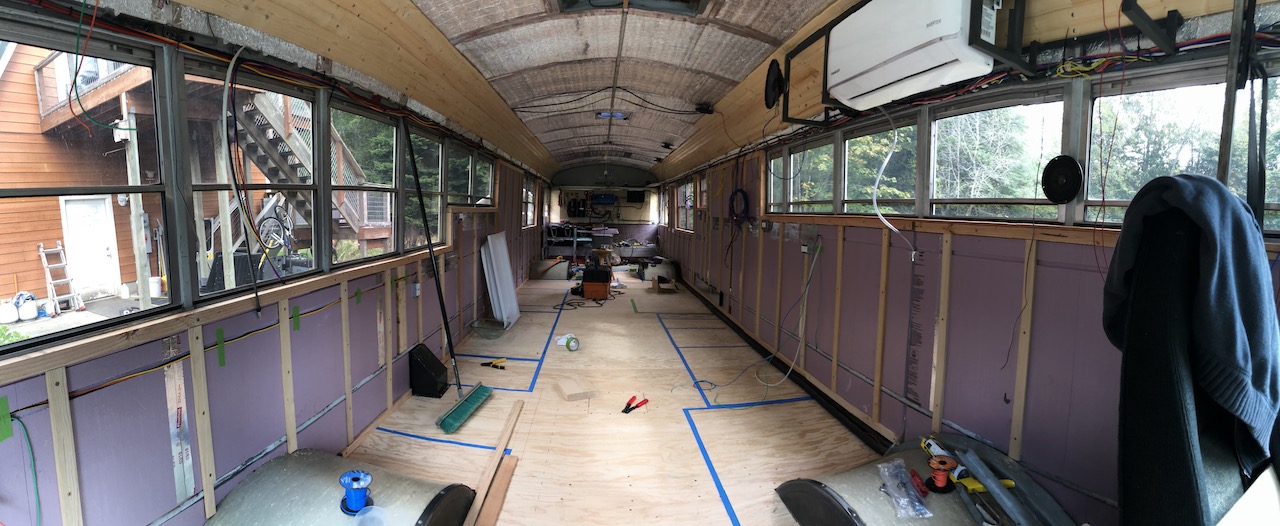
Lots happening here:
- 1" foam glued to the inner metal skin of the bus
- Upper and lower 2x2s screwed to the frame and skin to support the wall panels (1/4" plywood).
- 1/2 x 1-3/4 wood lathing every 16" to glue/nail the wall panels to.
- 2x4 screwed to wall to support dinette table (passenger side, middle)
- Wiring Chanels - routed 3/4 x 1/2" channels in the foam to provide for wiring.
- 120V wiring covered with sheet metal taped in place to prevent errant nail/screw issues.
- Duct embedded in the driver side wall (near back) to support air recirculation / filtering system. This draws air from the bedroom, filters it and sends it to the front of the bus.. or vice versa.. 
I've got almost all the wiring done now so I can finish the ceiling and then I can build the interior walls for the Shower and the rear wall.
I'm planning on installing the vinyl plank flooring under the cabinets.. mostly to hold it down when traveling.
|
|
|
|
|
01-12-2019, 10:53 PM
|
#107
|
|
Skoolie
Join Date: Aug 2017
Location: Kingston, WA
Posts: 111
Year: 1995
Coachwork: Thomas
Chassis: MVP
Engine: 8.3L Cummins Turbo
|
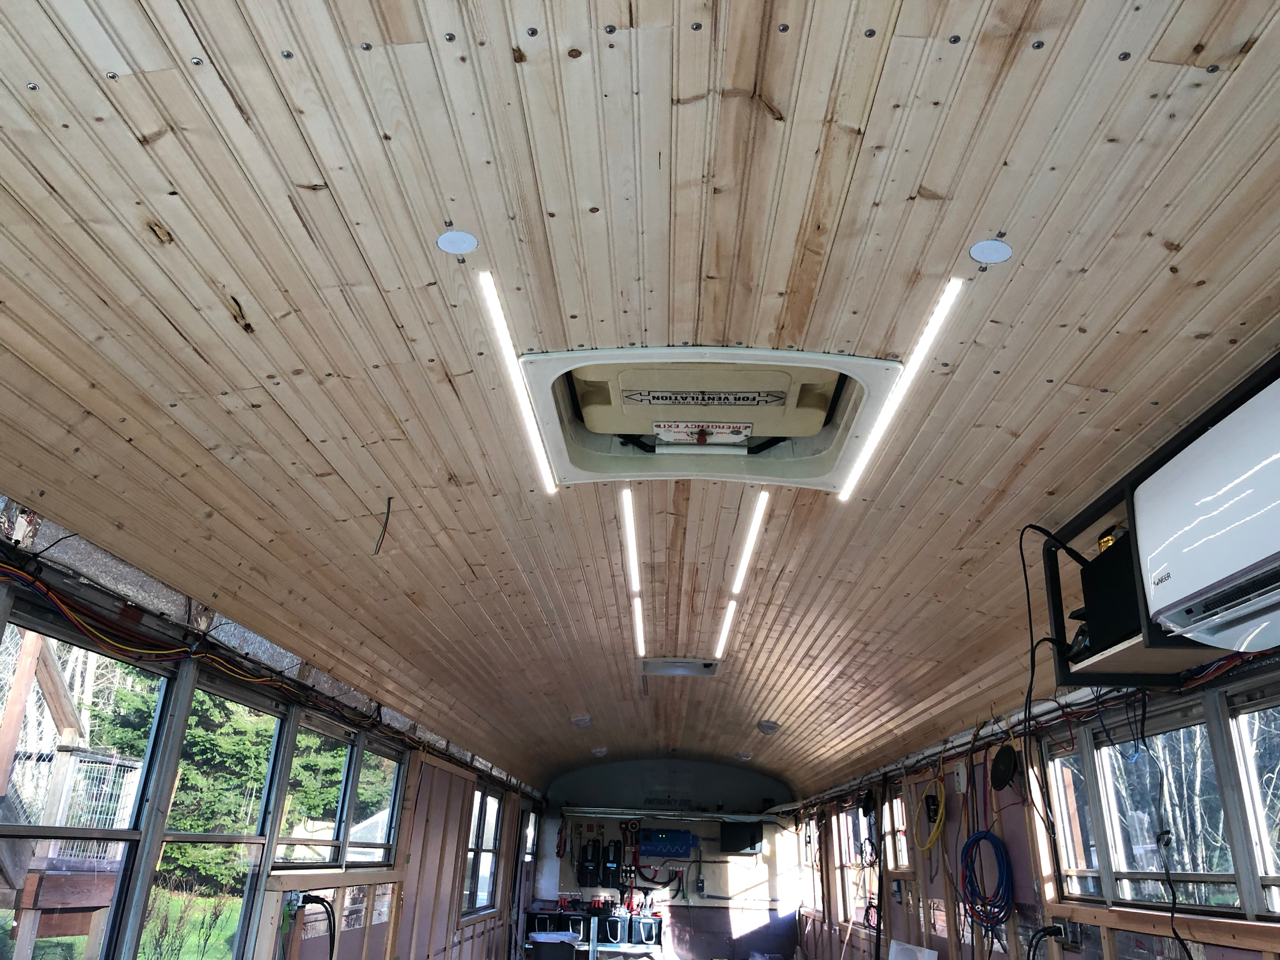
Ceiling Done!
Ceiling is done, including embedded HomeKit controlled LED Strip lights and other LED Lights (manual control)...
Ceiling is knotty pine tongue and groove "bead board planks". each plank is 3-1/2" wide and planks are installed in rib-sized offset pattern.
I squirted some clear calk into the groove of each plank about every 6 inches to prevent any rattles.
a single screw is installed at the rib locations of each plank. This allows for free expansion without splitting.
Planks were installed from the outside-in with the final strip at the center custom cut to variable width for each segment depending on the available space (which was not consistent).
Now on to the walls.
|
|
|
|
|
01-13-2019, 08:11 AM
|
#108
|
|
Bus Crazy
Join Date: May 2016
Location: Grayson County, VA
Posts: 1,428
Year: 1996
Coachwork: Amtran
Chassis: International
Engine: DT466
Rated Cap: 65
|
That ceiling turned out great! Looks like it was a lot of work, but it sure paid off.
|
|
|
|
|
01-13-2019, 06:31 PM
|
#109
|
|
Bus Geek
Join Date: Nov 2016
Posts: 2,775
|
gorgeous
morecharacters
|
|
|
|
|
01-14-2019, 10:06 AM
|
#110
|
|
Bus Geek
Join Date: May 2016
Location: Eastern WA
Posts: 6,401
Year: 2002
Coachwork: Bluebird
Chassis: All American RE (A3RE)
Engine: Cummins ISC (8.3)
Rated Cap: 72
|
Looking awesome!!
Can you tell us more about the material and where you found it?
Thanks.
|
|
|
|
|
01-14-2019, 05:09 PM
|
#112
|
|
Bus Geek
Join Date: May 2016
Location: Eastern WA
Posts: 6,401
Year: 2002
Coachwork: Bluebird
Chassis: All American RE (A3RE)
Engine: Cummins ISC (8.3)
Rated Cap: 72
|
Quote:
Originally Posted by nanoplane
|
Thank you!!
That is one of the best looking ceilings I have seen so far.
I am likely to borrow your method & material.
|
|
|
|
|
01-15-2019, 10:44 AM
|
#113
|
|
Skoolie
Join Date: Aug 2017
Location: Kingston, WA
Posts: 111
Year: 1995
Coachwork: Thomas
Chassis: MVP
Engine: 8.3L Cummins Turbo
|
Ceiling
Some additional notes:
- I think if I had to do it over, I would start with the "special" piece in the middle (tongues on both sides) and work out from the center of the ceiling down.. the hard part is figuring out how big that center piece should be to not wind up with tiny chunks at the bottom.
- Installing the strip lights required some thought.. I cut out a 1" part of the groove side of the plank to fit the lighting strips, then cut back the rear of each end of that slot to allow for the wires. I then glued small pieces of sheet metal (2" x 3") to the back side of the plank at the center and near each end of the cutout to give me a place to screw the clips that hold the aluminum channel that holds the lighting strip. This metal also extends slightly beyond the edge of the plank to act as additional support for the next plank (since there isn't a tongue and groove match any more where the light strip is.. An alternative would have been to cut the slot in the middle of the plank, but I figured that might weaken the plank too much.
- Even though I was using self drilling screws, I found it easier to pre-drill for each screw location.
|
|
|
|
|
01-16-2019, 11:32 AM
|
#114
|
|
Skoolie
Join Date: Jul 2018
Location: Just south of Dallas.
Posts: 172
Year: 1999
Coachwork: Thomas
Chassis: 40' MVP-ER
Engine: Cat 3126
|
Amazing Bus. Congrats! I'm sure jelly of your solar!!! 
|
|
|
|
|
01-17-2019, 05:42 PM
|
#115
|
|
Skoolie
Join Date: Aug 2017
Location: Kingston, WA
Posts: 111
Year: 1995
Coachwork: Thomas
Chassis: MVP
Engine: 8.3L Cummins Turbo
|
Quote:
Originally Posted by shaymcquaid
Amazing Bus. Congrats! I'm sure jelly of your solar!!! |
Thanks, It's a bit of work..
|
|
|
|
|
01-25-2019, 07:11 PM
|
#116
|
|
Skoolie
Join Date: Aug 2017
Location: Kingston, WA
Posts: 111
Year: 1995
Coachwork: Thomas
Chassis: MVP
Engine: 8.3L Cummins Turbo
|
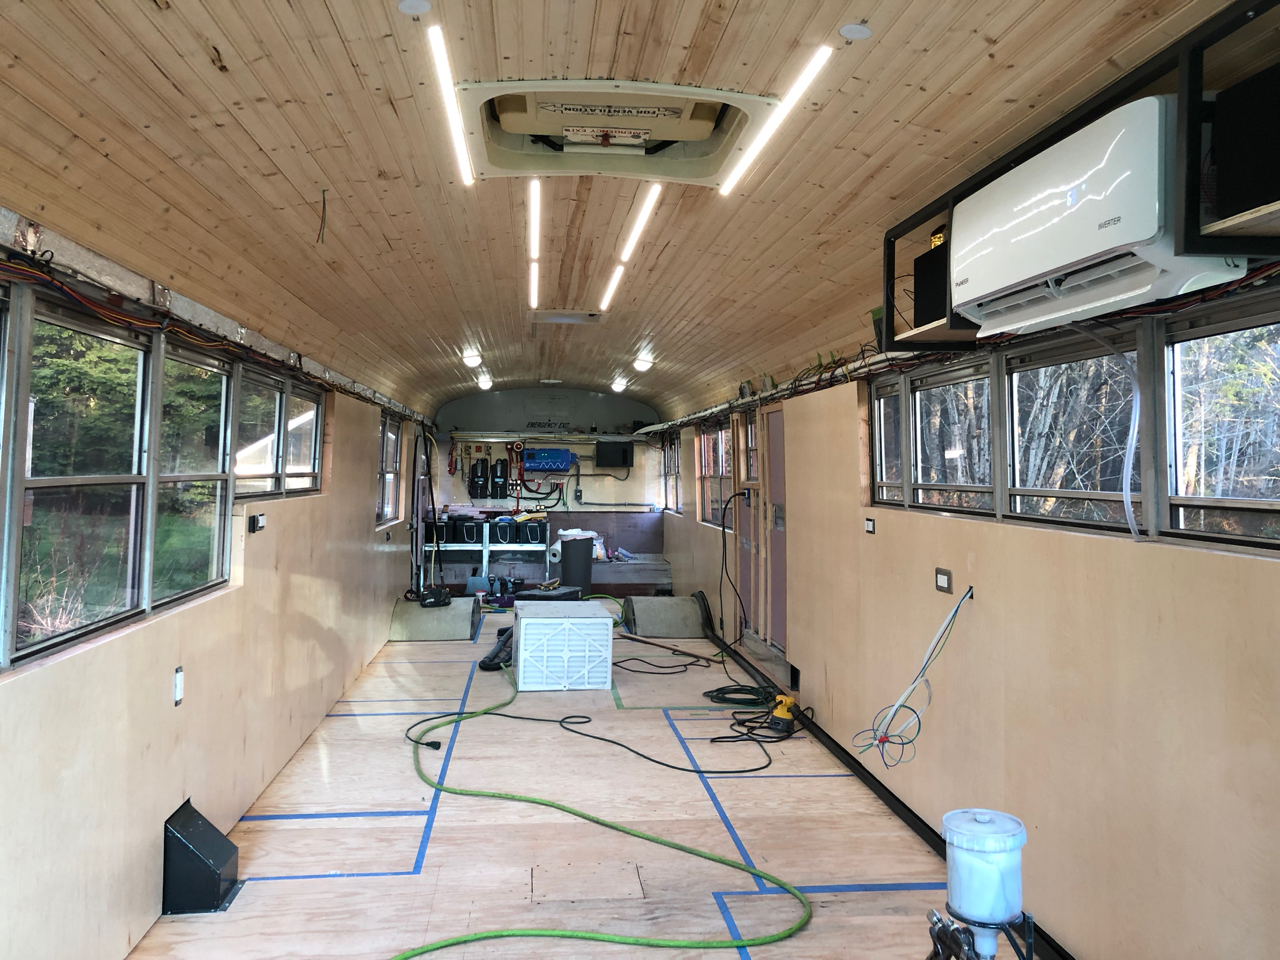
Inside wall panels
Panels (1/4" birch plywood) are done for the inside walls. Nailed to the slats and studs using 3/4" brad nails. Then everything masked and the panels sprayed with water based satin polyurethane (General Finishes High Performance Water Based finish). I really like this poly since it's extremely stable over time and doesn't really separate, even after a year or so.
|
|
|
|
|
01-29-2019, 02:54 PM
|
#117
|
|
Skoolie
Join Date: Aug 2017
Location: Kingston, WA
Posts: 111
Year: 1995
Coachwork: Thomas
Chassis: MVP
Engine: 8.3L Cummins Turbo
|
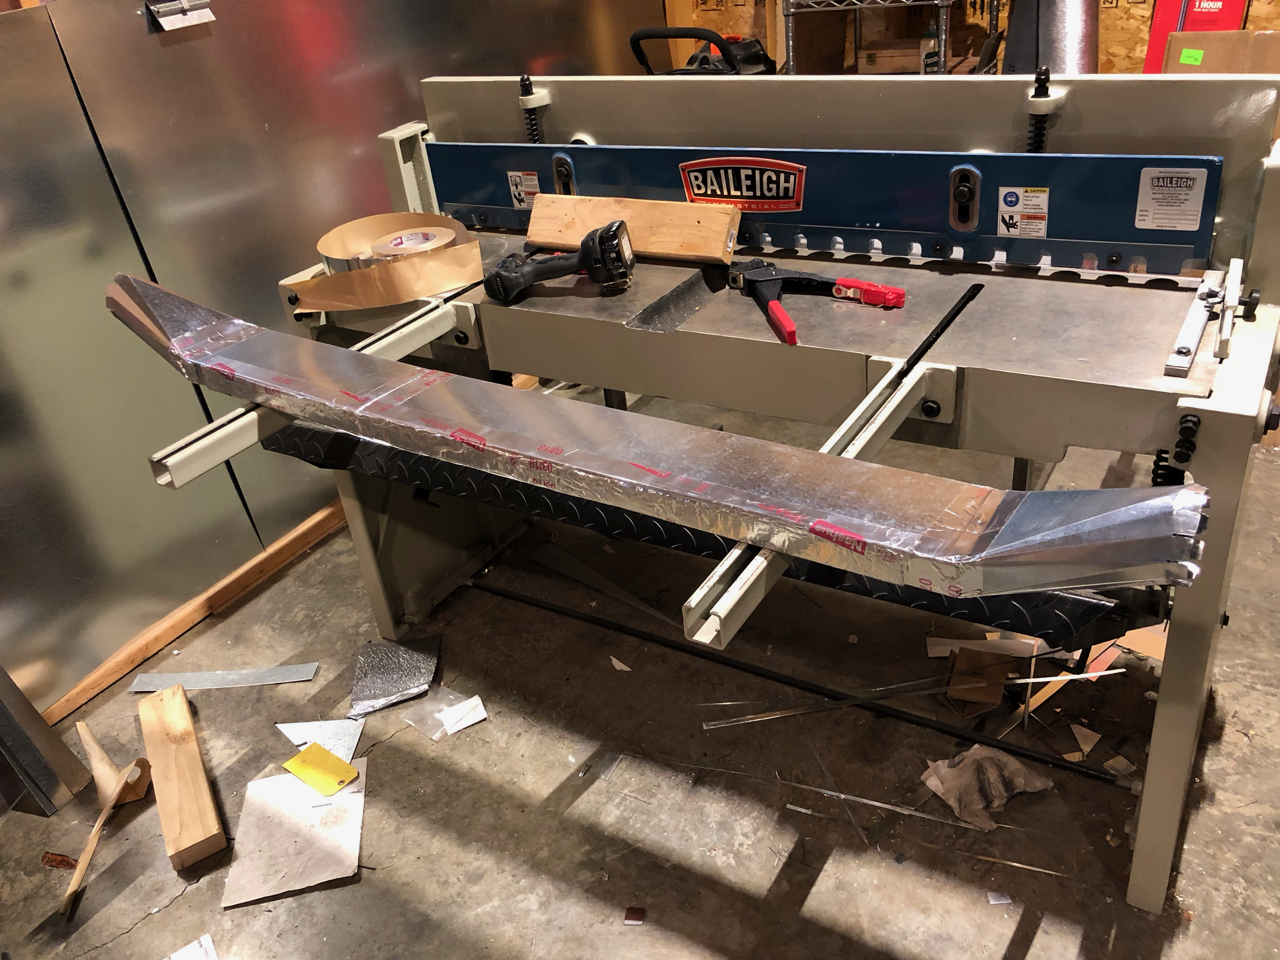
Duct
I wanted air circulation in the bus so I'm installing a duct that goes from the bedroom to the front of the bus on the driver's side. Only issue is that the bathroom is there and I didn't want the duct to interfere... So, I've fabricated a shallow (1-1/2" x 5") duct that fits in the wall, and two rectangular to round offset adapters on each end.
Here's the duct installed:

Did the design in autodesk Inventor using their "sheet Metal" option that lets you do a 3D design and then it flattens it to a pattern..
And Here's the pattern:
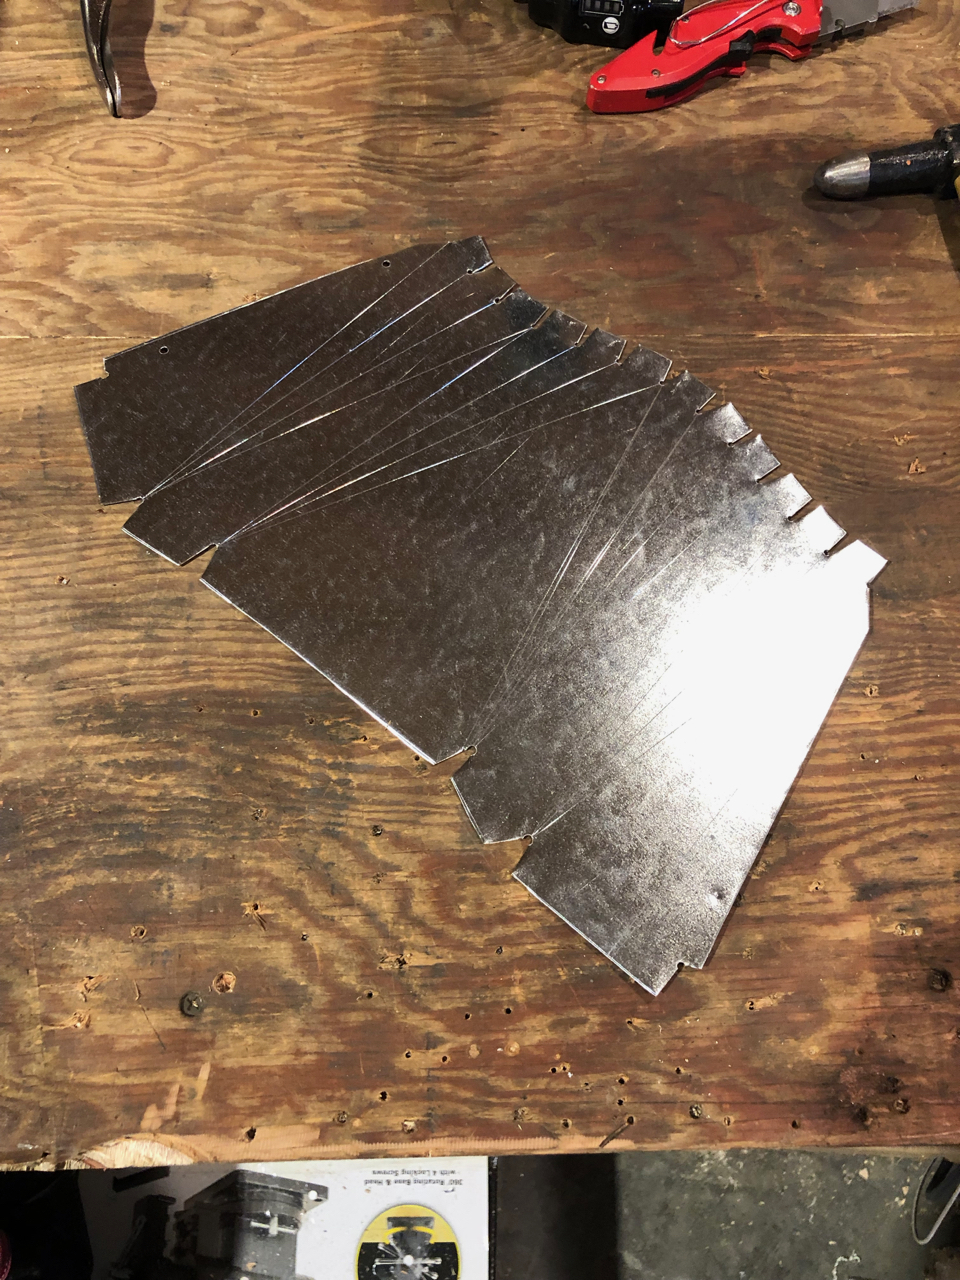
Bending it on the mag Brake:
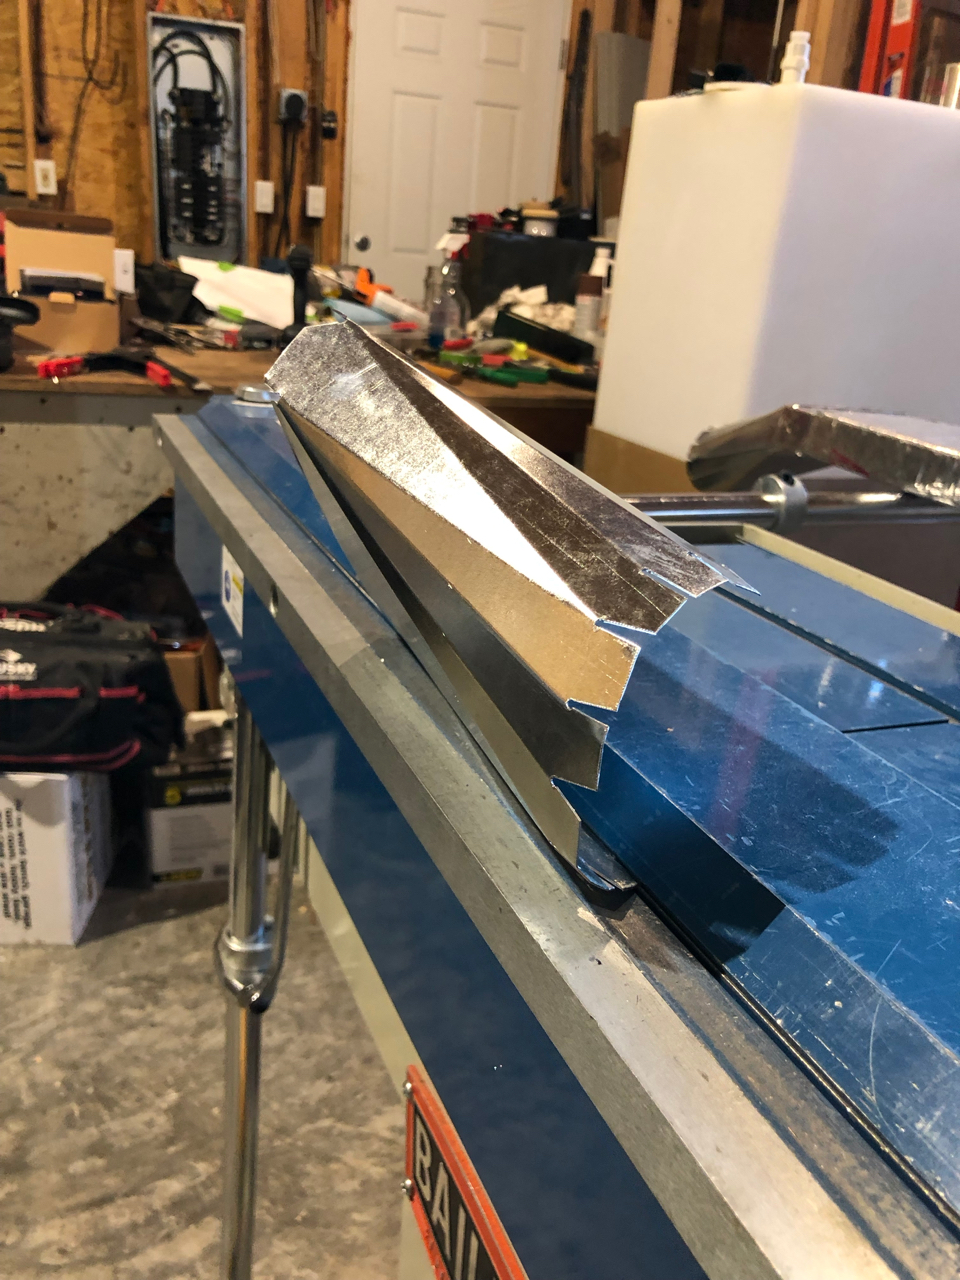
The completed offset adapter:
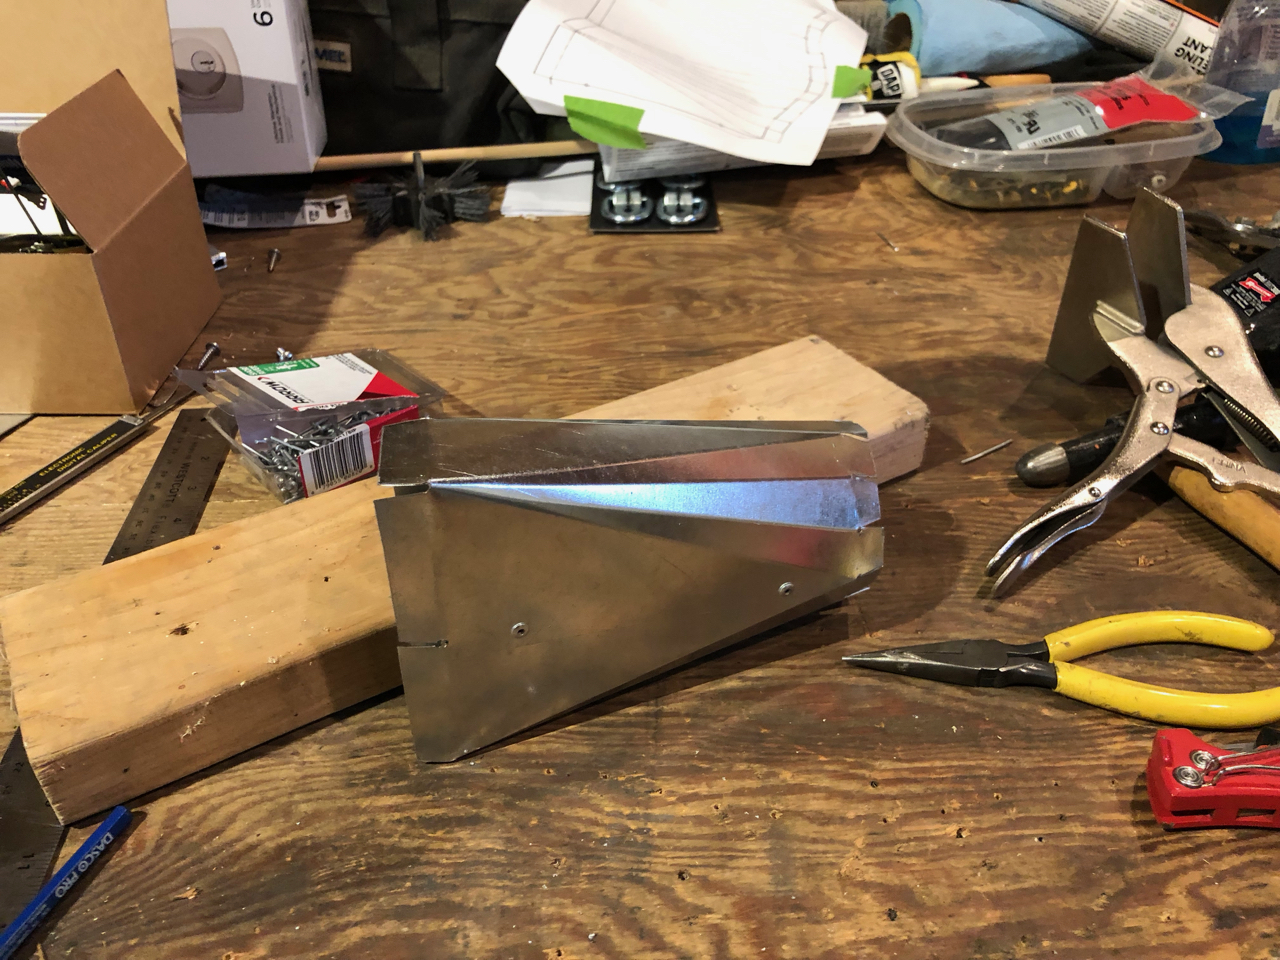
Assembled:
|
|
|
|
|
06-13-2019, 05:57 PM
|
#118
|
|
Skoolie
Join Date: May 2013
Location: Monrovia California
Posts: 151
Year: 1984
Coachwork: Blue Bird
Engine: 3208 turbo Cat
Rated Cap: 78
|
Quote:
Originally Posted by nanoplane
I've started on the ceiling. it's Tongue and Groove knotty pine bead board..
Got some of it done so far:
I stopped here so I could do this !!:
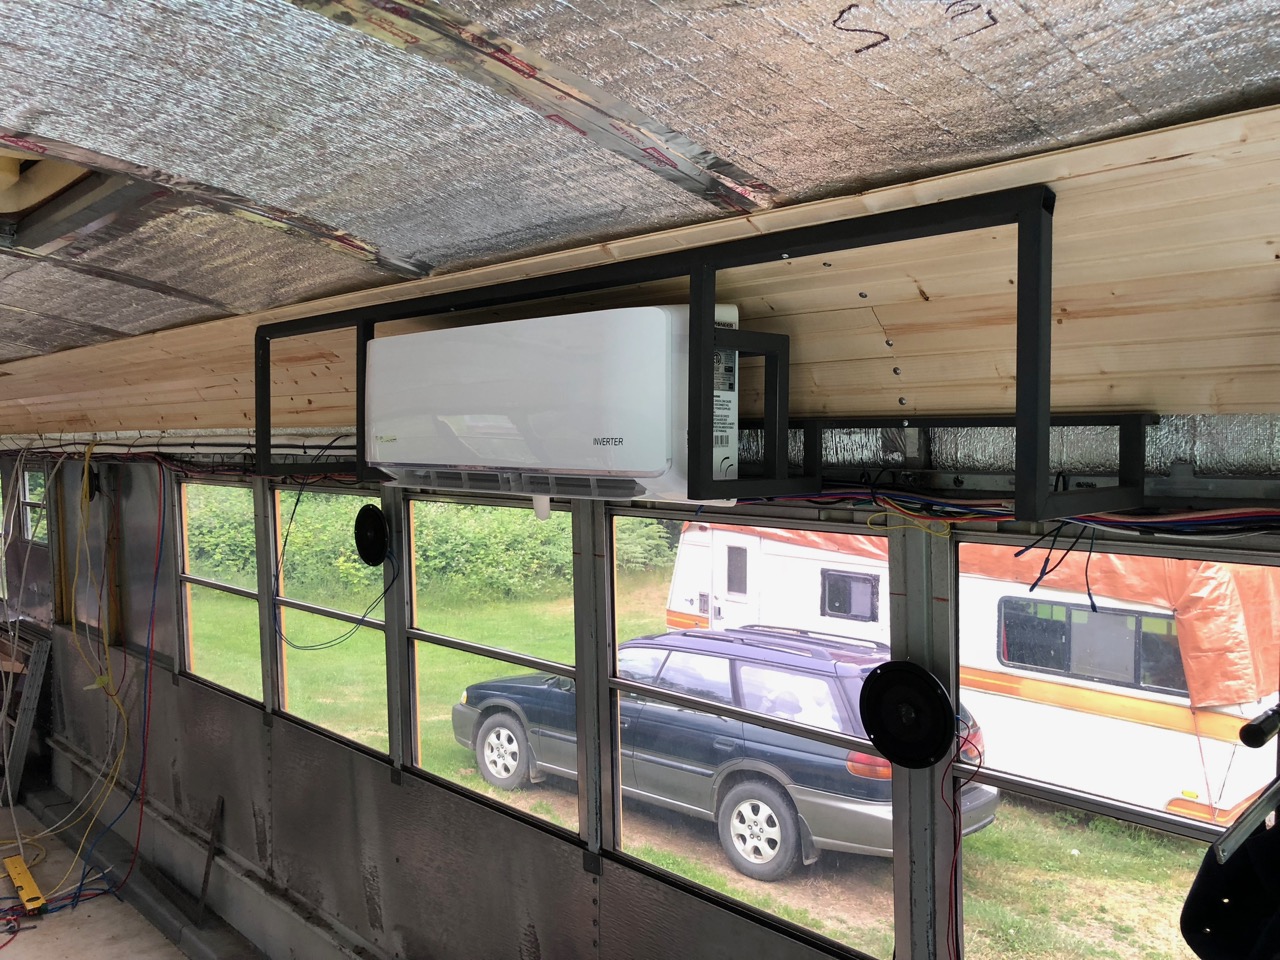
I have heating and cooling and dehumidifying !!! and it all works..
I really wanted to see if the Solar could keep up with "normal" heating and cooling activities.. The unit draws about 800W when running flat out, but it's an inverter unit so it draws only what it needs.
Key things I like:
1. It's really quiet, both inside and outside.
2. SEER 22 efficient
I'll post energy results.. it's fairly mild here right now. in the 50s at night and upper 60s, lower 70s during the day.. we have a few hot days coming (90s) it'll be a good test.. |
What did you use for ceiling insulation, is that Reflectix?
J
|
|
|
|
|
06-13-2019, 06:13 PM
|
#119
|
|
Skoolie
Join Date: Aug 2017
Location: Kingston, WA
Posts: 111
Year: 1995
Coachwork: Thomas
Chassis: MVP
Engine: 8.3L Cummins Turbo
|
Quote:
Originally Posted by juliol
What did you use for ceiling insulation, is that Reflectix?
J
|
Yes, I think if I did it again, I'd just use an inch of foam.
|
|
|
|
|
07-02-2019, 02:31 PM
|
#120
|
|
Skoolie
Join Date: Oct 2018
Location: Georgia
Posts: 169
Year: 2002
Coachwork: Bluebird
Chassis: Tc2000
Engine: 5.9 24v
Rated Cap: 27
|
Marcel, This is an incredible build. I haven't followed through the whole thing yet. but got redirected over here from the AC / DC thread.
I likewise am an electrical engineer and am geeking out hard over those pictures of your electrical system on page 5 & 6. If you are ever in Utah I would feel honored to get the chance to take a look at it and chat with you for a minute about the setup.
My bus right now has dual 24V 65AH ( 25.2v exact ) 6 Cell Li-Ion batteries out of a Fiat500E. 990W of fixed solar ( non flexible panels ) and a very similar looking 3KW inverter ( 9kw peak ) I am running a independent battery balancing module, as well as arduino BMS for backup monitoring of the cells. ( Arduino BMS is in the works )
I left room for a third 24V Li-Ion battery which would expand my capacity to ~~ 180AH at 24V.
|
|
|
|
|
|
 Posting Rules
|
You may not post new threads
You may not post replies
You may not post attachments
You may not edit your posts
HTML code is Off
|
|
|
|
 » Recent Threads
 |
|
|
|
|
|
|
|
|
|
|
|
|
|
|
|
|
|
|
|
|
|
|
|
|
|
|
|
|
|
|
|
|
|
|
|
|
|


 Linear Mode

