 |
|
 06-14-2014, 10:56 AM
|
#161
|
|
Bus Crazy
Join Date: Apr 2010
Posts: 1,208
Year: 1999
Coachwork: Bluebird
Chassis: 3800 International
Engine: T444E
Rated Cap: 72
|
Re: Project Niles Skoolie
Quote:
|
Originally Posted by jazty
Would you care to share the name of the insurance company? I took insurance off of my bus last fall, but will be insuring it again in the next couple months. I was previously with RSA Group (formerly Royal and Sun Alliance) through a local broker, but it was gosh danged expensive. It'd be nice to compare insurance companies that will actually give you a quote instead of a bunch of discouraging "NO!"s.
|
ouch, insurance just a pain in the ass here in Ontario, im using allstate, they insure my bus for $214.00 a year  but I had to switch my car and van to them, and I have 2 houses insured with them so I think that helped, I did send another skoolie there and they said they don't insure buses any more,  but I would give them a call anyways,
btw we will be In Sault Ste Marie in mid july may be at the koa camp ground, also will be in stouffville for a week at the end of july
gbstewart
|

|

|
|
06-15-2014, 07:50 PM
|
#162
|
|
Skoolie
Join Date: Feb 2013
Location: Hampton, Ontario, Canada
Posts: 103
Year: 1999
Coachwork: BlueBird
Chassis: 3800 International
Engine: DT466E
|
Re: Project Niles Skoolie
Thanks Guys i will try and keep going. As for the insurance my recommendation is to get an out of city broker that's used to doing farm equipment. Always make sure you can give them something else as well like your vehicle as it will help increase your chances of them saying yes...
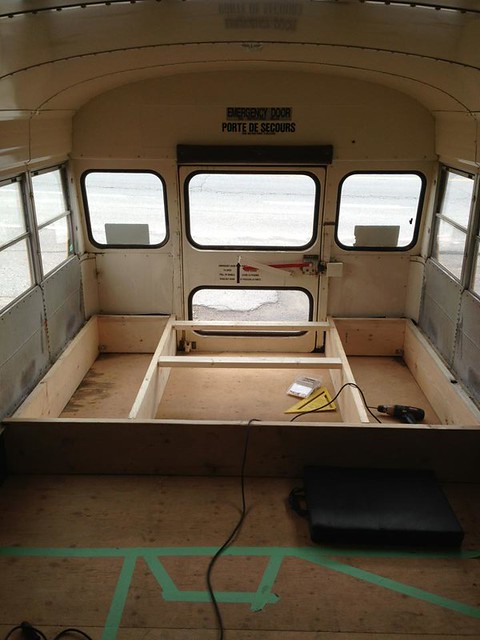
So, one day finishing the jeep this weekend, the other i spent on the waste and grey water drums. It took me about an hour to weld up the seam and i did it in 2 passes. An underpass to stitch it and and overpass to give it some strength. Its too hard to do all at once cause its very thin metal and burns through pretty fast even on low.

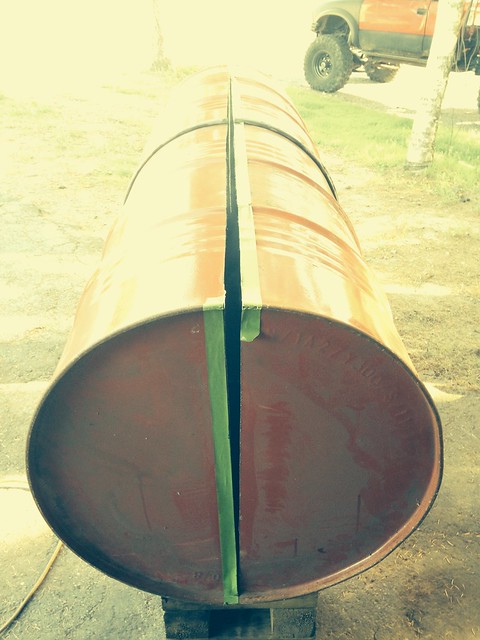
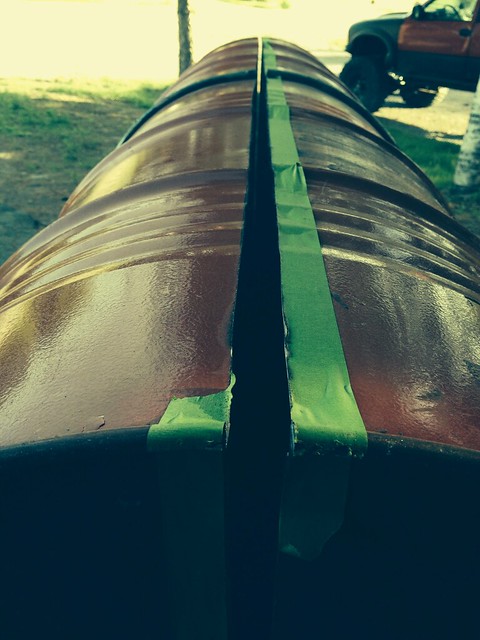
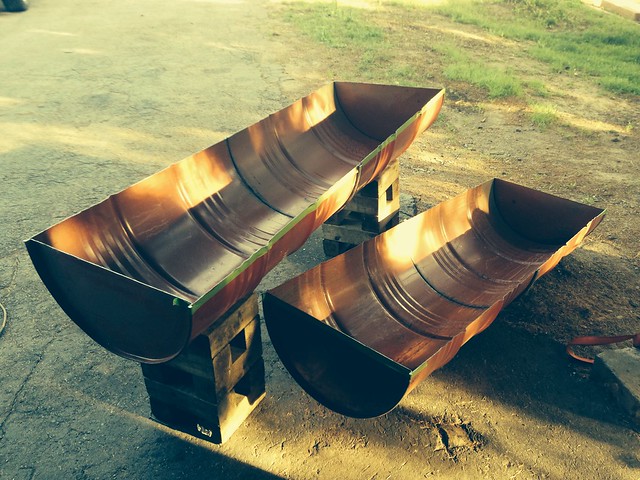
I have tops for the them already cut from the metal store but i want to do some epoxy resin at the joint inside and outside and place in my sensors and fittings. This way once i weld in the top its all ready to get painted and hooked up. Easier to access the indie topless hehe.
C.
|
|
|
|
|
06-18-2014, 02:08 PM
|
#163
|
|
Skoolie
Join Date: Feb 2013
Location: Hampton, Ontario, Canada
Posts: 103
Year: 1999
Coachwork: BlueBird
Chassis: 3800 International
Engine: DT466E
|
Re: Project Niles Skoolie
Thanks Nat, I got lots of practice welding when i built my buggy, trying to use my artistic skills and fabricating skills to do somewhat new ways that i have not see a lot of on here.
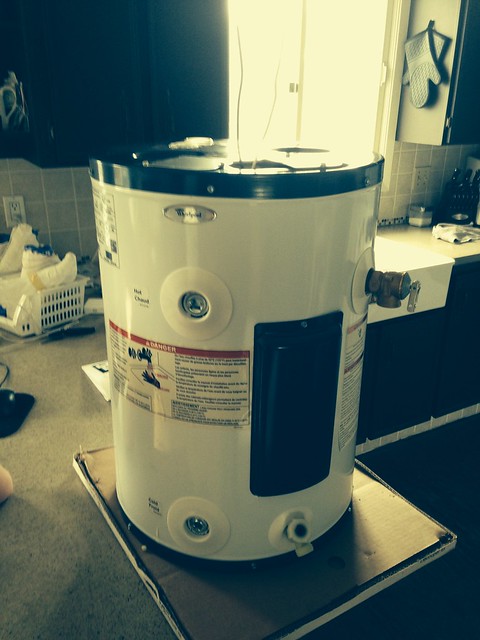
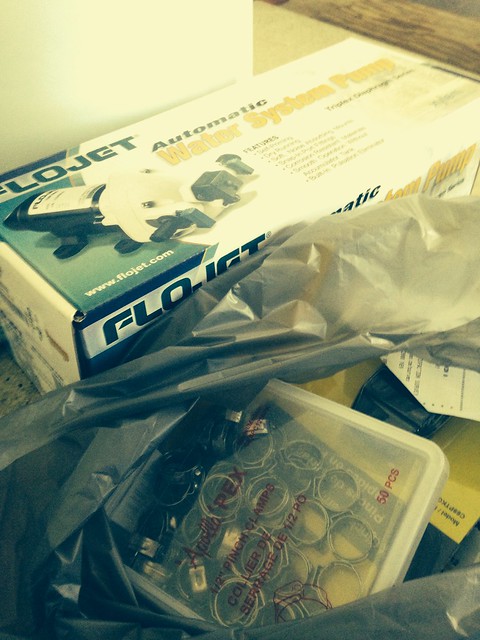
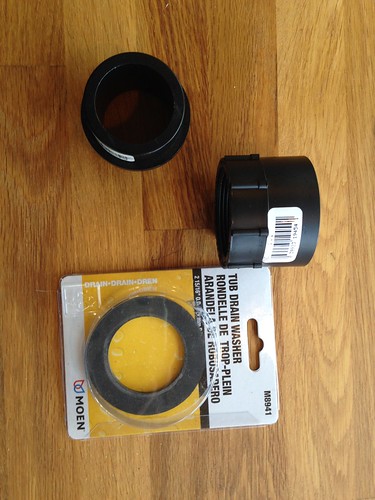
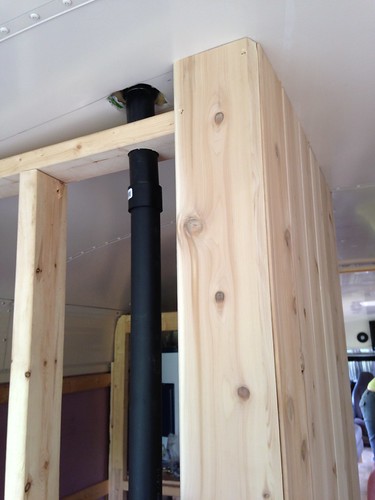
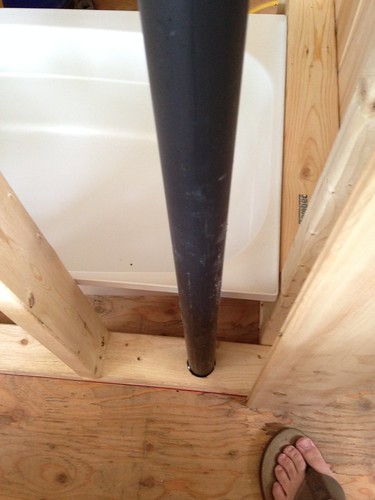
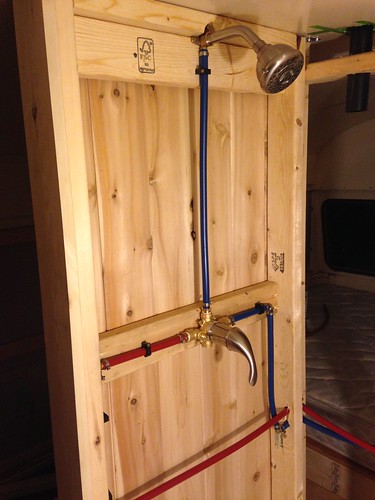
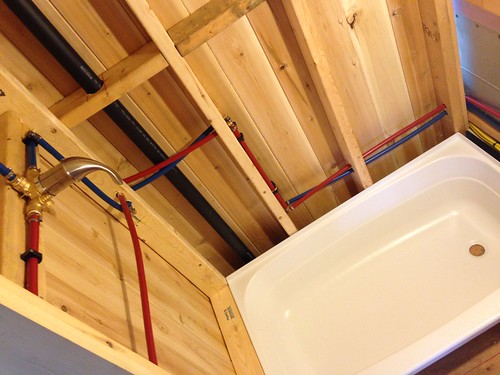
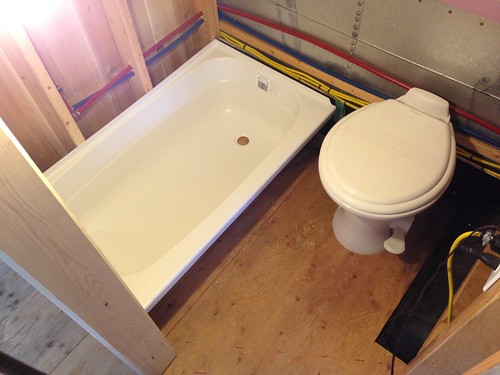
Soooooooo today i went shopping, picked up all the items i would need for hot water and running all the lines. There is still so much to do like purchase the shower / knee high tub and frame that in. As well as fresh water tanks but i will buy those as i want them to be super clean. I decided to do PEX 1/2 in the bus for lines. Easy to run and less chance of cracking as well as easy to fix on the road. I decided to use electric for insurance purposes as anything GAS or Propane scares the insurance companies and would require a certification done for it. This is a 12gal 110 or 220 Electrical hot water tank. I can run a generator if i want to go off grid with it but for the most part we will be doing KOA's or parks with electrical service.
|
|
|
|
|
06-19-2014, 10:34 AM
|
#164
|
|
Skoolie
Join Date: Jan 2010
Posts: 227
Year: 1990
Coachwork: Crown
Chassis: Super Coach II, 36 Ft. RE
Engine: Cat 3208T, MT643
|
Re: Project Niles Skoolie
You might want to rethink the 1/2 inch Pex. You familiar with Handybob's blog? He recommends 1/4 inch Pex because it's better for water conservation. (For example, less wasted water down the drain waiting for it to warm up in the line.)
http://handybobsolar.wordpress.com/
|
|
|
|
|
06-19-2014, 11:46 AM
|
#165
|
|
Bus Crazy
Join Date: Nov 2011
Location: Sault Ste. Marie, Ontario
Posts: 1,793
Year: 1997
Coachwork: Thomas
Chassis: B3800 Short bus
Engine: T444E
Rated Cap: 36
|
Re: Project Niles Skoolie
Quote:
|
Originally Posted by Locutus
You might want to rethink the 1/2 inch Pex. You familiar with Handybob's blog? He recommends 1/4 inch Pex because it's better for water conservation. (For example, less wasted water down the drain waiting for it to warm up in the line.)
http://handybobsolar.wordpress.com/ |
I considered going this route. Either 1/4" or 3/8" PEX. The problem is, it's damn hard to find! The tubing itself wasn't available at most plumbing stores. I can just imagine how hard it'd be to get all the fittings for appliances (1/2" or 3/4" NPT to 1/4" NPT adapter + 1/4" NPT to 1/4" PEX adapter?). I ended up going with 1/2" for that reason alone. Woulda loved me some 1/4" PEX, though...
|
|
|
|
|
06-19-2014, 03:03 PM
|
#166
|
|
Skoolie
Join Date: Feb 2013
Location: Hampton, Ontario, Canada
Posts: 103
Year: 1999
Coachwork: BlueBird
Chassis: 3800 International
Engine: DT466E
|
Re: Project Niles Skoolie
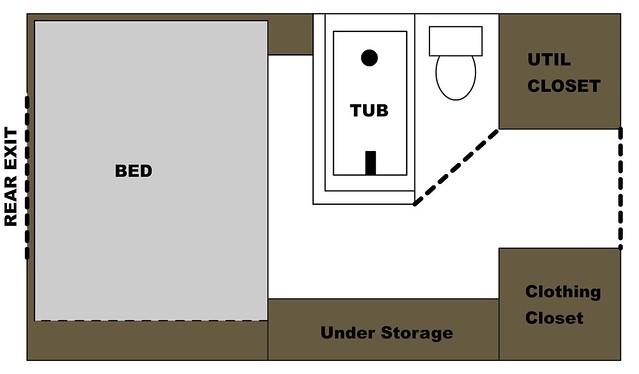
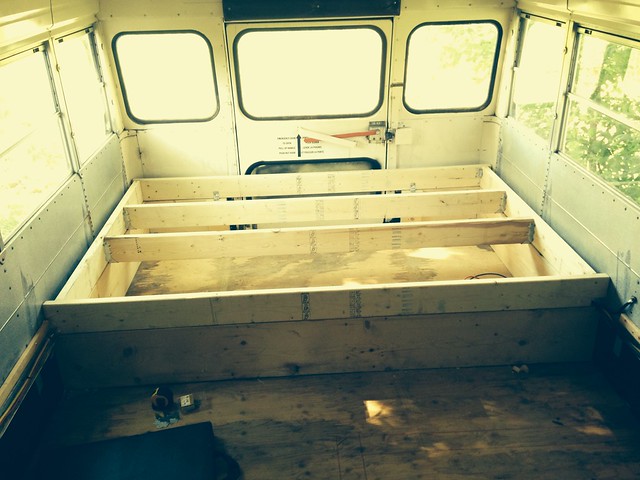
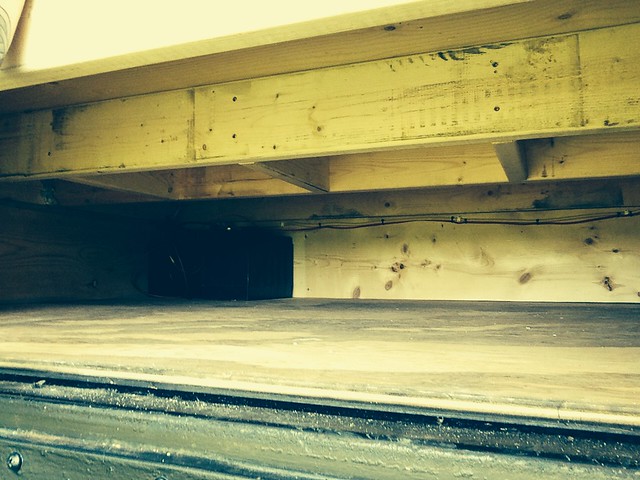
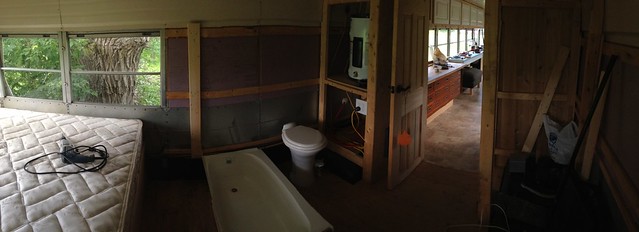
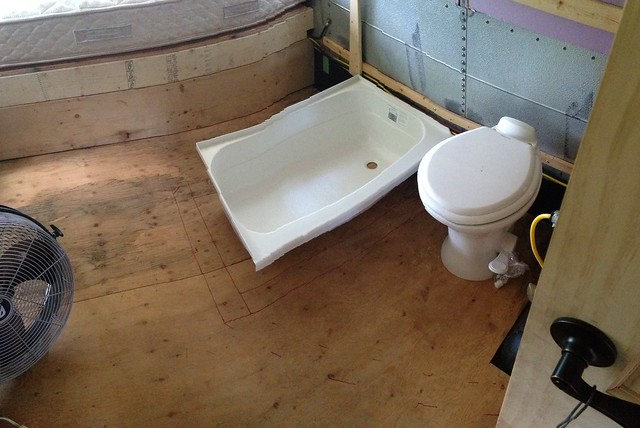
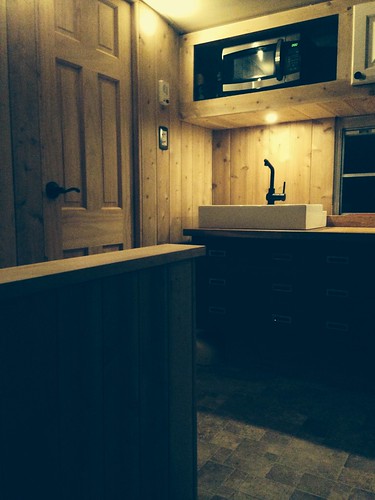
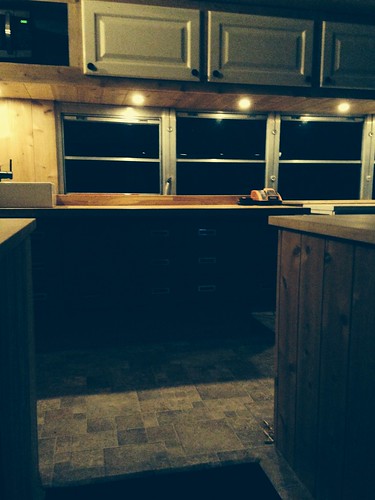
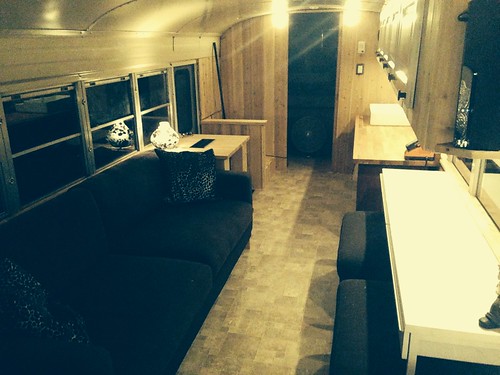
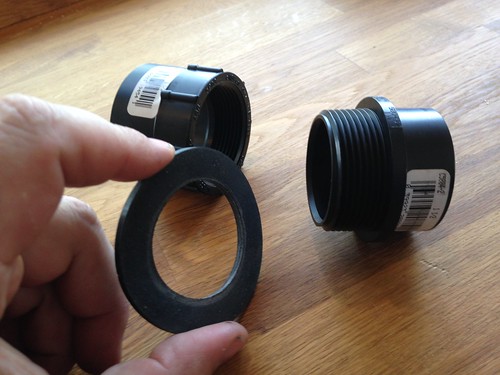
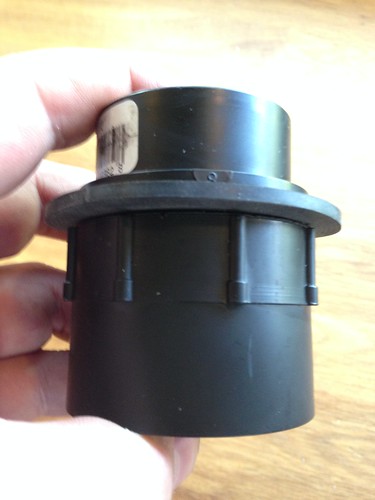
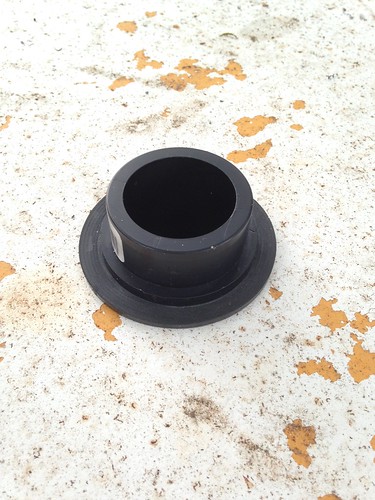
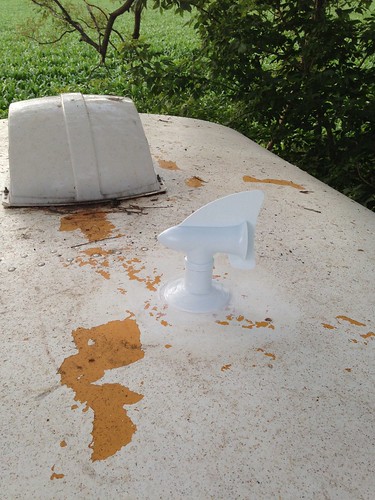
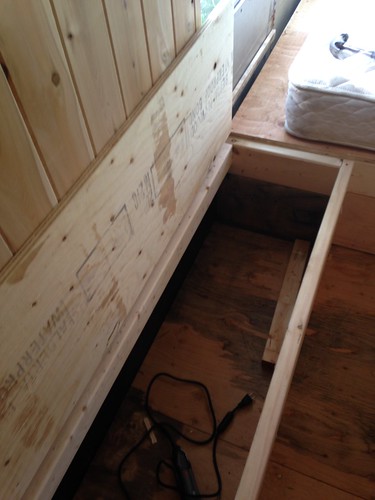
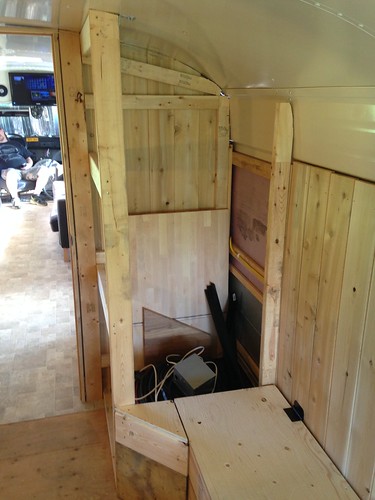
Like Jazty says good luck finding it here. I already am having issues finding bulk fittings for my tanks here which i thought would be a standard thing but isn't. I'm not too concerned with the amount of water as it is only my wife and i and for the most part we will be using the parks facilities for showering. It's just nice to have if you need it. My tank and pump are really close to everything and if i find it's an issue i will run a pressure reducer like most taps already use.For visual reference all plumbing is within a 6 foot area.
At some point too if i decide to park the bus on the 20 acre property i am shopping for, it will end up having septic available and once you go 1/4 its a lot harder to go to 1/2 at the point.
I do appreciate the information though.
Picked up the new pump, shower basin and fresh water tanks on order as of today.
Thanks
Chris
|
|
|
|
|
06-29-2014, 01:43 AM
|
#167
|
|
Skoolie
Join Date: Feb 2013
Location: Hampton, Ontario, Canada
Posts: 103
Year: 1999
Coachwork: BlueBird
Chassis: 3800 International
Engine: DT466E
|
Re: Project Niles Skoolie
|
|
|
|
|
06-29-2014, 02:49 AM
|
#168
|
|
Bus Nut
Join Date: Feb 2014
Location: The Valley - Arizona
Posts: 644
Year: 1999
Coachwork: Thomas
Chassis: Freight-shaker (Freightliner)
Engine: Cat 3126b 250 HP
Rated Cap: Only 1 seat
|
Re: Project Niles Skoolie
Awesome progress! Looks like you didnt miss a beat getting back into it. Take lots of pics for the plumbing!
-Doc
|
|
|
|
|
06-29-2014, 03:19 AM
|
#169
|
|
Skoolie
Join Date: Feb 2013
Location: Hampton, Ontario, Canada
Posts: 103
Year: 1999
Coachwork: BlueBird
Chassis: 3800 International
Engine: DT466E
|
Re: Project Niles Skoolie
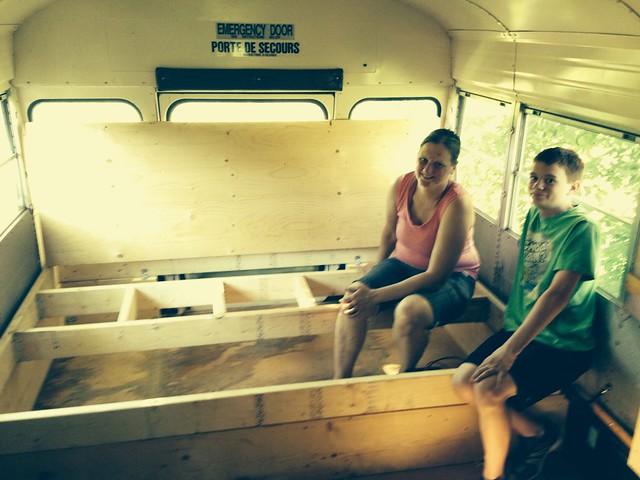
Thanks Doc, I will be doing all the water lines tomorrow... I haven't seen many under bus tank photos... i think most people hide that area because i had a hell of a time doing research on it to see what others did. It will be a play by year getting it going but i will take lots of pics  .
C.
|
|
|
|
|
06-29-2014, 07:43 AM
|
#170
|
|
Bus Crazy
Join Date: Apr 2010
Posts: 1,208
Year: 1999
Coachwork: Bluebird
Chassis: 3800 International
Engine: T444E
Rated Cap: 72
|
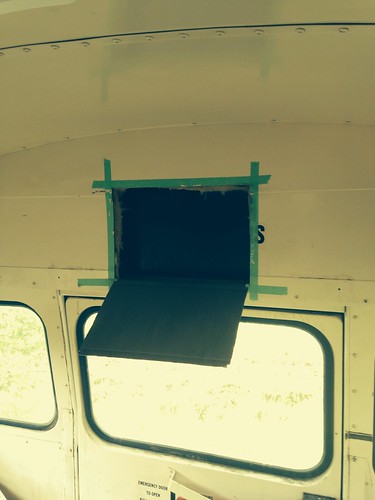
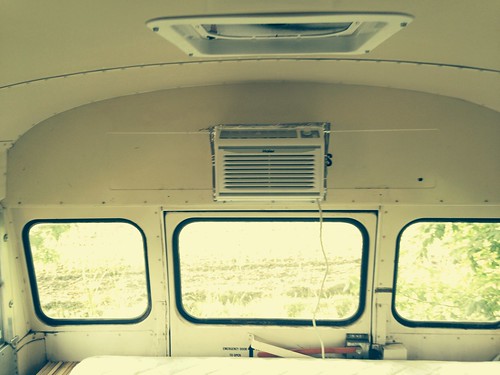
Re: Project Niles Skoolie
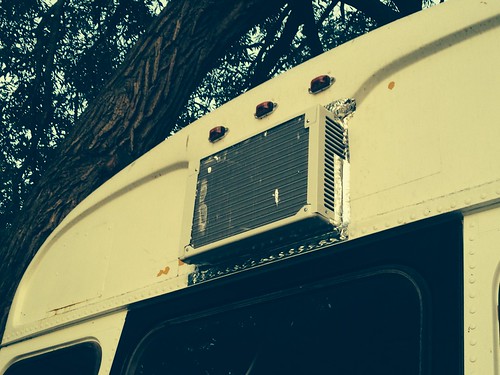
wow looks good, its amazing how many times you can change your mind on things, after you buy everything ,
as for the fridge we bought as used one out of a old rv propane,12v,120 works ok and we boondock a lot so I like the propane, but with that being said to do it again I think I would also go to reg house fridge
what size and modle of a/c did you get?
gbstewart
|
|
|
|
|
07-01-2014, 11:22 AM
|
#171
|
|
Skoolie
Join Date: Feb 2013
Location: Hampton, Ontario, Canada
Posts: 103
Year: 1999
Coachwork: BlueBird
Chassis: 3800 International
Engine: DT466E
|
Re: Project Niles Skoolie
|
|
|
|
|
07-01-2014, 12:29 PM
|
#172
|
|
Bus Crazy
Join Date: Apr 2010
Posts: 1,208
Year: 1999
Coachwork: Bluebird
Chassis: 3800 International
Engine: T444E
Rated Cap: 72
|
Re: Project Niles Skoolie
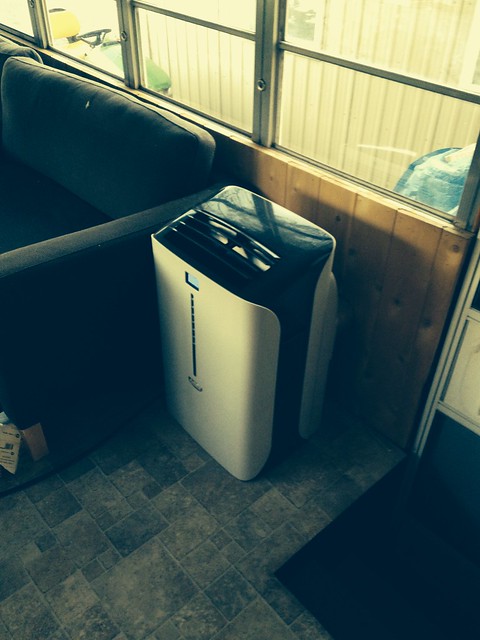
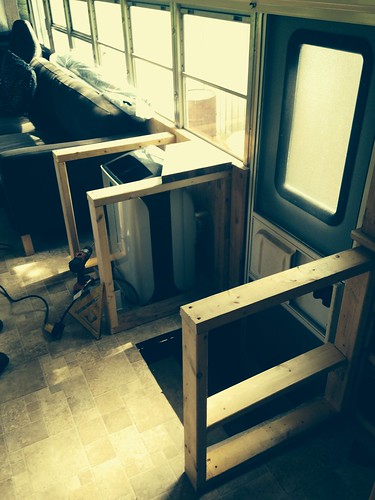
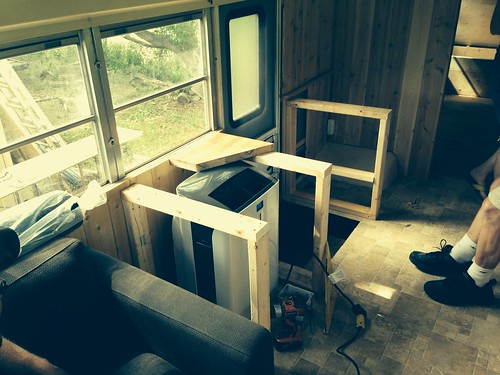
wow lots getting done, when I put my rear a/c in I used 1 and 2 inch L brackets to mount it, I used sheet metal screws right into the a/c metal outer case and into the bus wall both in the front and back, just make sure not to hit anything inside the a/c. it hasn't moved in over 13000kms. I do have to replace it with a new one its not cooling like it used too, it was a used unit when I bought it, so I cant complain
gbstewart
|
|
|
|
|
07-01-2014, 04:54 PM
|
#173
|
|
Bus Geek
Join Date: Mar 2011
Location: Houston, Texas
Posts: 8,462
Year: 1946
Coachwork: Chevrolet/Wayne
Chassis: 1- 1/2 ton
Engine: Cummins 4BT
Rated Cap: 15
|
Re: Project Niles Skoolie
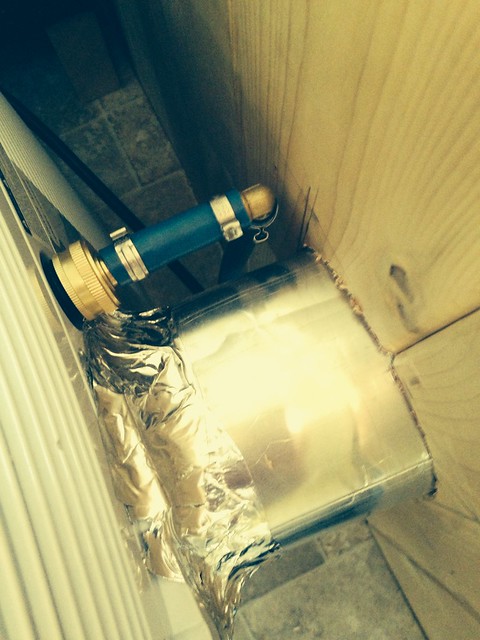
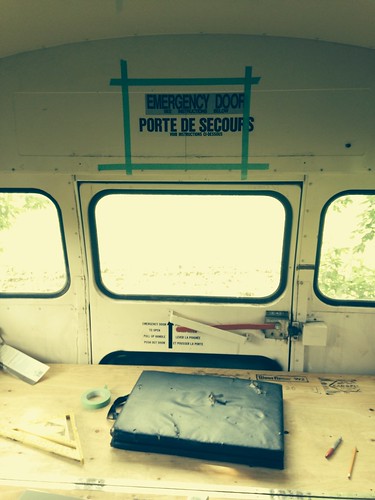
Just remembered seeing a nifty window unit installation years ago. Guy cut the hole in the rear like yours, but had a hatch cover. The A/C was mounted on welded frame with a pair of sliders so that it was tucked completely inside the bus when going down the road. The hatch cover was oversized, hinged across the top and acted as a rain cover when the unit was extended. Not sure how it was sealed around the unit when opened as I never got a look inside.
|
|
|
|
|
07-01-2014, 06:54 PM
|
#174
|
|
Bus Nut
Join Date: Aug 2013
Posts: 703
Year: 1995
Engine: DT408
|
Re: Project Niles Skoolie
A word of caution when welding steel drums end to end. They're formed just like a tin can with the top rolled over the sides. Only on these, they have a seal gasket sandwiched between the two parts to make them water tight. I welded 5 together once for a biodigester project years ago and discovered that welding the ends together melted the seal and I had leaks. If you can find a way to seal them from the inside (maybe do another pass from inside) you might be able to seal that up. It would be a bummer if you had leaks around your tank.
__________________
I am an sojourner in the earth; hide not Your Commandments from me. Psalm 119:19
Here is the patience of the saints; here are the ones keeping the commandments of YAHWEH, and the faith of Yahshua. Rev. 14:12
|
|
|
|
|
07-01-2014, 09:15 PM
|
#175
|
|
Bus Nut
Join Date: Jul 2012
Location: Olympia, Washington
Posts: 557
Year: 87
Coachwork: Wayne
Chassis: International s1700
Engine: 6.9 internatiional
Rated Cap: 65
|
Re: Project Niles Skoolie
i like how you installed your rear AC. thats how im going to do mine once i get to that point.
|
|
|
|
|
07-01-2014, 11:21 PM
|
#176
|
|
Skoolie
Join Date: Feb 2013
Location: Hampton, Ontario, Canada
Posts: 103
Year: 1999
Coachwork: BlueBird
Chassis: 3800 International
Engine: DT466E
|
Re: Project Niles Skoolie
|
|
|
|
|
07-01-2014, 11:26 PM
|
#177
|
|
Almost There
Join Date: Jan 2014
Location: Hattiesbur, MS
Posts: 74
Year: 1998
Coachwork: Bluebird
Chassis: All American RE
Engine: 8.3 Cummins
Rated Cap: 72
|
Re: Project Niles Skoolie
Nice bus dude. like the idea of the a/c.
|
|
|
|
|
07-04-2014, 01:31 AM
|
#178
|
|
Skoolie
Join Date: Feb 2013
Location: Hampton, Ontario, Canada
Posts: 103
Year: 1999
Coachwork: BlueBird
Chassis: 3800 International
Engine: DT466E
|
Re: Project Niles Skoolie
Thanks!!
Been a busy week already so far, had to spend some time on the jeep so she didn't get jealous of the bus.
Made custom brackets to fit the new heated leather seats into the jeep.
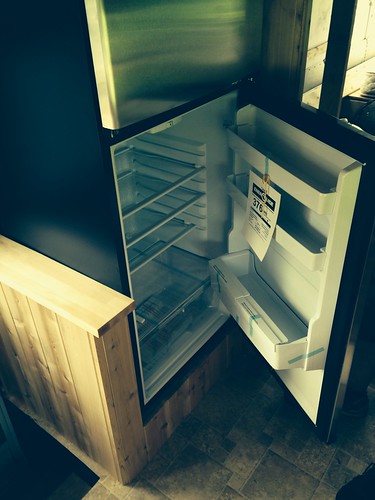
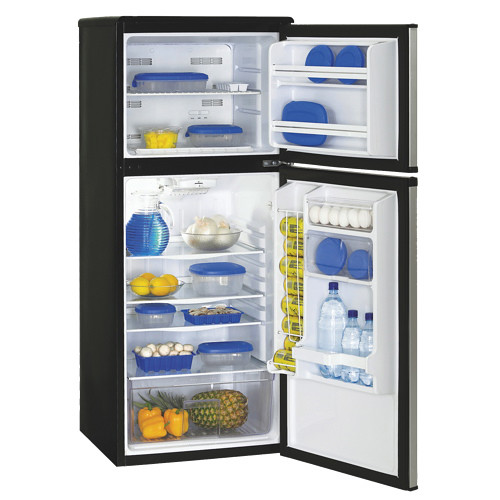
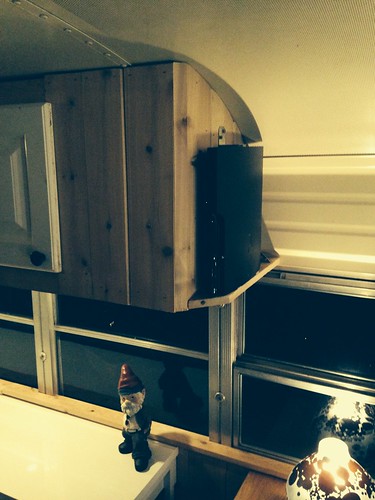
Here is the new fridge and it put in place, it finally came this afternoon and slide in like it was made for the hole it went in.
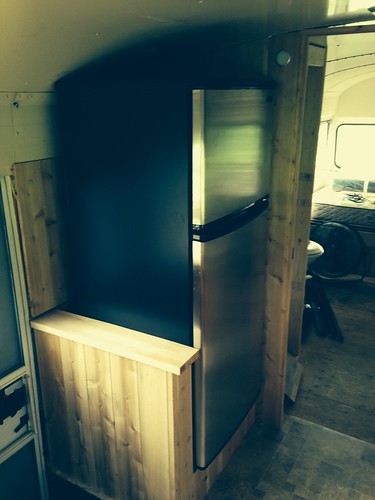
Chris
|
|
|
|
|
07-04-2014, 06:18 AM
|
#179
|
|
Bus Crazy
Join Date: Apr 2010
Posts: 1,208
Year: 1999
Coachwork: Bluebird
Chassis: 3800 International
Engine: T444E
Rated Cap: 72
|
Re: Project Niles Skoolie
nice fridge, that's about 3 cases of beer size
your bus is looking amazing, you should be ready to start using it soon
gbstewart
|
|
|
|
|
07-13-2014, 05:33 PM
|
#180
|
|
Skoolie
Join Date: Feb 2013
Location: Hampton, Ontario, Canada
Posts: 103
Year: 1999
Coachwork: BlueBird
Chassis: 3800 International
Engine: DT466E
|
Re: Project Niles Skoolie
|
|
|
|
|
|
 Posting Rules
|
You may not post new threads
You may not post replies
You may not post attachments
You may not edit your posts
HTML code is Off
|
|
|
|
 » Recent Threads
 |
|
|
|
|
|
|
|
|
|
|
|
|
|
|
|
|
|
|
|
|
|
|
|
|
|
|
|
|
|
|
|
|
|
|
|
|
|


 Linear Mode

