 |
|
 06-11-2015, 11:46 AM
|
#21
|
|
Skoolie
Join Date: Feb 2015
Location: South Dakota
Posts: 217
Year: 2002
Coachwork: Thomas
Chassis: Freightliner HDX
Engine: CAT 3126B250
Rated Cap: 84
|
Quote:
Originally Posted by lousot

all those wires were unnecessary Wow
|
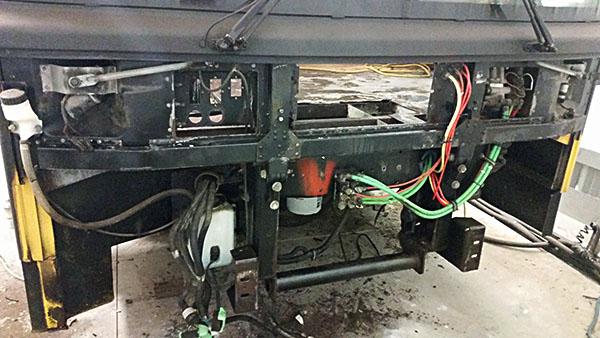
If you mean the picture of the little pile on page 1, then yeah. If you mean the absence of wires in the more recent pictures then no. I just have removed all of them so I can cut and grind that area without concern. About 95% of what I removed I consider "essential" to the operation of the bus. Even the segments I removed I will keep for extra wire, switches and connectors. The 8 (or so) wires at one of the bulkhead connectors I will bundle and leave in place next to the connector for future circuits.
|

|

|
|
06-14-2015, 11:06 AM
|
#22
|
|
Mini-Skoolie
Join Date: Feb 2015
Location: Elk Creek, Virginia
Posts: 28
Year: 1991
Coachwork: Bluebird
Engine: 5.9 Cummins
Rated Cap: 72
|
Your build looks like it going really well. I really like your bus its a good size. Its also nice to have it inside where you can work on it day or night even if its raining you dont have to worry about stuff getting wet. I've got mine in shop with a 1965 seagrave firetruck and a 1973 vw westy and still have a little room to work around it. Keep up the good work!
|
|
|
|
|
06-14-2015, 03:01 PM
|
#23
|
|
Skoolie
Join Date: Feb 2015
Location: South Dakota
Posts: 217
Year: 2002
Coachwork: Thomas
Chassis: Freightliner HDX
Engine: CAT 3126B250
Rated Cap: 84
|
Would love to see a pic of that fire truck, AtoZ!
Here's a little update since I'm at the computer.
I have started the prep for and application of Ospho in various areas of the interior and exterior. It looks like I painted the front of the bus with black primer, but that's the Ospho working its magic.
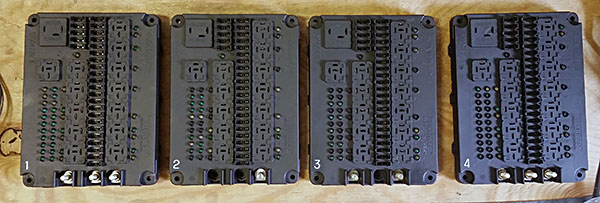
I also finished the 4 fuse panels (referred to by Thomas as PCB 1 through PCB 4) as follows:
- separate the board from the case
- clean both board and case
- test circuits and repair as required
- clean GND, IGN and BAT board connectors
- install new posts and seal them to the case
- spray primer the case inside and out
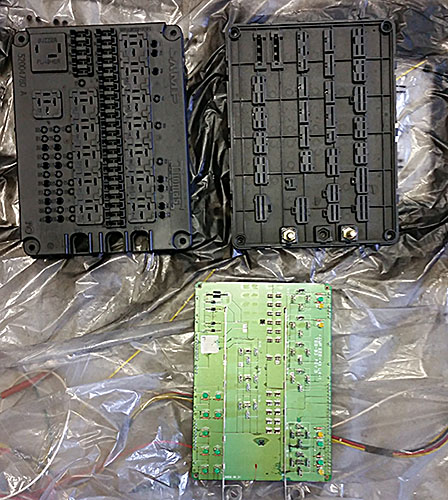
I used a little white paint to accent the board numbers. Overall, only 2 diodes needed to be replaced, and were replaced with ones that can take a little more punishment. There was minor corrosion of a few components, but nothing to be concerned about.
I'm glad I was this thorough, because I now know that the seal at the electrical panel on the driver's side does not meet my standards. I will have to engineer something, as well as create a new frame that holds PCBs 1 though 3. It seems to be a bit of overkill to use a 10 pound steel frame to hold 5 pounds of electronics. I will probably build one out of aluminum with rubber bushings everywhere.
In closing, Ospho is AMAZING. I will Ospho as much of the frame as I can get to. Oh, I almost forgot. I traced that last "Silent Witness" cable to the transmission harness. Only 2 wires were spliced into a twisted pair at the harness. They are no longer! One less thing to cause doubt.
|
|
|
|
|
06-14-2015, 03:15 PM
|
#24
|
|
Bus Geek
Join Date: Aug 2011
Location: Stony Plain Alberta Canada
Posts: 2,937
Year: 1992
Coachwork: Bluebird
Chassis: TC2000 FE
Engine: 190hp 5.9 Cummins
Rated Cap: 72
|
I like the details and care involved.
Pics are great too.
Nat
__________________
"Don't argue with stupid people. They will just drag you down to their level, and beat you up with experience."
Patently waiting for the apocalypses to level the playing field in this physiological game of life commonly known as Civilization
|
|
|
|
|
06-14-2015, 07:48 PM
|
#25
|
|
Bus Nut
Join Date: May 2015
Location: Minnesota
Posts: 502
Year: 92
Coachwork: Thomas Built
Chassis: International 3800
Engine: DTA360 5.9L
Rated Cap: 77
|
The zoidberg comment made me laugh, pretty funny. Holy **** that is a lot of wires though! not looking forward to doing mine now that i see that... crossing my fingers that it will be easy, as mine is a 92 and yours a 2000. cant believe it rusted all the way through on a 2000, mustve been through a lot of winters with heavily salted roads.
|
|
|
|
|
06-19-2015, 03:02 PM
|
#26
|
|
Skoolie
Join Date: Feb 2015
Location: South Dakota
Posts: 217
Year: 2002
Coachwork: Thomas
Chassis: Freightliner HDX
Engine: CAT 3126B250
Rated Cap: 84
|
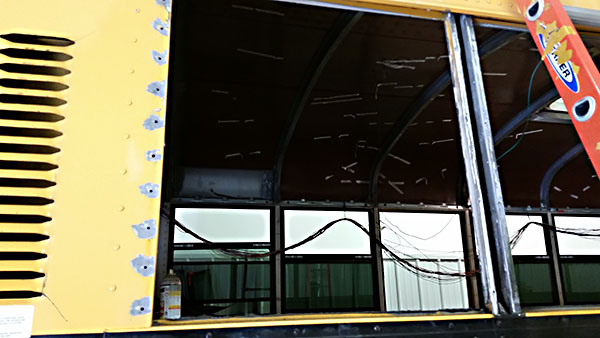
My new job started this week, midnight to 8am, so not much to report. I will be taking out all of the windows, including the exterior pillar covers, in order to fit sheet metal in so I can get the inside ready for primer. I've been avoiding doing the metalwork at the floor in the front. I need at least 2 reasons to go to the metal shop, and I should have those reasons by the end of the weekend.
On an interesting note, when I pulled the first pillar cover off, I saw this:

I never knew there was insulation inside the ribs. This piece goes all the way to the floor and I can see the end of a piece that goes into the ceiling arch. Hmmmmm. Maybe this would explain some frustration with using Great Stuff spray foam on my buddy's bus to fill the ribs.
So, I was thinking about covering the windows with sheetmetal that would be bent into a shallow sawtooth pattern, repeating every window width. It could only come out from the surface of the bus by about an inch and still be protected by the drip rail. I thought the effect would look pretty cool (visions of the "Nautilus" from 20,000 Leagues Under the Sea) but after making a quick rendering in my design program, I decided against it. 
It would be too much work and too much extra cost for materials to be worth what little of an effect it would have. Also, there would be the problem of making it seal properly without removing the entire upper skin of the bus, not to mention how out of place a window would look. I will have to find some other avenue of artistic expression.
I will be screwing the sheet metal panels (overlapped from back to front starting at the rear of the bus) into the ribs at an interval of 1-2 inches between screws. I will, of course, need to put some kind of weather seal / bonding agent where metal meets metal. Recommendations?
Oh, and using a propane torch to try to burn the masking tape stuck to the inside of the bus is not recommended.
|
|
|
|
|
06-19-2015, 10:28 PM
|
#27
|
|
Bus Geek
Join Date: Mar 2011
Location: Houston, Texas
Posts: 8,462
Year: 1946
Coachwork: Chevrolet/Wayne
Chassis: 1- 1/2 ton
Engine: Cummins 4BT
Rated Cap: 15
|
Roger the propane torch idea. Oxy Acetylene works much better
|
|
|
|
|
07-03-2015, 10:52 PM
|
#28
|
|
Skoolie
Join Date: Feb 2015
Location: South Dakota
Posts: 217
Year: 2002
Coachwork: Thomas
Chassis: Freightliner HDX
Engine: CAT 3126B250
Rated Cap: 84
|
Before I give the update, here's a little trick on removing the insulation from the ribs and behind the lower wall panels:
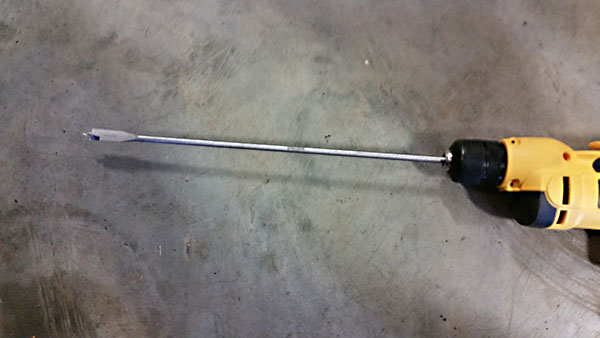
Find a long wood-boring drill bit like this one: 1/2" x 16" long. Jab the tip into the visible insulation and apply slow pressure or bursts if it is sticking to the body. You'll need a a good grip and healty wrist, but the insulation comes right out. My insulation isn't fibreglass, but was plenty dusty when it came out, so as always: mask and eye protection.
Now then - hanging sheetmetal panels over the windows.
After removing the pillar covers it's time for prep work which consists of:
- Removing window sealant from places where I wouldn't be able to get to after the panels are installed
- Wire wheel the exposed pillars to remove anything unwanted
- Ospho the ribs and under the drip rail
- Wipe the areas clean
- Apply a bead of butyl caulk under the drip rail where the panels slide in
- Clean the sheetmetal
- Apply 1" wide 3M automotive tape to the left, right and bottom sides of the panel
- Stick the panel in place
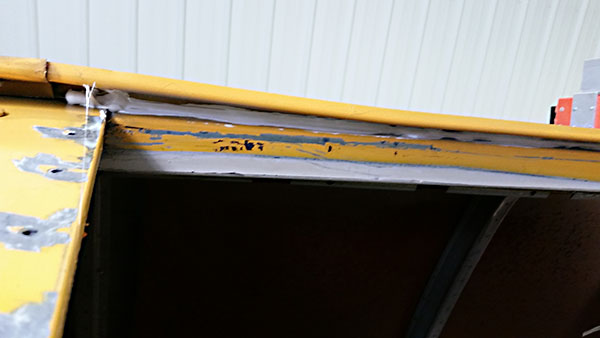
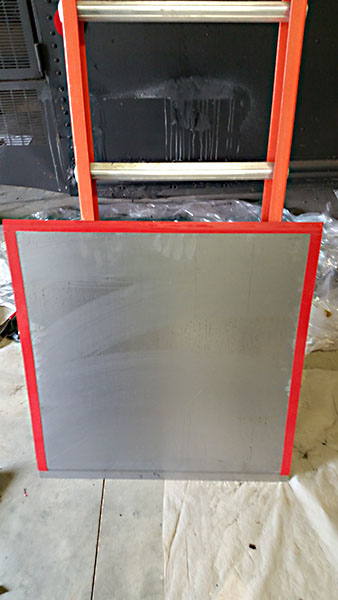
The tape does a great job of holing the panels in place so I can drill some guide holes from the inside for the stainless steel sheetmetal screws, which I have yet to do. Here's how she's looking so far:
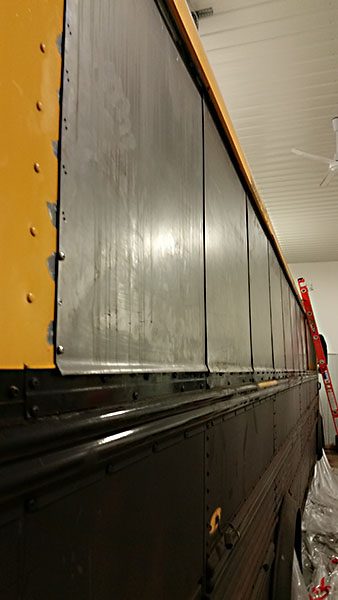
And with names like "Gigahorse" and "Doofwagon" for the vehicles in Mad Max - Fury Road, I was thinking I should call this the "Cruel Bus"
|
|
|
|
|
07-04-2015, 07:35 PM
|
#29
|
|
Skoolie
Join Date: Feb 2015
Location: South Dakota
Posts: 217
Year: 2002
Coachwork: Thomas
Chassis: Freightliner HDX
Engine: CAT 3126B250
Rated Cap: 84
|
Some additional info (may not be the same on other models)
Bus window: 14 pounds (all my windows were the same size)
18 ga sheetmetal panel (29.5"x30"): 12.5 pounds
Front bumper: 110 pounds (includes "shin bruiser" motor)
The aluminum crash bumper I'm getting is supposed to weigh about 200 pounds, so I will need to find more ways to drop some weight without sacrificing structural integrity.
I spent a surprisingly large amount of money on #10 x 1/2" stainless steel sheetmetal screw to attach the panels to the ribs. After shearing the heads off of about 10 of them and drilling out the remnants, I am taking the remaining 1,190 screws back to the store. I thought stainless steel was much tougher and was looking forward to not having to worry about any future corrosion. I will now be using the screws that held in the ceiling panels, since they match the screws on the body. I have yet to find an exact replacement screw in any hardware store. I heard that Thomas uses their own rivets during manufacture (unavailable anywhere else) so I suspect the screws might be the same.
The buytl rubber caulk is taking a much longer time to set up than I thought. It doesn't really matter, since the bus isn't going anywhere any time soon.
|
|
|
|
|
07-04-2015, 09:45 PM
|
#30
|
|
Bus Geek
Join Date: Mar 2011
Location: Houston, Texas
Posts: 8,462
Year: 1946
Coachwork: Chevrolet/Wayne
Chassis: 1- 1/2 ton
Engine: Cummins 4BT
Rated Cap: 15
|
Ya...the automotive "Seam Sealer" I use takes 2-3 days in hot weather to set up but once it does...it's there forever.
|
|
|
|
|
07-05-2015, 01:13 AM
|
#31
|
|
Bus Geek
Join Date: Aug 2011
Location: Stony Plain Alberta Canada
Posts: 2,937
Year: 1992
Coachwork: Bluebird
Chassis: TC2000 FE
Engine: 190hp 5.9 Cummins
Rated Cap: 72
|
I like the "Drip Edge" you had formed into the bottom of each panel.
I used a stiff steel wire with a hook bent into the end to pull the insulation out. The fiberglass would not pull, it just broke into bits every 3 inches or so.
High pressure water will also blast the insulation out of the ribs. Water also eliminates the dust issue.
Nat
__________________
"Don't argue with stupid people. They will just drag you down to their level, and beat you up with experience."
Patently waiting for the apocalypses to level the playing field in this physiological game of life commonly known as Civilization
|
|
|
|
|
07-05-2015, 04:00 PM
|
#32
|
|
Skoolie
Join Date: Feb 2015
Location: South Dakota
Posts: 217
Year: 2002
Coachwork: Thomas
Chassis: Freightliner HDX
Engine: CAT 3126B250
Rated Cap: 84
|
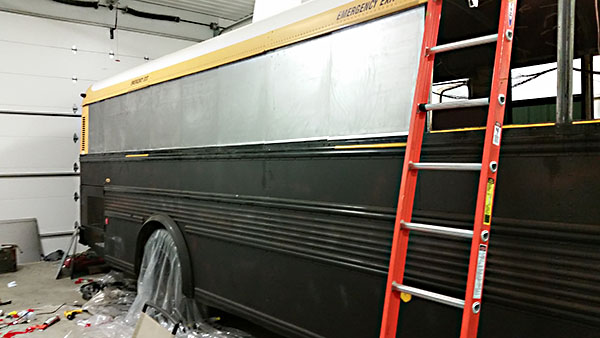
Finished mounting one side, need to start on the other. I'll do all the drilling, screwing and sealing this coming week since I have little time off from work.
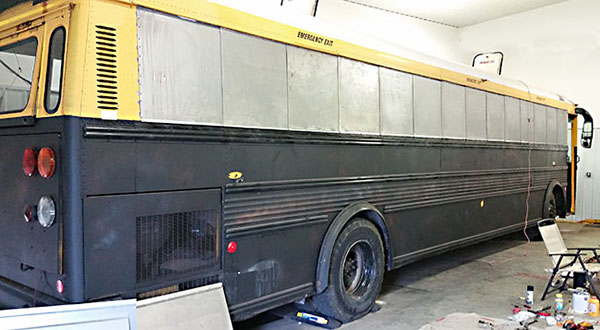
There are two screws holding each panel in place for now.
I want to develop a bold design for the intake and exhaust, but since they both happen here at the rear passenger side, I'm not sure I can really do much. Hmmmm
|
|
|
|
|
07-10-2015, 03:23 AM
|
#33
|
|
Bus Geek
Join Date: Aug 2011
Location: Stony Plain Alberta Canada
Posts: 2,937
Year: 1992
Coachwork: Bluebird
Chassis: TC2000 FE
Engine: 190hp 5.9 Cummins
Rated Cap: 72
|
Sure you can, right through the roof.
Nat
__________________
"Don't argue with stupid people. They will just drag you down to their level, and beat you up with experience."
Patently waiting for the apocalypses to level the playing field in this physiological game of life commonly known as Civilization
|
|
|
|
|
07-13-2015, 11:48 AM
|
#34
|
|
Moderator
Join Date: Feb 2007
Location: NUNYA
Posts: 4,236
Year: 1995
Coachwork: Thomas
Chassis: 3800
Engine: DT408, AT545
Rated Cap: 23 500 gvw
|
Quote:
|
I want to develop a bold design for the intake and exhaust, but since they both happen here at the rear passenger side, I'm not sure I can really do much. Hmmmm
|
This passed me on my way through New Mexico. No need to thank me. LOL
|
|
|
|
|
07-13-2015, 12:31 PM
|
#35
|
|
Bus Crazy
Join Date: Dec 2014
Location: Dowdy Lakes, Colorado
Posts: 1,444
Year: 1989
Coachwork: Thomas
Chassis: Saf-T-Liner ER
Engine: 3208 CAT/MT643 tranny
Rated Cap: 87
|
Quote:
Originally Posted by crazycal
This passed me on my way through New Mexico. No need to thank me. LOL
|
    Anymore need to be said?
__________________
Firearms stand next in importance to the Constitution itself. They are the American peoples liberty teeth and keystone under independence. George Washington
|
|
|
|
|
07-13-2015, 04:53 PM
|
#36
|
|
Bus Crazy
Join Date: Sep 2013
Location: Vacaville, Ca
Posts: 1,634
Year: 1988
Coachwork: Crown / Pusher
Engine: 8.3 Cummins
|
Quote:
Originally Posted by crazycal
This passed me on my way through New Mexico. No need to thank me. LOL
|
It's not opening for me
|
|
|
|
|
07-14-2015, 09:15 AM
|
#37
|
|
Skoolie
Join Date: Feb 2015
Location: South Dakota
Posts: 217
Year: 2002
Coachwork: Thomas
Chassis: Freightliner HDX
Engine: CAT 3126B250
Rated Cap: 84
|
Not seeing the picture there, crazycal, unless that's the point ;)
|
|
|
|
|
07-14-2015, 09:28 AM
|
#38
|
|
Moderator
Join Date: Feb 2007
Location: NUNYA
Posts: 4,236
Year: 1995
Coachwork: Thomas
Chassis: 3800
Engine: DT408, AT545
Rated Cap: 23 500 gvw
|
I saw it when I posted it but didn't last night. Might have been a glitch. I can see it now but I will repost.
|
|
|
|
|
07-14-2015, 09:51 AM
|
#39
|
|
Skoolie
Join Date: Aug 2014
Posts: 163
|
I have seen lots with chrome stacks off the back corners. Engine one side, genny venturing stack on the other.
|
|
|
|
|
07-14-2015, 11:34 AM
|
#40
|
|
Bus Crazy
Join Date: Sep 2013
Location: Vacaville, Ca
Posts: 1,634
Year: 1988
Coachwork: Crown / Pusher
Engine: 8.3 Cummins
|
Quote:
Originally Posted by nat_ster
Sure you can, right through the roof.
Nat
|
Are you saying it was a bad idea??
|
|
|
|
|
|
 Posting Rules
|
You may not post new threads
You may not post replies
You may not post attachments
You may not edit your posts
HTML code is Off
|
|
|
|
 » Recent Threads
 |
|
|
|
|
|
|
|
|
|
|
|
|
|
|
|
|
|
|
|
|
|
|
|
|
|
|
|
|
|
|
|
|
|
|
|
|
|


 Linear Mode

