 |
|
 04-01-2013, 10:51 PM
|
#61
|
|
Skoolie
Join Date: Feb 2013
Posts: 133
Year: 2000
Coachwork: Phantom
Chassis: Gillig
Engine: Series 50
|
Re: Skoolie Conversions ---- a great group!
Quote:
|
Originally Posted by Newfiedogs
Wow, Very nice and it looks like your surface choices will make it easy to clean with your grooming dryer!
Tracy
|
Tracy, I hope you're right! We usually try to groom outside. You've heard the expression "the fur's gonna fly". Well, it really does with Chows, especially at certain times of the year when they're blowing coat. If I can just keep the dryer from blowing the carpet off the wall . . .  Those grooming dryers really pack a punch!
Thanks guys for the comments. The floor turned out better than my expectations. If it just stays like it is now, I'll be happy. The expansion/contraction factor that they talk about in the instructions gives me a little concern. You have to leave 1/4" around the exterior to allow for this. There will be some places that will be fixed, like under the base cabinets. I hope it doesn't cause a problem. Time will tell. I'm hoping that the narrow width (at least compared to a room in a house) will minimize this issue. Other bus/motorhome installations I've read about haven't mentioned this as a problem.
|

|

|
|
04-02-2013, 10:18 AM
|
#62
|
|
Bus Nut
Join Date: May 2012
Location: Kelso, WA
Posts: 253
Year: 1989
Coachwork: Carpenter
Chassis: International 3800
Engine: DT360
Rated Cap: 72
|
Re: Skoolie Conversions ---- a great group!
Lookin great, love how the floor turned out!
__________________
"That's,. like,.. your opinion, man...." - the Dude.
|
|
|
|
|
04-02-2013, 08:10 PM
|
#63
|
|
Bus Nut
Join Date: Mar 2011
Location: from: Prescott, AZ currently: Denver, CO
Posts: 469
Year: 1992
Coachwork: BlueBird
Chassis: All American RE
Engine: 8.3 Cummins
Rated Cap: 72
|
Re: Skoolie Conversions ---- a great group!
Wow!! Nice work! The floor looks great. 
__________________
Ryan
Bluebird All American RE: Great White Buffalo (gone but not forgotten)
Our build thread: viewtopic.php?f=9&t=10065
|
|
|
|
|
04-13-2013, 03:26 PM
|
#64
|
|
Bus Crazy
Join Date: Feb 2012
Location: Salt Lake City Utah
Posts: 1,635
Year: 2000
Chassis: Blue Bird
Engine: ISC 8.3
|
Re: Skoolie Conversions ---- a great group!
Your work looks great. Thanks for sharing the tip with the cabinet-grade plywood and the laminate. I may look into those more as my project moves farther along. For now I'm planning and shopping -- just over a year ago I bought a 1991 Blue Bird with the 5.9 Cummins in front. In keeping with one of your rules/tips, I drove the thing around several months and made only very minor changes (ie removed and re-arranged some benches) and ended up deciding it wasn't the right platform for my conversion. I sold it last September and have been shopping since.
If you don't mind my asking, what kind of fuel economy do you get from that Phantom? I'm a little scared of the Detroit-powered models because I very nearly bought an old MCI with the 8V92 engine -- fortunately I found a seller who told me to expect 5-6 MPG out of that setup. Maybe I was spoiled by the 10.5-ish my Blue Bird had delivered, but I'm hoping to end up near there again (but with more HP in the engine). I drove Phantoms and other Gilligs about a decade ago when I was driving for my local transit agency; I liked them well enough, but I was doing urban routes and so didn't get much opportunity to run them on the freeway nor ever see what their fuel economy was.
I see yours has the Allison tranny control panel next to the window. Does it have one of those Allisons which can be programmed to run either 5 gears or 6?
|
|
|
|
|
04-15-2013, 08:46 PM
|
#65
|
|
Skoolie
Join Date: Feb 2013
Posts: 133
Year: 2000
Coachwork: Phantom
Chassis: Gillig
Engine: Series 50
|
Re: Skoolie Conversions ---- a great group!
Quote:
|
Originally Posted by family wagon
Your work looks great. Thanks for sharing the tip with the cabinet-grade plywood and the laminate. I may look into those more as my project moves farther along. For now I'm planning and shopping -- just over a year ago I bought a 1991 Blue Bird with the 5.9 Cummins in front. In keeping with one of your rules/tips, I drove the thing around several months and made only very minor changes (ie removed and re-arranged some benches) and ended up deciding it wasn't the right platform for my conversion. I sold it last September and have been shopping since.
If you don't mind my asking, what kind of fuel economy do you get from that Phantom? I'm a little scared of the Detroit-powered models because I very nearly bought an old MCI with the 8V92 engine -- fortunately I found a seller who told me to expect 5-6 MPG out of that setup. Maybe I was spoiled by the 10.5-ish my Blue Bird had delivered, but I'm hoping to end up near there again (but with more HP in the engine). I drove Phantoms and other Gilligs about a decade ago when I was driving for my local transit agency; I liked them well enough, but I was doing urban routes and so didn't get much opportunity to run them on the freeway nor ever see what their fuel economy was.
I see yours has the Allison tranny control panel next to the window. Does it have one of those Allisons which can be programmed to run either 5 gears or 6?
|
Thanks for the kind comments, Family Wagon. I haven't checked the mileage since I drove it home. To get a decent mileage check, I'd have to fill'er up again. $400 worth of fuel is not on my shopping list anytime soon. Since I've been doing the interior work, I haven't been driving it. When I brought it from Orlando, I got 7 mpg. That's about all I expected. That's about double what you get in transit service. Most of our fleet averages 3.5 mpg when used on routes. I don't think my B-400 Allison has the extra gear in it. A dealer told me that there was a serial range that did have the extra gear, but I don't think mine is in the range. When I get my transmission serviced I'll have the dealer check it. The current transmission has about 140,000 miles on it since rebuild.
|
|
|
|
|
06-02-2013, 02:20 PM
|
#66
|
|
Moderator
Join Date: Feb 2007
Location: NUNYA
Posts: 4,236
Year: 1995
Coachwork: Thomas
Chassis: 3800
Engine: DT408, AT545
Rated Cap: 23 500 gvw
|
Re: Skoolie Conversions ---- a great group!
Quote:
|
Originally Posted by LuckyChow
Quote:
|
Originally Posted by mchunt
Welcome. Impressive work.
I'm curious what did you learn from your previous conversion that you will or will not be doing on this one?
|
Wow, that's a big question. The short answer is a lot! In regards to building, I overbuilt some things, under built others. Some things that made sense at the time didn't make sense for the way I ended up using my bus. This is actually my third bus, so I know what worked well for me and what didn't. Some of the things that worked for me will not work for others. If you use your bus as your main living quarters, I think you might build in a different way than if it is a weekend get-a-way vehicle. Also, if you have family travelling with you, you will need to accommodate additional sleeping arrangements. This will impact your floor plan. Here are some of the things I'm doing differently than when I converted my first bus.
1. I don't cook in the bus much. Too hot in the summer time. I usually cook on the grill outside unless it's raining. Install a convection microwave. It's good for microwaving and baking. No stove or cook top. Just counter space with a sink. Use an electric skillet if you need to fry anything. I have a small, portable, induction cook top for boiling water for spaghetti. It's best if you run separate electrical outlets for these and not put them on the same one in case you need to use both at the same time. For weekend/3 day trips, I prefer to take pre-made plates I prepare at home or vegetable plates I buy at the local diner. I cook outside on the grill only in the late evening.
2. No overhead cabinets. I think I just heard some ladies scream! Other than too many dishes, mine mostly carried things I never used, with half of them remaining empty most of the time. If you can do without them, it really opens up the interior space. Use pull-out platforms in your bottom cabinets for dishes and pots. Again, I never used many of the ones I carried, so I was hauling way too many.
3. Use a home style fridge. The RV fridges work fair (most of the time), but you've got the issue of leveling (they need to be relatively level or their life is shortened). They are expensive, and they are small compared to what we are familiar with at home. As mentioned above, I like to take pre-prepared meals with me. These take up a good bit of room. Also, the freezers are small on RV fridges.
4. No LP. The items in RVs & buses that typically run on LP are fridges, cook tops, and furnaces. I use a 10 CF home style fridge, electric cook top, electric convection oven, and a ceramic heater for heating. I don't use the bus much in the winter. A ceramic heater keeps it nice and warm for the cool October mornings. No need for LP.
5. Make the bathroom as small as possible. If you think about how little time is spent in this space, it doesn't make much sense to have a large bathroom. You're just not there that long every day (probably ). Use the saved space for your main living quarters. You'll get more use from it.
6. Use quality RV furniture when possible. Like Flexsteel ---- yes, I know, it's not cheap, and I'm not rich either. But, it is scaled to fit into RV spaces and still be comfortable. By being slightly smaller than home style furniture, it doesn't over power your interior space by being out of scale. If you do a bit of looking, you can usually find very good used pieces on Craigslist.
7. Use 12 volt lighting (or 24 volt in my case). You can find just about anything you want now in low voltage. It works directly off the battery bank, without inverters, and is simple to install. I've always used reflected lighting. I like to bounce it off the ceiling by placing fluorescents behind a valance (down the side of the ceiling) or in a shaded fixture. I don't like to see the source of a light shining into my eyes. Reflected light (from the ceiling) is much more pleasant. You can also buy compact fluorescents now that are 12V, and use the same light fixtures as regular household bulbs. You just need to wire them on 12V and not 120V --- else you're in for a big surprise on power up!
8. I like a booth in the kitchen. This is just a personal preference of mine. Tables take us much less space than booths though, so if youre tight on space, consider using a table.
9. I wanted to build my current bus without 2X4 framing. This is the first time I've done this, and so far, it has worked out well. This advice was given to me by an older gentleman that is a long time converter. Please don't think that using 2x4's for framing is the wrong way. I don't believe that at all. Not using 2x4 framing is just a different way of doing it. The reason for not using them is straight forward ------ if you add up the width of all the 2x4's used in the bus, you will lose between 1 to 2 feet in bus length by the time you are through.
It's been an interesting experience figuring out how to brace all those walls without using 2x4s. Aside from the "engineering" time, it has added to the cost of the interior conversion, probably by $1,000 dollars. Mostly, the cost comes from requiring cabinet grade plywood instead of a lesser grade. Since there is no framing to screw to, you must use very straight ¾ inch plywood. As a result, I've rarely been able to find any plywood I can use at Lowes or HD. I did buy 5 sheets at Lowe's last month when they got in a new supply that was straight. After it sits there a while, it takes on a curve due to the way they shelf it. If you stand a sheet of ply up on its edge and sight down it, it must be straight with no curve. You can't really get the curve out if there is no framing to screw it to. As a consequence, Ive had to buy my plywood at the place most of the local cabinet makes use. They dont have Home Depot pricing.
10. Get all the bus mechanicals fixed before you start converting. I've done it both ways, and this way was better for me. My first bus needed several things repaired, nothing major, but things that should be done before using it much. I didn't really have the money to get them all fixed at the time, so I worked on the inside first. Before you know it, you'll find a place you want to take the bus for a weekend outing, but you can't go due to maintenance issues. On my current bus, I started getting maintenance things out of the way first. Couldn't do them all at once, but did them as I could afford it. The only things inside I did was to remove all the seats, rubber on the floor, and planned, planned, planned. Also, I started to buy up a few things I'd need once the interior work started. This gives you time to find good deals. I had the bus almost a year before I started the interior.
11. Use the bus whenever you can while converting. I can't stress this enough. If you work on it every weekend, but never use it, you can lose the luster for completing it. It's important to have some balance. It will also give you an idea of what works and what doesn't and give you memorable moments to laugh about in the future. This is another reason to get all your mechanicals fixed first.
12. Have buy-in from the family. Things go much better if your family is involved. Sharing the experiences brings you closer and teaches many lessons to the younger generation.
13. No generator. This won't work for everyone, maybe not even most, but it should work fine for me. Over several years of RV'ing/busing, I've discovered that I never go anywhere (as a destination) that doesn't have electrical hookups. First off, my bus is built primarily as my "dog show" vehicle. By far and away, most of my use is going to dog shows in the local region. It's hot down here in the summer, so A/C is required 24/7, especially with my Chow Chows. They have polar bear coats on them and need A/C to stay cool. With our heat and humidity, you just have to have A/C.
If you haven't done the math yet, running a genset 24/7 takes a about 10 - 12 gallons of fuel every 24 hrs. That's around $50. This greatly increases your weekend expense, not to mention those 150 hour maintenance intervals on the genset. Typically I'll be gone 3 days to a show. It's much cheaper to use the destination site's electric than to bring your own. Add to this the initial cost (and maintenance) of a genset and you're into a lot of dollars. Onan diesel generators are $5,000 to $7,000 for a new/used one. Plus you have to have some place to put it. Transit buses aren't exactly overrun with under floor storage. To solve all these problems, and to reduce expense, I decided I can live entirely without a generator. To do so, you need a little up-front planning though. Heres what I did:
a) I bought a bus with great air conditioning already built in. Transits have huge air conditioners on them. They must have them to accommodate the constant open/closing of doors as well as a bus full of passengers. So, I kept my A/C in the conversion. The down side of this is the duct work takes up conversion space, and A/C maintenance can be expensive if stuff goes wrong.
b) I have roof top A/C units for when I'm parked. Plug in to the destination electrical source and you're set for the weekend.
c) My Gillig has a 24V 270 amp generator on it. This is about 7.5 Kw of electrical power when you consider that the output voltage is actually 28 volts, not 24. I have a 3Kw sine wave inverter and a suitable battery bank for it. If need be, I can run an A/C unit while the engine is running for emergency cooling. This is my backup if Im on the road and the A/C goes out. So, I'm pretty much covered for A/C whether going down the road or at a destination. The one situation I cannot handle is boon docking. That's only practical for me in the early spring or late fall due to the heat.
So, this was the short answer. Youre probably sorry you asked. I hope I didnt bore everyone to death. There are many different ways to build a conversion. Everyones needs and wants arent the same. Thats why we all build it our way! |
A most excellent post. I like how clean the buses look in white and the two tone looks good too. What kind of paint did you use. And the most important question, how do you find time for dog show with the amount of time spent building the bus? You might have answered this already but I felt the need to post when I read the above. Keep up the excellent work and POST LOTS OF PICTURES.
|
|
|
|
|
06-02-2013, 11:08 PM
|
#67
|
|
Skoolie
Join Date: Feb 2013
Posts: 133
Year: 2000
Coachwork: Phantom
Chassis: Gillig
Engine: Series 50
|
Re: Skoolie Conversions ---- a great group!
Thanks crazycal! I'm glad you enjoyed it.
My paint job was not done by me. I sent it to a shop for that, so I can't take credit for the paint. Painting a whole bus is not a job I'm good at and I don't have the equipment to do a good job. To be honest, I don't know what kind of paint they put on it. It seems to have worked out okay though. I haven't had any issues.
You hit the nail on the head when you asked how I had time to go to dog shows and do all this work. The short answer is I haven't been going for the past year. Right now I don't have anything to show, so it worked out. My old girl is enjoying her elder years hanging with Pop. After I get home from work and go down to the bus, she's right there with me. She lays down outside near the door and watches the goings-on. We'll be taking a little trip very soon though. I know she misses going to the shows.
I don't know about everyone else, but my time is so tight I haven't done anything in my spare time for the past year except work on the bus. There's a tremendous amount of work and planning that goes into building these things and everything seems to take twice as long as you think when you start out. Yesterday I spent 2/3rds of the day building a platform over the front wheel housing that will hold the dog crate. It's just crazy the amount of time it takes to plan, round up all the materials, and build something out. I try to plan one project while I'm working on another one. That way you can order anything you don't have and hopefully, it'll arrive before you need it. I'm also having to make a good bit of my trim from angle aluminum. It's not hard, but it is time consuming. Also, putting laminate on everything takes up time too.
I'll have a photo update this week. I've got a good bit more done, but the bus has been so messy with everything strewn about, I haven't taken the pics yet. Today I installed the outside marine connector for the 50 amp service cord. You've probably seen them on some RV's before. They're made by Marinco and your service cord plugs into it on the outside of the bus. Hooked it up to my breaker box, as well as the air conditioner. Finally, I can get rid of the extension cords running in through the door and windows. Luckily, I was able to miss any braces when I cut a hole in the side of the bus. It's not hard when you have the interior walls out, but I didn't take mine out on this bus.
|
|
|
|
|
06-10-2013, 09:01 PM
|
#68
|
|
Skoolie
Join Date: Feb 2013
Posts: 133
Year: 2000
Coachwork: Phantom
Chassis: Gillig
Engine: Series 50
|
Re: Skoolie Conversions ---- a great group!
It's been a while since I posted an update. I've been working on several things at the same time, but it's coming along. A couple of weeks ago I built the platform over the right front wheel well where I'll put the dog crate.
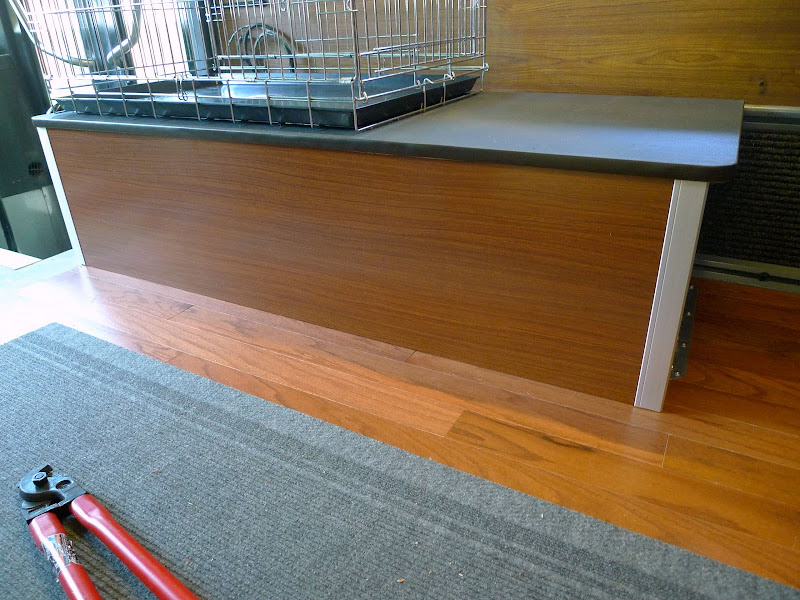
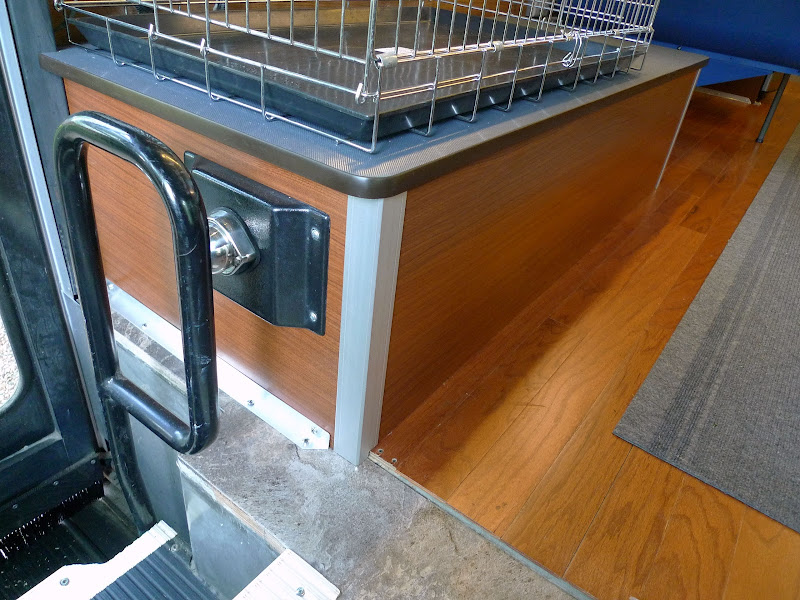
The top is covered with a rubber mat that is actually conveyer belting. Nice and thick and indestructible. The trim around the top edge is brown T-moulding. The corners are extruded aluminum corner moulding, which I've shown in some previous pics. I placed a crate on top just to see how much room there is around it. It will be anchored to the top. Sure makes that ugly wheel well look better.
I still haven't put the front edge on the flooring. I can't really fit it until the other wheel well is completed.
I also have the fridge installed. I did a lot of head scratching to figure out how to keep that jewel where it's suppose to be. It's between two panels, with spacers on the side. I made the spacers out of Trex board, since it's a sort of plastic. The fridge can't move fore or aft. I just needed to come up with a plan to keep it in the hole. In the end, I made a bracket that fits across the top and is secured to both sides. I screwed sheet metal screws into the fridge on the top edges. I was really glad to find out it still cools after getting it set in.


Not a very good picture, but this is the top edge with the bracket across the top of the fridge. One problem I ran into is that the top of the fridge is not flat. I'm guessing this is because the foam they inject them with expands. It makes the bracket look a little wonky, but not much you can do about it. In the rear is the combination switch and outlet I installed for the fridge. This is an easy way to turn it off and on without adjusting the thermostat inside.

Here's the bottom angle bracket which is bolted to the bottom of the fridge "legs". I used a quarter inch bolt so it's not going anywhere. It is bolted all the way through the floor with another quarter inch bolt. On the bottom side of the floor I used a T-bolt nut so it can be unscrewed from the top easily.
I'm currently in the middle of finishing up the electrical. Here's the electrical cabinet with the breaker boxes installed and being wired up. The one on the left is the main panel and the one on the right is the inverter sub-panel. Inverter is in the background. These electrical panels are Progressive Dynamic PD5500's. They are made for RV use and are relatively inexpensive at only $35 each.


A little peek behind the curtain. The large black cord going to the wall is #6 service cord that connects to the Marinco 50 amp connector on the outside. I repurposed this electrical cable from a service cable used on mobile homes. It was perfect my this use.

Here's the Prosine 3,000 watt sine wave inverter. This inverter is 8 years old at this point, but still works great. I'm hoping it stays that way! My bus is 24 volts, so it is a 24 volt model. I haven't installed the batteries yet. Just started on the cabling. Got the power posts and class T fuse block mounted though. I have two 4-D AGM batteries that will sit below on the floor of the electrical compartment. I don't really have room for them under the bus. Normally you would not install a battery bank inside unless they're sealed AGM's. Regular lead acid batteries would gas too much for this installation. Also, there will be a floor in this compartment to seal the batteries off from the other electrical apparatus.
|
|
|
|
|
06-11-2013, 03:54 AM
|
#69
|
|
Bus Geek
Join Date: Nov 2011
Location: MNT CITY TN
Posts: 5,158
|
Re: Skoolie Conversions ---- a great group!
Coming along nicely
__________________
Our build La Tortuga
Accept the challenges so that you can feel the exhilaration of victory.
George S. Patton
|
|
|
|
|
06-11-2013, 04:12 AM
|
#70
|
|
Bus Crazy
Join Date: Aug 2011
Location: Central Tennessee
Posts: 1,093
Year: 1973
Coachwork: Blue Bird
Chassis: All American
Engine: CAT 1160 V-8 Diesel
Rated Cap: 72
|
Re: Skoolie Conversions ---- a great group!
You do very nice and clean work. I really dig your electrical station.
|
|
|
|
|
08-18-2013, 08:10 PM
|
#71
|
|
Skoolie
Join Date: Feb 2013
Posts: 133
Year: 2000
Coachwork: Phantom
Chassis: Gillig
Engine: Series 50
|
Re: Skoolie Conversions ---- a great group!
Well, it's time for an update. Here's what I've been working on.
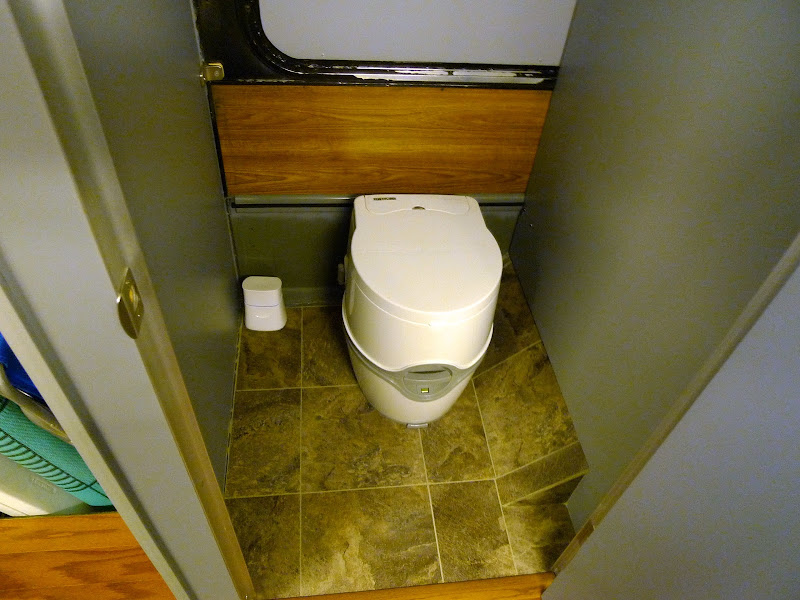
Since I don't have plumbing in yet, I'm using a portable toilet. I really like this one. It has a base plate you can use to secure it to the floor. It also is high enough so you aren't sitting with your knee's around your chin. Electric Water flush, 5 gallon holding tank, toilet paper roll hidden behind a panel that folds out on the right hand side, really all you could ask for with a portable. This is an item I expected to hate, but it's turned out to be quite the opposite.
 Electrical Closet
The electrical closet is finished, well, at least till I run some more circuits to it. Came out pretty good. There are two 4-D glass mat batteries in the base on the floor. These are my house batteries. There is also a switch that I can switch between house batteries, bus batteries, or combine both. That is very handy. When going down the road, I switch over to the bus batteries, as the inverter runs my 10 cf house fridge.


The two black boxes at the bottom are the electrical panels. The one on the left is the main panel and the one on the right is for items run off/through the inverter. The two black objects above the electrical panels are louvered vents for cool air intake. On the upper part of the door is the 24V electrical panel and the inverter control.

Inside the electrical closet are the components. At the top of the closet I installed 2 very quiet muffins fans with a thermostat. I wasn't sure how much heat I was going to get from that inverter, so I needed to make sure it had enough cooling air. It does tend to get hot if charging the batteries at a high rate.


Here's something that wasn't part of the original plan ------ a 24V battery charger. The inverter has a good one in it, but when running, the fans sound like a Cessna 172 taking off. Just too noisy. I installed a Progressive Dynamics charger to use instead of the one in the inverter. They have an excellent charger, made for RV use, that has an extremely quiet fan. Can't even hear it running. I usually disable the inverter charger and use this small one.
 Outside Door Switch
If you've followed my build, you might remember that I originally had an air operated door with a manual valve. I converted it to electric-over-air so that I can control it with electric switches. Here's my switch I mounted on the outside.

I've discovered that my air stays up enough to operate this door for about 24 hrs before I need to turn on the electric air compressor. I have one of those very quiet ones, small, 120v. Will easily run off my inverter if I need to. Running it once a day is all I need to keep the door working.

Here's the electric switch I mounted inside near the door (green button). This makes it easy to go in and out. There is also a switch mounted above it (you can't see it in the photo) that disables the outside switch so someone can't open the door from the outside if you don't want them in.
Steering Wheel Update
I recently changed out my steering wheel to a newer more modern looking wheel from VIP. They make excellent wheels and they are much less expensive than you might think. I believe this one cost about $75.
 Bedroom
The bedroom is finished. Here are the twin beds. They sit over the top of the water tank.

Here's the view from outside the bedroom door.

Here's something that is very handy. It's a stainless tubular shelf from Ikea. It's mounted on the wall at the foot of the bed. It's high enough that it's out of the way and looks good. Only $20.

 Living Room / Kitchen
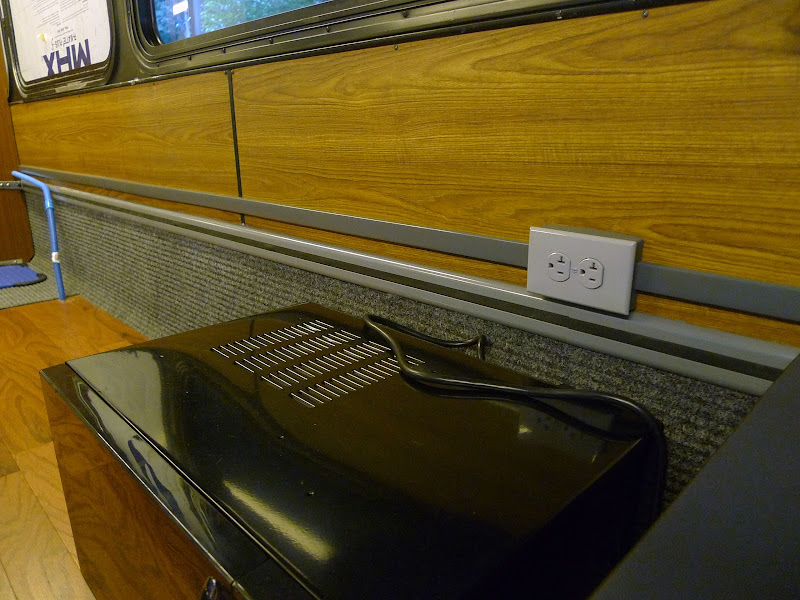
This is the left hand wall of the bus (drivers side). Since I didn't tear out my walls, I needed to come up with a way to run electrical power down it. This is what I ended up doing. Just on-the-wall electrical covers from either Lowes or HD. They were white originally, but I painted them grey. I did this on both sides of the bus. Whenever the kitchen cabinets get put in, they will hide most of it.
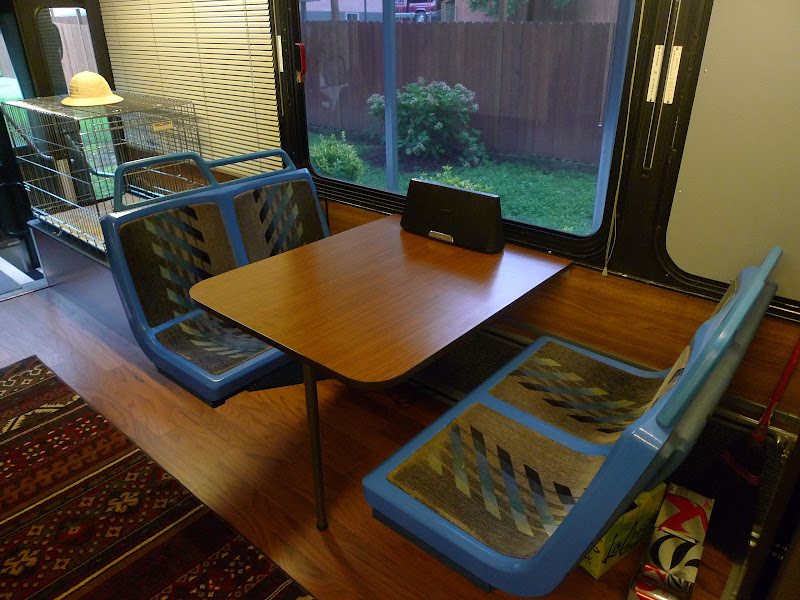
Here's my booth. I like a good booth. Some people prefer tables and chairs but I'm the opposite. The downside of booths are they take up more space than a table. I used two seats from the bus for the booth seats, one from each side so they could face each other. I couldn't find a table anywhere the right size, so I made my own.
And lastly, my living room. Here's a view from the front.

And a view from the back looking towards the front. You can also see my tv mounted on the panel behind the drivers compartment.

Hope everyone enjoyed the update!
|
|
|
|
|
08-19-2013, 06:00 AM
|
#72
|
|
Bus Geek
Join Date: Nov 2011
Location: MNT CITY TN
Posts: 5,158
|
Re: Skoolie Conversions ---- a great group!

nuf said 
__________________
Our build La Tortuga
Accept the challenges so that you can feel the exhilaration of victory.
George S. Patton
|
|
|
|
|
08-19-2013, 08:36 AM
|
#73
|
|
Bus Crazy
Join Date: Feb 2009
Location: Austin, TX
Posts: 1,489
Year: 1996
Coachwork: Thomas
Chassis: International
Engine: DT466/AT545
|
Re: Skoolie Conversions ---- a great group!
Wow. Very slick. Well done!
|
|
|
|
|
08-19-2013, 11:23 AM
|
#74
|
|
Bus Nut
Join Date: Dec 2009
Location: MN
Posts: 732
Year: 1991
Coachwork: Wayne
Chassis: International 3800
Engine: DT466
Rated Cap: 72
|
Re: Skoolie Conversions ---- a great group!
So clean and open looking!! Very professional as well. I love it!
__________________
The journey is the destination...
Brutus
|
|
|
|
|
08-19-2013, 12:51 PM
|
#75
|
|
Bus Crazy
Join Date: May 2010
Location: Farmington Hills, Mi (Detroit area)
Posts: 1,968
Year: 2000
Coachwork: Eldorado Aerotech 24'
Chassis: Ford E-450 Cutaway Bus
Engine: 7.3L Powerstroke
Rated Cap: 19
|
Re: Skoolie Conversions ---- a great group!
Beautiful work!!!!
|
|
|
|
|
08-19-2013, 01:49 PM
|
#76
|
|
Bus Crazy
Join Date: Nov 2010
Location: Andrews,Indiana
Posts: 2,436
Year: 1991
Coachwork: Bluebird
Chassis: AARE
Engine: 3116 Cat 250hp
Rated Cap: Just the two of us.
|
Re: Skoolie Conversions ---- a great group!
Well done!!!
|
|
|
|
|
08-19-2013, 01:50 PM
|
#77
|
|
Bus Nut
Join Date: Jun 2013
Location: West Lafayette, IN
Posts: 832
Year: 1999
Coachwork: Thomas
Engine: 3126
Rated Cap: 72
|
Re: Skoolie Conversions ---- a great group!

Stealing from bansil, good work
|
|
|
|
|
08-20-2013, 08:05 PM
|
#78
|
|
Bus Nut
Join Date: May 2012
Location: Kelso, WA
Posts: 253
Year: 1989
Coachwork: Carpenter
Chassis: International 3800
Engine: DT360
Rated Cap: 72
|
Re: Skoolie Conversions ---- a great group!
Very clean work, looks professional.
__________________
"That's,. like,.. your opinion, man...." - the Dude.
|
|
|
|
|
08-20-2013, 10:52 PM
|
#79
|
|
Skoolie
Join Date: Feb 2013
Posts: 133
Year: 2000
Coachwork: Phantom
Chassis: Gillig
Engine: Series 50
|
Re: Skoolie Conversions ---- a great group!
Thanks guys. I really appreciate the comments. Sometimes when I'm working on the bus, I think about you guys (and ladies), and that you're out working on your buses the same as me. I'm really glad to have the company and to know that I'm not the only one that enjoys this. I wish we weren't all spread out so far. I'd love to organize a mini-rally for all of us to bring our buses, swap a few stories and have a good laugh or two. People have no idea how much time we put into these, and because of that, there's some of us in each of our buses. As far as I know, I'm the only one in my area doing a conversion. But if there's anybody in or around Atlanta that is working on one, and haven't posted anything yet, please speak up. I'd love to do a meet-up at a campground sometime.
This was taken a while back, but is a typical day of "bus work", probably on a Saturday. I don't have a fancy shop to work in. It's usually an outdoor thing on two sawhorses. Thankfully I do have a roof over the bus, which helps keep the heat down when working inside. The foreman is usually there with me ------ you can see her on lying outside the door.

I had the "Inaugural Run" two weeks ago. It was the first time out for the bus. I don't have any running water or kitchen cabinets for that matter, but we went and had a great time anyway. The bath house was a short walk away so it was easy to take a shower. This was a new campground just built this year. The trees weren't as big as I like them, but it was fun. A couple of friends came over on Saturday afternoon. We had a cookout, swapped fish stories, and ate too much. A good time was had by all.


There was a beautiful Prevost in the background. I didn't get to meet them while there, but they waved to us as we were leaving.
This past weekend I went to a different campground (in my car) scouting for a good site for Labor Day weekend. I think I found it.

However, the site is already booked. I'll keep looking. I hope to find something by then.
|
|
|
|
|
08-21-2013, 05:32 AM
|
#80
|
|
Bus Geek
Join Date: Nov 2011
Location: MNT CITY TN
Posts: 5,158
|
Re: Skoolie Conversions ---- a great group!
great times!!!
and that does look like a pimp site maybe you can grab it next year
__________________
Our build La Tortuga
Accept the challenges so that you can feel the exhilaration of victory.
George S. Patton
|
|
|
|
|
|
 Posting Rules
|
You may not post new threads
You may not post replies
You may not post attachments
You may not edit your posts
HTML code is Off
|
|
|
|
 » Recent Threads
 |
|
|
|
|
|
|
|
|
|
|
|
|
|
|
|
|
|
|
|
|
|
|
|
|
|
|
|
|
|
|
|
|
|
|
|
|
|


 Linear Mode

