 |
|
 06-02-2011, 12:49 PM
|
#61
|
|
Skoolie
Join Date: Mar 2010
Location: Shoreline, WA
Posts: 176
Year: 1998
Coachwork: Thomas
Chassis: International
Engine: 7.3L, International
Rated Cap: 35
|
Re: the akitabus
Next i am going to work on the frigerator cabinet and holes for vent... now that i have cut into side wall of bus I don't think I can stop myself from cutting more of them... its kinda fun.
till next time.
Dogfinn
|

|

|
|
06-02-2011, 07:47 PM
|
#62
|
|
Bus Crazy
Join Date: Apr 2010
Posts: 1,485
|
Re: the akitabus
window looks good! so does the installation of the hot water heater
|
|
|
|
|
06-03-2011, 02:16 AM
|
#63
|
|
Almost There
Join Date: Oct 2010
Location: Vashon Autonomous Zone, Cascadia
Posts: 75
Year: 1995
Coachwork: Thomas MVP
Chassis: Thomas
Engine: Cummins8.3 Allison MD3060
Rated Cap: 72
|
Re: the akitabus
What are the details on the water heater, Finn? ($ too?)
|
|
|
|
|
06-03-2011, 03:02 PM
|
#64
|
|
Skoolie
Join Date: Mar 2010
Location: Shoreline, WA
Posts: 176
Year: 1998
Coachwork: Thomas
Chassis: International
Engine: 7.3L, International
Rated Cap: 35
|
Re: the akitabus
Not cheap... it is an RV-500, same unit that went in to the "Good News bus", got it from Global pro tankless or somehting like that... if you are really interested I can get you the correct name and a telephone number. I got the one with a winter protection system and it cost approx 1100.00. My water heater and refrigerator are the two most expensive thing I am putting into the bus. I have heard to many horror stories about 300.00 to 400.00 hot h20 tanks that rot out and don't last but a couple of years, so i dumped the big bucks for the rv-500.
http://precisiontemp.com/pt_rvmd_rv500.html
The above link should get you there.
till next time
Dogfinn
|
|
|
|
|
06-03-2011, 03:16 PM
|
#65
|
|
Skoolie
Join Date: Mar 2010
Location: Shoreline, WA
Posts: 176
Year: 1998
Coachwork: Thomas
Chassis: International
Engine: 7.3L, International
Rated Cap: 35
|
Re: the akitabus
Here is a couple more pics of the tankless heater.
Close up of the capped rub rails.
Pic from inside the bus of the hot water maker.
so much to do do and so little time.
Dogfinn
|
|
|
|
|
06-05-2011, 02:14 PM
|
#66
|
|
Bus Crazy
Join Date: Apr 2008
Location: Bakersfield, California
Posts: 1,013
Year: 1976
Coachwork: Crown
Chassis: Supercoach
Engine: Detroit 6-71 Mid-Ship Mounted
Rated Cap: 79 at Birth
|
Re: the akitabus
Looking real nice 
|
|
|
|
|
07-20-2011, 12:16 PM
|
#67
|
|
Skoolie
Join Date: Mar 2010
Location: Shoreline, WA
Posts: 176
Year: 1998
Coachwork: Thomas
Chassis: International
Engine: 7.3L, International
Rated Cap: 35
|
Re: the akitabus
getting ready for the refrigerator vent, went with the Norcold N641, even the simplist of task seem to take forever to get done.
completed vent, also ran all the LP lines under bus... went with black 1/2" pipe and left stubs into the bus with valves then copper tubing to the appliances.
|
|
|
|
|
07-20-2011, 12:21 PM
|
#68
|
|
Skoolie
Join Date: Mar 2010
Location: Shoreline, WA
Posts: 176
Year: 1998
Coachwork: Thomas
Chassis: International
Engine: 7.3L, International
Rated Cap: 35
|
Re: the akitabus
close up of the rab rail end before fitting and welding caps on the cut ends.
after fittiing and welding caps on the ends, little by little we get better at what we are doing.
|
|
|
|
|
07-20-2011, 12:26 PM
|
#69
|
|
Skoolie
Join Date: Mar 2010
Location: Shoreline, WA
Posts: 176
Year: 1998
Coachwork: Thomas
Chassis: International
Engine: 7.3L, International
Rated Cap: 35
|
Re: the akitabus
Looking through the vent at the backside of the OD water heater sitting the the other wheel bump.
Little by little we make progress.
till next time
|
|
|
|
|
07-20-2011, 01:36 PM
|
#70
|
|
Bus Crazy
Join Date: Apr 2008
Location: Bakersfield, California
Posts: 1,013
Year: 1976
Coachwork: Crown
Chassis: Supercoach
Engine: Detroit 6-71 Mid-Ship Mounted
Rated Cap: 79 at Birth
|
Re: the akitabus
Very nice work...looks like you're making some good progress.
|
|
|
|
|
07-20-2011, 02:31 PM
|
#71
|
|
Bus Crazy
Join Date: Feb 2009
Location: Austin, TX
Posts: 1,489
Year: 1996
Coachwork: Thomas
Chassis: International
Engine: DT466/AT545
|
Re: the akitabus
Great welding job on the rub rails - I'd really like to acquire that skill & equipment one of these days.
I'm curious about something though: I don't understand how that vent works - it looks like the rain would just go right into it, almost like it's upside down or something? Maybe it's just a visual illusion, or I'm not seeing it clearly in the pic?
|
|
|
|
|
07-20-2011, 03:58 PM
|
#72
|
|
Bus Geek
Join Date: Jun 2004
Location: Roswell, NM
Posts: 3,588
Year: 1986
Coachwork: BlueBird
Chassis: 40 ft All American FE
Engine: 8.2LTA Fuel Pincher DD V8
Rated Cap: 89
|
Re: the akitabus
It's the way it was made. It's installed right. Just looks odd. It's a fairly common RV vent cover.
|
|
|
|
|
07-20-2011, 04:05 PM
|
#73
|
|
Skoolie
Join Date: Nov 2010
Posts: 119
|
Re: the akitabus
I think copper line for the gas is not a good idea due to vibration. When you flare copper the material gets stressed at the flaring point and may break due to vibration from driving ( a problem that does not exist with static applications). Probably an approved flexible hose from your line to the appliance would be a better idea.
|
|
|
|
|
07-20-2011, 04:23 PM
|
#74
|
|
Skoolie
Join Date: Mar 2010
Location: Shoreline, WA
Posts: 176
Year: 1998
Coachwork: Thomas
Chassis: International
Engine: 7.3L, International
Rated Cap: 35
|
Re: the akitabus
Now you tell me, after we bought and used the flaring tool......I would agree with that that the vibration could pose a problem. I have but a short run to the water heater and it is fastened against the wall with rubberized gromets so I think on that one I am safe, but I will take a closer look at the other appliances to make sure that we don't have a problem.
And the vent does look like it is upside down but it is not, the little hole are on the top and we have had plenty of rain in Seattle with no leakage...
Rain and cold go away, how can I ever paint the bus in this weather.
Dogfinn
|
|
|
|
|
07-20-2011, 04:38 PM
|
#75
|
|
Bus Geek
Join Date: Jun 2004
Location: Roswell, NM
Posts: 3,588
Year: 1986
Coachwork: BlueBird
Chassis: 40 ft All American FE
Engine: 8.2LTA Fuel Pincher DD V8
Rated Cap: 89
|
Re: the akitabus
Quote:
|
Originally Posted by pipopak
I think copper line for the gas is not a good idea due to vibration. When you flare copper the material gets stressed at the flaring point and may break due to vibration from driving ( a problem that does not exist with static applications). Probably an approved flexible hose from your line to the appliance would be a better idea.
|
I'm sitting typing this in a 1977 sticks-n-staples RV with the original copper tubing. No flexible tubing in the whole thing (except for the homemade "Extend-a-stay" we built). It has 93,250 miles on it. LP to the furnace, range and water heater. You had better be very careful about the flexible METAL tubing that are for gas appliances. The stuff that is articulated will rust and leak in a very short time.
Like this...
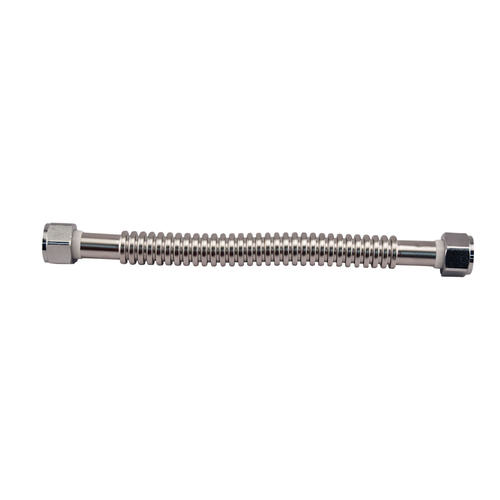
Don't get this, it will break at the articulation and leak. It was not made to handle being moved a lot. We prefer the iron pipe with shutoff valves and flexible rubber gas hoses. (I think the one pictured is for water hook up but the gas one looks just like it)
|
|
|
|
|
07-20-2011, 05:57 PM
|
#76
|
|
Mini-Skoolie
Join Date: Jul 2011
Posts: 34
|
Re: the akitabus
Quote:
|
Originally Posted by Diesel Dan
Great welding job on the rub rails - I'd really like to acquire that skill & equipment one of these days.
I'm curious about something though: I don't understand how that vent works - it looks like the rain would just go right into it, almost like it's upside down or something? Maybe it's just a visual illusion, or I'm not seeing it clearly in the pic?
|
The white cover has the 3 recesses that have openings along the top. The back, sides and bottom of each recess is solid. It isn't truely a vent so much as a ventilated cover that covers the working parts of the refrigerator. RV fridges usually vent burner gases out through the roof.
|
|
|
|
|
08-23-2011, 01:21 PM
|
#77
|
|
Skoolie
Join Date: Mar 2010
Location: Shoreline, WA
Posts: 176
Year: 1998
Coachwork: Thomas
Chassis: International
Engine: 7.3L, International
Rated Cap: 35
|
Re: the akitabus
Well it has been awhile since we posted anyhting, so here it is short and sweet.
Should be able to store the required things up here.
|
|
|
|
|
08-23-2011, 03:11 PM
|
#78
|
|
Skoolie
Join Date: Dec 2010
Location: Southeast British Columbia
Posts: 106
Year: 2003
Coachwork: Bluebird
Chassis: International
Engine: DT466E
Rated Cap: 72
|
Re: the akitabus
Hello, I have the same lower vent for my fridge. Yours does look to be upside down, it should have the twist latches on the bottom. If water runs over your it will fill up. Also if you plan on using your fridge on propane, I would line the back wall and upper vent with thin metal. The reason being, I recently took apart a 2008 travel trailer and found the panelled wall behind the exhaust portion of the fridge charred slightly. Also you want the back of the fridge well sealed from the interior of your vehicle in case of propane leak, it should leak outside. I know its sounds a little over kill, but I have had a leak from a fridge in a trailer. I just happened to notice it when I went in to grab a beer, could barely breathe. Both kids were sleeping inside at the time. Scary... I just installed my fridge, I lined the bottom. top and sides of the opening with metal flashing and then sealed it. once the fridge was in place I used spray foam to finish the job. (sorry no pics of installation). Now I sleep better.. That's all for now, thanks, Carl
__________________
Living the dream in the Kootenays
|
|
|
|
|
08-23-2011, 06:38 PM
|
#79
|
|
Skoolie
Join Date: Mar 2010
Location: Shoreline, WA
Posts: 176
Year: 1998
Coachwork: Thomas
Chassis: International
Engine: 7.3L, International
Rated Cap: 35
|
Re: the akitabus
If I flip my vent over so that the latches are on the bottom so will be my little vent holes in each vain of the vent, the way it is the picture the holes for the vent are on top and no water can get in. Perhaps they have changed the way the vents are made because I am 100 % sure that it is in correctly.
|
|
|
|
|
08-23-2011, 10:31 PM
|
#80
|
|
Skoolie
Join Date: Dec 2010
Location: Southeast British Columbia
Posts: 106
Year: 2003
Coachwork: Bluebird
Chassis: International
Engine: DT466E
Rated Cap: 72
|
Re: the akitabus
Your right, I just looked at mine. The design is the same but the latch is on the bottom, sorry about that. Cheers
__________________
Living the dream in the Kootenays
|
|
|
|
|
|
 Posting Rules
|
You may not post new threads
You may not post replies
You may not post attachments
You may not edit your posts
HTML code is Off
|
|
|
|
 » Recent Threads
 |
|
|
|
|
|
|
|
|
|
|
|
|
|
|
|
|
|
|
|
|
|
|
|
|
|
|
|
|
|
|
|
|
|
|
|
|
|


 Linear Mode

