 |
|
 02-23-2015, 08:34 AM
|
#21
|
|
Bus Nut
Join Date: Feb 2015
Posts: 258
|
Just curious - why did you decide on a bulb seal in the "corner" and such a big air gap? The camper I'm going to replace with my own Skoolie project has about a 1/8" gap (maybe 3/16"...) and the seal is on the "face" of the inner flange. The cam latch then draws the door tight against the side, compressing the seal. I had planned to do more or less the same, and was wondering if you had some reason for it.
|

|

|
|
02-23-2015, 11:55 AM
|
#22
|
|
Bus Geek
Join Date: Aug 2011
Location: Stony Plain Alberta Canada
Posts: 2,937
Year: 1992
Coachwork: Bluebird
Chassis: TC2000 FE
Engine: 190hp 5.9 Cummins
Rated Cap: 72
|
Looks like a good solid planned out design to me.
I hope there is a good, affordable metal working shop close to you so this can become a reality.
Nat
__________________
"Don't argue with stupid people. They will just drag you down to their level, and beat you up with experience."
Patently waiting for the apocalypses to level the playing field in this physiological game of life commonly known as Civilization
|
|
|
|
|
02-23-2015, 01:26 PM
|
#23
|
|
Bus Nut
Join Date: Aug 2013
Posts: 703
Year: 1995
Engine: DT408
|
Quote:
Originally Posted by family wagon

Finally, I've looked at some pictures of under-body tool boxes online and based on ideas there came up with this concept using piano hinge.

That's 8 bends per door (four in top and bottom shown, four more in left/right sides not shown), and I'd want 5 doors, plus the sill/jamb pieces. I don't have any idea whether that'll cost me an arm and leg to have manufactured. There's some bulb seal gasket in there hoping to keep the water and dust out. I'm thinking paint the steel parts first and then assemble with aluminum or stainless piano hinge.
Comments, criticisms, tales of woe (related to basement doors only, please!  ) are invited.. |
I've looked at basically doing the same thing but with one exception. Personally I really dislike piano hinges as they scratch ff the paint with their operation and always look ugly after some time. I'm looking at using what's called "bullet hinges". They won't be rubbing against each other and the door can be easily removed once in the full open position to repaint or repair as need be. We're also not considering the storage areas to be weather proof. We'll be storing things in plastic sealed totes inside the basement storage as extra protection from things getting wet. Here's a product that might be of interest for sealing the compartment.
__________________
I am an sojourner in the earth; hide not Your Commandments from me. Psalm 119:19
Here is the patience of the saints; here are the ones keeping the commandments of YAHWEH, and the faith of Yahshua. Rev. 14:12
|
|
|
|
|
02-23-2015, 05:00 PM
|
#24
|
|
Bus Geek
Join Date: Aug 2011
Location: Stony Plain Alberta Canada
Posts: 2,937
Year: 1992
Coachwork: Bluebird
Chassis: TC2000 FE
Engine: 190hp 5.9 Cummins
Rated Cap: 72
|
I have used the weld on bullet hinges before.
While I agree the paint falls off the piano hinges, I still love the strength. I also like the stainless steel flavor.
I wanted a piano hinge for my residential entry door, but could not find one strong enough in time.
Nat
__________________
"Don't argue with stupid people. They will just drag you down to their level, and beat you up with experience."
Patently waiting for the apocalypses to level the playing field in this physiological game of life commonly known as Civilization
|
|
|
|
|
02-23-2015, 08:50 PM
|
#25
|
|
Bus Nut
Join Date: Feb 2015
Posts: 258
|
Quote:
Originally Posted by nat_ster
While I agree the paint falls off the piano hinges, I still love the strength. I also like the stainless steel flavor.
|
Are you guys painting them assembled or something? Piano hinges are all over the place in homebuilt aircraft and I've only seen paint flaking off one of them. The only surfaces that rub against each other are the mating faces and you don't want paint in there anyway. You do disassemble them before painting right? It's annoying as hell to tape the inside face of every tongue to keep paint out of there, but with the right prep you can totally get a durable finish on them.
If your bad luck has been with aluminum hinges, you should know that a lot of the "generic" options are super cheap alloys and they need to be alodined or similar before they'll hold paint - even then the bond sucks. Stainless sounds a lot better IMO. I'm not sure this is the right thread for this, but if somebody tells me where it's appropriate I can post pics of generic vs. mil-spec stuff. I have a few leftover lengths from my last project and they're totally different beasties. (Totally different price, too.)
|
|
|
|
|
02-23-2015, 09:12 PM
|
#26
|
|
Bus Nut
Join Date: Aug 2013
Posts: 703
Year: 1995
Engine: DT408
|
Quote:
Originally Posted by taskswap
Are you guys painting them assembled or something? Piano hinges are all over the place in homebuilt aircraft and I've only seen paint flaking off one of them. The only surfaces that rub against each other are the mating faces and you don't want paint in there anyway. too.)
|
Every utility box truck and even the battery boxes on our skoolies (that I've seen) eventually succumb to rusting in the places where the hinge contacts another part shearing against it. This leads to very unsightly rust stains and extra maintenance I'd like to avoid, if possible. I even built my own heavy duty piano hinges over 20 years ago and they eventually rusted where making contact even with disassembling, painting (with a high end 3 part acrylic enamel)and reassembling. Working with steel has it's issues. Just trying to find a better solution. One could use stainless steel hinge as long as they riveted it to the door and frame. I'm looking at a totally welded situation. Bullet hinges with nylon washers will probably be the way I go.
__________________
I am an sojourner in the earth; hide not Your Commandments from me. Psalm 119:19
Here is the patience of the saints; here are the ones keeping the commandments of YAHWEH, and the faith of Yahshua. Rev. 14:12
|
|
|
|
|
02-24-2015, 04:53 PM
|
#27
|
|
Bus Nut
Join Date: Feb 2015
Posts: 258
|
Gotcha, thanks for the tips. I've worked more with aluminum than steel and I still have a lot to learn!
Anybody ever try black plastic piano hinges? I wouldn't use them on a passenger door, but for a storage bin flap they're strong enough, and they'll never rust... I have some fiberglass "C" hinges left over from another project. Maybe I'll give those a go.
family_wagon, I kinda hijacked your thread there, sorry. I'm still curious about your choice of the bulb seal placement, though. Is there an advantage to doing that as opposed to putting it on the face? For face installations they have "flange mount" bulb seals that would go right onto the edge of the interior lip that you drew above and you'd never have to worry about gluing it on. Not this size but this shape:

Reason I ask because I've had one fall off my current camper, and I'm looking for a more durable solution.
|
|
|
|
|
02-25-2015, 12:07 PM
|
#28
|
|
Bus Crazy
Join Date: Feb 2012
Location: Salt Lake City Utah
Posts: 1,635
Year: 2000
Chassis: Blue Bird
Engine: ISC 8.3
|
Quote:
Originally Posted by taskswap
Just curious - why did you decide on a bulb seal in the "corner" and such a big air gap? The camper I'm going to replace with my own Skoolie project has about a 1/8" gap (maybe 3/16"...) and the seal is on the "face" of the inner flange. The cam latch then draws the door tight against the side, compressing the seal. I had planned to do more or less the same, and was wondering if you had some reason for it.
|
I just kind of threw the drawing together.. The top 1/4 gap came about because that's the thickness of the arbitrary piano hinge I found on McMaster, and I guess I just figured I'd carry it all the way around. You're right, though, it would look very large on the 3 non-hinge sides. I'll have to do a full-size drawing and maybe a mock-up to figure out how small the gap can be on the side opposite the hinge. Probably it's a function of door height (swing radius) vs depth of the return flange.
The bulb seal placement was just "somewhere around here" without actually shopping for what's available. The products you and sojourner referenced are probably what I'd end up with, and they have the nice perk of covering the exposed metal edge on the jambs.
Quote:
Originally Posted by sojourner
Every utility box truck and even the battery boxes on our skoolies (that I've seen) eventually succumb to rusting in the places where the hinge contacts another part shearing against it. This leads to very unsightly rust stains and extra maintenance I'd like to avoid, if possible.
|
Hmmmm, good point. The rust trails tip is especially applicable to my build as I may end up painting it white. I was thinking about painting the door and jamb separately, then riveting an aluminum or stainless hinge. Do you think body seam sealer between the hinge and the painted steel would help matters any?
Bullet hinges might be a good idea here, too. I've just used a handful of those on a break-away trailer fender design. A long-ish door about 4-5 feet long might need more than two though because the door and jamb will flex. Do you have tricks for positioning several hinges all in-line so the door doesn't bind?
Quote:
Originally Posted by taskswap
Are you guys painting them assembled or something? [...] It's annoying as hell to tape the inside face of every tongue to keep paint out of there, but with the right prep you can totally get a durable finish on them.
|
I had to read this about 4 times before I finally got it.. You're saying pull the hinge pin, put a little piece of masking tape on both sides of every tongue where it rubs against the other half of the hinge, and then spray paint? Yep, I did it wrong (I've only painted one piano hinge, and it was just on a utility trailer anyway). Thanks for the tip.
Quote:
Originally Posted by taskswap
If your bad luck has been with aluminum hinges, you should know that a lot of the "generic" options are super cheap alloys and they need to be alodined or similar before they'll hold paint - even then the bond sucks. Stainless sounds a lot better IMO. I'm not sure this is the right thread for this, but if somebody tells me where it's appropriate I can post pics of generic vs. mil-spec stuff. I have a few leftover lengths from my last project and they're totally different beasties. (Totally different price, too.)
|
Wow. At least at McMaster, the mil-spec hinge category is on a whole different price schedule. The 6 ft 302 stainless in mid-$60, and the aluminum is double that. Apart from paint adhesion on the aluminum, are there other reasons to pony up for mil-spec over the generic stuff?
|
|
|
|
|
02-25-2015, 04:26 PM
|
#29
|
|
Skoolie
Join Date: Mar 2010
Location: Texas
Posts: 218
Year: 1997
Coachwork: AmTran
Chassis: Genesis
Engine: DT466
Rated Cap: 84
|
McMaster's strength is selection, not pricing. Might want to use google to find other sources for your hinges.
|
|
|
|
|
02-25-2015, 05:12 PM
|
#30
|
|
Bus Geek
Join Date: Mar 2011
Location: Houston, Texas
Posts: 8,462
Year: 1946
Coachwork: Chevrolet/Wayne
Chassis: 1- 1/2 ton
Engine: Cummins 4BT
Rated Cap: 15
|
I'm using stainless piano hinges on a couple of my hatches. Found some very cheap on Ebay. Lots of different widths & lengths too. Will use stainless rivets to put them on.
|
|
|
|
|
02-28-2015, 03:53 PM
|
#31
|
|
Bus Nut
Join Date: Feb 2015
Posts: 258
|
If you want less of a gap you can also recess the hinge. Basically, you cut a slot in the inside lip of the hatch/frame the same width as the hinge. You then weld a piece of flat stock back across the slot but on the inside. This leaves a recess that the hinge fits into, and you screw/rivet the hinge onto the flat stock.
For the life of me I can't find an image of this anywhere online, but it's basically what you'd do with a residential door.
I do agree with earlier comments about paint eventually flaking off. I was being an idiot - I had forgotten that I had been using aluminum hinges and fiberglass hatches. You don't get rust with those and somehow the (right) paint seems to hold really well on them.
Two other hinge styles I'm considering are:

This is sometimes called "hurricane" hinge although maybe there's a better name for it. It can only be used horizontally, but for a reason I like: once the hatch is open, you can slide it sideways and remove it completely. For some storage compartments that's really nice to have, especially if there's equipment in there you need to work on.
The other is this, or a variant of it:
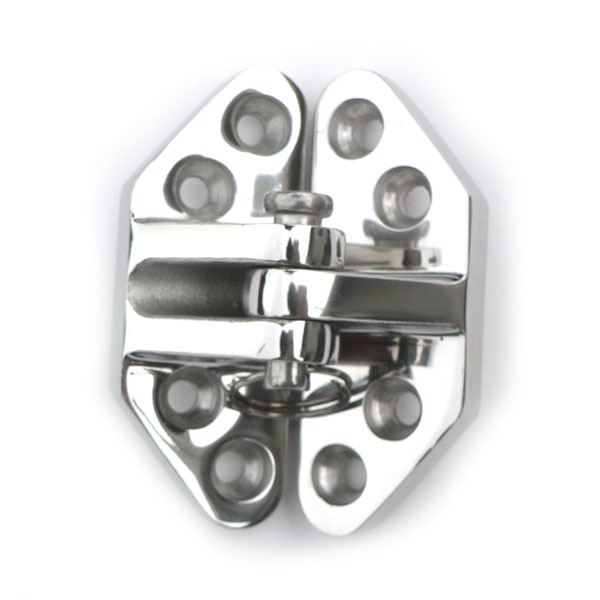
These are stainless hatch hinges for boats - marine hardware is crazy rugged and corrosion-resistant. Honestly, they're overkill for a 2-lb hatch that won't have to survive being open in a hurricane. I just think they look badass. 
|
|
|
|
|
03-31-2015, 12:11 AM
|
#32
|
|
Bus Crazy
Join Date: Feb 2012
Location: Salt Lake City Utah
Posts: 1,635
Year: 2000
Chassis: Blue Bird
Engine: ISC 8.3
|
Over the past years as I've been preparing to do a bus build I maneuvered things such that I'm living in a house which features a detached garage just long enough to squeeze the bus inside (but I do have to swing the right-hand mirror off to the side so the overhead door can come down). It seemed like it took roughly forever to do, but I finally got the place cleaned up enough to make the bus fit -- and then a month slipped by without getting any work done at all.
 
Snow began falling just before I moved the bus in.
|
|
|
|
|
03-31-2015, 12:36 AM
|
#33
|
|
Bus Crazy
Join Date: Feb 2012
Location: Salt Lake City Utah
Posts: 1,635
Year: 2000
Chassis: Blue Bird
Engine: ISC 8.3
|
Finally I've put my money where my mouth is and things got serious. Last Thursday night I pulled one window and a single piece of the interior skin, then Friday night I removed the interior trim from the rest of the windows, and Saturday went really crazy. All the windows are now out and nearly all the interior side wall metal is removed. I had started using the beloved Harbor Freight air chisel but found it wasn't doing the job shearing rivets very well and mentioned it to a co-worker. I'm convinced now he's a genius: he suggested re-grinding the chisel so that it has a single taper like a conventional wood chisel does. Harbor Freight supplies the chisels ground with a taper on both sides so that the point is centered on the thickness of the chisel. I was stunned how much faster that thing sheared the heads from the blind rivets with that simple mod! Somewhere here I also read a tip about knocking the mandrel out through the back of the rivet before hitting it with the chisel. It didn't seem to matter so much on the small-head rivets, but it was well worth the seeming "extra" time to do that on the large-head rivets. Maybe those smaller rivets generally had their mandrels broken off well below the surface so that driving them in deeper was unnecessary.
Now, though, I'm trolling through the forum looking for the answer for removal of these solid rivets from the exterior. I'm a wimp and haven't actually tried just chiseling them yet.. Let's just think of it as wisdom to ask for help before bludgeoning the rivets and my thumbs with successively larger hammers..

This thing has some slightly weird construction as compared to the regular skoolie body. Because the windows are long compared to skoolie windows, I expected to simply find that every other hat channel vertical post had been cut short. Many are that way, but you can see in this photo that the one centered below the left window isn't the usual hat channel at all, but instead a box profile. Naturally, I would want to be complicated by deleting one window and shifting the other a half-width to the side. I'll have to extend the one hat channel.. but what about that box? I think I'll remove it entirely and add new tube extending the full height of the wall. I don't know yet how the hat-channels are attached at the bottom, but I guess I'll figure that out and mimic it with the new tube.
Getting serious about the roof raise now, too. Tomorrow afternoon I'll go buy steel tube to build the roof-raising guide posts and to extend the hat channels. Not really sure what to use for the extensions; I've got more forum trolling to do to research what others have done there..
|
|
|
|
|
03-31-2015, 08:47 AM
|
#34
|
|
Bus Geek
Join Date: Aug 2011
Location: Stony Plain Alberta Canada
Posts: 2,937
Year: 1992
Coachwork: Bluebird
Chassis: TC2000 FE
Engine: 190hp 5.9 Cummins
Rated Cap: 72
|
I had a steel shop bend me up some hat Chanel out of 12 ga that fit over the original upright ribs.
We need some bigger more detailed pics of the odd construction around the windows. I always like seeing different construction methods that were used to build buses.
Nat
__________________
"Don't argue with stupid people. They will just drag you down to their level, and beat you up with experience."
Patently waiting for the apocalypses to level the playing field in this physiological game of life commonly known as Civilization
|
|
|
|
|
03-31-2015, 06:40 PM
|
#35
|
|
Bus Crazy
Join Date: Feb 2012
Location: Salt Lake City Utah
Posts: 1,635
Year: 2000
Chassis: Blue Bird
Engine: ISC 8.3
|
Nat, since you're always so full of insightful advice I'll indulge and get some more detailed photos for you in the next few days.
I'm interested to know your reasoning for having hat channel made rather than using off-the-shelf tube. I've been leaning toward channel because it provides an accessible flange so I can use the same non-blind fastener (solid rivets, maybe?) up the full height of the bus.
Question for everybody generally: lap the exterior skin joints, or butt weld them so that the exterior is one giant piece? I don't think I've seen anybody go the butt weld route, but it appeals to me because my bus is so loud inside and I really want to reduce the road/wind noise. Are there any thoughts as to whether the extra effort would pay off in any meaningful way?
|
|
|
|
|
03-31-2015, 07:45 PM
|
#36
|
|
Bus Geek
Join Date: Aug 2011
Location: Stony Plain Alberta Canada
Posts: 2,937
Year: 1992
Coachwork: Bluebird
Chassis: TC2000 FE
Engine: 190hp 5.9 Cummins
Rated Cap: 72
|
Quote:
Originally Posted by family wagon
I'm interested to know your reasoning for having hat channel made rather than using off-the-shelf tube. I've been leaning toward channel because it provides an accessible flange so I can use the same non-blind fastener (solid rivets, maybe?) up the full height of the bus.
Question for everybody generally: lap the exterior skin joints, or butt weld them so that the exterior is one giant piece? I don't think I've seen anybody go the butt weld route, but it appeals to me because my bus is so loud inside and I really want to reduce the road/wind noise. Are there any thoughts as to whether the extra effort would pay off in any meaningful way?
|
You nailed it. I could not find a square tube that fit perfectly, and I wanted to be able to access to the inside for paint, fasteners, wiring, and insulation.
Last reason was also the first reason. The bus was built with hat channel, I wanted to stay with hat channel bent from the same gauge of steel.
Tubing also fits into my dislikes list. Up here where I live, anything made from tubing always rusts from the inside out. Nothing like something just completely falling apart that looked fine on the exterior.
Over lap your skin seams the same as the bus builder did. Welding them would cause more buckling and beer canning.
I overlapped mine on the ribs, same as Blue Bird did.
I also overlapped my new sheets over the top of the rubrail to the bottom of the window openings. I always hated the way the water, dirt and salt would get behind the rub rail and cause a endless stream of muddy water to leak down the side of the bus.
In doing mine I learned a few things the hard way.
-If you can, make your hat channel from Galvanized steel sheet.
- Use galvanized sheet for your new steel to fill the old window openings.
- Paint your sheets black and let the sun heat them up before drilling a single hole. Keep it in the sun the entire time your bolting it on.
- Start riveting or bolting in the center of the sheet. Work your way out from there.
- Don't use to much caulk or seam seal. Less is more on the overlaps. You just need a little in a tight seam. To much will cause buckling / ripples.
- If using small 1/4 bolts, dont over tighten the sheet fasteners. This also causes ripples.
- Have the steel shop bend ribs into your new sheets that match the ribs in the bus skin down by the wheel wells. This is a big part of how the bus builders prevented the buckling / beer canning of the steel they used. It also adds looks and strength.
I will link pics tomorrow. I'm out of time.
Nat
__________________
"Don't argue with stupid people. They will just drag you down to their level, and beat you up with experience."
Patently waiting for the apocalypses to level the playing field in this physiological game of life commonly known as Civilization
|
|
|
|
|
04-01-2015, 07:24 AM
|
#37
|
|
Bus Nut
Join Date: Dec 2014
Location: Florida
Posts: 584
Year: 1988
Coachwork: Blue Bird
Chassis: I.H.
Engine: DT360
|
Road sign posts used to be hat channel. It may not be the size you need but it might start some thinking in a direction nobody has gone yet. What else is also hat channel that could already be available? Just thinking out loud. My 2cents.
|
|
|
|
|
04-02-2015, 08:49 AM
|
#38
|
|
Bus Geek
Join Date: Aug 2011
Location: Stony Plain Alberta Canada
Posts: 2,937
Year: 1992
Coachwork: Bluebird
Chassis: TC2000 FE
Engine: 190hp 5.9 Cummins
Rated Cap: 72
|
Quote:
Originally Posted by HolyBus
Road sign posts used to be hat channel. It may not be the size you need but it might start some thinking in a direction nobody has gone yet. What else is also hat channel that could already be available? Just thinking out loud. My 2cents.
|
Not usable, wrong gauge, size, ect.
Pics of the hat channel.
I had them made at my local metal shop the previous summer.

The fit.


The piece I cut out to take to the metal shop as a template.

installed


Nat
__________________
"Don't argue with stupid people. They will just drag you down to their level, and beat you up with experience."
Patently waiting for the apocalypses to level the playing field in this physiological game of life commonly known as Civilization
|
|
|
|
|
04-02-2015, 02:32 PM
|
#39
|
|
Bus Crazy
Join Date: Feb 2012
Location: Salt Lake City Utah
Posts: 1,635
Year: 2000
Chassis: Blue Bird
Engine: ISC 8.3
|
Thanks Nat. I just got a quote on the flat sheet; galvanized is only a few dollars more than cold rolled mild.
So far as the hat channel is concerned.. ouch. Mine measures out to 0.075-0.084 depending where I put the calipers so I guess it's 14 ga. The ouch part is USD$380 (including material) to form two sheets into channel. I'm quoted USD$88 for each 4x10 sheet of galvanized 14 ga; I think two sheets will make the 14 pieces I need to fill in some windows, relocate others, and extend the remaining full-height ribs so that bid is roughly $180 material and $200 labor. (more lop-sided toward labor if we assume he gets a better price on the sheet than I do)
The 14 ga 1.25 square tube comes in 24 ft lengths about $22 each, so 6 pieces for $130 gives me roughly the same material to work with. It's hard to pay 3x/$250 more for the hat channel but you're absolutely right about tube rusting from the inside out if it's exposed to water.
My exterior plans are fairly extensive (delete some windows and move the others, delete the front door, add a basement, and lift the roof) plus many pieces of the existing skin are either rusted or bent, so I'm intending to fully replace the sides.
Speaking of the side metal -- mine seems to be 16 ga. I'm trying to decide whether to shave 20% from the weight and cost (reduce 200 pounds and $230) by replacing with 18 ga instead.
|
|
|
|
|
04-03-2015, 06:35 PM
|
#40
|
|
Bus Geek
Join Date: Aug 2011
Location: Stony Plain Alberta Canada
Posts: 2,937
Year: 1992
Coachwork: Bluebird
Chassis: TC2000 FE
Engine: 190hp 5.9 Cummins
Rated Cap: 72
|
The 3X cost to make the hat chanal sucks, but paid around $400 to have mine made. I just didn't want to shortcut and regret it later in the build.
18 ga would be fine for skinning if you could pull it real tight some way.
If you need to balance the budget, I would get the hat channel and use the 18 ga to sheet the openings.
Your steel prices are close to the same as mine.
Nat
__________________
"Don't argue with stupid people. They will just drag you down to their level, and beat you up with experience."
Patently waiting for the apocalypses to level the playing field in this physiological game of life commonly known as Civilization
|
|
|
|
|
|
| Thread Tools |
|
|
| Display Modes |
 Linear Mode Linear Mode
|
 Posting Rules
|
You may not post new threads
You may not post replies
You may not post attachments
You may not edit your posts
HTML code is Off
|
|
|
|
 » Recent Threads
 |
|
|
|
|
|
|
|
|
|
|
|
|
|
|
|
|
|
|
|
|
|
|
|
|
|
|
|
|
|
|
|
|
|
|
|
|
|


