 |
|
 12-02-2015, 05:34 PM
|
#861
|
|
Bus Crazy
Join Date: Nov 2015
Location: Billings, MT
Posts: 1,269
Year: 2003
Coachwork: Thomas
Chassis: HDX
Engine: Cat C7
Rated Cap: 84 passenger
|
What did you use to remove the decals? I've got far too many of them on my (new to me) 03 Thomas HDX.
|

|

|
|
12-02-2015, 05:47 PM
|
#862
|
|
Bus Crazy
Join Date: Nov 2015
Location: Billings, MT
Posts: 1,269
Year: 2003
Coachwork: Thomas
Chassis: HDX
Engine: Cat C7
Rated Cap: 84 passenger
|
Quote:
Originally Posted by bansil

do you have the capability to drill and tap those 1/4-20?
and how much thread is needed?
|
I used a 1/4 bit and galled out the holes enough for a snap-link. That way, I can still open the door in the middle of the night.
|
|
|
|
|
12-02-2015, 07:19 PM
|
#863
|
|
Bus Nut
Join Date: Jun 2013
Location: West Lafayette, IN
Posts: 832
Year: 1999
Coachwork: Thomas
Engine: 3126
Rated Cap: 72
|
Read my blog on how I did it. It was not to hard to remove the decals, just took time.
Details on how the work was done. | the journey visvi
|
|
|
|
|
12-02-2015, 07:24 PM
|
#864
|
|
Bus Nut
Join Date: Jun 2013
Location: West Lafayette, IN
Posts: 832
Year: 1999
Coachwork: Thomas
Engine: 3126
Rated Cap: 72
|
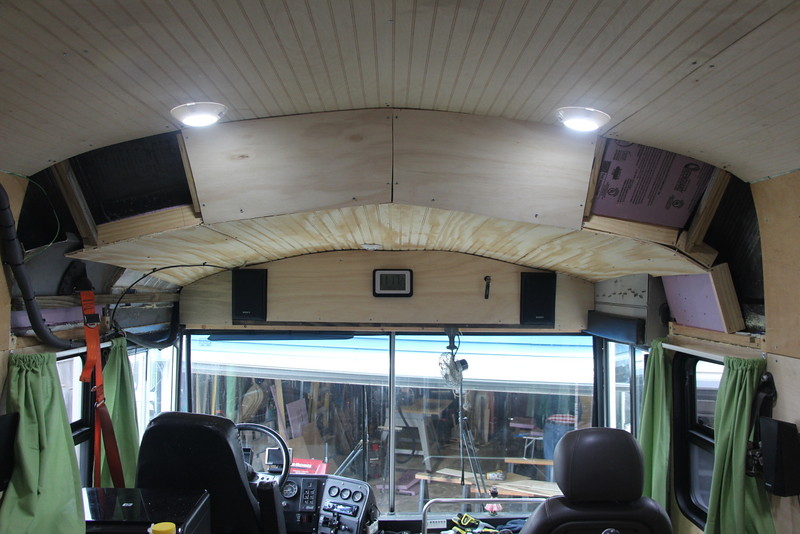
Covering the front Cab aka My Mud Room
I call the front of my bus the Mud Room. I left the rubber floor in, it makes it easy to clean. I can even pour water down it and it drains out the door.
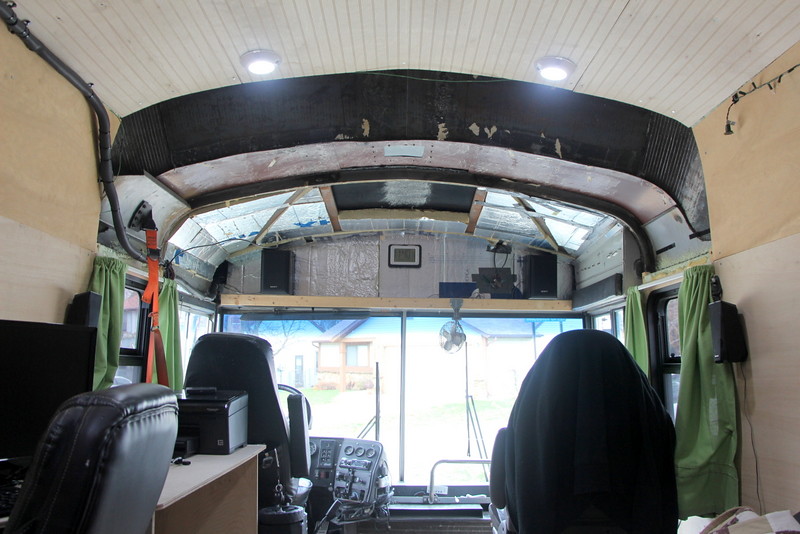
This has always bothered me because it is the first thing people see when the enter, but I know this will be the hardest to cover because of all the curves and shapes.

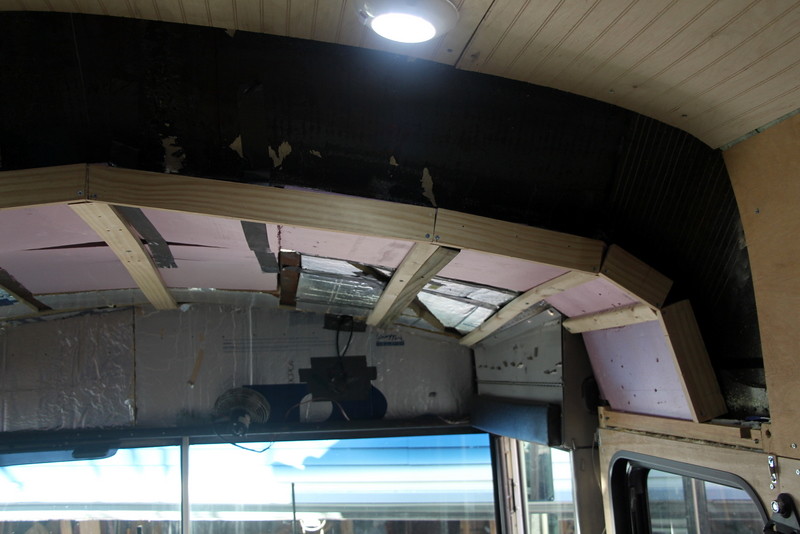
We just tackle it a piece at a time and then it will be done. I needed to add wood to attach the bead-board for the ceiling. Then added the missing insulation.

Up goes the bead-board.
I had to use a different type of bead-board, they dont have the sanded stuff I got in Maryland. When it is all painted no one should be able to tell the difference.
We finished this in and mounted speakers and the air valve for the door. Once I decide what kind of door to put in, I will then have some storage between the speakers. The storage is about 4′ wide x 1′ high x 8″ deep.
All that is left is the hard part, The angled area made by the roof raise. We already have the vertical supports. Now just need to cut the 1/4″ plywood to the shape and screw in. Oh and we need to cut insulation to fill the void.
|
|
|
|
|
12-06-2015, 03:53 PM
|
#865
|
|
Bus Crazy
Join Date: Apr 2008
Location: Bakersfield, California
Posts: 1,013
Year: 1976
Coachwork: Crown
Chassis: Supercoach
Engine: Detroit 6-71 Mid-Ship Mounted
Rated Cap: 79 at Birth
|
You're moving right along and things looking good...march on !
|
|
|
|
|
12-10-2015, 07:56 PM
|
#866
|
|
Bus Nut
Join Date: Jun 2013
Location: West Lafayette, IN
Posts: 832
Year: 1999
Coachwork: Thomas
Engine: 3126
Rated Cap: 72
|
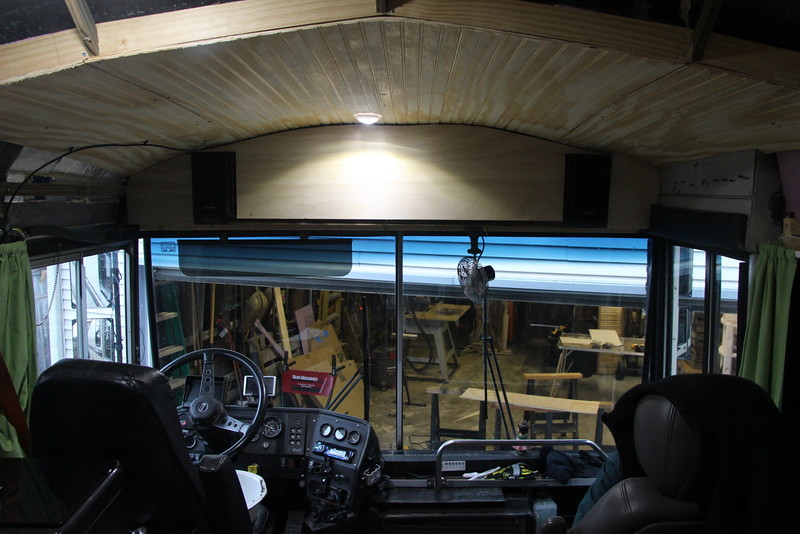
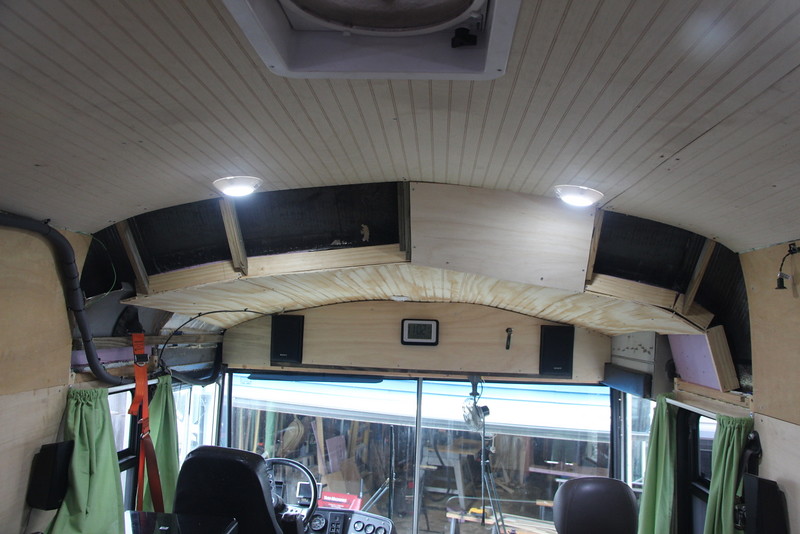
Covering the front Cab
Finished
Can anyone say scraps. That is all we have left and that is what we used. Doing the roof raised section was easier in smaller sections, but it would have looked nicer if it had all been one piece.
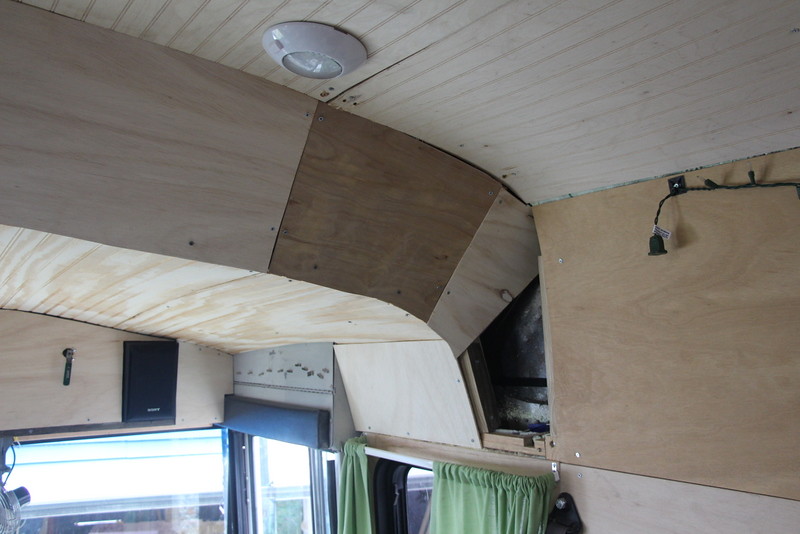
We used cardboard to figure out the angles and curves, then found a piece of scrap 1/4 plywood that was big enough to cut the piece out of.
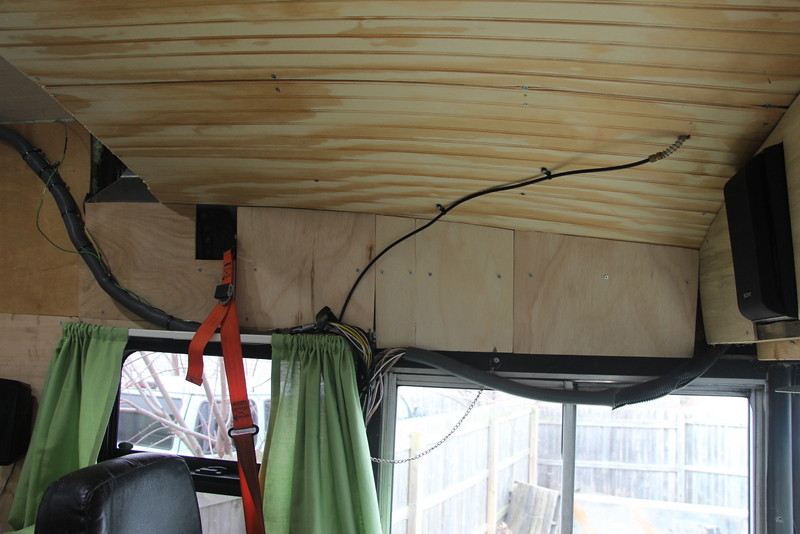
When I got to this section I had even smaller pieces to chose from.
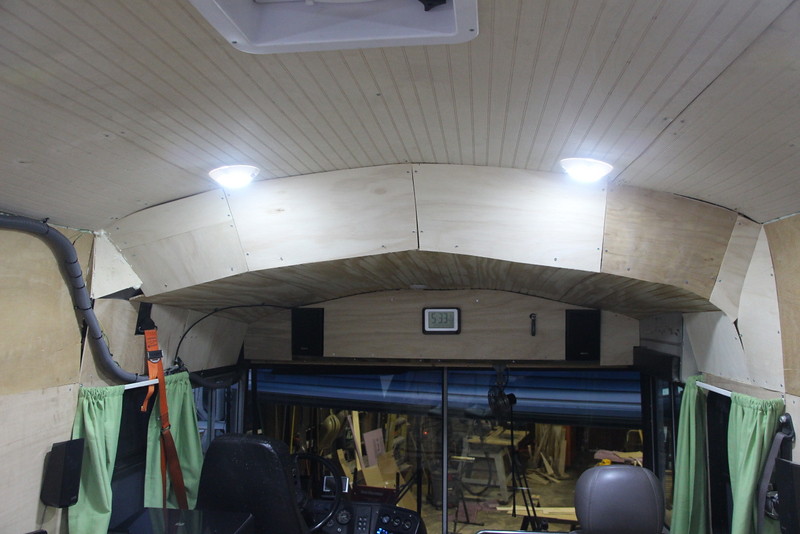
In the end it still looks nice. It feels good to have the whole interior completed and insulated. My heater runs less often and it feels much warmer inside. It seems quieter when Im driving too.
|
|
|
|
|
12-10-2015, 07:57 PM
|
#867
|
|
Bus Nut
Join Date: Jun 2013
Location: West Lafayette, IN
Posts: 832
Year: 1999
Coachwork: Thomas
Engine: 3126
Rated Cap: 72
|
I've been humbled this morning. I was driving on HW 64 in Kentucky. Posted speed limit 70 and I wad doing a respectable 66 - 67 mph. I got passed by a school bus like I was standing still.
I guess in Kentucky it is important to get your kids to school as fast as possible.
|
|
|
|
|
12-10-2015, 08:21 PM
|
#868
|
|
Bus Crazy
Join Date: Sep 2013
Location: Vacaville, Ca
Posts: 1,634
Year: 1988
Coachwork: Crown / Pusher
Engine: 8.3 Cummins
|
Quote:
Originally Posted by wmkbailey
I've been humbled this morning. I was driving on HW 64 in Kentucky. Posted speed limit 70 and I wad doing a respectable 66 - 67 mph. I got passed by a school bus like I was standing still.
I guess in Kentucky it is important to get your kids to school as fast as possible.
|
Wow, Here in Ca you go over 55mph with kids in the bus your done.
|
|
|
|
|
12-11-2015, 11:48 AM
|
#869
|
|
Mini-Skoolie
Join Date: Sep 2011
Posts: 12
|
Oh, yes your build is still being followed. Been too busy reading it to stop and comment. Great job and inspirational for me...who is still looking for the right bus.
|
|
|
|
|
01-15-2016, 09:11 AM
|
#870
|
|
New Member
Join Date: Jan 2016
Posts: 1
|
I recently finished reading through your build. Awesome job man. It looks great.
|
|
|
|
|
02-26-2016, 08:39 PM
|
#871
|
|
New Member
Join Date: Feb 2016
Posts: 1
|
I spent the whole day just reading your conversion. Inspirational to say the least. I am still looking for my 'right' bus but with what you have chronicled it helps me make a better decision on what to get and what to do after I get it - minus the roof raising. (I guess I am just not up to that much adventure)
Am soo looking forward to see how you paint it and the continued progress. Dont stop now telling us what you are doing.
|
|
|
|
|
05-29-2016, 07:13 PM
|
#872
|
|
Bus Geek
Join Date: May 2016
Location: Eastern WA
Posts: 6,401
Year: 2002
Coachwork: Bluebird
Chassis: All American RE (A3RE)
Engine: Cummins ISC (8.3)
Rated Cap: 72
|
Hey William,
GREAT JOB!!!!!!!!
Not only on the well done progress so far but also on how well you have documented and shared with the rest of us.
You are an inspiration. Those riding the fence as far as beginning a conversion as well as those who have started but are making slow progress.
I converted an Eagle 10 back in the 90's. Once it was near complete I knew that I would convert another someday. I loved the process and looked forward to getting off of work so that I could get home and work on it.
As crazy as it sounds, I quit my job so that I could focus on the conversion. I then spent almost 7 years living, traveling and working from my trusty bus.
Then life happened. I wound up with a regular job, a house and no bus.
You have inspired me... I am going to have to build another bus.
Thank you again.
S.
|
|
|
|
|
07-17-2016, 03:58 AM
|
#873
|
|
New Member
Join Date: Jun 2016
Posts: 1
|
Reply about roof raise
Quote:
Originally Posted by wmkbailey
Thanks,
It would be a little tricky to cut above the window. You have cross supports at the window line. If you cut above, you have nothing to support your roof horizontally. You would have to weld something in to keep the roof in alignment. I have a gutter right at the roof line that I will put my new steel under to prevent leaking. Not sure how you would do that above the window line.
Anything is possible. I have not seen anyone do it above the windows; in the window area gives you an easy place to re-attach the roof.
|
What if the cut was in the middle of the window pillars? Then you could just replicate the shape of the steel pillars to reattach the old windows and use half school bus windows above or below the old ones. Then it would look pretty killer having three rectangular window sections versus the stock two.
|
|
|
|
|
08-10-2016, 04:13 AM
|
#874
|
|
Almost There
Join Date: Sep 2013
Location: Mount Victory, OH
Posts: 85
|
William, I has taken me a few days to read all 88 pages but well worth it. I love your build. I am looking for the same bus as you have. I also want to do a roof raise but want the full 13'-6" for maximum interior room for a loft. I hope you have some more pics to share with us about your awesome bus!
|
|
|
|
|
04-12-2020, 01:05 PM
|
#875
|
|
Bus Nut
Join Date: Jun 2013
Location: West Lafayette, IN
Posts: 832
Year: 1999
Coachwork: Thomas
Engine: 3126
Rated Cap: 72
|
It has been a long time and many things have happened. Jan 2017 Durango my Border Collie and I have been living in the bus for a year and a half. We were headed to Mayland to clean out my storage. The bus broke down in the middle of nowhere. That same night I slipped on ice and tore my quad muscle off the bone on my right leg. No money, no way to tow the bus back to Indiana, I had to walk away from it. I rented a U-Haul and removed as much as I could. Then Durango died, he was 18 so it was a good life. I'm in a better place and plan to start over with what I learned the first time around. I want the same size bus and will do a roof raise again. I won't have the funds to buy a bus this year at the school auction, so I will have to wait until next year.
|
|
|
|
|
04-12-2020, 01:42 PM
|
#876
|
|
Bus Geek
Join Date: Sep 2017
Location: Swansboro,NC
Posts: 2,987
Year: 86
Coachwork: Thomas
Chassis: Ford B700
Engine: 8.2
Rated Cap: 60 bodies
|
nice to hear from you again.
sorry about the bus and definitely DURANGO.
i have a 2 year old border collie that is almost the exact opposite color pattern of Durango
black where he was white and white where he was black?
wishing you luck in your new journey
|
|
|
|
|
04-13-2020, 10:05 PM
|
#877
|
|
Bus Crazy
Join Date: Jun 2015
Location: Wisconsin
Posts: 1,259
Year: 2001
Coachwork: Bluebird
Chassis: All American
Engine: 8.3 Cummins ISC
Rated Cap: 75
|
Quote:
Originally Posted by wmkbailey
The bus broke down in the middle of nowhere. That same night I slipped on ice and tore my quad muscle off the bone on my right leg. No money, no way to tow the bus back to Indiana, I had to walk away from it. I rented a U-Haul and removed as much as I could.
|
Sorry to hear about your loss. How bad was the breakdown? It kills me to see such a nice conversion go to waste. I hope you got some of your investment back.
|
|
|
|
|
04-14-2020, 04:10 AM
|
#878
|
|
Bus Geek
Join Date: Sep 2014
Location: Eustis FLORIDA
Posts: 23,764
Year: 1999
Coachwork: Thomas
Chassis: Freighliner FS65
Engine: Cat 3126
Rated Cap: 15
|
Quote:
Originally Posted by wmkbailey
It has been a long time and many things have happened. Jan 2017 Durango my Border Collie and I have been living in the bus for a year and a half. We were headed to Mayland to clean out my storage. The bus broke down in the middle of nowhere. That same night I slipped on ice and tore my quad muscle off the bone on my right leg. No money, no way to tow the bus back to Indiana, I had to walk away from it. I rented a U-Haul and removed as much as I could. Then Durango died, he was 18 so it was a good life. I'm in a better place and plan to start over with what I learned the first time around. I want the same size bus and will do a roof raise again. I won't have the funds to buy a bus this year at the school auction, so I will have to wait until next year.
|
I destroyed most of my left quadracep in a drunken golf carting accident. It was brutal.
Sorry bout your dog, too man. that sucks.
|
|
|
|
|
05-02-2023, 10:21 PM
|
#879
|
|
New Member
Join Date: Aug 2017
Location: Towson and Baltimore MD
Posts: 1
Year: 2001
Chassis: IC International RE 3000
Engine: I WANT TO KNOW HELP ME
|
Quote:
Originally Posted by wmkbailey
I walked into the Maryland MVA with the paper work and they handed me tags good until August. No questions asked.
|
Using the VR-095 form?
|
|
|
|
|
|
| Thread Tools |
|
|
| Display Modes |
 Linear Mode Linear Mode
|
 Posting Rules
|
You may not post new threads
You may not post replies
You may not post attachments
You may not edit your posts
HTML code is Off
|
|
|
|
 » Recent Threads
 |
|
|
|
|
|
|
|
|
|
|
|
|
|
|
|
|
|
|
|
|
|
|
|
|
|
|
|
|
|
|
|
|
|
|
|
|
|


