 |
|
 05-04-2015, 11:30 PM
|
#61
|
|
Almost There
Join Date: Mar 2015
Location: CO
Posts: 91
Year: 1975
Coachwork: Ward
Engine: Ford 391 V8
Rated Cap: 72
|
Quote:
Originally Posted by taskswap

Oh, and about that stove paint, it's definitely "less than black". Old cast iron is BLACK BLACK and stove paint is more of a charcoal. It'll darken in time, but you can also try different products. It looks like yours is a pure flat finish. You might try a product with a little gloss to it. I like the Krylon Satin but YMMV.
|
Quote:
Originally Posted by The-Breeze
Sorry that your paint job came out more gray. If I had known that you had planned to paint it I would have suggested trying what they used in the olden days...STOVE BLACK. I have always used this stuff on cast iron and it dries very, very black.
I bought some last year during the summer and had a hard time finding it because, I was told "it was seasonal". Our ancestors would put stove black on their stoves right before the start of the fire season, then get a good fire going to set it in.
|
Hm, I will have to look for that. I might just take the paint with a picture of my stove back to the store and ask them, too. The can shows a picture of a very black stove and it says it's black stove paint, and it came out quite grey... SMH... it wasn't at all cheap either. Maybe they can help me, Maybe the paint was bad?  Ahh well. Still looks ok... but not what I wanted.
Quote:
Originally Posted by The-Breeze
Along the lines of TOMMAY's concern with expansion below is a picture of what we did in our bus

There is about a 1/2 to 3/4 inch gap behind the vertical slats and these slats are held in screws that don't go thru the horizontal slats and are screwed right into the original metal walls. We are hoping this will help with flexing and expansion going down the road. |
Ohh, with driving induced flexing? Hm. I thought TOMMAY was just asking about expansion due to heat.
Ahh, I see what you did there. That's a good idea. We should do that with our walls (we got a screamin' deal on some beadboard)! What kind of panels/slats do you have? I think that is kind of the same concept of the tongue and groove of our ceiling, no? Our ceiling panels have pretty big tongue and groove, unlike what you would see in locking smaller "tongue and groove" flooring. Am I on point with what you're trying to say or totally off?
__________________
Cheers!
-Kelsey and Justin
Thewolfbus.com
|

|

|
|
05-05-2015, 09:47 PM
|
#62
|
|
Bus Nut
Join Date: Nov 2013
Location: Gainesville. Georgia
Posts: 544
Year: 1992
Coachwork: bluebird
Rated Cap: 72
|
What you are seeing is flooring from the Restore...the price was right and since I plan to paint it all the colors didn't need to match. I feel that they hook together enough to stay up when we go mobile. Since most of this will be hidden behind cabinets & beds & such we felt this would do fine for the job.
Below is what we used in the front living area that is more exposed:

We got these from my Moms neighbor that had thrown them out for trash and we were able to salvage enough for the whole front of bus. (we had tiny scraps left, talk about lucky)
Back to Stove Blacking...it is not paint, it comes in pint or quart size rectangle cans...I think its something like ash & some sort of kerosene blended together. I'll look & see if I can find pictures of the stove I blackened to show you.
Most old timers know what I'm talking about (it goes by other names too, though that escapes me at the moment).
|
|
|
|
|
05-18-2015, 11:05 PM
|
#63
|
|
Almost There
Join Date: Mar 2015
Location: CO
Posts: 91
Year: 1975
Coachwork: Ward
Engine: Ford 391 V8
Rated Cap: 72
|
__________________
Cheers!
-Kelsey and Justin
Thewolfbus.com
|
|
|
|
|
05-18-2015, 11:34 PM
|
#64
|
|
Bus Nut
Join Date: Jul 2012
Location: Olympia, Washington
Posts: 557
Year: 87
Coachwork: Wayne
Chassis: International s1700
Engine: 6.9 internatiional
Rated Cap: 65
|
the wood looks fantastic!!
|
|
|
|
|
05-19-2015, 04:02 AM
|
#65
|
|
Bus Geek
Join Date: Nov 2011
Location: MNT CITY TN
Posts: 5,158
|
Must agree the wood is awesome
__________________
Our build La Tortuga
Accept the challenges so that you can feel the exhilaration of victory.
George S. Patton
|
|
|
|
|
05-19-2015, 05:38 AM
|
#66
|
|
Bus Geek
Join Date: Sep 2014
Location: Eustis FLORIDA
Posts: 23,764
Year: 1999
Coachwork: Thomas
Chassis: Freighliner FS65
Engine: Cat 3126
Rated Cap: 15
|
Way to stay busy yall!
|
|
|
|
|
05-19-2015, 07:01 AM
|
#67
|
|
Bus Nut
Join Date: Dec 2014
Location: Florida
Posts: 584
Year: 1988
Coachwork: Blue Bird
Chassis: I.H.
Engine: DT360
|
Friggin awsum!
|
|
|
|
|
05-24-2015, 05:25 PM
|
#68
|
|
Bus Nut
Join Date: Sep 2010
Location: Ocala, FL
Posts: 635
Year: 1995
Coachwork: Bookmobile body by Farber
Chassis: International 3800
Engine: Navistar DT466/Alison MT643
Rated Cap: 1
|
That's a pretty ceiling.
|
|
|
|
|
05-24-2015, 06:32 PM
|
#69
|
|
Moderator
Join Date: Feb 2007
Location: NUNYA
Posts: 4,236
Year: 1995
Coachwork: Thomas
Chassis: 3800
Engine: DT408, AT545
Rated Cap: 23 500 gvw
|
Is that blue stain pine? It looks nice.
|
|
|
|
|
06-16-2015, 08:31 PM
|
#70
|
|
Almost There
Join Date: Mar 2015
Location: CO
Posts: 91
Year: 1975
Coachwork: Ward
Engine: Ford 391 V8
Rated Cap: 72
|

For the ceiling, we used panels of Beetle-Kill-Pine. It was pretty difficult with one person to hold them and screw them in, so having two people was a must- it made the installation so much easier. When we were getting down to the edges of the ceiling of the bus, right over the windows, it became even more difficult to secure the panels due to the curvature of the ceiling making it hard for the tongue and grooves to line up. It was often a puzzle of how much to back out panels or screw them in to make the tongue and groove line up.
At the very edges, right above the windows, our panels werent square. This caused there to be an uneven amount of gap from the front of the bus to the back of the bus. We are going to use trim board to cover these imperfections. We are so happy to have the ceiling finally done though, we think it looks great!
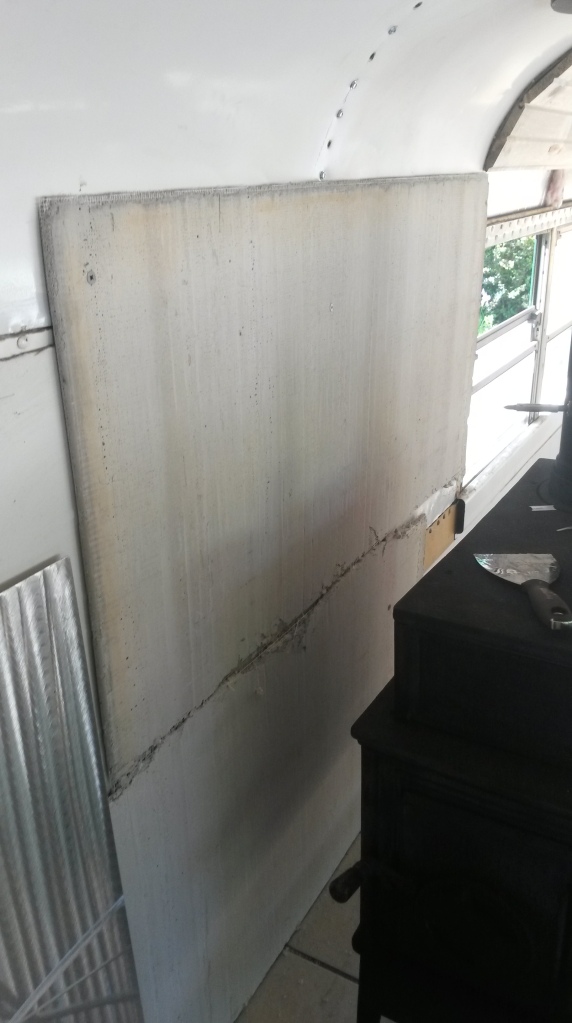
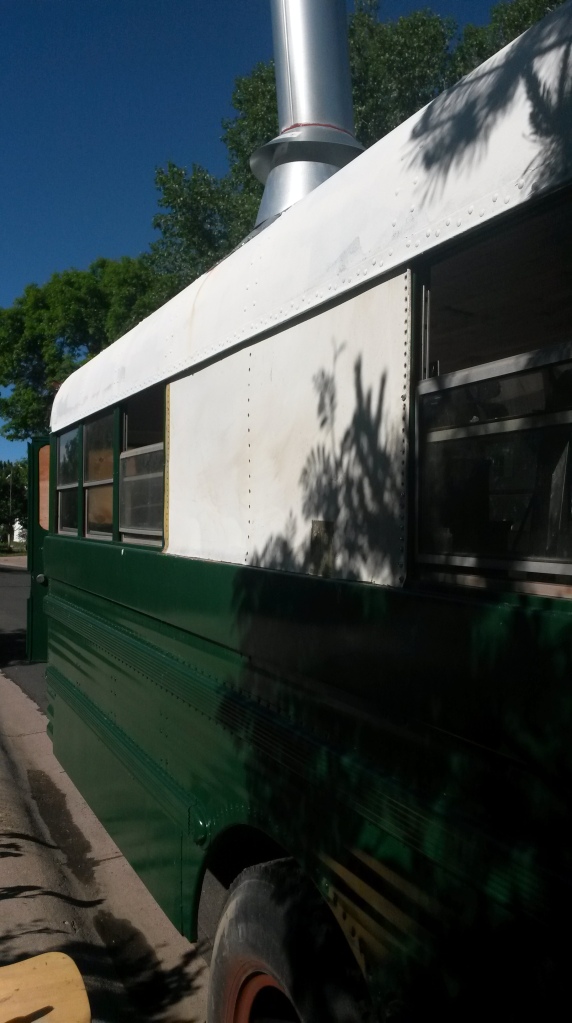

We also finished the hearth! We cut two pieces of metal that were left over from the original ceiling and secured it to the interior and exterior, covering the windows. Then we put cementboard on the inside as a fire block. On top of that, we put decorative sheet metal that we picked up for free a couple of years ago. It turned out quite beautiful, we think!!

Our good friend Abe Bebo, of A L E O art, has been working on a beautiful original piece of a wolf in our bus. He just put the finishing touches on this amazing piece yesterday! It is above where our bed will be, above the exit door.

We started putting handprints outside of our bus to thank the people who have helped us! Many more hands are to come
please contact us if you have helped, so we can set up a time for your hand to get on our bus!!


Today, we put together our couch. I saw the design online, and just copied it (it pulls out to like a twin, maybe full size bed?), and when we get the hardware in, it will also lift up to reveal storage underneath. It is full length, and firm, but pretty cozy! Super happy that there will be enough room for a desk in between the bed and couch! I didn't think i would get one, but things seemed to have squished together nicer than in the plans!!
Thanks for your support, as always!
__________________
Cheers!
-Kelsey and Justin
Thewolfbus.com
|
|
|
|
|
06-16-2015, 10:54 PM
|
#71
|
|
Bus Crazy
Join Date: Feb 2012
Location: Salt Lake City Utah
Posts: 1,635
Year: 2000
Chassis: Blue Bird
Engine: ISC 8.3
|
Looks like you're having great fun creating your own unique place. Keep up the good work.
|
|
|
|
|
06-17-2015, 05:06 PM
|
#72
|
|
Skoolie
Join Date: Jul 2013
Location: Georgia
Posts: 164
Year: 1993
Coachwork: blue bird
Chassis: International, 3000, Blue Bird
Engine: Dt360
Rated Cap: 25000
|
Great job on the bus, love all the wood, I used lot's of it in my bus but stained it. Take time to sit in the bus and just look and ask your self questions about size and space, how would it look over here?
__________________
Looking for that happy place, I've got a home on wheels and I'm going to find it.
|
|
|
|
|
06-21-2015, 11:52 PM
|
#73
|
|
Almost There
Join Date: Mar 2015
Location: CO
Posts: 91
Year: 1975
Coachwork: Ward
Engine: Ford 391 V8
Rated Cap: 72
|
We're just going to clear seal the ceiling (say that ten times fast, lol). Since we got the couch in we have been doing a lot of sitting 
So we are in the plumbing and electrical phase... Yay!
I have run into troubles trying to find an electrician. Licensed electricians won't touch our bus... They say the liability is too high. *groan*
So I have taken to the good old Internet and the library to solve the problem myself. I do have an issue though... I designed the bus to have all the outlets on one side, the drivers side, where the shore power and batteries will be located. The one issue is the refrigerator will be on the other side of the bus.
I was hoping I could get some ideas on how you guys think I could run a wire from the right side to the left for a power outlet. Going thru the ceiling is not an option. I could run it around the front of the bus, but then I have to deal with how to hide it, and how to go around the front door and then under the windows. We can't wrap it from the back because of the wood stove that is close to the wall. Justin suggested putting it IN the subfloor, but that just doesn't seem safe. We are thinking that our only option is to go under the bus, and use a tube to protect it. Ideas?
__________________
Cheers!
-Kelsey and Justin
Thewolfbus.com
|
|
|
|
|
06-22-2015, 12:14 AM
|
#74
|
|
Almost There
Join Date: Mar 2015
Location: CO
Posts: 91
Year: 1975
Coachwork: Ward
Engine: Ford 391 V8
Rated Cap: 72
|
Thanks again for all the positive feedback guys, it really means a lot to me! Here's a drawing to explain what I just said about the electrical 
__________________
Cheers!
-Kelsey and Justin
Thewolfbus.com
|
|
|
|
|
06-22-2015, 12:31 AM
|
#75
|
|
Bus Crazy
Join Date: Feb 2012
Location: Salt Lake City Utah
Posts: 1,635
Year: 2000
Chassis: Blue Bird
Engine: ISC 8.3
|
Pansy electricians. They're just jealous!
Going straight across the bus sounds good for simplicity, keeping the cable short, etc. If the sub-floor is thick enough you could cut a groove into it and lay a 1/2" EMT conduit (the thin metal kind) in there, then pull Romex or individual strands of THHN through. Some would say that Romex with its plastic jacket does not belong inside a conduit; remove the outer jacket and use just the conductors. I can't really speak to that. Or you could lay "BX" armored cable in a groove -- it might have a smaller diameter than the EMT has.
If it must go under the floor that's not so bad either. You might be able to bend and wiggle a length of 1/2" PVC conduit enough to weave a single piece under the floor, between the ribs, and over the frame rails without any couplers. There exist "L bodies" (probably type LB is what you'd want) and "pull elbows" which could come in handy for bringing the ends of the conduit up through the floor with a much tighter corner than could be achieved simply by bending the pipe or using pre-formed elbows. Those are easily found both in cast metal and PVC material. For use under the bus PVC might be nice because it can be easily sealed to keep road spray out.
|
|
|
|
|
06-22-2015, 08:43 AM
|
#76
|
|
Bus Geek
Join Date: Mar 2011
Location: Houston, Texas
Posts: 8,462
Year: 1946
Coachwork: Chevrolet/Wayne
Chassis: 1- 1/2 ton
Engine: Cummins 4BT
Rated Cap: 15
|
There were many wires pulled under my bus when I got it that had been run through about 15' of old, reinforced garden hose. It had been there at least 20 years according to the guy I bought her from and was still in excellent shape. Tough, flexible and easy to thread...I just may re-use it.
|
|
|
|
|
06-22-2015, 10:32 AM
|
#77
|
|
Bus Nut
Join Date: Aug 2010
Posts: 352
Year: 1995
Coachwork: Thomas
Chassis: International
Engine: 466DT
Rated Cap: 65
|
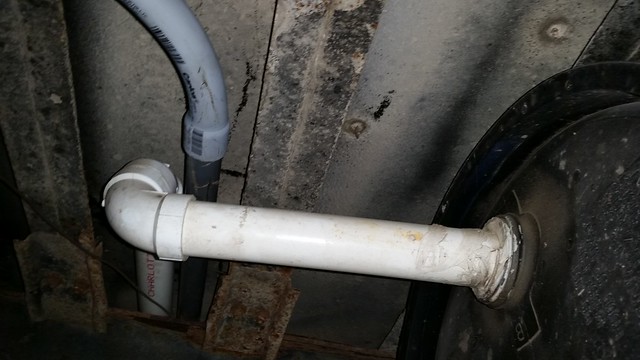
I've done exactly what Family wagon as suggested. I used 1" pvc pipe, couplings and LB's. It works really well. I start with a hole saw in bus where I want it. Make sure you are in between ribs though. Then attach a coulping on a short piece of 1 inch pipe. That will keep pipe form falling through the hole. Then you can go underneath bus and get a good marking on your pvc for the next fitting. Here is one I used for the power inverter. Its just a coupling on the inside + 1inch pipe + coupling on bottom side since its just going straight down to batteries. Have someone stand on the top side when you glue the bottom on.
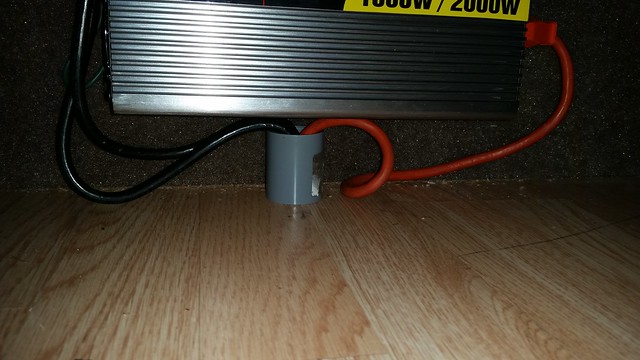 20150622_100852 20150622_100852 by Hvbuzz, on Flickr
Doing this makes it easy to go from one side of bus to the other. I have a run that runs from the front to back and across. I just used EMT clamps, tek screwed to the bus ribs to hold up the pvc pipe.
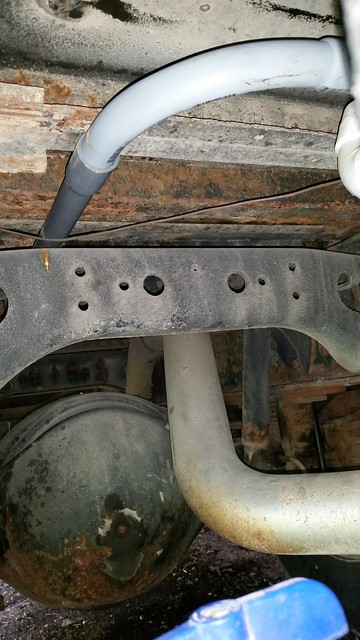 20150622_100713 20150622_100713 by Hvbuzz, on Flickr
 20150622_100735 20150622_100735 by Hvbuzz, on Flickr
If your just running one romex, 1/2" pvc would work, like Family wagon said.
|
|
|
|
|
06-22-2015, 10:53 AM
|
#78
|
|
Skoolie
Join Date: Jul 2013
Location: Georgia
Posts: 164
Year: 1993
Coachwork: blue bird
Chassis: International, 3000, Blue Bird
Engine: Dt360
Rated Cap: 25000
|
Another idea is to run it behind the baseboard on that side of the bus? I milled the baseboard in my bus as I did not like what I found at the box store. If you can you will be able to cut out a grove for the wire to lay in at the floor level and nail it to the wall board just above the wire securing it. This way you will not have to cut more holes in the bus.
__________________
Looking for that happy place, I've got a home on wheels and I'm going to find it.
|
|
|
|
|
06-22-2015, 11:06 AM
|
#79
|
|
Almost There
Join Date: Mar 2015
Location: CO
Posts: 91
Year: 1975
Coachwork: Ward
Engine: Ford 391 V8
Rated Cap: 72
|
Wow those are all excellent ideas!! I really love the photos,too!! Makes it much easier for me to imagine.
Hm, I will really have to do some sitting and thinking. I do really like that baseboard idea... But I get worried about the wire heating up, especially if it runs to a refrigerator.
Family wagon, why do you remove the outer coating from the wires within a conduit? Does that mean the ground will be exposed to the conduit then? Would that be risky if the conduit is metal?
Hmm, if the wires are under/in the floor, it would make them harder to change, if need be. Although a conduit just makes a tube and it would still be easy to thread wires through. Hmm.
Hvbuzz, off topic, but the tank in your last photo, which tank is that? We are wondering if we can get away with our black water tank not sitting directly under the toilet.
__________________
Cheers!
-Kelsey and Justin
Thewolfbus.com
|
|
|
|
|
06-22-2015, 11:21 AM
|
#80
|
|
Bus Crazy
Join Date: Apr 2014
Location: EHT New Jersey
Posts: 1,134
Year: 2003
Coachwork: AmTran
Chassis: International 3000RE
Engine: T444E/AT545
Rated Cap: 75
|
Quote:
Originally Posted by maggiemae
Hmm, if the wires are under/in the floor, it would make them harder to change, if need be. Although a conduit just makes a tube and it would still be easy to thread wires through.
|
Changing out old wires in conduit is a helluva lot easier than not in conduit. One of the tricks that military radio maintenance guys use when changing out antenna cable on old installations is to tie off the new cable to the old and pull the old cable out, pulling the new cable through the conduit. Of course, a little pulling grease makes it a little easier.
|
|
|
|
|
|
 Posting Rules
|
You may not post new threads
You may not post replies
You may not post attachments
You may not edit your posts
HTML code is Off
|
|
|
|
 » Recent Threads
 |
|
|
|
|
|
|
|
|
|
|
|
|
|
|
|
|
|
|
|
|
|
|
|
|
|
|
|
|
|
|
|
|
|
|
|
|
|


 Linear Mode

