(From our website


We have had three panels of beadboard-like paneling sitting in our garage for awhile, now. We got them on super-sale at Home depot, they were normally about $40 for a 4x8′ sheet, and we got them for $9 each. We had selected them to use on the walls, and now we are finally installing them!
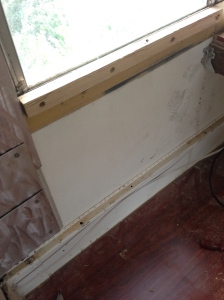
Before we could install them, we had to run wiring. I ended up running the wire around the bus(instead of under), for the refrigerator/wash machine. I threaded it under the hearth box we made(over the wheelwell). We also had to run a rail, right below the windows, even in depth to the metal railing that the seats used to sit on, so that the paneling would sit level against the wall. This was an interesting task, because I used recycled and warped 2×4s and a table saw. I was sure to wear eye protection!


I then used a big drill bit, and drilled out about half of the depth of the newly made wooden rail for screws to sit in. I screwed the wood rail onto the wall, right under the windows, using the same wood to metal screws that we used on the ceiling!

Then we installed fiberglass insulation. Previously, I had used metal screws and a piece of cardboard (to act as a big washer) to place the insulation. This time, however, we just used duct tape.
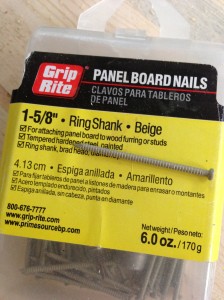
After the insulation was in, it was finally time to place our paneling, Yay! We cut it to size, 31″ tall, and secured it to the bus wall. For securing it onto the top wooden rail, we used finishing/trim nails. We pre-drilled the holes, of course. We used plenty of nails for this, because they are small and will be easy to hide once we paint the walls.

To secure the wood panel to the bottom metal (former bus seat) rail, we sparingly used metal screws. These screws arent the prettiest, but they do the job, and will be painted over, too.
After I installed a few panels, I decided to work on the trim to see what the finished product would look like. I did this also because I wanted to know if there would be any problems securing the trim to the boards
and if so, I could change my approach to the wall panel installation. Fortunately and surprisingly, the trim pieces secured wonderfully to the wall panels! The nails we were using almost acted like a screw, joining the trim to the panel very nicely. Also, the fiberglass batting behind the wall panel created rigidity, because we really packed it in there.

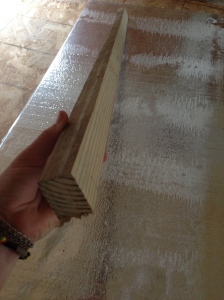
For the trim, we are using the same pine planks that I love (and used for our couch)! They are just little 1×3 pine wood pieces. You cant beat $1.80 for 8 feet of trim!! I also created a little railing/shelf below the windows, to help hide the wooden rail and the top of the wood paneling.
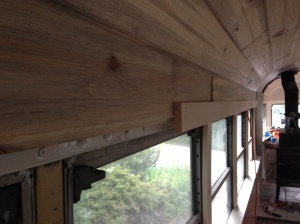
Then I put a piece of trim on the end of the ceiling panels, to help hide the uneven-ness (see our other
post). It came out superb, I think. Again, securing it using the trim nails.

To finish the windows, we framed them with the same trim, this time only using one wood to metal screw (the same kind that we used in our ceiling).

We will still need to paint the walls and trim white. I usually like to paint BEFORE installing something, but we are in a bit of a time crunch, so I want to reserve painting until the very last minute, where we can paint everything all at once!
---------------------
It's been awhile since I last posted here... sorry guys! Just been in high gear getting this bus ready!
I got the electrical almost all done last week, except for a couple boxes... it was surprisingly easy (after researching it for weeks, lol). Just running 120 off 30 amp... no battery bank/ inverters, etc. for now. Later, we will set that up, but not right now... no time. We have one extra battery we picked up that we will use for the 12v water pump, but that's it for 12v.
Today we switched gears and are working more on the plumbing. The toilet is in, and we got the black water tank cleaned out (we pulled it with poop still in it..

, had to use a 5 gallon bucket and run the waste inside to our house toilet). We dropped it down to clear some mechanical things in the way, and created "brackets" using punched steel. It's currently raining, so we are going to finish the toilet-to-tank connection tomorrow. The only drawback of dropping it down is that you can see it from the side of the bus, hanging under. Eventually we are going to put skirts on, but for now it looks just slightly trashy. oh well.
Still working on figuring out the stink stack. I figured all along we had to do it the tried and true way... through the roof. Thought maybe I could run it on the outside of the bus instead, going up. But again, that might not be to aesthetically appealing. We even have a 2" pvc stink stack ready to go... I just really HATE making holes in the roof. Justin thought we could use an air admittance valve directly on the tank, but my sense tells me that would leave the smell of rotting poop under the bus... yuk. Not to mention risking splashing or leaking if it gets too full. Anyone had experience with AAV's REPLACING the black/grey water tank vents? Ayah.. maybe we will invest in a composting toilet in the future.

Why is human waste so difficult!?! LOL.
17 days till move in. Can you tell I'm getting a little bus-crazy?

Not to mention.. the place that we had arranged to live since wayyyyy back before we bought the bus (in APRIL), fell through last week. All the RV parks are full ('tis the season), wont allow dogs, or won't allow our "old" bus. Here's to hoping that we find a spot to park, here in the next two weeks!!!


 Linear Mode


