 |
|
 10-26-2015, 08:58 PM
|
#1
|
|
Mini-Skoolie
Join Date: Oct 2015
Location: Wisconsin
Posts: 59
Year: 1996
Coachwork: Thomas
Chassis: International 3800
Engine: DT466
Rated Cap: 77
|
Tiny House Bus - 1996 Thomas International
Hello everyone! My name is Nick and my wife is Julie. We started our skoolie journey in July when I received our security deposit from our last apartment (after moving states) to see $75 docked for "cleaning". After a few very frustrating days of trying to get it back (it was illegally taken) we turned our energy towards the future. Today I try and consider that $75 as a down deposit on our future skoolie life.
After many hours of research and contemplation we found/bought our bus on August 26th for $2,400. It's a 1996 Thomas International DT466 7.6L 6cyl 77 passenger conventional 5-speed, purchased from eastern Minnesota from a small town bus contractor. It is a rusty bus, but none of it is structural and we consider it to be in pretty good shape.
Our bus sits at a local storage unit facility with open air RV storage. We do not have electricity or water at the site so all of our power tools are cordless. To date, we titled and registered the bus, removed the seats (gave away free on craigslist), removed ceiling panels and insulation (free on craigslist), removed side panels and insulation (kept metal, trashed insulation), removed heaters (recycled), and painted the roof white and sides green (keeping the black rub rails and accents).
Last week we ordered sheet metal and hat channel for our roof raise occurring this week.
Stay tuned for the rest of our build. Our blog is on Wordpress and we frequently post on Instagram/Facebook. Videos will be on youtube sporadically (we have limited internet). We welcome suggestions and hope to hear from you! Cheers! Nick
Wordpress: tinyhousebus.wordpress.com
Instagram: instagram.com/tinyhousebus
Facebook: facebook.com/tinyhousebus
Youtube: youtube.com/nickfish03
|

|

|
|
10-26-2015, 09:00 PM
|
#2
|
|
Bus Crazy
Join Date: Oct 2015
Location: Spring Valley AZ
Posts: 1,343
Year: 2000
Coachwork: Bluebird
Engine: 5.9 Cummins
Rated Cap: 2 elderly children, 1 cat
|
Welcome!...
__________________
Don, Mary and Spooky the cat.
|
|
|
|
|
10-26-2015, 09:58 PM
|
#3
|
|
Bus Geek
Join Date: Mar 2011
Location: Houston, Texas
Posts: 8,462
Year: 1946
Coachwork: Chevrolet/Wayne
Chassis: 1- 1/2 ton
Engine: Cummins 4BT
Rated Cap: 15
|
Welcome to the Madness! --- Sounds like a great platform to build on. Five speed standards are pretty rare ducks around here but should give you reasonable top end if the rear gearing is right.
And please...do post some pix.
|
|
|
|
|
10-26-2015, 10:16 PM
|
#4
|
|
Mini-Skoolie
Join Date: Oct 2015
Location: Wisconsin
Posts: 59
Year: 1996
Coachwork: Thomas
Chassis: International 3800
Engine: DT466
Rated Cap: 77
|
Quote:
Originally Posted by Tango

Welcome to the Madness! --- Sounds like a great platform to build on. Five speed standards are pretty rare ducks around here but should give you reasonable top end if the rear gearing is right.
And please...do post some pix.
|
Thanks and will do. Not sure about the gearing but the rpm governor is set at 2800. One of these days I'm gonna open up the adjustor port and click it up a couple times. Driving it home I was getting 60 mph max. 60 is ok with me, but I'm afraid it will diminish with interior and rear load (flat tow vehicle). Don't need the extra speed but doesn't hurt to have the capability as long as adjusting the governor doesn't run the engine hot or spew out smoke, which I don't think it will.
|
|
|
|
|
10-27-2015, 12:40 AM
|
#5
|
|
Bus Geek
Join Date: Sep 2014
Location: Eustis FLORIDA
Posts: 23,764
Year: 1999
Coachwork: Thomas
Chassis: Freighliner FS65
Engine: Cat 3126
Rated Cap: 15
|
It won't slow it down to load it up.
Mine does 62, I'll be leaving it as is for now.
I don't know how much more rpm I'd ask of a stock 466 in a school bus, though. Mine redlines at 2500 but the meat of it is under 2000.
|
|
|
|
|
10-27-2015, 08:26 AM
|
#6
|
|
Bus Geek
Join Date: Mar 2011
Location: Houston, Texas
Posts: 8,462
Year: 1946
Coachwork: Chevrolet/Wayne
Chassis: 1- 1/2 ton
Engine: Cummins 4BT
Rated Cap: 15
|
You might look up the engine specs to see where the "sweet spot" is on the tach. The 7.6 has a very low RPM peak torque as I recall (around 1300) and max HP is also down fairly low. Getting the most out of almost any diesel means keeping it close to those numbers as much as possible. If geared to run over the road within that range at reasonable highway speed, they will be happy, get peak MPG and last for a half-million plus miles.
BTW...you can check your rear axle ratio by jacking up the driver side of the axle...putting a mark on both the tire & the ground...then putting a mark on the driveshaft. Then, rotate the wheel one full revolution while counting the number of turns the driveshaft makes. The resulting numbers are your ratio. Example: If the shaft makes a little over four turns to the wheels one...it is probably a 4.11:1. If the shaft makes 6 turns...you are in the 6.0:1 range. By checking what axle ratios were available on your rig, then running a count you can determine exactly what's in your pumpkin.
|
|
|
|
|
10-27-2015, 01:04 PM
|
#7
|
|
Skoolie
Join Date: Sep 2015
Posts: 193
|
Welcome! I just got here, too. It will be helpful to watch your conversion progress as I am just starting mine, too.
|
|
|
|
|
10-27-2015, 01:37 PM
|
#8
|
|
Moderator
Join Date: Feb 2007
Location: NUNYA
Posts: 4,236
Year: 1995
Coachwork: Thomas
Chassis: 3800
Engine: DT408, AT545
Rated Cap: 23 500 gvw
|
Quote:
Originally Posted by Tango
You might look up the engine specs to see where the "sweet spot" is on the tach. The 7.6 has a very low RPM peak torque as I recall (around 1300) and max HP is also down fairly low. Getting the most out of almost any diesel means keeping it close to those numbers as much as possible. If geared to run over the road within that range at reasonable highway speed, they will be happy, get peak MPG and last for a half-million plus miles.
BTW...you can check your rear axle ratio by jacking up the driver side of the axle...putting a mark on both the tire & the ground...then putting a mark on the driveshaft. Then, rotate the wheel one full revolution while counting the number of turns the driveshaft makes. The resulting numbers are your ratio. Example: If the shaft makes a little over four turns to the wheels one...it is probably a 4.11:1. If the shaft makes 6 turns...you are in the 6.0:1 range. By checking what axle ratios were available on your rig, then running a count you can determine exactly what's in your pumpkin.
|
There is no way you will get it that low. On my trip back from Texas with the DT408 and the AT545, I was at 2500rpm at 55mph. I chose to drive between 45 and 50 keeping the rpm in the 2000 to 2200 range.
|
|
|
|
|
10-27-2015, 01:44 PM
|
#9
|
|
Bus Geek
Join Date: Sep 2014
Location: Eustis FLORIDA
Posts: 23,764
Year: 1999
Coachwork: Thomas
Chassis: Freighliner FS65
Engine: Cat 3126
Rated Cap: 15
|
On my return trip from KY to FL I did the same- 2000-2200. That's where my 466 likes to cruise.
|
|
|
|
|
10-27-2015, 04:08 PM
|
#10
|
|
Bus Geek
Join Date: Mar 2011
Location: Houston, Texas
Posts: 8,462
Year: 1946
Coachwork: Chevrolet/Wayne
Chassis: 1- 1/2 ton
Engine: Cummins 4BT
Rated Cap: 15
|
2200 is max for a mechanical 466 if I remember correctly. I can't imagine anything but maybe a marine engine pulling at 1300, but then again, the "sweet spot" won't be at the upper limit either. I would be interested to find out just where it is on that engine.
B series Cummins are between 17-1800 but they are totally different critters.
|
|
|
|
|
10-28-2015, 09:47 AM
|
#11
|
|
Mini-Skoolie
Join Date: Oct 2015
Location: Wisconsin
Posts: 59
Year: 1996
Coachwork: Thomas
Chassis: International 3800
Engine: DT466
Rated Cap: 77
|
Well, yesterday I chiseled off all the drip edge rivets from the inside (after cutting a notch with cordless angle grinder) to prep for the roof raise this weekend. Not sure if it will be Fri or Sat, the weather keeps changing. Today is supposed to be drizzly all day so I'll be catching everyone up on our build. I spent a little bit of time yesterday, but just figured out now, how to post images directly from Instagram, so I don't have to spend the time re-uploading everything from both of our phones and camera.
Here's the DT466 sticker. Is this what you guys were mentioning about for peak power? I assume the 2300 RPM for the brake horse power is the main figure. Just as a side note I have noticed that I get most of my power/acceleration in 5th and 1st is pretty touchy. I haven't had the chance to drive it around since bringing it home as the GMAC agent said everything has to be done and pics need to be sent before he can submit it to Underwriters.
Unfortunately our 10 gigs of internet just ran out until it resets in 10 days so online activities are going to be slow. BUT, Dish doesn't throttle the upload speeds so I'll be catching up on video uploads and hopefully the roof raise once it's done so keep an eye on Youtube if you're interested.

|
|
|
|
|
10-28-2015, 10:29 AM
|
#12
|
|
Mini-Skoolie
Join Date: Oct 2015
Location: Wisconsin
Posts: 59
Year: 1996
Coachwork: Thomas
Chassis: International 3800
Engine: DT466
Rated Cap: 77
|
We traveled 3 hours to pick up our bus (specs in first post) and spent maybe 15 minutes going over everything I could to check it out. The seller/contractor's father mentioned to my wife "I've never seen anyone be that thorough". Well, that's me : ) After tapping on the frame with a 12" drill bit (I didn't want to be rude banging on it with a hammer), walking around and inside the bus multiple times, having him start the engine I checked for blow-by out of the oil filling chamber and looked at the exhaust pipe I asked him to take us for a ride. Everything looked pretty good, he was asking $2,500 but the tank was 1/4 full and a couple tires worn compared to his "tires good" craigslist posting, so I got him down to $2,400.
About 45 minutes down the road after stalling once (I wasn't familiar with the spring on the stick shift to get into 1st, so I kept going from 1st to 4th thinking I was going into 2nd.)
Explanation in detail: we got to the city and stopped for lunch and gas. At which point, to be honest, I was a bit of a nervous wreck. It is definitely a big leap to buy a bus and immediately drive it 3 hours without prior experience, as well as the life changing decision it entails.
Emergency stop at Target instead of Walmart to calm down.

We arrived safely home after passing 4 different law enforcement situations (I was worried of being stopped on the way back), stalling once more and almost stalling more than once. We immediately brought the bus to the RV storage site that we had previously spoken with and had been honest about our intentions. He arrived just behind us and we gave him our $25 of monthly rent, signed the papers and went home exhausted (5 min drive home). I should mention we are currently living with my wife's parents after moving out of Kentucky last May (wife finished her masters in biology), getting married in June in northern Minnesota and are looking for our next jobs.
Nick, Julie and Sally the dog.

|
|
|
|
|
10-28-2015, 10:46 AM
|
#13
|
|
Bus Geek
Join Date: Sep 2014
Location: Eustis FLORIDA
Posts: 23,764
Year: 1999
Coachwork: Thomas
Chassis: Freighliner FS65
Engine: Cat 3126
Rated Cap: 15
|
Congrats.
Reminds me of my return to FL with my bus from KY.
Had to pull over in TN and chill out at an abandoned convenience store to calm my nerves. A 40 ft 23 year old bus on narrow KY roads while shivering!
Was a LONG 800 mile trip home.
|
|
|
|
|
10-28-2015, 11:01 AM
|
#14
|
|
Mini-Skoolie
Join Date: Oct 2015
Location: Wisconsin
Posts: 59
Year: 1996
Coachwork: Thomas
Chassis: International 3800
Engine: DT466
Rated Cap: 77
|
The next few steps I'm sure most are familiar with. Take the seats out, remove stickers, prep and paint.
Generic key I matched at the store that works for the bus as a spare (we received two, but I like to have a spare key for all locks).

Heavy duty zinc plated gate lock for the emergency exit (only entrance available if front doors are closed)

Sally with my 2002 Subaru Legacy Wagon and trunk pallet wood tool organizer

3 20V 2Ah batteries that came with my 7-tool combo kit. Masterforce brand (Menards) on sale for $350.

Safety is always first. When taking the seats out the best practice we found was Julie in the bus with a solid wrench, and me under the bus with a impact deep wall socket after spraying all nuts with WD-40. A few we had to do with the wrench under the bus when it was inside the beams, which was a pain. Electronic ear muffs, gloves and plastic face shield for dirt/cow crap (bus contractor owned a farm too). The face shield comes in handy for angle grinder use too.

All seats were given away free on Craigslist (tried to sell them, but not quick enough. Though we did ask for optional donations and received $20).

Ceiling and side panels were installed with sheet metal screws. Made tear down a relatively quick process.

Our cleaning kit as we don't have access to water at the site. Goo Gone, Simple Green knockoff, water, powerade/gatorade bottles with a nail hole in the top to spray, razor blade scrapers and rags.

Adhesive removal was probably the most time consuming, but here it is all clean and sanded. A quick rinse/dry before paint.

Painting phase one complete. Everything below the drip edge is/will be painted green (we tried Hunter Green but didn't like how dark it was, so we went with John Deere/Safety Green) except for anything black will remain so/be touched up next year.

The hood is green as well.

Above the drip edge is white.

|
|
|
|
|
10-28-2015, 11:02 AM
|
#15
|
|
Mini-Skoolie
Join Date: Oct 2015
Location: Wisconsin
Posts: 59
Year: 1996
Coachwork: Thomas
Chassis: International 3800
Engine: DT466
Rated Cap: 77
|
Quote:
Originally Posted by EastCoastCB
Congrats.
Reminds me of my return to FL with my bus from KY.
Had to pull over in TN and chill out at an abandoned convenience store to calm my nerves. A 40 ft 23 year old bus on narrow KY roads while shivering!
Was a LONG 800 mile trip home.
|
I believe it. I used to read electric meters in central and western KY.
|
|
|
|
|
10-28-2015, 11:16 AM
|
#16
|
|
Bus Geek
Join Date: Sep 2014
Location: Eustis FLORIDA
Posts: 23,764
Year: 1999
Coachwork: Thomas
Chassis: Freighliner FS65
Engine: Cat 3126
Rated Cap: 15
|
Oh, ok. It sure is beautiful country.
I picked my bus up in Elkton, Todd County. They are so damned friendly there.
Glad to see yall so busy with that bus! The face shield is a very necessary item for sure.
I've worn them nearly every day for years, and still wear glasses underneath, too, just to play it safe. Grinding and deburring parts, it always seems a few bits fly up under or around and straight for the eyes!
Your bus looks EXTRA clean inside, btw.
Keep up the pics and the work!
|
|
|
|
|
10-28-2015, 11:34 AM
|
#17
|
|
Mini-Skoolie
Join Date: Oct 2015
Location: Wisconsin
Posts: 59
Year: 1996
Coachwork: Thomas
Chassis: International 3800
Engine: DT466
Rated Cap: 77
|
$30 Stant locking gas cap. It's pretty finicky to unlock, but we don't plan on burning a lot of diesel. The bus will be our primary residence to follow the jobs (wife is trying to get a government biology/natural resources job, so whenever she gets a good offer, that's where we're headed. Though we're trying to stick to the Mid/North-West). Down the road of the future, if we buy/build a small house, we might use the bus as a RV or a tiny house hotel.

Finding the original first aid/bodily fluids kits was pretty cool. Medicine cabinet maybe? or updated first aid kit? Not sure yet. I would have been happier with a service manual but oh well. I called around to 3-4 dealers/service centers to order a manual but only one could, and it'd be ~$200. Maybe I can grab/scan a outdated copy from a school somewhere.

The two of these will be going back on once I figure out how to make them pretty again.

We got lucky and someone on Craigslist took all of our ceiling insulation and panels. As of right now all the side panels and insulation is gone. We scrapped all extra metal (we are keeping the 14 gauge side panels for now) for free and paid $8 to trash the insulation and padded barriers.

Scrapped the two copper bus heaters. Maybe could have sold it but I don't have the time. The valves to the cab are closed, so this won't be an issue right now, still looking for a permanent fix.

For all you up-cyclers, there was a rotten cast iron bench in the back of the yard that I temporarily rebuilt with pallet wood. It's getting a little cold now to use but it's better than nothing. The father-in-law was going to rebuild it with treated wood but never got around to it, so I got tired of waiting : )

Ready to work.

Gotta take a little time off every now and then.

|
|
|
|
|
10-28-2015, 11:42 AM
|
#18
|
|
Mini-Skoolie
Join Date: Oct 2015
Location: Wisconsin
Posts: 59
Year: 1996
Coachwork: Thomas
Chassis: International 3800
Engine: DT466
Rated Cap: 77
|
Here's our somewhat current floor plan. I'll have to post the updated one soon. It's kind of a pain using the Stanley floor plan app, they make you buy the plan to post the pic, so I have to take a picture of my phone screen with my camera. The L couch on the bottom left is now straight and the fold-up table across from it is now a booth/bench/bed. The cabinet in the middle left is actually lower and upper cabinets with a counter. Windows will be across from the couch, middle L and R, bedroom L and R. Our two roof emergency exits will be skylights, I'm thinking clear with a diffuser screen.

|
|
|
|
|
10-28-2015, 12:04 PM
|
#19
|
|
Mini-Skoolie
Join Date: Oct 2015
Location: Wisconsin
Posts: 59
Year: 1996
Coachwork: Thomas
Chassis: International 3800
Engine: DT466
Rated Cap: 77
|
Taking out two of the windows to get a feel for things, and cut out a 6" piece of hat channel for the sheet metal contractor to make 3'5" extensions for a 20" raise.

Using my cordless angle grinder that I bought in addition to the 7-tool kit. It was definitely worth the $70 bare-tool. I bought a 6.5" cutting wheel for my cordless circular saw to make the cuts a little easier for the raise.

We had to take out the emergency exit windows so I could cut the side panels close to flush with the window sill.

I saw one of these manual/hand impact drivers at Menards by chance but didn't buy it. Our neighbor happened to have one so he lent us his. If I need it again I wouldn't hesitate to buy one for myself. It's only $9 and is a huge help to break all the screws on the outside. It would have helped to take out some of the screws on the inside if I knew it existed.

If you don't take out your windows, I'd suggest re-caulking them. I noticed two dripping leaks into the side wall insulation and pooled water under this window.

All fasteners (rivets/screws) in the bus are 3/16" or #10, so we're going to be fastening all the skin with #10 (3/16") truss head machine screws. The hat channel extensions will be secured with 1/4" grade 2 hex bolts. At each lap there will be 1 bolt in the middle, and 1 in each leg. So a total of 12 bolts per channel. The machine screws will go through wings of the channel. I bought a regular sized head machine screw to see what it would look like, but I went with the larger truss head.

A view of the machine screws from inside. One is 3/4" long and the other 1". I ordered 3/4" long for both the screws and bolts after quite a few calculations and recalculations of total finished thickness.

|
|
|
|
|
10-28-2015, 12:09 PM
|
#20
|
|
Bus Crazy
Join Date: Nov 2011
Location: Sault Ste. Marie, Ontario
Posts: 1,793
Year: 1997
Coachwork: Thomas
Chassis: B3800 Short bus
Engine: T444E
Rated Cap: 36
|
Quote:
Originally Posted by Tinyhousebus
Scrapped the two copper bus heaters. Maybe could have sold it but I don't have the time. The valves to the cab are closed, so this won't be an issue right now, still looking for a permanent fix.
|
Welcome to skoolie.net! Your progress so far looks great.
Your driver's side heater looks the same as mine from what I can see. If you look close at the heater core connections, are they two tees? If so, you will want to plug the exit holes completely instead of running a loop. This will force all of the coolant through the heater core - producing more heat. This will be important in those Wisconsin winters!
My solution was to remove the heater core completely, squash the copper ends of the tees with a vice grip, then solder the squashed end up. Clean and strong. All coolant now flows through the heater core. No tubes hanging out the back of the heater.
^ I sound like a broken record with these comments, having posted this all over skoolie.net, but many people loop the lines. It's the right thing to do in most circumstances, but the wrong thing to do with many of these Thomas buses.
Here's an illustration. Does this look like your previous set up?
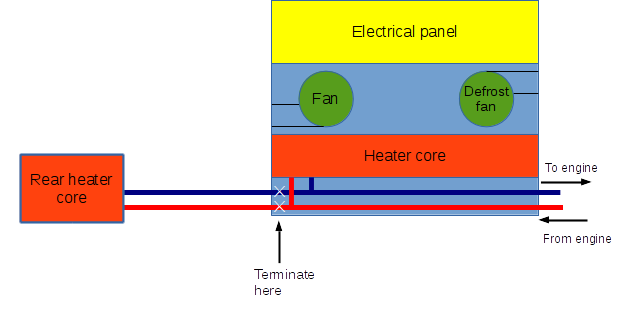
Cheers
|
|
|
|
|
|
| Thread Tools |
|
|
| Display Modes |
 Linear Mode Linear Mode
|
 Posting Rules
|
You may not post new threads
You may not post replies
You may not post attachments
You may not edit your posts
HTML code is Off
|
|
|
|
 » Recent Threads
 |
|
|
|
|
|
|
|
|
|
|
|
|
|
|
|
|
|
|
|
|
|
|
|
|
|
|
|
|
|
|
|
|
|
|
|
|
|


