 |
|
 04-01-2012, 12:39 AM
|
#101
|
|
Bus Geek
Join Date: Mar 2011
Location: Houston, Texas
Posts: 8,462
Year: 1946
Coachwork: Chevrolet/Wayne
Chassis: 1- 1/2 ton
Engine: Cummins 4BT
Rated Cap: 15
|
Re: '46 Chevy Shorty
Howdy All --- been a while since I made any progress on the shorty but finally got a break and put in about a week and a half on a variety of projects. I now have the skin off both sides from the upper rails down and have been working on hanging a couple of fairly large tanks. One is an aluminum 44 gallon fuel tank to replace the 18 g original and the other is a 44 g black/gray tank. Fabbing the hangers for the fuel tank has been a bear. Since there will be over 350 pounds of diesel in it, it needed very solid mounts. Made 3' spacers for it to butt against on top and have 6-2"square mounts welded in place around the sides that the bottom plate & straps will bolt to. There will be fuel-proof rubber insulation all around. Here's a couple of qwik pix...
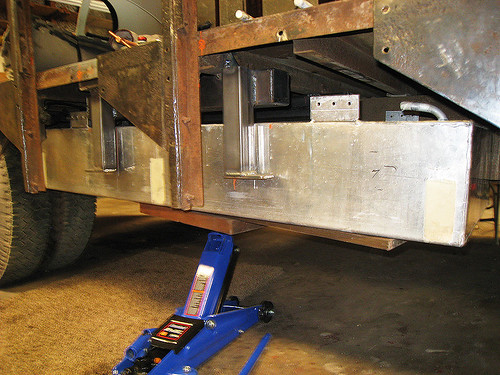
The new (to me) aluminum tank positioned inside the hangers I just made & welded in place
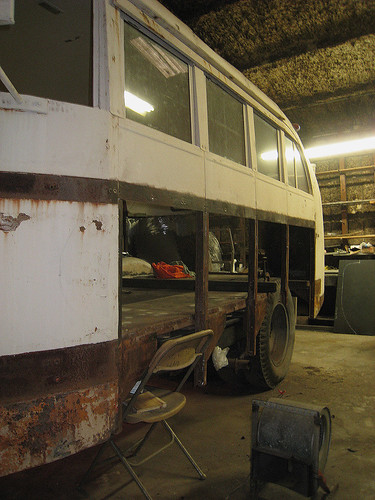
On the drivers side, I now have the skin cut away and the black/gray tank is being positioned (hard to see, but it's there...really it is)
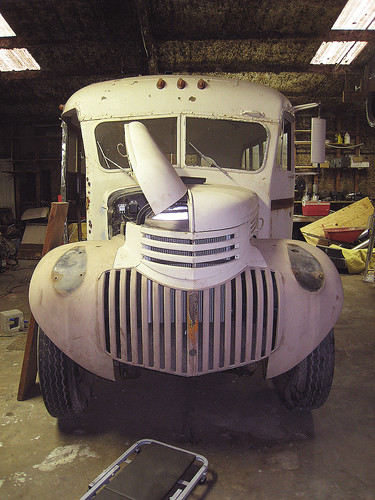
...and I have just started breaking down the front clip. Removed the headlamp buckets and lower grill panel and I am now working on removing (mostly breaking off) the bolts & screws that hold the fenders and grill components in place.
Hope to get back to working on the entry door next. Who knows, I might even live long enough to drive this thing someday.
|

|
|
|
04-01-2012, 09:16 AM
|
#102
|
|
Bus Crazy
Join Date: Oct 2009
Location: Moodus, Ct.
Posts: 1,062
Year: 1996
Coachwork: Champion
Chassis: Ford e-450
Engine: 7.3 Powerstroke
Rated Cap: 14
|
Re: '46 Chevy Shorty
Stong is good-but I think you might be getting carried away a bit. Look at any big truck on the road-they have 100 gal. tanks held on with 2 3" straps. Even my stock 55 gal tank is just held in with straps.
My plastic 52 gal veg tank is held up with 3 2" straps + some grade 5 threaded rod. Hasn't moved at all in 15k miles.
|
|
|
|
|
04-01-2012, 12:25 PM
|
#103
|
|
Bus Geek
Join Date: Mar 2011
Location: Houston, Texas
Posts: 8,462
Year: 1946
Coachwork: Chevrolet/Wayne
Chassis: 1- 1/2 ton
Engine: Cummins 4BT
Rated Cap: 15
|
Re: '46 Chevy Shorty
sdwarf --- Ya...I definitely tend to get carried away with the over engineering thing (LOL)! But, if like you said "strong is good"...then stronger be better...right? I'm also adding a steel skid pad/rock guard to the bottom, but only because the aluminum is so thin I don't think it would stand up to very much abuse without puncturing. The holding tank won't get quite the same treatment, but only 'cause I figure if it springs a leak way out in the boonies, it won't prevent me from making it back to civilization where the fuel tank would. Might not be pleasant for anyone tailgating me, but then hey...maybe they will back off.
|
|
|
|
|
04-01-2012, 01:52 PM
|
#104
|
|
Bus Geek
Join Date: Jun 2004
Location: Roswell, NM
Posts: 3,588
Year: 1986
Coachwork: BlueBird
Chassis: 40 ft All American FE
Engine: 8.2LTA Fuel Pincher DD V8
Rated Cap: 89
|
Re: '46 Chevy Shorty
Quote:
|
Originally Posted by Tango
... The holding tank won't get quite the same treatment, but only 'cause I figure if it springs a leak way out in the boonies, it won't prevent me from making it back to civilization where the fuel tank would. Might not be pleasant for anyone tailgating me, but then hey...maybe they will back off.
|
If the black tank springs a leak, you can be cited for dumping hazardous materials by the EPA. All you need to protect the black tank is a thick piece of plywood. Also add a sheet of insulation as well. Cooked Black tank isn't what you want. We had to put quite a bit of water in the Class C's 18 gallon black tank when we stopped in the Benbrook COE. Driving down the roads in July heat cooked all the liquid out of the black tank and we had to dump the solids out. That is why we plumbed the bathroom sink into our black tank on the bus, to keep the liquid on the high side. But only you can decide what you want to do. Some states are getting really serious about "leakage" others (like TN) don't do a whole lot. the following was in TN. With state budgets tightening up, some states may start issuing larger fees....
http://www.irv2.com/forums/f59/georg...lot-57013.html
Quote:
http://www.irv2.com/forums/f59/georg...tml#post671081
The person (or should I say "low life") that dumped his black tank in the Unicoi,Tn. Wal Mart lot last fall pleaded "GUILTY" in Unicoi General Sessions Court last Oct. His fine was $50.00 + court costs-(about $140) plus Clean up costs of $250.00.
|
This was the article in the Erwin Record (11/2009)
Quote:
Georgia man causes stink in Walmart lot
By Lesley Hughes
News Editor
lhughes@erwinrecord.net
When you gotta go, you gotta go.
A really big pooper scooper was needed last week to clean up a mess in Wal-Mart parking lot where a camper trailer owner dumped raw sewage.
Paul Russell Combs, 42, Vidalia, Ga., was charged with criminal littering and unlawful disposal of raw sewage after an off-duty dispatcher, Tony Jones, witnessed Combs dumping the raw sewage on the parking lot.
When Combs was finished, he reached down and shut the valve on the trailer and then they left, Unicoi County Sheriffs Department Deputy Josh Randolph said.
The Unicoi Volunteer Fire Department, Emergency Management Director Ed Herndon and Lt. Jimmy Erwin came to the scene and helped clean up the mess.
Sheriff Kent Harris was disgusted that someone would dump sewage in a parking lot where people and children are present.
Theres plenty of places with dumpsites, at campsites, campgrounds and some rest areas have them, Harris said, but not at Walmarts parking lot.
Walmart is good enough to let campers park in the parking lot to rest but to get someone like this who takes advantage of the kindness, its just not a good thing.
He called it dangerous for people who unknowingly could have come across the sewage and thanked Jones for being alert to what was happening. Imagine some kids getting out and jumping in water puddles, he said, only its not water. I can see my two boys doing it. If there is a water puddle around, they make a bee line for it to jump in it.
|
|
|
|
|
|
04-02-2012, 10:52 AM
|
#105
|
|
Bus Geek
Join Date: Mar 2011
Location: Houston, Texas
Posts: 8,462
Year: 1946
Coachwork: Chevrolet/Wayne
Chassis: 1- 1/2 ton
Engine: Cummins 4BT
Rated Cap: 15
|
Re: '46 Chevy Shorty
Hi Guys --- rest assured I was only funnin' regarding waste tank leaks. It will get similar protection to the fuel tank...just not quite as overboard on the mounts. It is a very heavy walled ABS unit that can likely take a great deal more punishment than its' aluminum fuel counterpart.
|
|
|
|
|
04-02-2012, 04:22 PM
|
#106
|
|
Skoolie
Join Date: Jul 2011
Posts: 124
Year: 1999
Coachwork: ElDorado
Chassis: Chevy P30
Engine: 7.4 liter 454 Chevy
Rated Cap: 24
|
Re: '46 Chevy Shorty
NOW I know where all those brown skid marks came from..
|
|
|
|
|
04-15-2012, 06:41 PM
|
#107
|
|
Skoolie
Join Date: Feb 2012
Location: georgia
Posts: 117
Year: 1979
Coachwork: superior
Chassis: intl loadstar 1653
Engine: D150 V8 diesel
Rated Cap: 48
|
Re: '46 Chevy Shorty
Quote:
|
Originally Posted by Bullwhacker007
NOW I know where all those brown skid marks came from..
|
Those aren't skid marks.. its my monogram!
__________________
Allen,
|
|
|
|
|
04-16-2012, 11:39 PM
|
#108
|
|
Bus Geek
Join Date: Mar 2011
Location: Houston, Texas
Posts: 8,462
Year: 1946
Coachwork: Chevrolet/Wayne
Chassis: 1- 1/2 ton
Engine: Cummins 4BT
Rated Cap: 15
|
Re: '46 Chevy Shorty
|
|
|
|
|
04-17-2012, 08:54 PM
|
#109
|
|
Bus Crazy
Join Date: Feb 2009
Location: Austin, TX
Posts: 1,489
Year: 1996
Coachwork: Thomas
Chassis: International
Engine: DT466/AT545
|
Re: '46 Chevy Shorty
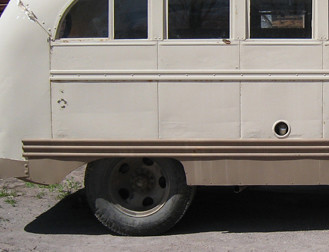
I think your rear wheel cutouts will look much better than the skirts. Sure it won't be "authentic" but it's your bus man, and I think your approach will be an improvement. Of course I've never been a fan of wheel skirts on any vehicle. What's the point?!
|
|
|
|
|
04-17-2012, 09:30 PM
|
#110
|
|
Bus Geek
Join Date: Apr 2012
Location: So Cal
Posts: 3,231
Year: 1935
Coachwork: Superior
Chassis: Chevy
Engine: 317 ci/tid / Isuzu
|
Re: '46 Chevy Shorty
Your plan to make the rear fender openings makes good sense. Without one of the old school pneumatic lifts ( stuck in under the bumper and lifted the body then the axle) you would be hard pressed to get a tire off the way it was. Several other body manufactures of the time used the "tear drop" rear fender opening you have proposed and it will look just fine.
I'm curious to know how you plan to replace the side sheetmetal you have removed as I will be doing some of the same on my '35. How will you seal the floor and how will you support the lower edge of the skin? Will it be necessary to line the BW tank or will the Aluminum be ok? You are way ahead of me on your project--it looks real good
|
|
|
|
|
04-17-2012, 11:49 PM
|
#111
|
|
Bus Geek
Join Date: Mar 2011
Location: Houston, Texas
Posts: 8,462
Year: 1946
Coachwork: Chevrolet/Wayne
Chassis: 1- 1/2 ton
Engine: Cummins 4BT
Rated Cap: 15
|
Re: '46 Chevy Shorty
Thanks for the feedback guys ---
DAN...actually I got the idea from another bus from that period. It had rear cutouts that were much more like what was in front...big & open & teardrop ("streamlined"). For whatever reason, the original (I'm assuming "original") on this body was way out of proportion. Hopefully it will be an asset when the time comes to change a rear tire.
ol trunt --- I have already had the outer side panel replacement sheet metal fabbed and it is ready to install. I am going to wait until most of the underbody work (tanks, mostly) is done to put it on just for the ease of access. I plan on just welding it in place directly to the ribs. The original plan had it fastened with screws to the framework and fitted into each rib, but in such a way that you'd have to take the danged whole bus apart to remove or repair any of them. I figure cutting & patching will actually be simpler in the future than the routine the original would require. Each panel has a folded, 90 degree lip along the bottom edge that provides rigidity, plus there are body spacers I have also re-made that back each up, but out of galvanized. Finally, there is a vertical backer that puts a slight amount of tension on each panel to minimize vibration. Had to re-make several of those as well. All in all, it's been a lot of work to date. Most of which will be unseen, but necessary. Can't wait to get on to doing something that will actually show!
The fuel tank is the aluminum one and should be fine without any lining. I'm converting to a diesel engine and it is very aluminum friendly. The black/gray tank is very heavy walled ABS. Found both in absolute perfect sizes on Epay at excellent prices...it just took 9 months of searching.
Onward!
|
|
|
|
|
04-18-2012, 05:47 AM
|
#112
|
|
Bus Geek
Join Date: Nov 2011
Location: MNT CITY TN
Posts: 5,158
|
Re: '46 Chevy Shorty
The new profile looks tons better....the original body must of been made by a company that later started to make small popups, the wheel openings look the same 
__________________
Our build La Tortuga
Accept the challenges so that you can feel the exhilaration of victory.
George S. Patton
|
|
|
|
|
04-18-2012, 04:38 PM
|
#113
|
|
Bus Geek
Join Date: Mar 2011
Location: Houston, Texas
Posts: 8,462
Year: 1946
Coachwork: Chevrolet/Wayne
Chassis: 1- 1/2 ton
Engine: Cummins 4BT
Rated Cap: 15
|
Re: '46 Chevy Shorty
Bansil --- Roger the "pop-up" look. Tiny openings, but at least they had tiny wheels to go in them.
|
|
|
|
|
04-18-2012, 08:26 PM
|
#114
|
|
Bus Geek
Join Date: Apr 2012
Location: So Cal
Posts: 3,231
Year: 1935
Coachwork: Superior
Chassis: Chevy
Engine: 317 ci/tid / Isuzu
|
Re: '46 Chevy Shorty
I'm going to follow your lead here. working on the tanks etc. with the side skins off sure looks like the way to go. I'm still not quite clear as to how you are going to seal the floor to the sides. I plan just to leave the area below the floor as a single panel with braces to the 90 degree angle at the bottom-- are you using a double panel?
I made up dies to stamp the original body lines into the new panels I'll install. While moving the stamp and die from the work bench, the stamp rolled over in the die and caught my fat little tummy--ever seen a ten inch blood blister? OUCH! I've yet to try the stamp and die in the press but if it works as good on the sheat metal as it dit on my tummy I am hopefull.
I'd like to hear more about your diesel plans at some point.
|
|
|
|
|
04-19-2012, 01:01 AM
|
#115
|
|
Bus Geek
Join Date: Mar 2011
Location: Houston, Texas
Posts: 8,462
Year: 1946
Coachwork: Chevrolet/Wayne
Chassis: 1- 1/2 ton
Engine: Cummins 4BT
Rated Cap: 15
|
Re: '46 Chevy Shorty
Hey Trunt --- Ya...having the side skin off definitely makes any underbelly work easier. As for closing everything up, there are also interior panels that need to be fabbed as well. They will be filled with insulation where possible, but the windows limit what can go in the space between the inner & outer skins. They will be separate, overlapping pieces that screw into the ribs and floor between each set of ribs. Basically just flat panels with an "L" bend at the bottom that attaches to the floor. I plan on adding thin sound & thermal insulation sheets onto both the inner & outer skin panels then filling the area below the windows with foam where possible and hope for the best.
Quote:
|
Originally Posted by Tango
a ten inch blood blister
|
Ouch! I can only picture this...and it's not a pretty sight!
As for the "diesel"...it is a Cummins 4BTAA (intercooled 4 cylinder w/turbo). 130 hp & 355 lbs. of torque. Being totally rebuilt by a local Cummins/diesel shop. Brand new turbo & manifold plus new injectors and a re-manned fuel pump. Should be good out to the "B" rating (500,000 miles). What I like most about this Cummins is the combo of torque with efficiency. Capable of pulling much heavier loads than mine and still yielding 27-30 mpg. And there are zero computers or electronics. It is the older two wire engine...Alt output & a ground wire. The tranny I have finally settled on is an Allison S6-6 speed automatic with double overdrive. According to calcs, it will keep the engine in its' sweet spot of 1800rpm at 63 mph...even with my original 5.43 rear end. It is one tough little motor.
|
|
|
|
|
04-25-2012, 09:18 AM
|
#116
|
|
Bus Geek
Join Date: Mar 2011
Location: Houston, Texas
Posts: 8,462
Year: 1946
Coachwork: Chevrolet/Wayne
Chassis: 1- 1/2 ton
Engine: Cummins 4BT
Rated Cap: 15
|
Re: '46 Chevy Shorty
Hanging my fuel tank required a fair amount of welding and such but was pretty straight forward. However...I'm now trying to figure out the black/gray tank and it has me a bit bamboozled. I have very little space between the chassis & tank. Not really enough to reach/work and haven't yet figured out how to handle connecting everything with such limited access. With the fuel tank it was easy...just leave some slack in the hoses so the tank can be raised or lowered as needed. But with the black/gray, it's all hard fittings.
So, the question to the group is...exactly how did you go about connecting the drains to your tank? Did you have enough room above the tank to access it from outside (under the bus) or did you make up the connections from inside? Not at all sure how the plumbing goes together and haven't found anyone locally familiar with setting up a system from scratch so any input, drawings or pix will be greatly appreciated.
All I am hooking up is a straight drop for a toilet with a branch for a shower/sink drain and a vent. And if necessary, I can drop the black/gray down maybe two inches, but the access to the top where the connections go will still be very limited.
|
|
|
|
|
04-25-2012, 10:35 AM
|
#117
|
|
Bus Crazy
Join Date: Mar 2011
Location: Oregon/Philippines
Posts: 1,660
|
Re: '46 Chevy Shorty
i suspect that you should figure out your approximate shower, toilet and drain, locations, and see if a tank will fit under that area, and move your floor plan a bit as necessary so that things like your black water tank will fit under where you want the toilet. Then, you can see what you have to make for brackets, and measure and fit drain, vent lines with holes in floor in appropriate places. hope this is what your question is...
__________________
Jesus Christ... Conversion in progress.
|
|
|
|
|
04-25-2012, 04:02 PM
|
#118
|
|
Bus Geek
Join Date: Jun 2004
Location: Roswell, NM
Posts: 3,588
Year: 1986
Coachwork: BlueBird
Chassis: 40 ft All American FE
Engine: 8.2LTA Fuel Pincher DD V8
Rated Cap: 89
|
Re: '46 Chevy Shorty
Your toilet flange should thread into the fitting on top of your black tank. Put your black tank in place (dry fit). Go inside the bus and thread your toilet flange into the tank. Screw the flange to the floor. Go outside and secure the tank. Don't forget to drill the hole for your vent stack thru the floor. We mounted the pipe connection to the tank before hanging it, then glued the vent pipe to the fitting on the tank.
Use the threaded toilet flange (you can use regular house type flange) not the glue on. You will want to be able to drop the black tank in case it cracks or you need to go fishing for something important (like your cell phone or your only set of bus keys). We prefer to use a threaded connection so that we can drop tanks if needed.
Fresh and grey are similar. You have the fittings needed on the tank and then glue/thread from the inside and connect from there. Just like on a house.
|
|
|
|
|
04-25-2012, 08:30 PM
|
#119
|
|
Bus Geek
Join Date: Mar 2011
Location: Houston, Texas
Posts: 8,462
Year: 1946
Coachwork: Chevrolet/Wayne
Chassis: 1- 1/2 ton
Engine: Cummins 4BT
Rated Cap: 15
|
Re: '46 Chevy Shorty
Thanks all --- I have the locations set for the toilet & a shower drain but wasn't sure about what fittings to use since I do want to be able to disconnect everything to drop the tank if needed. A threaded fitting makes more sense than the glue-in fittings I've seen. I guess I need to make a run to an RV supply and look over what's available.
And since I hope to tie the shower directly into the toilet drain, I am considering one of those self-sealing Hepvo waste valves to isolate the shower from the black drain. Has anyone here had any experience with Hepvo products? If they do what they say, they ought to be great for tight spaces, plus you shouldn't have to worry about a P-Trap going dry and backgassing.
http://www.hepvo.com/HepvoUSTechGuide.pdf
|
|
|
|
|
04-25-2012, 09:02 PM
|
#120
|
|
Bus Geek
Join Date: Apr 2012
Location: So Cal
Posts: 3,231
Year: 1935
Coachwork: Superior
Chassis: Chevy
Engine: 317 ci/tid / Isuzu
|
Re: '46 Chevy Shorty
I'll look into the helco product as well as it may save ne a lot of grief. Since my shower/potty/sink are all in one??? I had thought about using a marine sump pump to drain the shower water into the grey tank which will not be close to the black tank. I calculated the flow rate for the kind of shower I like to take (bucket and stop watch) and then acquired a small pump that draws just a bit more. I'll wire it into the hot water side of the shower ( on demand hot water). I don't have enough room for a trap but the pump should keep the "gasses" from gassing me If this doesn't work I'll use a snorkel! What da u al thnk?
|
|
|
|
|
|
 Posting Rules
|
You may not post new threads
You may not post replies
You may not post attachments
You may not edit your posts
HTML code is Off
|
|
|
|
 » Recent Threads
 |
|
|
|
|
|
|
|
|
|
|
|
|
|
|
|
|
|
|
|
|
|
|
|
|
|
|
|
|
|
|
|
|
|
|
|
|
|


 Linear Mode

