 |
|
 03-18-2016, 01:40 PM
|
#1461
|
|
Bus Geek
Join Date: Mar 2011
Location: Houston, Texas
Posts: 8,462
Year: 1946
Coachwork: Chevrolet/Wayne
Chassis: 1- 1/2 ton
Engine: Cummins 4BT
Rated Cap: 15
|
More tid-bits dropped off at the machine shop today --- (Kinda scary tid-bits) After about a week of measuring, re-measuring, drafting, tweaking, test-fitting, measuring again, consulting a buddy/builder and one final measure and mark...I took my Isuzu drag link in for a chop job. I have to (once again) perform unholy surgery to attach parts from the '46 Chevy onto parts from the '03 NPR. Victor Frankenstein would be proud
("It's Frahn-kin-Steen!").
I have to join the antique end off my old drag link onto the new Isuzu in order for it to fit the ball on my bus's idler arm. And they are...quite different. Damn...maybe I should go measure one more time.
Pix will follow...one way or another. Fingers crossed.
ONWARD!
|

|
|
|
03-18-2016, 06:39 PM
|
#1462
|
|
Bus Geek
Join Date: Apr 2012
Location: So Cal
Posts: 3,231
Year: 1935
Coachwork: Superior
Chassis: Chevy
Engine: 317 ci/tid / Isuzu
|
Hey Tango. When I did that to my Isuzu drag link I talked with a structural engineer as how to weld the parts back together. He recommended 4 plug welds on each end where the sleeve slides over the original part or through the original part to the inner reinforcement depending on the application. It was his opinion that a continual weld around an overlap was apt to create a brittle area prone to failure. So far so good with the plug welds. All the plug welds had the inner part drilled 1/2 their wall thickness where the plugs went. I sealed the ends with flexible seam sealer to keep moisture from getting in between the layers. Jack
|
|
|
|
|
03-19-2016, 10:43 AM
|
#1463
|
|
Bus Geek
Join Date: Mar 2011
Location: Houston, Texas
Posts: 8,462
Year: 1946
Coachwork: Chevrolet/Wayne
Chassis: 1- 1/2 ton
Engine: Cummins 4BT
Rated Cap: 15
|
Howdy Jack --- I opted to go with an adjustable drag link. The shop is building up my old end from 5/8" o.d. to 3/4" o.d. and will thread the shaft so it screws into the NPR portion. It will allow me to fine tune the steering. I can't imagine it ever stripping out but I just might weld it up after I get everything where I want it. We'll see.
|
|
|
|
|
03-20-2016, 03:48 PM
|
#1464
|
|
Bus Geek
Join Date: Apr 2012
Location: So Cal
Posts: 3,231
Year: 1935
Coachwork: Superior
Chassis: Chevy
Engine: 317 ci/tid / Isuzu
|
Hey Tango. That sounds like a good way to go. If I ever need to adjust my drag link I'll have to rotate the pitman arm a notch or two and hope for the best. Jack
|
|
|
|
|
03-20-2016, 08:41 PM
|
#1465
|
|
Bus Geek
Join Date: Mar 2011
Location: Houston, Texas
Posts: 8,462
Year: 1946
Coachwork: Chevrolet/Wayne
Chassis: 1- 1/2 ton
Engine: Cummins 4BT
Rated Cap: 15
|
That should work Jack --- Getting the toe-in and camber are a real trick since there are no "specs" to go by. Just make a guess, then watch the wear on the tires I guess.
|
|
|
|
|
03-21-2016, 10:03 AM
|
#1466
|
|
Bus Geek
Join Date: Mar 2011
Location: Houston, Texas
Posts: 8,462
Year: 1946
Coachwork: Chevrolet/Wayne
Chassis: 1- 1/2 ton
Engine: Cummins 4BT
Rated Cap: 15
|
Speaking of "camber"...one more alignment note/question...
Seems I read somewhere (long ago and now lost) that when going from old school tube-type, bias ply tires to tubeless radials on the front...it was necessary to re-adjust the camber. By any chance does anyone here know anything about this?
|
|
|
|
|
03-21-2016, 10:17 AM
|
#1467
|
|
Bus Nut
Join Date: Feb 2014
Location: Cuyahoga Falls Ohio
Posts: 592
Year: 1997
Coachwork: Startrans
Chassis: Ford e-350 single wheel
Engine: 5.4 litre
Rated Cap: 12
|
Quote:
Originally Posted by Tango

Speaking of "camber"...one more alignment note/question...
Seems I read somewhere (long ago and now lost) that when going from old school tube-type, bias ply tires to tubeless radials on the front...it was necessary to re-adjust the camber. By any chance does anyone here know anything about this?
|
Maybe on the HAMB board?
|
|
|
|
|
03-21-2016, 10:49 AM
|
#1468
|
|
Bus Crazy
Join Date: May 2010
Location: Montana
Posts: 1,626
Year: 1995
Coachwork: Blue Bird
Chassis: All-American R/E
Engine: 8.3 Cummins
Rated Cap: 72
|
|
|
|
|
|
03-21-2016, 11:18 AM
|
#1469
|
|
Bus Geek
Join Date: Mar 2011
Location: Houston, Texas
Posts: 8,462
Year: 1946
Coachwork: Chevrolet/Wayne
Chassis: 1- 1/2 ton
Engine: Cummins 4BT
Rated Cap: 15
|
Thanks leadsled --- I checked the HAMB and have been searching online but have not found anything definitive. Lots of opinions and a couple of vehicle specific adjustments that are far removed from being anything like my bus. Seems to have been discussed a lot by restorers who want a better ride, but no simple answers so far.
|
|
|
|
|
03-21-2016, 04:41 PM
|
#1470
|
|
Bus Geek
Join Date: Mar 2011
Location: Houston, Texas
Posts: 8,462
Year: 1946
Coachwork: Chevrolet/Wayne
Chassis: 1- 1/2 ton
Engine: Cummins 4BT
Rated Cap: 15
|
Thanks Opus...I have the original specs. What I am looking for is what adjustments are necessary to compensate for the change from bias ply tube tires to tubeless radials. I have seen a lot of discussion on the topic but all specific to other makes and models with a lot of variation from one to another. Still no idea how to get it right, or even close on this much modified dinosaur. Hope to avoid learning by quickly wearing out a set of new tires.
|
|
|
|
|
03-21-2016, 04:54 PM
|
#1471
|
|
Bus Crazy
Join Date: May 2010
Location: Montana
Posts: 1,626
Year: 1995
Coachwork: Blue Bird
Chassis: All-American R/E
Engine: 8.3 Cummins
Rated Cap: 72
|
Most everything I read said factory specs are what you go with. You'll be the first to find out. ;)
|
|
|
|
|
03-21-2016, 09:49 PM
|
#1472
|
|
Bus Geek
Join Date: Mar 2011
Location: Houston, Texas
Posts: 8,462
Year: 1946
Coachwork: Chevrolet/Wayne
Chassis: 1- 1/2 ton
Engine: Cummins 4BT
Rated Cap: 15
|
Roger that. I just hope to NOT find out the Hard Way.
|
|
|
|
|
03-26-2016, 12:33 AM
|
#1473
|
|
Bus Geek
Join Date: Mar 2011
Location: Houston, Texas
Posts: 8,462
Year: 1946
Coachwork: Chevrolet/Wayne
Chassis: 1- 1/2 ton
Engine: Cummins 4BT
Rated Cap: 15
|
Yet another chapter in the "Never Ending Story" --- Howdy All...spent Good Friday fabbing more oddball parts for my oddball bus. I now have my drive$haft and that (naturally) means that everything around it must be moved, modified, altered or otherwise reconfigured to accommodate it's presence. Worked on the exhaust which wraps around it...made a new safety hoop in case the shaft ever drops...decided to add yet another safety hoop for the front part of the driveshaft...and...had to modify the bearing support bracket since I screwed up the measure on the shaft by 1/4".
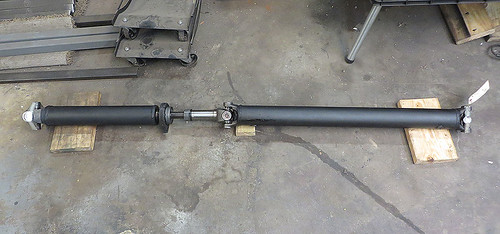
Here's the new 2-piece driveshaft. All $1100 bucks worth. I did get two more quotes. One being about $15 bucks less and the other being over $200 bucks more. I went with the original quote. Ain't it purdy though?
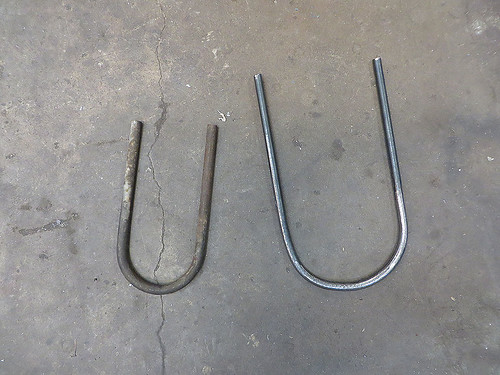
Had to torch and bend some steel rod to make the new safety hoop. This is just the rough cut. It will catch the rear section of the driveshaft if it ever comes loose and keep it from digging into the pavement and doing a pole vault number. Not something you want to happen.
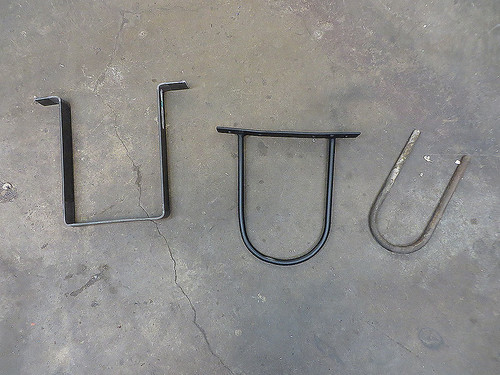
And here's the finished pair (front & rear) plus the original I cut out.
All have been installed but I ran out of energy so pix will have to wait. Manana.
ONWARD!
|
|
|
|
|
03-26-2016, 08:12 AM
|
#1474
|
|
Bus Nut
Join Date: Feb 2015
Location: Houston, Tx.
Posts: 403
Year: 1999
Coachwork: AmTran
Chassis: International
Engine: DT466E
Rated Cap: 84
|
Wow Tango, that driveshaft definitely is professional looking. Looks like you got your moneys worth  .
|
|
|
|
|
03-26-2016, 09:09 AM
|
#1475
|
|
Bus Crazy
Join Date: Oct 2015
Location: Spring Valley AZ
Posts: 1,343
Year: 2000
Coachwork: Bluebird
Engine: 5.9 Cummins
Rated Cap: 2 elderly children, 1 cat
|
Wow....Nice shaft!
Baby look at this guys shaft!!
(Mary runs over to monitor to look)
__________________
Don, Mary and Spooky the cat.
|
|
|
|
|
03-26-2016, 09:18 AM
|
#1476
|
|
Bus Geek
Join Date: Mar 2011
Location: Houston, Texas
Posts: 8,462
Year: 1946
Coachwork: Chevrolet/Wayne
Chassis: 1- 1/2 ton
Engine: Cummins 4BT
Rated Cap: 15
|
Ya, the folks at this drive train shop have a great reputation for quality products. But once in place, I quickly realized just how far off the pinion angle on the rear section really is. A bunch. The rear axle has to rotate down something like 12 degrees. I knew it was high but, come on! As near as I can tell so far, the wedge shaped shims made for adjusting that angle only go to about 10 degrees max...so...here we go again.
|
|
|
|
|
03-26-2016, 09:25 AM
|
#1477
|
|
Bus Crazy
Join Date: May 2010
Location: Montana
Posts: 1,626
Year: 1995
Coachwork: Blue Bird
Chassis: All-American R/E
Engine: 8.3 Cummins
Rated Cap: 72
|
Glad you made the hoops, good call.
When I was young, if we had cell phones then I am sure I would have been sending pix of hot chicks, hot rods to my friends. Now....I send pix of food, buses, driveshafts, etc.
[sigh]
|
|
|
|
|
03-26-2016, 10:14 AM
|
#1478
|
|
Bus Geek
Join Date: Apr 2012
Location: So Cal
Posts: 3,231
Year: 1935
Coachwork: Superior
Chassis: Chevy
Engine: 317 ci/tid / Isuzu
|
I was going to say that I was glad you got the shaft, but then I'd have had to try to explain what I meant and you know how those things go, so----- it really looks good. You are getting closer to that first drive all the time. Jack
|
|
|
|
|
03-27-2016, 01:20 AM
|
#1479
|
|
Bus Geek
Join Date: Mar 2011
Location: Houston, Texas
Posts: 8,462
Year: 1946
Coachwork: Chevrolet/Wayne
Chassis: 1- 1/2 ton
Engine: Cummins 4BT
Rated Cap: 15
|
I not only "got the shaft"...I installed it.
Had another good day and got a few significant things accomplished.
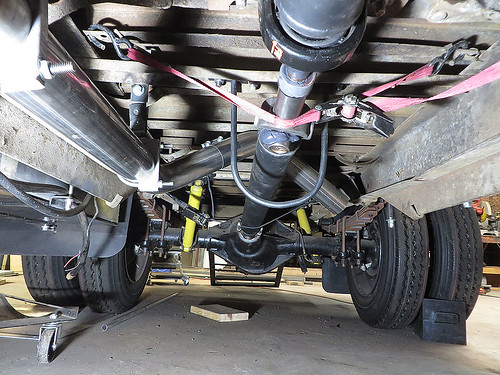
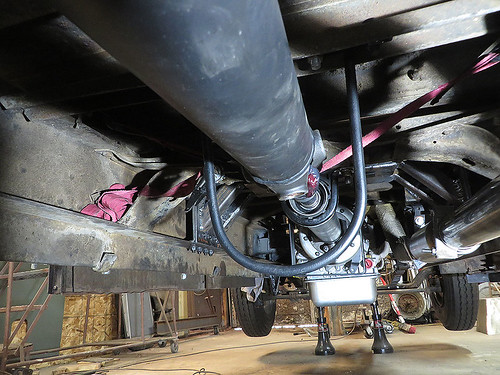
The driveshaft fits and is in. Please ignore the nylon straps. Placing a 2 piece driveshaft by yourself turns out to be a major chore that requires some jury rigging to get it done.
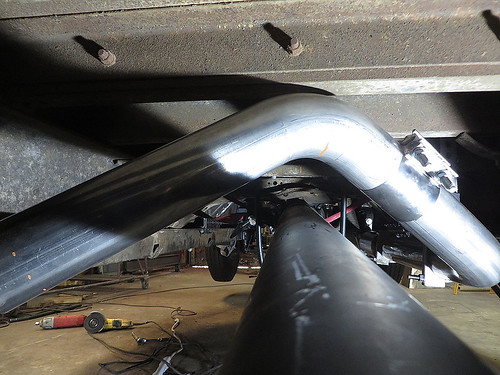
Here's the rear safety hoop now in place...

...and this is the front one. Either will catch the driveshaft should it ever decide to let go and prevent the bus from pole vaulting.
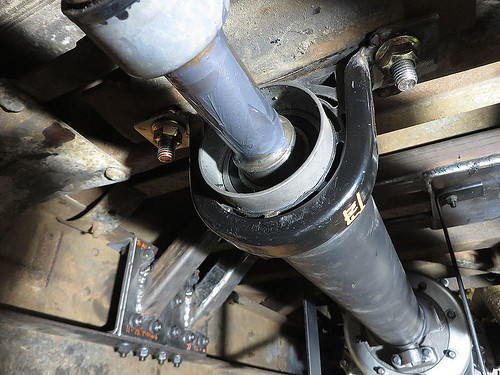
I doubt you can tell from the pic but this retainer for the central bearing was a royal Beotch to fab/modify. Due to a measuring error on my part...I had to relocate the mounting bolt holes back about a half inch. It was a real nail-biter!
And, lastly...
 ...I can now I can try to lock down the position of the exhaust. It is tight under there. I think there is enough room for the shaft to move, but...
ONWARDS!
|
|
|
|
|
03-27-2016, 09:30 AM
|
#1480
|
|
Bus Geek
Join Date: Apr 2012
Location: So Cal
Posts: 3,231
Year: 1935
Coachwork: Superior
Chassis: Chevy
Engine: 317 ci/tid / Isuzu
|
Quite a milestone Tango. Clever way to one man the drive shaft installation.
"Please ignore the nylon straps." Now you know I can't do that! I hear butter was once used to lubricate leather straps used in a similar setting------  Jack
|
|
|
|
|
|
 Posting Rules
|
You may not post new threads
You may not post replies
You may not post attachments
You may not edit your posts
HTML code is Off
|
|
|
|
 » Recent Threads
 |
|
|
|
|
|
|
|
|
|
|
|
|
|
|
|
|
|
|
|
|
|
|
|
|
|
|
|
|
|
|
|
|
|
|
|
|
|


 Linear Mode

