 |
|
 06-28-2017, 12:34 AM
|
#2401
|
|
Bus Crazy
Join Date: Feb 2012
Location: Salt Lake City Utah
Posts: 1,635
Year: 2000
Chassis: Blue Bird
Engine: ISC 8.3
|
As custom as our rigs can be in the body and floor plan departments it makes sense that the electrical systems would get that way too. I can imagine that finding somebody local to consult on a custom system, rather than simply a person to repair typical factory production stuff, could be tricky.
Most of what you listed seems relatively straightforward. The easiest way to combine shore power and generator sources is to simply plug the shore power cord into the genny when appropriate. If hard wire is preferred, a transfer switch can be selected. Then it's off to the PDI modules -- do you have any particular parts or families picked already? There are the all-in-one PD4000, PD4500, and PD4135 series or the charger-converter and distribution functions can be selected separately. For example, the PD9200 series charger-converter units plus a PD5000 AC/DC distribution panel.
My personal bias for charging house batteries from the alternator is that I'd really like to see a multi-stage charge control system just like we have when charging from AC mains. That's why I shy away from basic battery isolators - especially the diode-based style, but also the FET-based style. I just don't believe the alternator's regulator is configured for ideal charging of a potentially large house battery. Instead I'd consider something basic such as alternator supplying a DC-to-AC inverter, in turn supplying the AC input of the PDI converter-charger equipment. It's not going to earn an Energy Star rating for efficiency but maybe efficiency of the battery charging from the alternator isn't a big concern.
Maybe you'll want an inverter anyway and some clever switching could allow the one component to be used either in the alternator-to-house charging flow or in the house-to-AC-sockets flow. Note that this sort of setup would probably only be feasible with the separate converter-charger and distribution components; an all-in-one might make this impossible.
The cord pictured looks like SO type cord. It's fantastic stuff for a rugged abrasion, cut, and oil-resistant cord around the shop, but I wouldn't put it in a concealed place. OSHA and NEC are of the opinion that conductors called "cord" don't belong there. How about marine grade wire? www.bestboatwire.com lists their tinned stranded 12/3 at 85 cents a foot, which is actually cheaper than what I'm seeing on Home Depot's web site for 12/3 SOOW cord. Interestingly, they state "The maximum allowable amperage of 12/3 AWG marine grade primary wire is 45 amps outside of engine spaces and 38.3 amps inside the engine space." I'm not sure what temperature rise profile that's based on nor why it's so different to the 12 ga=20 amps rule traditionally used in buildings.
|

|
|
|
06-28-2017, 03:32 AM
|
#2402
|
|
Bus Geek
Join Date: May 2009
Location: Columbus Ohio
Posts: 18,828
Year: 1991
Coachwork: Carpenter
Chassis: International 3800
Engine: DTA360 / MT643
Rated Cap: 7 Row Handicap
|
In the 120 volt world of code for houses , 15 amp is 14 gauge, 20 amp is 12 gauge, 30 amp is 10 gauge. 40 amp is 8 gauge and 50 amp is 6 gauge. At the higher amps some people like to up gauge on runs over 25 feet, is for the 40/50 for a range .
The brackets, the way I understand is that the 1000/2000 are the same case. So any navistar truck or school bus with hydraulic brakes is a possible candidate. Or any school bus for that matter. The IC BE series came with 1000s in them and most had hydraulic brakes. Navistar can look about anything up by vin, at least my dealer can, so I if we even so much as find a bus for sale online with the d421 shifter and hydraulics it's a candidate for that bracket and we just need it's vin
Christopher
|

|
|
|
06-28-2017, 11:18 AM
|
#2403
|
|
Bus Crazy
Join Date: Feb 2012
Location: Salt Lake City Utah
Posts: 1,635
Year: 2000
Chassis: Blue Bird
Engine: ISC 8.3
|
Ah! The answer to the marine wire ampacity riddle. Firstly, they're a bit mistaken. Secondly, it seems marine wire is commonly rated for 105*C temperature whereas building wire is commonly 60, 75, or 90*C -- and in fact, NEC/NFPA70 does have different ampacities for the different temperature ratings. The higher temperature rating of the insulation allows for higher ampacity while minimizing risk of the insulation turning gooey and dripping off the conductors (or merely getting soft so that a pressure point such as a staple can more easily press through).
The 45 amp rating shown at bestboatwire is based on a single conductor in free space as per ABYC electrical standards. It should be derated for the 12/3 flat cable configuration to account for the two current-carrying conductors and the sheath. It seems that when the deratings are properly considered ABYC and NEC aren't all that different in their ampacities.
|
|
|
|
|
06-29-2017, 10:00 PM
|
#2404
|
|
Bus Geek
Join Date: Mar 2011
Location: Houston, Texas
Posts: 8,462
Year: 1946
Coachwork: Chevrolet/Wayne
Chassis: 1- 1/2 ton
Engine: Cummins 4BT
Rated Cap: 15
|
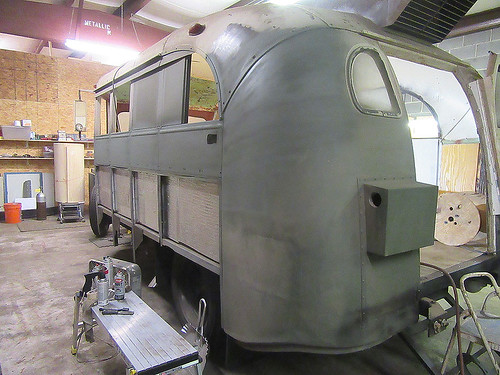
More body work --- I HATE body work. And I would not be doing any if a few of the parts I so desperately need were ready!
Got after the paint mess with some Aircraft Stripper, then a few passes with a stripping wheel, followed by some rust converter/primer and a quick shot of self etching primer. Which, BTW, is a necessity here in Humidity Central. Otherwise rust forms instantly.
As near as I can tell, this old gal has been through a lot, paint wise. Some areas appear to have been sanded to bare metal, then the geniuses applied water based latex which left an under layer of rust. Other areas appear to have been left alone as they had the latex on top of a thin coat of an unknown type pale green paint on top of the original "School Bus Orange" (yes...it was orange way back in the olden days)...all on top of some red lead primer. That metal was clean as a whistle. Just wish they had left the rest of her alone.
Anyhow, after much burning of fingers (NOTE: latex gloves do NOT keep out Aircraft Stripper...they melt.) and scraping I managed to clean up the rest of the driver side and get the primer on.
 ONWARD!
|
|
|
|
|
07-02-2017, 11:22 AM
|
#2405
|
|
Bus Geek
Join Date: Mar 2011
Location: Houston, Texas
Posts: 8,462
Year: 1946
Coachwork: Chevrolet/Wayne
Chassis: 1- 1/2 ton
Engine: Cummins 4BT
Rated Cap: 15
|
Hope everyone is having a great 4th of July Weekend!!! --- and...getting a little work done.
Just a couple of quik pix...
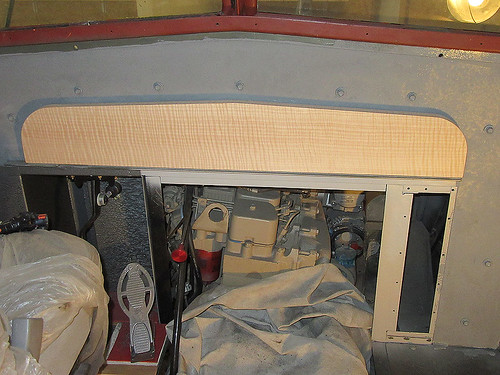
Worked up a blank for my dash. Curly maple with a cutout on back for some insulation. There will be more to this but it's a start.
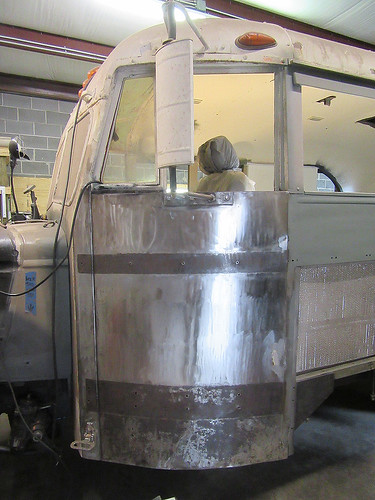
Got the last of the paint off the driver side...
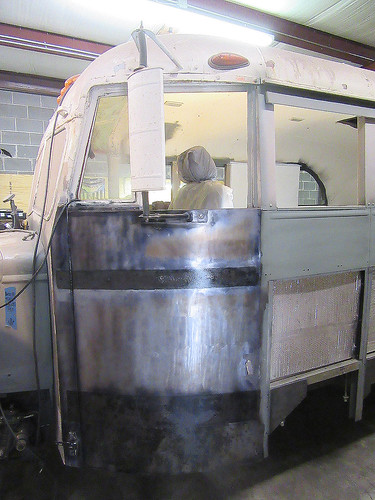
...then a few shots of rust converter before applying some primer. Tha's on the schedule for today.
ONWARD!
|
|
|
|
|
07-02-2017, 02:15 PM
|
#2406
|
|
Bus Crazy
Join Date: Mar 2011
Location: Oregon/Philippines
Posts: 1,660
|
Quote:
Originally Posted by Tango

Well Crap...
Just discovered that GM has discontinued making/selling the driveline park brake cable bracket I need for my trans. Thanks guys. I mean they are only on about 80 different and recent model vehicles.
Sure would have been easier to order than fab. Might get lucky at a scrap yard but it will probably be quicker just to make one.
Hey Cadillac...do you have a pic of the one on your trans?
|
just build your own.. i often have made brackets instead of wasting time looking for them, but have built entire cars since i was 20
__________________
Jesus Christ... Conversion in progress.
|
|
|
|
|
07-02-2017, 02:25 PM
|
#2407
|
|
Bus Geek
Join Date: May 2009
Location: Columbus Ohio
Posts: 18,828
Year: 1991
Coachwork: Carpenter
Chassis: International 3800
Engine: DTA360 / MT643
Rated Cap: 7 Row Handicap
|
Love that dash mockup ! Wood is good!
Chev49 yeah I had to make my own for the same purpose as tango. Grrr.. it just sucks when you have to take time making a part that should be easily available....
Christopher
|
|
|
|
|
07-02-2017, 08:57 PM
|
#2408
|
|
Bus Geek
Join Date: Mar 2011
Location: Houston, Texas
Posts: 8,462
Year: 1946
Coachwork: Chevrolet/Wayne
Chassis: 1- 1/2 ton
Engine: Cummins 4BT
Rated Cap: 15
|
I will very likely wind up fabbing the park brake cable bracket --- but I had hoped to avoid it. Only because I am fabbing so damned many other trivial little items. In fact, today I may have set a skoolie record for the smallest chunks if metal cut and welded. Two pieces about 1/8" square by maybe 3/8" long.
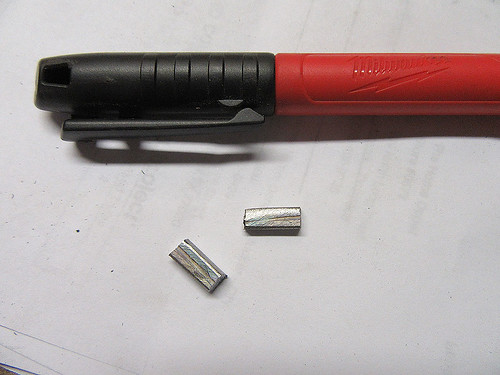
Little bits of what is now my brake light switch bracket.
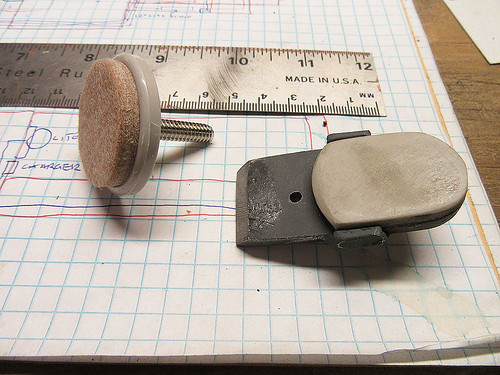
The teeny, tiny tabs keep the plastic pad from rotating. My brake light switch is metal and I didn't want it wearing through so the pad should take the wear as well as be non-conducting if it ever does.
It's stuff like this that eats my lunch, but hey...
ONWARD!
|
|
|
|
|
07-02-2017, 10:01 PM
|
#2409
|
|
Bus Geek
Join Date: May 2009
Location: Columbus Ohio
Posts: 18,828
Year: 1991
Coachwork: Carpenter
Chassis: International 3800
Engine: DTA360 / MT643
Rated Cap: 7 Row Handicap
|
I totally dig the pastic pad idea!! I am with you on keeping things isolated.. I bread-baorded some vairablew resistors today.. and even though the package claims that the shofts of them arent electrically connected to either pole, i used plastic to mount them so no chance of conductivity between them!..
and welding 1/8" yeaoow.. thats smaller by double what my weld beads are !
-Christopher
|
|
|
|
|
07-02-2017, 10:56 PM
|
#2410
|
|
Bus Geek
Join Date: Mar 2011
Location: Houston, Texas
Posts: 8,462
Year: 1946
Coachwork: Chevrolet/Wayne
Chassis: 1- 1/2 ton
Engine: Cummins 4BT
Rated Cap: 15
|
Ya..the Volvo switch is all metal (which I like), but if they wear thru they will short out. Heck...I should live so long as to wear it out!
And the toughest part of the welding job was simply holding the tiny bits in place while trying to get a spark...and not fry my fingers. I can usually use a clamp or magnet or some such, but not on those fragments. I have concluded I am much more comfortable with big stuff like the deck. More work but much less angst.
|
|
|
|
|
07-03-2017, 10:05 AM
|
#2411
|
|
Bus Geek
Join Date: May 2009
Location: Columbus Ohio
Posts: 18,828
Year: 1991
Coachwork: Carpenter
Chassis: International 3800
Engine: DTA360 / MT643
Rated Cap: 7 Row Handicap
|
small work is always tough.. and less forgiving..
face it if you are working on something that is 6 feet long and you make a weld a 1/16" off its probably still going to work and fit.. if you have a piece 1/8" and you make a weld 1/16" off its probably time to start over....
-Christopher
|
|
|
|
|
07-03-2017, 01:32 PM
|
#2412
|
|
Almost There
Join Date: Jul 2015
Location: Corpus Christi, TX
Posts: 97
Year: 1965
Coachwork: Looking for a bus...maybe
Chassis: International Scout
Engine: 7.3L Powerstroke
Rated Cap: 2
|
 Curly Maple dash
|
|
|
|
|
07-03-2017, 07:09 PM
|
#2413
|
|
Bus Geek
Join Date: Mar 2011
Location: Houston, Texas
Posts: 8,462
Year: 1946
Coachwork: Chevrolet/Wayne
Chassis: 1- 1/2 ton
Engine: Cummins 4BT
Rated Cap: 15
|
Here's hoping for fewer tiny welds --- just too danged nerve wracking.
And there is still more to come on the dash. Still working out the shifter for my Allison. It has to go somewhere up there.
|
|
|
|
|
07-03-2017, 07:54 PM
|
#2414
|
|
Bus Geek
Join Date: Apr 2012
Location: So Cal
Posts: 3,231
Year: 1935
Coachwork: Superior
Chassis: Chevy
Engine: 317 ci/tid / Isuzu
|
Got any room off to the left of the drivers seat down on the floor? I ended up with both my parking brake and shifter there just in front of the below the floor start batteries. Jack
|
|
|
|
|
07-03-2017, 09:01 PM
|
#2415
|
|
Bus Geek
Join Date: Mar 2011
Location: Houston, Texas
Posts: 8,462
Year: 1946
Coachwork: Chevrolet/Wayne
Chassis: 1- 1/2 ton
Engine: Cummins 4BT
Rated Cap: 15
|
Howdy Jack --- I am trying to keep that (very small) area for some other goodies like heat & A/C. Plus I hope to be able to fully rotate my pilot seat to use as a Lazy Boy when parked, so the dash is my first choice. Still not sure if it will work there but then everything has pretty much been that way so far. The park brake lever may HAVE to go there unless I can figure a way to put it overhead.
|
|
|
|
|
07-09-2017, 08:27 PM
|
#2416
|
|
Bus Geek
Join Date: Mar 2011
Location: Houston, Texas
Posts: 8,462
Year: 1946
Coachwork: Chevrolet/Wayne
Chassis: 1- 1/2 ton
Engine: Cummins 4BT
Rated Cap: 15
|
No...I have NOT been slacking --- Just dealing with minor PITA projects. For example...
Running the 110volt wires from the rear up to the kitchen area. Had to all go along the frame rail. Problem being a major crossmember in the way. I looked at just dropping the wiring below the frame but REALLY do NOT like the idea of four 110 lines hanging out in harms way. The two options were to fab an armored cover or...go through the crossmember. I went through the crossmember.
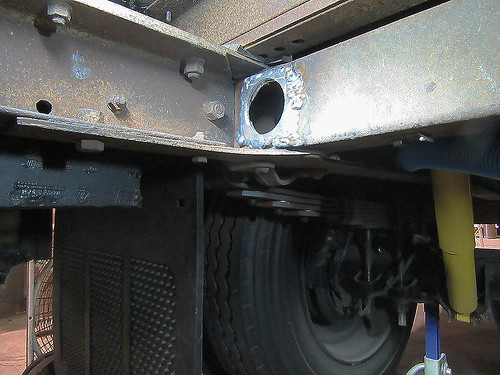
My main concerns were..1. removing that much steel from a major frame element...and 2...simply being able to get to the work area. It is very tight. Drilled a 2" hole in the crossmember but welded a 1/4" plate to try and reinforce the area. Had to acquire a new "shorty" drill just to get to the rail (any excuse for a new tool...right?).
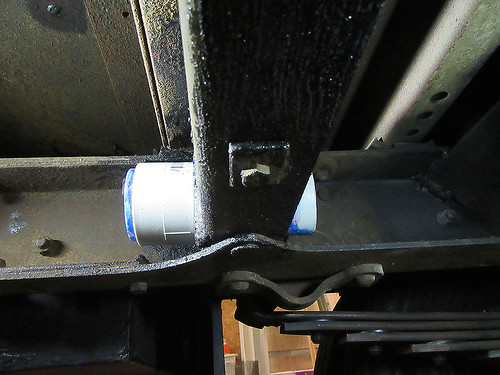
Then...inserted some 2"id PVC to prevent chaffing and insulate the pass through.
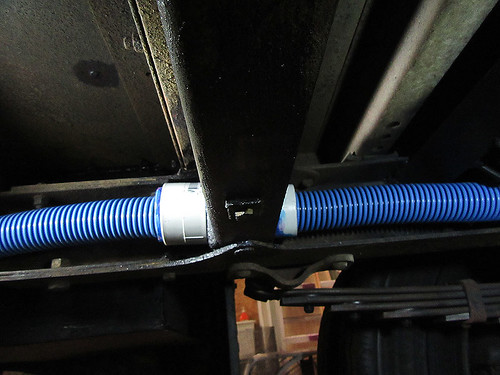
Now my flex conduit (actually some swimming pool vacuum hose) slides through nicely. The four #12 wires fit inside the blue tubing.
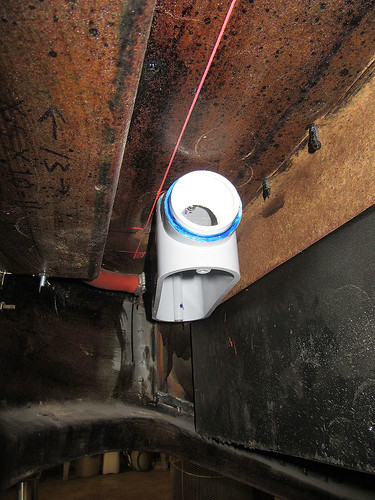
And, this is the wires starting point. A non-metallic box that leads up through the floor to the converter/control panel. The other end goes to various boxes and appliances via a similar box below the kitchen area.
All for now. This was far more time (and patience) consuming than it should have been.
ONWARD!
|
|
|
|
|
07-09-2017, 09:51 PM
|
#2417
|
|
Bus Geek
Join Date: May 2009
Location: Columbus Ohio
Posts: 18,828
Year: 1991
Coachwork: Carpenter
Chassis: International 3800
Engine: DTA360 / MT643
Rated Cap: 7 Row Handicap
|
wiring takes a lot of time.. every time IO get into a project that involves wiring i allocate a block of time then dopuble or trip[le it just because i just know my best idea plan is going to get holes shot in it.. by me myself and I..
your idea looks solid, keeps the wires dry and the bus wont bust in half on a bump.. thats all good in my book!
-Christopher
|
|
|
|
|
07-10-2017, 09:42 AM
|
#2418
|
|
Bus Geek
Join Date: Mar 2011
Location: Houston, Texas
Posts: 8,462
Year: 1946
Coachwork: Chevrolet/Wayne
Chassis: 1- 1/2 ton
Engine: Cummins 4BT
Rated Cap: 15
|
Roger the wiring taking more time than allotted...or desired --- Especially for someone who knows NOTHING about things electrical. That said, the swimming pool vacuum hose seems to be working better than any of the standard issue electrician stuff I came across. Extremely flexible, water tight and made to be dragged around rough surfaces. I guess I'll know how good an idea it was in twenty years.
|
|
|
|
|
07-10-2017, 10:11 AM
|
#2419
|
|
Bus Crazy
Join Date: Jun 2013
Location: Picton,Ont, Can.
Posts: 1,956
Year: 1997
Coachwork: Bluebird
Chassis: GMC
Engine: Cat 3116
Rated Cap: 72
|
Quote:
Originally Posted by Tango
Roger the wiring taking more time than allotted...or desired --- Especially for someone who knows NOTHING about things electrical. That said, the swimming pool vacuum hose seems to be working better than any of the standard issue electrician stuff I came across. Extremely flexible, water tight and made to be dragged around rough surfaces. I guess I'll know how good an idea it was in twenty years.
|
Mr. TANGO,
Glad you are making progress in the strange world of wiring. I do have some concerns about what you have done though. It all seems good on the surface as your pics and comments describe.
Are you pulling just 4 single conductors through the pool hose from back to front of the bus?
You live in a very hot part of the world so do you think that hose will stand the heat from the road, let alone when driving?
That piece of 2" pvc might or might not stand the heat and vibration and breakdown over time, less than 20 years, maybe 1 or 2 years at most.It will loose shape and just flatten down, then fall out likely or rattle in the opening.
Be sure you pull a ground wire into that hose along with the 4 conductors you have planned and ground it at both ends.
I wish I knew for sure that you are pulling 4 individual conductors, say a red, black, blue and whit for example. Or are you pulling 4 runs of 12/2 house wire with grounds of course? I sure hope you aren't thinking that because they will definitely overheat lying in that pool hose when they are energized and then likely melt down or worse. All that hard work you have done for nothing.
If me, I would make that whole run out of 2"pvc, not just where you went through the crossmember. Your pic shows a 2"LB to go vertically at that end so do that at the other end to into the panel.
I'm not trying to be critical but just advising of what could potentially be wrong with your method over time.
Feel free to pm if you need advice or if I can add some clarity before you carry on.
John
__________________
Question everything!
|
|
|
|
|
07-10-2017, 12:03 PM
|
#2420
|
|
Bus Geek
Join Date: May 2009
Location: Columbus Ohio
Posts: 18,828
Year: 1991
Coachwork: Carpenter
Chassis: International 3800
Engine: DTA360 / MT643
Rated Cap: 7 Row Handicap
|
whats the difference in that hose vs the "convoluted" tubing or whatever the black plastic ribbed wiring harness is... that stuff in both my busses is still in good shape underneath after the age of the busses..
if he pulled SO through there would that give an extra layer of protection?
-Christopher
|
|
|
|
|
|
| Thread Tools |
|
|
| Display Modes |
 Linear Mode Linear Mode
|
 Posting Rules
|
You may not post new threads
You may not post replies
You may not post attachments
You may not edit your posts
HTML code is Off
|
|
|
|
 » Recent Threads
 |
|
|
|
|
|
|
|
|
|
|
|
|
|
|
|
|
|
|
|
|
|
|
|
|
|
|
|
|
|
|
|
|
|
|
|
|
|


