 |
|
 11-05-2017, 09:19 AM
|
#2761
|
|
Bus Geek
Join Date: Mar 2011
Location: Houston, Texas
Posts: 8,462
Year: 1946
Coachwork: Chevrolet/Wayne
Chassis: 1- 1/2 ton
Engine: Cummins 4BT
Rated Cap: 15
|
Still Tinkering & Sketching --- As I previously mentioned, sorting out how to convert the existing hydraulic actuation of the master cylinder to pure mechanical has kept me busy the past few days. I have tossed out a number of ideas but think I may be close now.
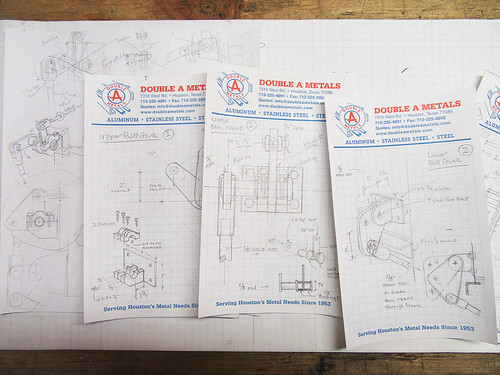
One of my main objectives is to resolve this issue while having to alter/throw out the fewest number of existing parts. Having spent months fabricating nearly all of them from scratch, I do NOT wish to abandon any more than absolutely necessary. This particular solution calls for only removing the hydraulic clutch master (which I did not make) and then replacing it with a system of three heavy duty bell cranks and steel shafts. I will have to machine a couple of pieces but have a connection that I believe will work with me on them.
We'll soon see.
|

|
|
|
11-05-2017, 12:28 PM
|
#2762
|
|
Bus Geek
Join Date: Apr 2012
Location: So Cal
Posts: 3,231
Year: 1935
Coachwork: Superior
Chassis: Chevy
Engine: 317 ci/tid / Isuzu
|
Hey Tango, thanks to WanderWoman I am sending this post from my new phone using Tapatalk!
Would it be possible to substitute a dual action master cylinder from a small import --- that would give you the extra safety you need. Jack
P.S. now that I've finished up my Retrobird and gotten the hang of Tapatalk there will be no end to my disturbances. I'll even post pics. Take that Photosket!
 
Sent from my LG-M255 using Tapatalk
|
|
|
|
|
11-05-2017, 04:27 PM
|
#2763
|
|
Bus Crazy
Join Date: Nov 2015
Location: Billings, MT
Posts: 1,269
Year: 2003
Coachwork: Thomas
Chassis: HDX
Engine: Cat C7
Rated Cap: 84 passenger
|
Oooh! I want THAT car!
|
|
|
|
|
11-05-2017, 05:48 PM
|
#2764
|
|
Bus Geek
Join Date: Mar 2011
Location: Houston, Texas
Posts: 8,462
Year: 1946
Coachwork: Chevrolet/Wayne
Chassis: 1- 1/2 ton
Engine: Cummins 4BT
Rated Cap: 15
|
WOW Jack! Come on...is that for real!? --- Would make a mighty sweet Toad except it needs a paint job to match Rosebud. Maybe something with some tasteful flames?
The Corvette master is one of the few that moves enough fluid to take care of the big four wheel disks I now have. Anything smaller was not considered based strictly on volume. And it is big. I also wanted to use the bracket I already have made for it that sits along side the frame/fishplate so...this will be a fairly complicated set of pushrods. Not really all that bad but three bellcranks do have to be fabbed to make it all work.
|
|
|
|
|
11-06-2017, 11:07 AM
|
#2765
|
|
Almost There
Join Date: Jul 2015
Location: Corpus Christi, TX
Posts: 97
Year: 1965
Coachwork: Looking for a bus...maybe
Chassis: International Scout
Engine: 7.3L Powerstroke
Rated Cap: 2
|
Quote:
Originally Posted by Tango

Still Tinkering & Sketching --- As I previously mentioned, sorting out how to convert the existing hydraulic actuation of the master cylinder to pure mechanical has kept me busy the past few days. I have tossed out a number of ideas but think I may be close now.
One of my main objectives is to resolve this issue while having to alter/throw out the fewest number of existing parts. Having spent months fabricating nearly all of them from scratch, I do NOT wish to abandon any more than absolutely necessary. This particular solution calls for only removing the hydraulic clutch master (which I did not make) and then replacing it with a system of three heavy duty bell cranks and steel shafts. I will have to machine a couple of pieces but have a connection that I believe will work with me on them.
We'll soon see.
|
Tango- Saw your earlier post about the brake master cylinder and was going say...how about a bellcrank? 
Dodge and Chevy Vans in the 70s had a 90* brake booster

Jeff's Bronco Graveyard offers a brake booster upgrade for broncos that has ~45* bracket through the firewall.

Lots of hot rod 90* set up for under dash brake booster/master upgrades.
Perhaps some inspiration?


|
|
|
|
|
11-06-2017, 11:34 AM
|
#2766
|
|
Traveling
Join Date: Nov 2015
Location: Midwest
Posts: 2,573
Year: 2003
Coachwork: BlueBird
Chassis: TC2000
Engine: 5.9L Cummins
Rated Cap: '00
|
Quote:
Originally Posted by Tango
Still Tinkering & Sketching --- As I previously mentioned, sorting out how to convert the existing hydraulic actuation of the master cylinder to pure mechanical has kept me busy the past few days. I have tossed out a number of ideas but think I may be close now.
One of my main objectives is to resolve this issue while having to alter/throw out the fewest number of existing parts.
We'll soon see.
|
How about moving the motor up a few inches. 
Beautiful drawings- what program did you use? 
Somebody mentioned a booster off of a P42 stepvan might work (nevermind- something else). I like off the shelf for brake stuff ideally.

|
|
|
|
|
11-06-2017, 01:14 PM
|
#2767
|
|
Bus Geek
Join Date: Mar 2011
Location: Houston, Texas
Posts: 8,462
Year: 1946
Coachwork: Chevrolet/Wayne
Chassis: 1- 1/2 ton
Engine: Cummins 4BT
Rated Cap: 15
|
Guido...I looked at a few 90 degree set ups, but my hydro boost master is just too danged big to cram in anywhere except down on the frame. The only other space available is way up under what is left of the cowl and would be a monster to get to as well as calling for adding a lot more structure to carry it.
Rusty...the Program is called 2B. But it does come with an eraser.
|
|
|
|
|
11-06-2017, 01:40 PM
|
#2768
|
|
Bus Geek
Join Date: May 2009
Location: Columbus Ohio
Posts: 18,835
Year: 1991
Coachwork: Carpenter
Chassis: International 3800
Engine: DTA360 / MT643
Rated Cap: 7 Row Handicap
|
so is the issue just no room for the hydraulic actuated solution? or just that you want to mechanically actuate your master cylinder for fear of hydraulic failure?
-Christopher
|
|
|
|
|
11-06-2017, 03:44 PM
|
#2769
|
|
Bus Geek
Join Date: Mar 2011
Location: Houston, Texas
Posts: 8,462
Year: 1946
Coachwork: Chevrolet/Wayne
Chassis: 1- 1/2 ton
Engine: Cummins 4BT
Rated Cap: 15
|
Both Christoper. I only came to use the clutch system because there was no room to put the hydro boost anywhere under the hood and at the time did not see any way for it to be mechanically operated. But since getting it in, I have decided that relying on that single piston/seal to work everything is simply a bad idea and went back to the drawing board for one more try.
I'm not a big fan of doing things twice, but in this case I'm think I'm making the right call. Gonna run the plans by a buddy here who is a serious builder (NASCAR, NHRA, Big dollar customs) to see what he thinks. I'll need him to do the machining anyway.
|
|
|
|
|
11-06-2017, 05:18 PM
|
#2770
|
|
Bus Geek
Join Date: Mar 2011
Location: Houston, Texas
Posts: 8,462
Year: 1946
Coachwork: Chevrolet/Wayne
Chassis: 1- 1/2 ton
Engine: Cummins 4BT
Rated Cap: 15
|
Just realized they used my bus to take young Forrest Gump to school.

Well...not MY bus, but one with the same body. Course the same body was made from 1941 thru early '47 so there were a lot of them around. And the one in the movie looks to be in excellent shape.
|
|
|
|
|
11-06-2017, 08:45 PM
|
#2771
|
|
Bus Geek
Join Date: May 2009
Location: Columbus Ohio
Posts: 18,835
Year: 1991
Coachwork: Carpenter
Chassis: International 3800
Engine: DTA360 / MT643
Rated Cap: 7 Row Handicap
|
if failure is one of the main keys.. what about a mechanical brake solution for the rear discs (or drums whichever you have).. that would be a cable solution.. enough pressure to get one stop out of it.. combined with your downshift.. or perhaps a much heavier mass 12" drum on your transmission?
even with my standard mass 10" drum I did an experiment and was able to stop redbyrd.. slammed it to 'L1' and actuated my brake lever.. the transmission wont destroy itself.. it only downshifts when its safe to do so and not over-rev the motor.. and yeah the drum got hot, didnt burn it up and it didnt smoke like crazy but it smelled warm.. .. but the bus did stop in a pretty reasonable distance.. main reasoning is i wanted to know if the "parking brake" could also be an emergency brake..
with a larger diameter and mass drum it couldve slowed me down faster..
just a thought..
-Christopher
|
|
|
|
|
11-06-2017, 10:09 PM
|
#2772
|
|
Bus Geek
Join Date: Mar 2011
Location: Houston, Texas
Posts: 8,462
Year: 1946
Coachwork: Chevrolet/Wayne
Chassis: 1- 1/2 ton
Engine: Cummins 4BT
Rated Cap: 15
|
I have a full sized driveline drum brake installed but only consider it as a failsafe mechanism. I'm just really uncomfortable with having that clutch master as the sole device controlling the dual pot main master. The all mechanical connection to the master gives me a much more warm fuzzy feeling.
|
|
|
|
|
11-07-2017, 06:27 AM
|
#2773
|
|
Bus Geek
Join Date: May 2009
Location: Columbus Ohio
Posts: 18,835
Year: 1991
Coachwork: Carpenter
Chassis: International 3800
Engine: DTA360 / MT643
Rated Cap: 7 Row Handicap
|
I do agree on the mechanical connection feeling better.. though if it ends up being a myriad of cfranks / linkages, and such then it ends up being more failure prone than the hydraulic line.. a pin falls out / bolt breaks / lever jams, etc..
if you can do a mechanical linkage with very few moving parts then I say go for it.. otherwise i say think logically and methodically into the possible failure points.. and the failsafe systems..
in a simple pedal with a pin to the master system.. we both know that almost never fails.. the master cylinder itself may fail.. but normally with lots of warning and only one of the 2 brake systems being compromised.. in that sense, the clutch master is a lot more likely to fail than a simple (standard car) system.. as we know people's hydraulic clutches die now and then..
add cranks and more pistons, pins, levers.. and at what point does that system surpass in the likeliehood of failure.. theres no data to know.. because manufacturers dont build them that way..
but ultimately your failsafe is your backup system, designed to stop you in the event your hydraulics fail.. pretty much the reason for having installed it..
if there were some way to have a simple pedal to master then thats the best.. (and how you wouldve built it if it was feasibly possible)..
-Christopher
|
|
|
|
|
11-07-2017, 10:08 AM
|
#2774
|
|
Bus Geek
Join Date: Mar 2011
Location: Houston, Texas
Posts: 8,462
Year: 1946
Coachwork: Chevrolet/Wayne
Chassis: 1- 1/2 ton
Engine: Cummins 4BT
Rated Cap: 15
|
Hey Christopher --- I absolutely agree. The simpler, the better. Which, given the space restrictions that came along with this rig, have been difficult to adhere to design-wise. I'm as loyal a follower of the KISS principal as you will find, but sometimes you have to adapt to what you are working with.
In this case, I am more comfortable (so far) with the mechanical linkage idea than I am with the single hydraulic point of failure possibility. Even involving three bellcranks.
Everything will be overbuilt and doubly secured. Two of the brackets will be made from 1/4" plate and one machined from 1/2-3/4" stock, the rods will be either 3/8 or 1/2" and all pivots will have both retaining rings plus cotter pins. As noted earlier, I am going to run the design past a local builder who has many years experience resolving such issues before proceeding. It is actually simpler than it sounds.
Hope to get with him today or tomorrow.
I'll let you know if he breaks out laughing.
|
|
|
|
|
11-11-2017, 08:11 AM
|
#2775
|
|
Bus Geek
Join Date: Mar 2011
Location: Houston, Texas
Posts: 8,462
Year: 1946
Coachwork: Chevrolet/Wayne
Chassis: 1- 1/2 ton
Engine: Cummins 4BT
Rated Cap: 15
|
OK...I met with someone who has a great deal more experience (and skill) than I at building a wide variety of vehicles, and after much crawling under, measuring and such, he concluded the design I had was the best solution to a tricky situation.
And that was after he tore his scalp open and bled all over the place.
I had no sooner finished the sentence..."be careful, there are a lot of sharp things hanging down under there"...when I heard the yelp. Poor guys bald head took a really nasty gouge but he quickly went back to the business at hand after a band aid and mopping things up. He is obviously a Pro.
He had a number of detail ideas and shortcuts that should make for a very solid mechanical system of actuating the brakes. I will tighten up my drawings and measurements and we can get started fabbing.
ONWARD!
|
|
|
|
|
11-11-2017, 09:33 AM
|
#2776
|
|
Bus Geek
Join Date: May 2009
Location: Columbus Ohio
Posts: 18,835
Year: 1991
Coachwork: Carpenter
Chassis: International 3800
Engine: DTA360 / MT643
Rated Cap: 7 Row Handicap
|
good deal!! second set of eyes is always a nice thing to have on a project like this.. however painting your bus blood-red likely wasnt in the plan!! ugh hope he recovers soon.. cant wait to see how you get this mechanically actuated.. of course one thought i had would get me tossed across the room.. which is.. "why didnt you just use Air brakes?"..
-Christopher
|
|
|
|
|
11-11-2017, 11:24 AM
|
#2777
|
|
Bus Geek
Join Date: Mar 2011
Location: Houston, Texas
Posts: 8,462
Year: 1946
Coachwork: Chevrolet/Wayne
Chassis: 1- 1/2 ton
Engine: Cummins 4BT
Rated Cap: 15
|
A better question might be...
"What the Hell was I thinking when I took on a 71 year old school bus?"
|
|
|
|
|
11-11-2017, 11:39 AM
|
#2778
|
|
Bus Geek
Join Date: May 2009
Location: Columbus Ohio
Posts: 18,835
Year: 1991
Coachwork: Carpenter
Chassis: International 3800
Engine: DTA360 / MT643
Rated Cap: 7 Row Handicap
|
Quote:
Originally Posted by Tango
A better question might be...
"What the Hell was I thinking when I took on a 71 year old school bus?"
|
probably the same thing as any of us who take on a 1940 something anything.. "how cool this is gonna be!.. and it cant be that hard to slap a big engine in, some A/C, a tilt steering column and yeah lets go!.. said many a Hot-rodder who gave up before the wheels ever turned under their own power..
then again when you are out camped next to Ol trunt stealing the eyes of the whole campground.. the booze flowin and the sun is setting it will a be all worth it!!
-Christopher
|
|
|
|
|
11-11-2017, 11:56 AM
|
#2779
|
|
Bus Geek
Join Date: Mar 2011
Location: Houston, Texas
Posts: 8,462
Year: 1946
Coachwork: Chevrolet/Wayne
Chassis: 1- 1/2 ton
Engine: Cummins 4BT
Rated Cap: 15
|
Let's hope so Christopher.
I pretty much knew what I was in for when I fell in love with this gal. I also knew that very few things in this world get you into more trouble than "love".
|
|
|
|
|
11-11-2017, 12:06 PM
|
#2780
|
|
Bus Geek
Join Date: May 2009
Location: Columbus Ohio
Posts: 18,835
Year: 1991
Coachwork: Carpenter
Chassis: International 3800
Engine: DTA360 / MT643
Rated Cap: 7 Row Handicap
|
the world of resto-modding makesi t even harder.. when you restore a car back to original, you at least have a good idea of what the parts are supposed to be.. even if you have a tough time finding them.. you know that part A was supposed to go in hole B..
when resto-modding you first have to determine that you need a part A.. and what part A is gonna look like.. then you have to figure out how to make part A.. and then you find out that you cant drill hole B because bracket C is already where hole B is supposed to be... Ok.. back to 'I think I need a part A.."
-Christopher
|
|
|
|
|
|
 Posting Rules
|
You may not post new threads
You may not post replies
You may not post attachments
You may not edit your posts
HTML code is Off
|
|
|
|
 » Recent Threads
 |
|
|
|
|
|
|
|
|
|
|
|
|
|
|
|
|
|
|
|
|
|
|
|
|
|
|
|
|
|
|
|
|
|
|
|
|
|


 Linear Mode

