 |
 09-09-2015, 11:42 AM
|
#1
|
|
Mini-Skoolie
Join Date: Aug 2015
Posts: 25
|
Carpenter Cadet
Hello,
Our family bought a bus a couple weeks ago. It is a 1975 Carpenter Cadet. It is a GMC p30 based bus with 350/TH400. 7 windows on the drivers side. Total space inside is about 6.5'x16'. It was originally from the Oregon coast. So far not too much rust at all with the exception of The headlight trim rings and the battery box. This bus will be mostly for weekend trips within 200 miles of home which is north of Seattle, Wa. We will also go further like to southern California, then Alaska as funds will allow.
We purchased the bus about 60 miles north and drove it home. 55-60 and it was screaming. It drove fine. But was loud and rattling due to extra parts stacked in back. We got a Dometic 2510 fridge, a propane /electric oven range, a suburban furnace. It also came with a small breaker box and a converter/battery charger with the bus. We will evaluate,clean and test all of these items before making a decision on them.
At this point we have removed the wall panels and nasty insulation on the passenger side. We have everything on passenger side primed with XO rust Rusty Metal Red primer. White paint will go on in window openings hopefully tonight.
I found a great deal on XO Rust oil based enamel at a local True Value that is closing. 75% off=$2.12 a quart.
Im thinking we'll buy some red, they have lots of it, to paint the walls below window and on floor. I want all the metal sealed up before we start.
My plan at this point is to put 2 layers of 1/2 inch R max foam insulation between the ribs under each window.
Then we will add plywood strips as a chair rail below the bottom of all windows. We are keeping all windows in the bus. We want to see out as much as possible. We will make some heavy duty curtains to cover them at night. If the need arises we can make some rigid foam insulation window covers for very cold trips. The panels would be covered somehow.
Each rib will have plywood strips much like Nat used in his build.
It seems that marine plywood would be the smart way to do it. It will all be sealed and painted.
I also thought about using composite lumber but it is expensive seems to come in sizes that don't really work for our layout.
What would be the most durable method of building the chair rail under the window?
I am thinking in wrapping thin white plastic which is made to put on bathroom walls, 1/16" from under the window frame down around the inside and down the plywood strips
so that any condensation form will not get into the wood. I will seal the windows with silicone to keep the foam seals from taking on water which seems to be the design flaw on this bus with old foam.
I can not put carriage bolts through the ribs into the strips as we are not removing the outer skin. Would tek screws come loose eventually? I don't think so but I'm not positive.
Would we be better off tapping threads into the rib and using loctite on the bolts?
Then we are planning on putting another 1/2" layer of rigid insulation over the ribs.
I think that we can attach the interior components to the wood strips through the foam insulation as long as there is enough surface area to spread the load over a large area. Is this correct?
Does the wall need a skin over the foam even if it is behind a cabinet etc?
We don't want to trap moisture in the wall. Will the inside of the outer skin have condensation on it behind the rigid foam?
As for the floor we are going to put down 1 inch of foam over the painted floor. We are hoping to use FRP sheets as the subfloor. I found the rough finish type fairly inexpensive at HD. Can we lay the FRP rough side down and glue it to the foam and have it be rigid enough to protect the foam?
We could also go with galvanized steel but it is expensive. Would doubling up on thinner galvanized sheets work as well or close?
Whatever subfloor we use will be covered with one piece of vinyl flooring that will extend up the wall on the sides and also over the exposed end of the floor at the rear emergency door so that the flooring layers would be protected.
Our focus right now is to get the walls and floor done and then move on from there.
So do we have the right idea so far? We want to do this bus as economically as possible but also want it to built to last. Any advice or experience you all may have would be greatly appreciated. Thanks.
|

|

|
|
09-09-2015, 12:31 PM
|
#2
|
|
Bus Geek
Join Date: Aug 2011
Location: Stony Plain Alberta Canada
Posts: 2,937
Year: 1992
Coachwork: Bluebird
Chassis: TC2000 FE
Engine: 190hp 5.9 Cummins
Rated Cap: 72
|
I would use 14 or 16 ga galvanized steel as a subfloor, not FRP.
Here FRP is $55 a sheet. The galvanized 16 ga steel is around $70 a sheet.
I would not try more than one layer of thin steel. It will ripple and bubble, making it hard to glue down.
FRP was not made for the force of foot traffic, and will not hold up.
Painting your wood strapping should be enough. No need to wrap in plastic as that will trap moisture inside the wood.
Marine grade plywood is nice, but IMO in not really necessary for the strapping.
#14 self tapping 3/8 bolt head tech screw will work fine VS the bolts I used. I just dipped the threads into automotive seam seal befor driving them in. This seals and acts as a lock tight to prevent them from backing off. Both my bottom and top strapping in my bus are attached this way.
Nat
__________________
"Don't argue with stupid people. They will just drag you down to their level, and beat you up with experience."
Patently waiting for the apocalypses to level the playing field in this physiological game of life commonly known as Civilization
|
|
|
|
|
09-10-2015, 03:17 AM
|
#3
|
|
Mini-Skoolie
Join Date: Aug 2015
Posts: 25
|
We will try to find a deal on heavy gauge galvanized steel.
Should we just leave the walls open behind the cabinets etc? We will install tongue and groove wood where the walls are exposed.
Should we redo the windows with adhesive backed foam strips or should we also seal around the windows with silicone and foam?
What is the best type of foam material to use for this?
I should be getting the passenger side painted today. Is there a way to add pictures without hosting them?
Thanks.
|
|
|
|
|
09-10-2015, 07:09 AM
|
#4
|
|
Bus Nut
Join Date: Feb 2014
Location: Cuyahoga Falls Ohio
Posts: 592
Year: 1997
Coachwork: Startrans
Chassis: Ford e-350 single wheel
Engine: 5.4 litre
Rated Cap: 12
|
Quote:
Originally Posted by 75GMCCadet26

We will try to find a deal on heavy gauge galvanized steel.
Should we just leave the walls open behind the cabinets etc? We will install tongue and groove wood where the walls are exposed.
Should we redo the windows with adhesive backed foam strips or should we also seal around the windows with silicone and foam?
What is the best type of foam material to use for this?
I should be getting the passenger side painted today. Is there a way to add pictures without hosting them?
Thanks.
|
Butyl rubber is the best for resealing windows. IMO . You will need to remove windows add the butyl and reinstall windows.
|
|
|
|
|
09-10-2015, 07:28 AM
|
#5
|
|
Mini-Skoolie
Join Date: Aug 2015
Posts: 25
|
Does the butyl rubber come in strips with adhesive on it or do we have to glue it in? No big deal on taking windows out as we have already removed them on the passenger side so that we could paint the window openings.
Is the automotive body/paint place the best place to buy it or are there better sources? Thanks.
|
|
|
|
|
09-10-2015, 12:46 PM
|
#6
|
|
Bus Nut
Join Date: Feb 2014
Location: Cuyahoga Falls Ohio
Posts: 592
Year: 1997
Coachwork: Startrans
Chassis: Ford e-350 single wheel
Engine: 5.4 litre
Rated Cap: 12
|
Quote:
Originally Posted by 75GMCCadet26
Does the butyl rubber come in strips with adhesive on it or do we have to glue it in? No big deal on taking windows out as we have already removed them on the passenger side so that we could paint the window openings.
Is the automotive body/paint place the best place to buy it or are there better sources? Thanks.
|
The butyl rubber I have comes in strips actually coils with brown waxed paper keeping it from sticking to itself. I bought mine at the local swap meet. I think a lot of windsheilds are glued in with butyl caulk. Not sure if its the same as the strips.
|
|
|
|
|
09-10-2015, 02:15 PM
|
#7
|
|
Bus Geek
Join Date: Aug 2011
Location: Stony Plain Alberta Canada
Posts: 2,937
Year: 1992
Coachwork: Bluebird
Chassis: TC2000 FE
Engine: 190hp 5.9 Cummins
Rated Cap: 72
|
Quote:
Originally Posted by leadsled01
The butyl rubber I have comes in strips actually coils with brown waxed paper keeping it from sticking to itself. I bought mine at the local swap meet. I think a lot of windsheilds are glued in with butyl caulk. Not sure if its the same as the strips.
|
Both will work fine.
The strips are far less messy for someone that doesn't do it everyday.
Be sure to read the instructions on windshield caulk. The pre prep is everything to ensure the product works as planned.
Nat
__________________
"Don't argue with stupid people. They will just drag you down to their level, and beat you up with experience."
Patently waiting for the apocalypses to level the playing field in this physiological game of life commonly known as Civilization
|
|
|
|
|
09-10-2015, 02:49 PM
|
#8
|
|
Bus Crazy
Join Date: Nov 2011
Location: Sault Ste. Marie, Ontario
Posts: 1,793
Year: 1997
Coachwork: Thomas
Chassis: B3800 Short bus
Engine: T444E
Rated Cap: 36
|
In my opinion, there are places where butyl rubber is the ultimate choice and others where it simply isn't appropriate. Take this image for example, which crudely shows two cross-sections:
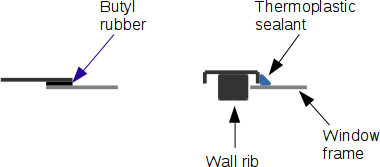
In the first case butyl rubber will work amazingly well at sealing two parallel, flat objects.
In the second case it might work, but not as well as a sealant designed specifically for perpendicular sealing. This is the case for the windows in my bus. As the windows are tightened from the inside of the bus, the window frame tightens against the metal support, which is perpendicular to the frame. If butyl rubber tape were to be pressed onto the window frame before tightening, it would get sliced in half by the support. Some may stay in between and keep things sealed, but a thermoplastic sealant will work better. Also, you wouldn't want to use something like automotive seam sealer since it doesn't cure. It stays sloppy, collects dirt and can easily be morphed.
You'll have to look at how your windows are installed to determine which will work better.
|
|
|
|
|
09-10-2015, 04:45 PM
|
#9
|
|
Bus Geek
Join Date: Apr 2012
Location: So Cal
Posts: 3,231
Year: 1935
Coachwork: Superior
Chassis: Chevy
Engine: 317 ci/tid / Isuzu
|
Just a heads up on butyl tape. It is no longer approved for windshields in the U.S. The structural aspect of glazing in modern autos is not supported by butyl tape when it comes to shear.
Buy your materials from an automotive glass installation firm--they will know which mastic is approved for which use.
heck this out: phoenixglass.biz/do-it-yourself-auto-glass-questions.htm
|
|
|
|
|
09-30-2015, 10:42 AM
|
#10
|
|
Mini-Skoolie
Join Date: Aug 2015
Posts: 25
|
We now have all of the wall panelling off and most of the ceiling panels too. More nasty insulation has been pulled out. Should have all ceiling off this am.
We want to build a sleeping loft on the rear of the roof. We want to have a place for our kids to sleep that is above the main bed. The plan is to build a flat platform on roof that is 6.5'x8'long. Then build a roof that is also flat on the bottom. The walls will be hinged off of roof piece with rollers on the bottom which ride in a track. A boat winch will be used to pull the bottom of the wall toward the outside of the bus which will lift the roof and allow the walls to stand straight up. The walls on the ends will then fall into place as the two side walls become vertical. We will devise a way to pin the walls in place once it is in extended position. Hopefully that makes sense.
It will be about 2.5 feet higher when down and probably 6.5 when up. We are at 9.5' now so down the road we would be at 12'.
We are planning on using super strut as the framework, foam insulation then plywood inside with cedar on the outside. It will have 4 house windows 1 on each wall. Using the home depot website I calculated that it would weigh about 700 pounds, so lets just call it 1000lbs.
This is on a bus which has GVW of 14,400 p30 chassis. It has a huge rear axle(have yet to id it) and dual 19.5 wheels. It is a Carpenter Cadet which is a school bus cousin of a step van.
Is this going to cause handling issues?
Do we need to redesign this with aluminum?
I am still at a loss as to how to calculate the center of gravity. Would the center of the frame the fulcrum? About how much does an 8 foot section of bus body weigh? It seems that while putting that much weight up high would create a long lever. On the other hand it seems that the bus body should weigh close to the same given the similar type of construction which means that it wouldn't be much different than a 2 foot roof raise on the last 8 feet of the bus.
What does the average roof deck weigh? Has anyone done a roof deck on this type of bus?
|
|
|
|
|
09-30-2015, 11:07 AM
|
#11
|
|
Bus Geek
Join Date: Aug 2011
Location: Stony Plain Alberta Canada
Posts: 2,937
Year: 1992
Coachwork: Bluebird
Chassis: TC2000 FE
Engine: 190hp 5.9 Cummins
Rated Cap: 72
|
No reason to use aluminum for the roof extension. It would be more trouble than good.
However 3/16th aluminum angle would be great for building the roof deck frame. Just be sure to isolate it from the steel to avoid galvanic corrosion.
Super strut is a bit heavy for what it is. It was not made for mobile uses.
I would get some channel formed up at a metal shop from 14 gauge sheet steel. Have them make it to the same size as the original support ribs (channels) in the bus.
If I was you, I would just raise that section of roof, and not bother with all that folding stuff you mentioned. It sounds like a leaky mess waiting to happen.
Center of gravity will not be a issue as long as all you water tanks and other heavy objects are kept low at frame height or lower.
More than one member here have raised their entire roof to 12 feet. The bus body does not weigh as much as you think.
Also, please stay with metal sheeting on the outside. Wood has no place on the exterior of a bus. Think of what would happen if a piece of cedar came off and hit a car behind you. Also the metal is what locks all the framing together, making everything strong.
I'm looking forward to pics.
Nat
__________________
"Don't argue with stupid people. They will just drag you down to their level, and beat you up with experience."
Patently waiting for the apocalypses to level the playing field in this physiological game of life commonly known as Civilization
|
|
|
|
|
09-30-2015, 12:09 PM
|
#12
|
|
Mini-Skoolie
Join Date: Aug 2015
Posts: 25
|
I am not really set on super strut by any means, the weight info was just easy to get off of HD site. The hat idea is probably the best from a strength/weight standpoint.
Good point on the wood. It could be secured but as it degrades it becomes an issue.
The roof will not be opened up under it, it will just have a hatch that goes into it.
When it comes to leaks it seems that as long as it fits together nicely and has seal material between each layer it will be ok. Yes with the added complexity comes risk of leaks but I have no doubt that that can be overcome. 90% of the roof will still be intact so most leaks would result in water ending up on the bus roof, which would run off.
The reason that we do not want to raise the roof is that it would be nice to have it much higher when parked than would be possible with a permanent raise.
|
|
|
|
|
 Posting Rules
|
You may not post new threads
You may not post replies
You may not post attachments
You may not edit your posts
HTML code is Off
|
|
|
|
 » Recent Threads
 |
|
|
|
|
|
|
|
|
|
|
|
|
|
|
|
|
|
|
|
|
|
|
|
|
|
|
|
|
|
|
|
|
|
|
|
|
|


 Linear Mode

