 |
|
 05-16-2021, 09:17 AM
|
#241
|
|
Skoolie
Join Date: Nov 2020
Location: Long Island, NY
Posts: 167
Year: 2009
Coachwork: Girardin
Chassis: Chevy
Engine: 6.6 turbo diesel
Rated Cap: ?
|
That is definitely pretty cool. I have bottomed out multiple times with my hitch and really hate it. Way to use your noodle, and talents, to put this one in the bumper!
|

|

|
|
05-22-2021, 07:40 PM
|
#242
|
|
Bus Geek
Join Date: Dec 2015
Location: pa
Posts: 2,509
Year: 98
Coachwork: 1. Corbeil & 2. Thomas
Chassis: 1 ford 1998 e350 4x4 7.3 2 mercedes 2004
Engine: 7.3 powerstroke & MBE906
|
Finally I got my hitch welded up, then I thought that I should make a 1 gallon air tank out of the main tube. Square tube is not the best for pressure vessels but 1/4" wall steel is pretty stout. So I welded endcaps and drilled and tapped 1/8 npt holes .
I am using a 12 v air compressor from a Lincoln air suspension and that pumps it to 120 psi. Slow but good for my air springs and emergencies.
Tomorrow one more leak test and then I can button this hitch / bumper project up.
|
|
|
|
|
05-23-2021, 03:10 PM
|
#243
|
|
Bus Geek
Join Date: Dec 2015
Location: pa
Posts: 2,509
Year: 98
Coachwork: 1. Corbeil & 2. Thomas
Chassis: 1 ford 1998 e350 4x4 7.3 2 mercedes 2004
Engine: 7.3 powerstroke & MBE906
|
Passed the leak test, that is no leaks. Nice to put it all back together after the upgrades.
|
|
|
|
|
05-23-2021, 03:52 PM
|
#244
|
|
Skoolie
Join Date: Nov 2020
Location: Long Island, NY
Posts: 167
Year: 2009
Coachwork: Girardin
Chassis: Chevy
Engine: 6.6 turbo diesel
Rated Cap: ?
|
Congrats. Well done��
|
|
|
|
|
05-23-2021, 03:58 PM
|
#245
|
|
Bus Geek
Join Date: Dec 2015
Location: pa
Posts: 2,509
Year: 98
Coachwork: 1. Corbeil & 2. Thomas
Chassis: 1 ford 1998 e350 4x4 7.3 2 mercedes 2004
Engine: 7.3 powerstroke & MBE906
|
Thanks, I needed to see some progress, finally...
|
|
|
|
|
05-23-2021, 08:58 PM
|
#246
|
|
Skoolie
Join Date: Nov 2020
Location: Long Island, NY
Posts: 167
Year: 2009
Coachwork: Girardin
Chassis: Chevy
Engine: 6.6 turbo diesel
Rated Cap: ?
|
I am feeling the same. Life has had me jumping a bunch of different directions. Cant wait to get back in the saddle and see some progress myself. However, that does not minimize how impressed i always am with the chalenges you take on and the progress you make. Keep on keepin on!!!
|
|
|
|
|
05-23-2021, 09:30 PM
|
#247
|
|
Bus Nut
Join Date: May 2018
Location: Wamego Ks
Posts: 617
Year: 2007
Chassis: Collins
Engine: 6.6L LMM Duramax
|
Very good looking hitch tucked up behind the bumper! I also love the idea of creating an air tank from something like the tubing from your hitch! Good work!
__________________
2007 Collins (Chevy Express 3500)
LMM Duramax Diesel with newly rebuilt 4L85E Transmission!
|
|
|
|
|
07-05-2021, 07:01 PM
|
#248
|
|
Bus Geek
Join Date: Dec 2015
Location: pa
Posts: 2,509
Year: 98
Coachwork: 1. Corbeil & 2. Thomas
Chassis: 1 ford 1998 e350 4x4 7.3 2 mercedes 2004
Engine: 7.3 powerstroke & MBE906
|
If that was a smart move ? Combining something structural with an air tank seems to be a bad idea. I am running out of space and against the gvwr. So got to make compromises.
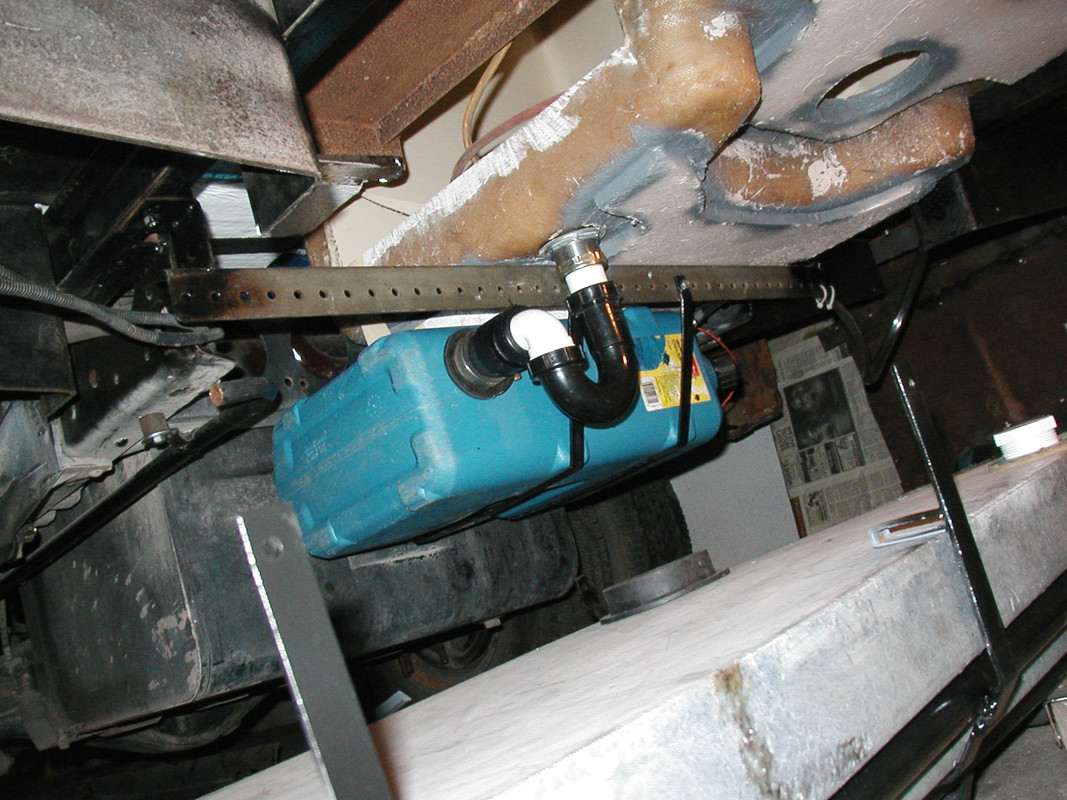
Here is another one. The accident caused a lot of damage and during the rebuilding we decided to change the layout a little.
We would like to have a bathroom and shower.
There is very little space so it requires some consideration. The key was making the driver chair part of the dinette. That saved some space. I had to move the freezer box a little to the rear and remove the heater core.
The idea is to lower the floor between the crossmembers (21") and put a stainless 3" deep tub in.
In the same space would be a litterbox toilet with urine diverter that can slide out of the way.
I temporary used a SS pot I had laying around from goodwill. I will get one size bigger and weld a SS funnel in as diverter.
But this is good enough for a first test.
While I was getting stuff out of the way I mounted a set of WVO filters hidden behind a blue " water Jerry can" .
|
|
|
|
|
08-07-2021, 02:42 PM
|
#249
|
|
Bus Geek
Join Date: Dec 2015
Location: pa
Posts: 2,509
Year: 98
Coachwork: 1. Corbeil & 2. Thomas
Chassis: 1 ford 1998 e350 4x4 7.3 2 mercedes 2004
Engine: 7.3 powerstroke & MBE906
|
Finally brought up the courage to cut a hole in my floor. The shower pan will drop 4" in there. 1/2 insulation below that.. the standing height under the roof is the 70" The interior of the bus got painted by Smita and the kids. Looking a lot nicer. So I have some pressure to get this shower pan made. You can see the top of the ac skirt condenser and next the that the webasto TSL17.
The interior heater is now relocated and in the corner above the wheel well in the shower stall will be shower heat exchanger.. recirculating is the design.
Johan
|
|
|
|
|
08-07-2021, 08:29 PM
|
#250
|
|
Bus Geek
Join Date: Apr 2012
Location: So Cal
Posts: 3,231
Year: 1935
Coachwork: Superior
Chassis: Chevy
Engine: 317 ci/tid / Isuzu
|
That first cut is a hard thing to face. It looks like you've gotten past the worst of it!
For what it's worth and since I'm well over 70 inches tall, I'll share what I end up doing. Maybe it'll give you some more ideas.
Jack 
I lowered my bath 7 inches (normal step height for a stair case) and since I couldn't stand up straight yet I cut a hole in the top. I also added a grey water tank below the bus floor level equipped with a lift pump to get the shower water into the regular grey tank. Other than being quite a confined shower/toilet/sink, it all works fine.
Jack
 .
 .
 .
 .
|
|
|
|
|
08-08-2021, 09:36 PM
|
#251
|
|
Bus Geek
Join Date: Dec 2015
Location: pa
Posts: 2,509
Year: 98
Coachwork: 1. Corbeil & 2. Thomas
Chassis: 1 ford 1998 e350 4x4 7.3 2 mercedes 2004
Engine: 7.3 powerstroke & MBE906
|
Thanks Jack,
Did you make your shower stall?.. must have missed it when I was reading your build.
Making a card board mockup for the shower pan. After that I will bend and weld it in stainless..
What lift pump did you use.. how do you service it with hair and so.
Johan
|
|
|
|
|
08-09-2021, 12:08 PM
|
#252
|
|
Bus Geek
Join Date: Dec 2015
Location: pa
Posts: 2,509
Year: 98
Coachwork: 1. Corbeil & 2. Thomas
Chassis: 1 ford 1998 e350 4x4 7.3 2 mercedes 2004
Engine: 7.3 powerstroke & MBE906
|
On with the shower pan.. got scrap stainless in the form of ss cabinets... Made a template from cardboard..now I have to transfer it on stainless.
Johan
|
|
|
|
|
08-17-2021, 08:03 PM
|
#253
|
|
Bus Geek
Join Date: Dec 2015
Location: pa
Posts: 2,509
Year: 98
Coachwork: 1. Corbeil & 2. Thomas
Chassis: 1 ford 1998 e350 4x4 7.3 2 mercedes 2004
Engine: 7.3 powerstroke & MBE906
|
Side tracked a little by lithium batteries..
It is moving day in state College and so many bed frames are at the curb.
Decided to make battery boxes for 8 cells 24 volt.
The battery tray in Dory handles 2 8D batteries and with a little modification can handle three sets of these 24 battery boxes. They can only be 7-1/4 wide so it requires 1/8" thickness.. ie...bedframes...a little hard to weld because of the carbon...almost like a spring steel so it needs a slow cool down to not be to brittle.
|
|
|
|
|
08-17-2021, 08:22 PM
|
#254
|
|
Bus Geek
Join Date: Apr 2012
Location: So Cal
Posts: 3,231
Year: 1935
Coachwork: Superior
Chassis: Chevy
Engine: 317 ci/tid / Isuzu
|
I keep a screen strainer in the shower floor and clean it after each use. My tank is a 7 gallon water jug. I used standard water tank fittings but stuffed a submersible 12v pump through the original fill spout which allows me access should I need it. I wrote the pump info on the side of the tank and I'll have to back the bus out of the garage to read it--I'll be happy to do it if you are interested. I think keeping hair etc out of the tank is the most important thing. That and draining as soon after use as possible.
Jack
I may have posted this:
.
|
|
|
|
|
08-24-2021, 04:49 PM
|
#255
|
|
Bus Geek
Join Date: Dec 2015
Location: pa
Posts: 2,509
Year: 98
Coachwork: 1. Corbeil & 2. Thomas
Chassis: 1 ford 1998 e350 4x4 7.3 2 mercedes 2004
Engine: 7.3 powerstroke & MBE906
|
Thanks Jack, no need for the pump # at this moment.
Had some fun cutting a SS sheet out of those cabinets. Then prep. This is 0.040" thick. To get sharper corners I scored the sheet at the outside with a cutoff wheel.
The local welding shop needed a repair on their automatic pipe bender.. I was able to repair it, Broken limit switch, power resistor and another switch. They were happy and dropped their work to bend my stainless project.
Back at home I welded the corners up to give it rigidity and did a test fit.
The 4" floor drop is perfect for me ( 6ft02").
I goofed up the back wall..should have been 6" taller.. a piece of my cardboard template tore of. The good thing was that the bending brake could not have bend that extra material. I guess that cardboard tore of for a reason after all. The pictures are without that material. I still have to weld it on.
Later Johan
|
|
|
|
|
08-24-2021, 05:36 PM
|
#256
|
|
Bus Nut
Join Date: May 2018
Location: Wamego Ks
Posts: 617
Year: 2007
Chassis: Collins
Engine: 6.6L LMM Duramax
|
Wow! That is great work! I hate working with stainless (cutting,drilling, bending) because it's a pain, But I love TIG welding it. Your cardboard template must have been right on because the pan looks like it fits great!
__________________
2007 Collins (Chevy Express 3500)
LMM Duramax Diesel with newly rebuilt 4L85E Transmission!
|
|
|
|
|
08-24-2021, 08:36 PM
|
#257
|
|
Bus Geek
Join Date: Dec 2015
Location: pa
Posts: 2,509
Year: 98
Coachwork: 1. Corbeil & 2. Thomas
Chassis: 1 ford 1998 e350 4x4 7.3 2 mercedes 2004
Engine: 7.3 powerstroke & MBE906
|
Thanks. I was pretty fortunate with this part. I am not a skilled tig welder. I used 40 amps and an about 1 mm tungsten. A copper back bar against burn thru...any advise?
Johan
|
|
|
|
|
08-24-2021, 11:21 PM
|
#258
|
|
Bus Nut
Join Date: Mar 2021
Location: Connecticut
Posts: 638
Year: 2009
Coachwork: Gillig
Chassis: G27E102
Engine: Cummins ISL 280
Rated Cap: 26,000 lbs
|
Wow. Impressive!!
Ive already trouble drilling stainless, trying to weld it isnt something I am going to try very soon
And Im wondering what the pamphlet says. For or against what exactly [emoji848]
|
|
|
|
|
08-25-2021, 08:07 AM
|
#259
|
|
Bus Nut
Join Date: May 2018
Location: Wamego Ks
Posts: 617
Year: 2007
Chassis: Collins
Engine: 6.6L LMM Duramax
|
Quote:
Originally Posted by joeblack5

Thanks. I was pretty fortunate with this part. I am not a skilled tig welder. I used 40 amps and an about 1 mm tungsten. A copper back bar against burn thru...any advise?
Johan
|
What welder setup are you using? Do you have a foot pedal? Are you using filler rod? 309L 316, etc? Grab a piece of scrap and mimick your joints. If you have a foot pedal, set your machine a little higher than you think you'll need. You'll be able to watch your puddle and prevent burn through with a little practice with no backer bar. I assume the corner joints are your most trouble? Those will need filler rod to produce a consistent easy to weld joint ( Unless you have one of the mating pieces overlap a bit so you can burn it back to the other piece) Your copper backer bar may also be acting as a heat sink as well (which is good). I would keep using it.
A lap joint vs butt joint may be easier to weld without burn through as well if changing joint design is an option. Stainless is finicky and if you burn through, it will create a dark gray oxide type of layer where the gas didn't reach. You can sand this off if needed. If the weld/material gets too hot or not enough gas coverage, it'll turn a dull gray. A stainless weld should produce a nice shiny gold, red, bluish colored weld.
As far as tungsten goes, I use a larger (than 1mm) tungsten for about everything. Sharpened to a point with the grinding marks going in the same plane as the tungsten. A well sharpened tungsten can help you control your arc and weld puddle. With the small tungsten you have, you should have good control.
Sorry for the Novel, I'm no professional but these are things I've learned over the years. I used to be a decent TIG welder when I was welding everyday making stainless parts for packing house almost 20 yrs ago. I dont feel old enough to be saying 20 yrs ago. Lol but it would have been around the 2001-2002 time period... When I was 19-20 yrs old. Lol
|
|
|
|
|
08-25-2021, 10:00 AM
|
#260
|
|
Bus Geek
Join Date: Apr 2012
Location: So Cal
Posts: 3,231
Year: 1935
Coachwork: Superior
Chassis: Chevy
Engine: 317 ci/tid / Isuzu
|
Frochevy. Made me laugh when you said "I don't feel old enough to be saying 20 yrs ago. Lol but it would have been around the 2001-2002 time period... When I was 19-20 yrs old. Lol". Wait 'till you're pushing eighty and see what you say----
Jack 
|
|
|
|
|
|
 Posting Rules
|
You may not post new threads
You may not post replies
You may not post attachments
You may not edit your posts
HTML code is Off
|
|
|
|
 » Recent Threads
 |
|
|
|
|
|
|
|
|
|
|
|
|
|
|
|
|
|
|
|
|
|
|
|
|
|
|
|
|
|
|
|
|
|
|
|
|
|


 Linear Mode

