Journey with Confidence RV GPS App RV Trip Planner RV LIFE Campground Reviews RV Maintenance Take a Speed Test Free 7 Day Trial ×


Reply
 
Thread Tools Display Modes
 
Old 12-23-2016, 05:13 AM   #101
Bus Geek
 
Join Date: May 2009
Location: Columbus Ohio
Posts: 18,835
Year: 1991
Coachwork: Carpenter
Chassis: International 3800
Engine: DTA360 / MT643
Rated Cap: 7 Row Handicap
The blowers in bus heaters are typically high compared units and also able to produce good static pressure through the coils. Computer fans are designed for zero static pressure unless you get the noisy high performance ones used in 4 post enclosed racks. The larger coil only helps if you have the ability to move coolant and air through it. A cutaway bus likely has no 1 inch coolant lines anywhere in it, not even the supply and return from the block. That said you can still get good heat out of the coils you have by adapting the 1 inch fittings down to the 3/4 or 5/8 that the bus has, no need to re plumb all the hoses for that one unit.

Christopher

cadillackid is offline   Reply With Quote
Old 12-23-2016, 07:00 AM   #102
Bus Geek
 
joeblack5's Avatar
 
Join Date: Dec 2015
Location: pa
Posts: 2,506
Year: 98
Coachwork: 1. Corbeil & 2. Thomas
Chassis: 1 ford 1998 e350 4x4 7.3 2 mercedes 2004
Engine: 7.3 powerstroke & MBE906
Morning Christopher, you are an early riser.
The pump on the webasto is 400 gph if I remember correctly. The hose connection are 3/4" and the original bus line is indeed 5/8"
I have 1" and 3/4" laying around and will temporarily adapt to the existing stuff. Later I have to pull the coolant WVO HIH lines out of our old BULAN. They are 3/4" with 3/8" thin wall stainless fuel line inside. they worked fine for the rear heat in the econoline.

My main gripe with the original heater fans is that they are to noisy, so my goal is to enlarge the heat exchanger from 16Kbtu to 50 Kbtu, not that I need that but just so that I can use low flow , guiet, fans. Will see, if you want something special cheap then it always becomes an experiment.

I will post some pictures of my DIY heater contraption.

Later J
joeblack5 is offline   Reply With Quote
Old 12-23-2016, 11:29 AM   #103
Bus Geek
 
joeblack5's Avatar
 
Join Date: Dec 2015
Location: pa
Posts: 2,506
Year: 98
Coachwork: 1. Corbeil & 2. Thomas
Chassis: 1 ford 1998 e350 4x4 7.3 2 mercedes 2004
Engine: 7.3 powerstroke & MBE906
Elf Bus E350 coolant heaters

Just for info :
The two different interior heaters next to each other, The cube unit on the floor is 16000 BTU, the rectangular one that hangs normally on the bottom of the seat is 50000 BTU.

http://www.skoolie.net/forums/member...ture14759.html
I drilled the spot welds for the brackets and inverted the bracket so that by chance it fits the wider frame width of our seats. I raised them up also so that the new heater is going to be under a small angle and directs slightly to the front of the seat. Probably going to put 6 normal 0.12 Amp computer fans on top so that the fan pushes thru the core and that the core then acts as a muffler.

Here is how I hung the Webasto against the AC condensor box.

http://www.skoolie.net/forums/member...ture14760.html

The bolt in the top left is the front end of the leaf spring bracket.
Later J
joeblack5 is offline   Reply With Quote
Old 12-24-2016, 04:48 PM   #104
Bus Geek
 
joeblack5's Avatar
 
Join Date: Dec 2015
Location: pa
Posts: 2,506
Year: 98
Coachwork: 1. Corbeil & 2. Thomas
Chassis: 1 ford 1998 e350 4x4 7.3 2 mercedes 2004
Engine: 7.3 powerstroke & MBE906
Merry christmas everbody!!
A little more work on our bus.
Cut a piece of lexan and glued magnetic strip salvaged from a fridge door seal. Had to modify the rear door lock bracket so that it would not interfere.

http://www.skoolie.net/forums/member...ture14766.html

I will add a couple of screws on the bottom so that it does not slide town by vibration or bumps. Maybe add a couple of bags of silicagel to eliminate moisture.

http://www.skoolie.net/forums/member...ture14767.html

Needed to cut of a little of the door handle so it would not poke into the magnet strip.

Then I went on and removed the old heater core and replaced it with a big one. Drilled new holes in the floor. Was happy to see that at least at that location the plywood was dry and not rotten. It came out pretty nice. Tomorrow I will add some computer fans to the top and see how it performs.

http://www.skoolie.net/forums/member...ture14765.html

merry christmas,
later j
joeblack5 is offline   Reply With Quote
Old 12-31-2016, 07:06 PM   #105
Bus Geek
 
joeblack5's Avatar
 
Join Date: Dec 2015
Location: pa
Posts: 2,506
Year: 98
Coachwork: 1. Corbeil & 2. Thomas
Chassis: 1 ford 1998 e350 4x4 7.3 2 mercedes 2004
Engine: 7.3 powerstroke & MBE906
No progress but....

Happy New Year and stay safe. for this great forum

later J
joeblack5 is offline   Reply With Quote
Old 02-11-2017, 10:08 PM   #106
Bus Geek
 
joeblack5's Avatar
 
Join Date: Dec 2015
Location: pa
Posts: 2,506
Year: 98
Coachwork: 1. Corbeil & 2. Thomas
Chassis: 1 ford 1998 e350 4x4 7.3 2 mercedes 2004
Engine: 7.3 powerstroke & MBE906
snowstorm NIKO

It has been awhile. Busy with Life. small progress in bolting the rack for the solar panels and installing the webasto heater with a larger interior heater core. Also made a mount for the spare tires under the bus and then we needed it to go a haul a electric car conversion project from a couple of hundred miles.

We decide against good judgement to leave 4 hours before snow storm Niko with the idea that we it would hit more north.

We "camped" in Easton PA and woke up in this

http://www.skoolie.net/forums/member...ture15129.html

The webasto and our upgraded heater core kept us warm enough and with a little more sealing and insulation I think we are in a good shape. Next are the solar panels.
Later J
joeblack5 is offline   Reply With Quote
Old 02-26-2017, 09:13 PM   #107
Bus Geek
 
joeblack5's Avatar
 
Join Date: Dec 2015
Location: pa
Posts: 2,506
Year: 98
Coachwork: 1. Corbeil & 2. Thomas
Chassis: 1 ford 1998 e350 4x4 7.3 2 mercedes 2004
Engine: 7.3 powerstroke & MBE906
Finally some solar on Elfie.

http://www.skoolie.net/forums/member...ture15256.html

Two of the three panels are up. Going on a trip to arizona this week so it is getting hectic.

Later J
joeblack5 is offline   Reply With Quote
Old 02-28-2017, 07:43 PM   #108
Skoolie
 
Join Date: Jul 2015
Location: Vermont
Posts: 152
Year: 1996
Coachwork: Turtle Top
Chassis: E-Super Duty
Engine: Ford 7.3 Powerstroke
Rated Cap: 13-passenger
Very impressive timeline on this build so far. Very jealous that you have solar.
sproutroot is offline   Reply With Quote
Old 03-04-2017, 08:23 AM   #109
Bus Geek
 
joeblack5's Avatar
 
Join Date: Dec 2015
Location: pa
Posts: 2,506
Year: 98
Coachwork: 1. Corbeil & 2. Thomas
Chassis: 1 ford 1998 e350 4x4 7.3 2 mercedes 2004
Engine: 7.3 powerstroke & MBE906
Thanks Spoutroot.

So we had a medical thing going on with one of the girls and had to stay put. Made some more improvements.
First we made some clothing storage above our bed in the rear. Going to see how well it goes with the doors off first.

http://www.skoolie.net/forums/member...ture15270.html
Found some furniture grade 1/4" plywood for the bottom and front, little quarter panel is made of 7/16 ply. I wanted to go light. W wll see if this to light. Used polyurethane floor coating and that made the surface a lot stronger.

Another storage for the kids toys above the kids dinette.

http://www.skoolie.net/forums/member...ture15271.html

Like to add one more bracket to reduce vibration issues.
The bottom is is only 4-3/4 " wide and it is hung from the bottom of the wiring duct with machine screws that were mounted in the wiring duct. Nuts are on the bottom. Extra thread is sticking out so that the same screw can hold the insulating blinds.
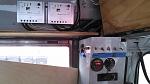
On the right are the solar controllers.

Here is a detail shot of the house electrical panel.
I had and like to use old style toggle switches and here you see it.
No relays. The switches against the window are the heat controls, webasto pump, webasto and several computer fans that circulate the air through the heater cores. The webasto has its own fuse. The other heat related stuff goes thru one 10 Amp reset fuse.

http://www.skoolie.net/forums/member...ture15269t.jpg

The switches on the front are for the fridge / freezer/ monitor/aux fan and master ceiling lights.

The battery monitor shows voltage , amp load, Ah and some other stuff. It relates only to the house battery. The solar is tied into amp meter the shunt resistor

Next to it is the master house switch fused with 30 Amp. The solar controller go directly to the battery and are individually fused.

Later J


So this whole message dissappeared again. i had it saved but the forum interface sucks.
joeblack5 is offline   Reply With Quote
Old 03-17-2017, 05:58 PM   #110
Bus Geek
 
joeblack5's Avatar
 
Join Date: Dec 2015
Location: pa
Posts: 2,506
Year: 98
Coachwork: 1. Corbeil & 2. Thomas
Chassis: 1 ford 1998 e350 4x4 7.3 2 mercedes 2004
Engine: 7.3 powerstroke & MBE906
thumbnails inserted in post disappearing

Just thought I update with a solar panel picture but see that all pictures in the last page (11) in this thread are gone, coincidence? The previous page (10) has all the pictures there??

i will wait a little till this clears up.
later J
joeblack5 is offline   Reply With Quote
Old 03-17-2017, 06:27 PM   #111
Bus Geek
 
joeblack5's Avatar
 
Join Date: Dec 2015
Location: pa
Posts: 2,506
Year: 98
Coachwork: 1. Corbeil & 2. Thomas
Chassis: 1 ford 1998 e350 4x4 7.3 2 mercedes 2004
Engine: 7.3 powerstroke & MBE906
Amazing it cleared up again,I uploaded more pictures to the album. I could see the thumbnails of the new pictures but some of the older ones (page11) were still gone. Let me check if the thumnails are no back in the album. I noticed that if I clicked on a missing thumbnail I got a screen with a one pixel dot in the centre. First thought that my lcd screen had a problem but it did not show up in other screen shots. Tried it on my cell phone same centre pixel. Hope that the techies can figure this stuff out.

Later J
joeblack5 is offline   Reply With Quote
Old 03-17-2017, 08:44 PM   #112
Bus Geek
 
joeblack5's Avatar
 
Join Date: Dec 2015
Location: pa
Posts: 2,506
Year: 98
Coachwork: 1. Corbeil & 2. Thomas
Chassis: 1 ford 1998 e350 4x4 7.3 2 mercedes 2004
Engine: 7.3 powerstroke & MBE906
Just before our trip to the outer banks we temporarily completed the electrical set up.

http://www.skoolie.net/forums/member...ture15434.html

installed the battery switch so that the inverter can be from the engine compartment battery or the second engine battery that I moved below the floor under the inverter. The inverter is fused with an 150 Amp breaker.
With the battery selector in all both battery are in parallel and connected to the inverter.
The main house switch and other switches are located on the original vertical wiring trough. it is fused directly to the house battery.
Cables to the inverter are very short but I still have issues when I turn on the induction cooking plate or water boiler on full power. When the engine is running or sun is shining there is no problem but on batteries only the voltage drops pretty quick and the inverter turns off.
Next to the house main switch is an AH / voltage / amp gauge that keeps track of the house battery only. In the left top you can see the charge controllers and a separate solar generation readout.
joeblack5 is offline   Reply With Quote
Old 03-17-2017, 09:15 PM   #113
Bus Geek
 
Join Date: May 2009
Location: Columbus Ohio
Posts: 18,835
Year: 1991
Coachwork: Carpenter
Chassis: International 3800
Engine: DTA360 / MT643
Rated Cap: 7 Row Handicap
what size 12 volt cables are you using?

I ran 2/0 welding cable to my inverter.. (1500 watt)... a single group 31 battery wont last long at 1000 watts+ (cooktop) pull on it.. if the wire is not heavy enough then the inverter will reach low-voltage cutoff much earlier than the battery being low.. as it gets lots of voltage drop in the 12 volt wire...

-Christopher
cadillackid is offline   Reply With Quote
Old 03-17-2017, 10:38 PM   #114
Bus Geek
 
joeblack5's Avatar
 
Join Date: Dec 2015
Location: pa
Posts: 2,506
Year: 98
Coachwork: 1. Corbeil & 2. Thomas
Chassis: 1 ford 1998 e350 4x4 7.3 2 mercedes 2004
Engine: 7.3 powerstroke & MBE906
Actually I did not measure it so I am not sure. Think 2/0"

http://www.skoolie.net/forums/member...ture15433.html

The total length pos and neg combined is about 12 feet. Neg goes directly thru a 500 amp shunt directly to battery terminal. Pos. goes thru battery selector switch and breaker. Both go thru the Anderson ( between seat and inverter in picture)
The voltage drop goes over 5 minutes of time so I think it is just poor batteries.
joeblack5 is offline   Reply With Quote
Old 03-19-2017, 10:09 AM   #115
Bus Geek
 
joeblack5's Avatar
 
Join Date: Dec 2015
Location: pa
Posts: 2,506
Year: 98
Coachwork: 1. Corbeil & 2. Thomas
Chassis: 1 ford 1998 e350 4x4 7.3 2 mercedes 2004
Engine: 7.3 powerstroke & MBE906
Here is another shot of the electrical panel, with the 600 watt of solar I have installed now the battery selector switch is kind of useless. The batteries recover so fast from peak loads and the continues load from fridge / freezer and heater is completely covered by the solar.

School Bus Conversion Resources - joeblack5's Album: Elf Bus E350 Corbeil II - Picture

panel pictures.

School Bus Conversion Resources - joeblack5's Album: Elf Bus E350 Corbeil II - Picture


School Bus Conversion Resources - joeblack5's Album: Elf Bus E350 Corbeil II - Picture

Later J
joeblack5 is offline   Reply With Quote
Old 03-31-2017, 03:48 PM   #116
Bus Geek
 
joeblack5's Avatar
 
Join Date: Dec 2015
Location: pa
Posts: 2,506
Year: 98
Coachwork: 1. Corbeil & 2. Thomas
Chassis: 1 ford 1998 e350 4x4 7.3 2 mercedes 2004
Engine: 7.3 powerstroke & MBE906
A little update the travel ability of Elfie,
Our bus did not come with a spare tire holder. The largest tire size I am planning on using is 255/85/R16 . We were lucky that it just fitted between the tank and the rear bumper.. Ultimately this going to be a 4x4 so I wanted it as high as possible and not below the bumper level.

School Bus Conversion Resources - joeblack5's Album: Elf Bus E350 Corbeil II - Picture

so I rigged one up from a Stainless Steel handle of an commercial dishwasher. Hinges on the tank side and chains to the frame at the bumper side.

By now I have used the system several time, not easy but much better then having no spare.

Later J
joeblack5 is offline   Reply With Quote
Old 04-03-2017, 08:32 AM   #117
Bus Nut
 
Join Date: Feb 2014
Location: Cuyahoga Falls Ohio
Posts: 592
Year: 1997
Coachwork: Startrans
Chassis: Ford e-350 single wheel
Engine: 5.4 litre
Rated Cap: 12
I like your tire set-up. I installed a front mounted hitch and mounted my spare so the weight is on the front of bus. Helps a lot with weight distribution.
leadsled01 is offline   Reply With Quote
Old 04-03-2017, 11:03 AM   #118
Bus Geek
 
joeblack5's Avatar
 
Join Date: Dec 2015
Location: pa
Posts: 2,506
Year: 98
Coachwork: 1. Corbeil & 2. Thomas
Chassis: 1 ford 1998 e350 4x4 7.3 2 mercedes 2004
Engine: 7.3 powerstroke & MBE906
Thanks leadsled,
Our other E350 has a nice winch system that pulls the tire up in that same space. I would think easy to get from the junk yard.
I have a diesel in the front and soon a 12000 winch so I need all the weight in the rear.
The spar tire system of an E350 takes up about 4 inch below the floor level. I did not want to loose any round clearance in the rear overhang so that is why we did it this way.
Do you have a photo album? Always curious what other people do with their mini's or micro's

Later J
joeblack5 is offline   Reply With Quote
Old 04-03-2017, 11:27 AM   #119
Bus Nut
 
Join Date: Feb 2014
Location: Cuyahoga Falls Ohio
Posts: 592
Year: 1997
Coachwork: Startrans
Chassis: Ford e-350 single wheel
Engine: 5.4 litre
Rated Cap: 12
Sorry , no pics. My camera and computer don't like each other. I agree that diesel in your bus is heavy. Mines only alittle gasser .
Quote:
Originally Posted by joeblack5 View Post
Thanks leadsled,
Our other E350 has a nice winch system that pulls the tire up in that same space. I would think easy to get from the junk yard.
I have a diesel in the front and soon a 12000 winch so I need all the weight in the rear.
The spar tire system of an E350 takes up about 4 inch below the floor level. I did not want to loose any round clearance in the rear overhang so that is why we did it this way.
Do you have a photo album? Always curious what other people do with their mini's or micro's

Later J
leadsled01 is offline   Reply With Quote
Old 04-03-2017, 06:17 PM   #120
Bus Geek
 
joeblack5's Avatar
 
Join Date: Dec 2015
Location: pa
Posts: 2,506
Year: 98
Coachwork: 1. Corbeil & 2. Thomas
Chassis: 1 ford 1998 e350 4x4 7.3 2 mercedes 2004
Engine: 7.3 powerstroke & MBE906
Today i started a little more storage project.
In this case behind the rear wheels.

School Bus Conversion Resources - joeblack5's Album: Elf Bus E350 Corbeil II - Picture

A little more cutting.

School Bus Conversion Resources - joeblack5's Album: Elf Bus E350 Corbeil II - Picture

Planning on cleaning the rust on the frame up a little.

Later J
joeblack5 is offline   Reply With Quote
Reply


Posting Rules
You may not post new threads
You may not post replies
You may not post attachments
You may not edit your posts

BB code is On
Smilies are On
[IMG] code is On
HTML code is Off
Trackbacks are Off
Pingbacks are Off
Refbacks are Off


» Featured Campgrounds

Reviews provided by

Powered by vBadvanced CMPS v3.2.3

All times are GMT -5. The time now is 09:08 PM.


Powered by vBulletin® Version 3.8.8 Beta 4
Copyright ©2000 - 2024, vBulletin Solutions, Inc.