 |
|
 04-20-2018, 10:22 PM
|
#1
|
|
Bus Nut
Join Date: Apr 2018
Posts: 421
|
 The Argobus - 1995 E-350, 7.3L, 4 Windows/Rows
I decided to restart the thread to make it easier for lurkers to search and find what were my common questions.

Here are the specifications:
- Year: 1995
- Chassis: Ford E-350
- Coachwork: Girardin Minibus (of Quebec, Canada)
- Engine: 7.3L Powerstroke Diesel (they say these engines are good for 1,000,000 miles, but I doubt I'll put on more than a few thousand a year)
- Transmission: Automatic (I'm not sure what kind)
- Odometer: 337,000 miles
- Size: 4 rows and 4 window
- Price: $2,500
Usable Bus Interior Dimensions (behind the driver's seat):
- Length: 10 feet
- Width: 6.5 feet
- Height: 5.5 feet
Window Dimensions:
- Width: 25 inches
- Height: 26 inches
- Space in between the windows: 1.25 inches
Exterior Bus Dimensions:
- Length: 19.5 feet bumper to bumper
- Length (between axles): 11.5 feet
- Width: 6.5 feet (7.5 feet with the mirrors)
- Height: 8 feet
How to find and buy a used school bus:
I scanned Craigslist for "bus" every week for quite some time, and there were definitely some good options on there. But none worked out, either because of distance or size or price. I eventually did a Google search for "Bus Dealerships" in my area, and found a dealership that had an office in my city. They also had an office in Los Angeles, and they happened to have two short busses that actually exceeded my requirements.
I called them up, asked if they could deliver it, but they couldn't due to the price (they were trying to get their money back and didn't want to spend any extra time on it). Well, fortunately for me, I was going to Las Vegas for a work conference, and decided to drive through LA on my way back up to Northern California.
An added bonus of buying from a dealership is that they're a business with a reputation at stake; I talked to their mechanic for about 30 minutes and asked questions like:
- Are there any maintenance records?
- What's the condition of the tires, brakes, belts, engine?
- Do all the lights work?
- Does the heater/air conditioner work?
- Is there a warranty?
They were very explicit that it was sold as is, meaning no warranty, but they also wouldn't leave me hanging out to dry if it blew up on the drive back home. I agreed to buy it for their asking price of $2,500 and scheduled a time to visit when I would be driving through.
I showed up, gave it a test drive down the highway (I wanted to make sure it could hit 60, which it did no problem), and liked how it handled.
They did not accept personal checks, so I paid partially in cash and used a debit card for the rest. They would've accepted a wire, too, but that would've taken too long since I wanted to drive it away that day.
After we closed the deal, and filled out the appropriate DMV paperwork and paid all taxes and fees, they handed me the keys and gave me a one time use permit to drive it from the dealership to my home.
Before I drove away, however, I called my auto insurer and obtained insurance for a Ford E-350 Econoline. The automatic insurance system didn't recognize the VIN number, probably because it's so old, so I had to call in person to get it done. Insurance came to about $300 a year. Not bad at all.
How to register a used school bus in California: In California, I had ten days to register it with the DMV. Once I made it home, I visited a private DMV rep (Registration Express Group) with all the paperwork and paid $150 for the registration and the convenience of not waiting at the regular DMV (totally worth it). I registered it as a regular auto.
That's right. Not a camper van. Not an RV. No inspections necessary. I just brought in my paperwork from the dealership and my debit card, and walked away with the registration and license plates.
|

|

|
|
04-21-2018, 05:26 PM
|
#2
|
|
New Member
Join Date: Apr 2018
Posts: 1
|
What was the name of the dealership that you went through? A 4 window, single rear wheel 7.3 Ford diesel sounds great. Is your Girardin aluminum skinned? Thanks.
|
|
|
|
|
04-21-2018, 06:24 PM
|
#3
|
|
Mini-Skoolie
Join Date: Jan 2018
Posts: 21
|
Is it written in the legislation about the color? Only reason I ask is because Stanley Steamer carpet Vans are that same yellow.
I'm looking forward.to following your build.
|
|
|
|
|
04-21-2018, 08:42 PM
|
#4
|
|
Bus Nut
Join Date: Apr 2018
Posts: 421
|
Quote:
Originally Posted by Windward

What was the name of the dealership that you went through? A 4 window, single rear wheel 7.3 Ford diesel sounds great. Is your Girardin aluminum skinned? Thanks.
|
I bought it from A to Z Bus Sales in Colton, CA. They also have a Sacramento office but they only sell used buses at their Colton location (as well as new, including full sized electric busses!). I think they still have one left!
|
|
|
|
|
04-22-2018, 06:12 PM
|
#5
|
|
Bus Nut
Join Date: Apr 2018
Posts: 421
|
Quote:
Originally Posted by crashmonster
Is it written in the legislation about the color? Only reason I ask is because Stanley Steamer carpet Vans are that same yellow.
I'm looking forward.to following your build.
|
https://leginfo.legislature.ca.gov/f...ctionNum=27603.
It might be that a school bus can only be that yellow if operating as a school bus--so other vehicles, such as cars and vans, could perhaps be that yellow no problem since they're not buses.
|
|
|
|
|
04-23-2018, 03:16 PM
|
#6
|
|
Bus Nut
Join Date: Apr 2018
Posts: 421
|
Quote:
Originally Posted by Windward
Is your Girardin aluminum skinned?
|
Is there any easy way to tell if its steel or aluminum? There are a few sheets of metal on the bus that Im not sure about.
|
|
|
|
|
04-23-2018, 03:18 PM
|
#7
|
|
Bus Nut
Join Date: Feb 2018
Location: New Jersey
Posts: 335
Year: 2004
Coachwork: Corbeil
Chassis: Ford
Engine: Ford PowerStroke Diesel 6.0
Rated Cap: GVWR 11,500
|
Quote:
Originally Posted by TheArgobus
Is there any easy way to tell if its steel or aluminum? There are a few sheets of metal on the bus that Im not sure about.
|
Steel is ferromagnetic, aluminum is not. Grab your favorite bottle opener off the side of the fridge and see if she's attracted to your panels.
|
|
|
|
|
04-23-2018, 04:14 PM
|
#8
|
|
Mini-Skoolie
Join Date: Jan 2018
Posts: 21
|
Quote:
Originally Posted by TheArgobus
|
I guess the color is an issue. That's rough.
|
|
|
|
|
04-23-2018, 05:43 PM
|
#9
|
|
Bus Nut
Join Date: Apr 2018
Posts: 421
|
How to Remove the Seats in a Used School Bus

This was a two person job. There really wasn't any way around it. One person went below the bus, used a wrench or a ratchet to hold the nut in place, and the other undid the bolt from the cabin.

I'm keeping two of the seats to put back in (with new cushions), and that's also some fun scrap metal to use for various projects.
|
|
|
|
|
04-23-2018, 05:53 PM
|
#10
|
|
Bus Nut
Join Date: Apr 2018
Posts: 421
|
How to Paint the Exterior of a Used School Bus
I sanded the entire exterior with a random orbital sander using 150 grit sandpaper, then wiped it down with xylene (any solvent will do, such as acetone--xylene is quite stinky, so it goes without saying wear nitrile gloves and a respirator). After that I taped it up.

I ended up going with a DTM Acrylic water based paint, obtained from an auto paint shop. I thinned it with about 10% water, and used a spray gun/air compressor combo with a 1.8mm tip. Every hour or so, I had to clean the tip from all the gunk that dried, and I put on two coats total.
This was my first time using a spray gun, and you can definitely tell this is an amateur job--I let the compressor hose scrape the fresh paint, and quite frequently it dripped because it wasn't mixed properly. If I were to do it again, I'd use Floetrol and a hardener. And move slower. And perhaps tape things up better. And pick a better day when there wasn't so much pollen in the air.

What paint to use on the exterior of a used school bus:
Here’s everything I found on the subject. You will need three things:
The paint itself (on my 22 foot bus, I used about 1/2 gallon for one coat of paint), a thinner (which not only makes it flow easier on your brush or spray gun, but also lets it absorb more into the surface you're painting), and a hardener (which helps protect against the sun, rust, and also decreases drying time).
If using an oil-based paint (and in a state that allows the following--a.k.a. not California):
Paint: Rustoleum Professional High Performance Protective Enamel
Thinner: Acetone (or any other solvent, such as xylene)
Hardener: Valspar 4625 Enamel Hardener
Use a ratio of 10:1 paint:thinner, and a 15:1 paint:hardener. So 1 gallon of paint would mean adding about 3/4 pint (12 ounces) of thinner and 1/2 pint (8 ounces) of hardener.
If using a water-based paint:
Paint: DTM Acrylic Enamel
Thinner: Floetrol (or just water)
Hardener: Acrylic Enamel Hardener
Use a ratio of 10:1 paint:thinner, and 8:1 paint:hardener. So 1 gallon of paint would mean adding about 3/4 pint (12 ounces) of thinner and 1 pint (16 ounces) of hardener
The previous items are just recommendations, there are many substitutes that will work. It may be different if you're rolling the paint on, or spraying it, or using an airless sprayer. Follow the labels for the product you choose.
I used less than 1 gallon of the acrylic paint and thinned it with water, and that worked fine with a sprayer. But I wish I had taken the time to do it right, and used both the Floetrol instead of water, and the acrylic enamel hardener.
Here's the paint I used:


For my 20 foot bus, I used about 1 gallon of paint. Once I'm done cutting and installing all the ports and cabinets, I'll put two more coats on and call it good.


|
|
|
|
|
04-24-2018, 08:56 AM
|
#11
|
|
Bus Crazy
Join Date: Aug 2014
Location: SW New Hampshire
Posts: 1,334
|
Really good looking paint job! People have paid good money for paint jobs that look like that.
|
|
|
|
|
04-25-2018, 05:00 PM
|
#12
|
|
Bus Nut
Join Date: Apr 2018
Posts: 421
|
Quote:
Originally Posted by dan-fox
Really good looking paint job! People have paid good money for paint jobs that look like that.
|
Thanks. I'm quickly realizing that doing my own work has quite a few other benefits, other than just saving money. I now have a solid air compressor and air tools, which has made my life so much easier--I had no idea how great they were until I tried them out!
|
|
|
|
|
04-25-2018, 05:29 PM
|
#13
|
|
Bus Nut
Join Date: Apr 2018
Posts: 421
|
How to Remove the Floor in a Used School Bus
I decided to start where it would be the most difficult, since that's where I needed most of my energy. That was up at the front by the stairs.
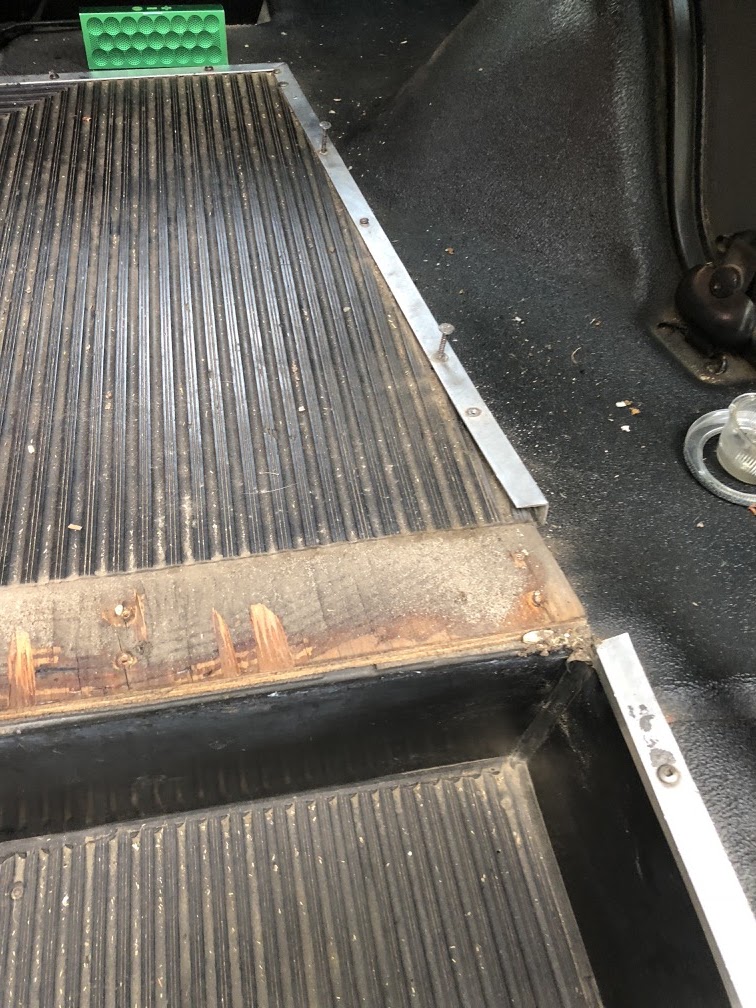
I found as many metal trim pieces like in the picture, unscrewed as many screws as I could, and removed as many pieces as possible. Then I found an edge with the back side of the hammer and wedged it up just enough to fit a chisel underneath the rubber.
I didn't bother with removing the rubber first. I just pulled up whatever would come up.
I used a husky 8 gallon air compressor with their air chisel, and this worked wonderfully. I highly recommend everyone pick up some air tools, they make it so much easier to power through stuff.
Eventually, I found some screws that were embedded inside the plywood, making it impossible to unscrew. I ripped up the wood up anyway, using the crowbar, and just let the screws be.
I found that using swift, jerky motions ripped the wood best. I ended up with a few huge chunks of wood coming up, but also left some pieces of floor here and there. Those were easily dealt with on their own.


This was way more labor intensive than I thought, and that was with using the air chisel. I also found that a long crow bar really helped out a lot, as did a pick axe. Sure, it left a few holes in the floor, but I'm just gonna patch those up later.
|
|
|
|
|
04-25-2018, 05:38 PM
|
#14
|
|
Bus Nut
Join Date: Apr 2018
Posts: 421
|
How to Remove the Floor Heater in a Used School Bus
My floor heater ran off the engine coolant, meaning I couldn't just cut the lines and remove the heater because then the engine would lose coolant pretty quick. Fortunately, there are shutoff valves underneath the bus for both the in/out coolant lines.
I turned them off, put a bucket underneath, and straight up cut the lines just downstream of the valves. Some residual coolant spilled into the bucket, and then I simply unscrewed the heater, cut the electrical wires, and pulled it out. I was able to remove the entire floor this way.
However, I need to remove the rest of the lines under the bus because they take up precious space. I followed the lines back to the engine, and I'm going to try and figure out how to cap them off there so nothing runs back.
Any pointers on how to do that? What's a good material to use for a u-shaped hose to connect the output to the input? Or perhaps should I just take the shut off valves and put them further upstream? A friend told me to be careful with air bubbles in the coolant system. Any thoughts on that?
|
|
|
|
|
04-26-2018, 02:19 PM
|
#15
|
|
Bus Crazy
Join Date: Aug 2014
Location: SW New Hampshire
Posts: 1,334
|
Quote:
Originally Posted by TheArgobus
What's a good material to use for a u-shaped hose to connect the output to the input? Or perhaps should I just take the shut off valves and put them further upstream? A friend told me to be careful with air bubbles in the coolant system. Any thoughts on that?
|
A piece of the heater hose you just pulled out would do nicely to short-circuit your heater coolant loop. Only you can judge what condition it is in and what the risk is vs going and buying a foot of the new stuff. Don't bother relocating valves or anything tricky like that.
You didn't just cut off circulation to your defrost heat coil, did you I'm guessing not, since you appear to have a cutaway from what's listed in your profile. Worth being sure about that.
Since you have a bus based on a van chassis, chances are good that you have an overflow container associated with your radiator - a "puke pot" in slang. That's where any air you introduce will make its way to; not a worry. Your worries are all about making sure your repairs don't leak.
|
|
|
|
|
04-26-2018, 11:50 PM
|
#16
|
|
Bus Nut
Join Date: Apr 2018
Posts: 421
|
Well the curious thing is that the dash air doesnt work. Air con or heat. Or fans. Id like to get it up and running, so that may require some more investigation.
|
|
|
|
|
04-27-2018, 07:56 AM
|
#17
|
|
Bus Nut
Join Date: Jul 2016
Location: Central Florida
Posts: 938
Chassis: GMC or Chevrolet, I hope
Engine: gasser probably
|
My dream bus 😀
__________________
the more i learn, the less I know what to buy . . .
|
|
|
|
|
04-27-2018, 04:11 PM
|
#18
|
|
Bus Crazy
Join Date: May 2010
Location: Farmington Hills, Mi (Detroit area)
Posts: 1,968
Year: 2000
Coachwork: Eldorado Aerotech 24'
Chassis: Ford E-450 Cutaway Bus
Engine: 7.3L Powerstroke
Rated Cap: 19
|
I spliced the heater lines at the back of the motor on our 2000 7.3L. Used two wood clamps to avoid too much coolant draining out and a 3/4" (IIRC) hose connector to splice them together. Five years later there's been no problems with this setup.
Our dash heater controls were disabled and heat was controlled at the add-on switch box on the engine cover. I had to trace the wiring and reconnect the factory wiring when I took out the switch box.
|
|
|
|
|
04-27-2018, 04:24 PM
|
#19
|
|
Bus Crazy
Join Date: May 2010
Location: Farmington Hills, Mi (Detroit area)
Posts: 1,968
Year: 2000
Coachwork: Eldorado Aerotech 24'
Chassis: Ford E-450 Cutaway Bus
Engine: 7.3L Powerstroke
Rated Cap: 19
|
Quote:
Originally Posted by TheArgobus
Well the curious thing is that the dash air doesnt work. Air con or heat. Or fans. Id like to get it up and running, so that may require some more investigation.
|
Your heater/AC fan is located under the hood on the passenger side firewall. You can pull the wiring connector and jump battery power to the fan to test whether it works or not. If memory serves there's also a heater resistor in that area that's known to fry. The resistor controls the different fan speeds. Neither is too horrible to get at to replace if your starting battery isn't mounted there.
|
|
|
|
|
04-27-2018, 05:27 PM
|
#20
|
|
Bus Nut
Join Date: Apr 2018
Posts: 421
|
Thanks. I'm gonna check this out once I get the bus back from the mechanic, so expect me to hit ya up sometime in the near future.
|
|
|
|
|
|
| Thread Tools |
|
|
| Display Modes |
 Linear Mode Linear Mode
|
 Posting Rules
|
You may not post new threads
You may not post replies
You may not post attachments
You may not edit your posts
HTML code is Off
|
|
|
|
 » Recent Threads
 |
|
|
|
|
|
|
|
|
|
|
|
|
|
|
|
|
|
|
|
|
|
|
|
|
|
|
|
|
|
|
|
|
|
|
|
|
|


