 |
|
 09-26-2017, 02:35 AM
|
#21
|
|
Skoolie
Join Date: Aug 2017
Location: Phoenix, AZ
Posts: 228
Year: 1997
Coachwork: Blue Bird
Chassis: AARE 3903
Engine: Cummins 8.3L 12v
Rated Cap: 78
|
Quote:
Originally Posted by pengyou

If you can take the leaf's battery apart, can you reconfigure it to be 48v? Just change a lot of the serial circuits into parallel?
|
Yes, it's more or less that simple. Each module is 4 cells, 2 parallel 2 series. There are 48 modules, or 2 parallel 96 parallel cells in the pack. Nominally 360V, and can put out 500A plus. Wiring the modules somewhere between 6 parallel 8 series, and 8 parallel 6 series will give a pack in the neighborhood of 48V, with a current capacity somewhere in the neighborhood of 3,000 to 4,000A. Good fuses are important ;) 100A to drive a 5kW inverter will be downright boring for the pack.
6 series is technically enough, but at 42-48V it's on the low end. On a lead pack float charge is probably around 56V, and 42V is where some inverters start cutting out. Any voltage sags due to surge current losses could push you into shutdown at lower state of charge. 7 series is probably ideal, but would end up wasting modules as it doesn't divide the 48 modules evenly. 8 series is on the high side at 56 to 64V. Both the inverter/charger and charge controller I'm looking at can be programmed that high though.
Quote:
Originally Posted by Rusty
Rob-
Check out military gensets- diesel and 3-phase. MEP 003 might be good choice. I've got one of those and the bigger MEP 004. Heavy and built for continuos use, unlike disposable BigBox gensets.
Attachment 16103
maybe even a MEP002 5 Kw (underated by 50%)
Attachment 16104 |
Very cool, thanks for the heads up.
On the totally off the deep end range of options, I do have the Leaf motor sitting in the garage. Which is an 80kW Permenant Magnet AC unit which only weighs 200Lbs..... Assuming I could couple the power it would double as a ~100hp engine retarder.  And of course if you can use it in regen, you might as well use it for drive power as well. Now we are talking hybrid Skoolie 
Coming back down to earth I did find that most Prestolite/Leece alternators seem to have isolated negative terminals, and they seem to make quite a few 24V models. Some also have adjustable regulators, which could be handy for tuning the voltage to a safe range for the Li pack.
|

|

|
|
09-26-2017, 02:42 AM
|
#22
|
|
Skoolie
Join Date: Aug 2017
Location: Phoenix, AZ
Posts: 228
Year: 1997
Coachwork: Blue Bird
Chassis: AARE 3903
Engine: Cummins 8.3L 12v
Rated Cap: 78
|
Solar Hybrid Electric Skoolie Adventure Begins!
That microturbine though....
In the last video it was just idling at ~45,000 rpm. Here's one running up to 30kW at 95,000 rpm!
https://youtu.be/_-hTEb-nsJw
Sent from my iPhone using Tapatalk
|
|
|
|
|
09-26-2017, 06:36 AM
|
#23
|
|
Bus Geek
Join Date: Dec 2015
Location: pa
Posts: 2,506
Year: 98
Coachwork: 1. Corbeil & 2. Thomas
Chassis: 1 ford 1998 e350 4x4 7.3 2 mercedes 2004
Engine: 7.3 powerstroke & MBE906
|
Yes. So to repeat what is said. Each physical block of the leaf battery has two cells in series. At a full charge that is about 8 volt.
The definition of full is more ambiguous then with lead. They are not self regulating as lead that will deal with overcharging by just " boiling" the water away. Lithium will self destruct. You will need better chargers.
3 leaf cell can give 24 volt and 6 give then 48 volt.
The average lead acid battery would be charged with voltages about 15 30 or 60 volt . ( depending on temperature and type..gel or flooded.)
So for a 24 volt system it would be better and safer to use 4 leaf units and for 48 volt 7 or 8 units.
The currents are very high so you want good fuses that can handle the higher DC voltages.
Later j
|
|
|
|
|
11-22-2017, 04:24 PM
|
#24
|
|
Skoolie
Join Date: Aug 2017
Location: Phoenix, AZ
Posts: 228
Year: 1997
Coachwork: Blue Bird
Chassis: AARE 3903
Engine: Cummins 8.3L 12v
Rated Cap: 78
|
Getting closer to a plan, so here's an update. Some things still in flux, but the basic idea and main equipment selection is getting pretty solid. Leaving out the charging from the bus option at the moment, as still don't have a workable solution. Would be nice for running AC while driving, but if the sun is out the solar should also be producing so maybe its not that critical. Also don't have a specific solution for charging the starter battery off the house batteries, but worst case this can be a bog standard battery charger running off the inverter. Lastly, haven't found an affordable option for a true balancing BMS that I like yet. For now just planning on a basic SOC monitor and cell voltage monitors to give us a heads up if we are getting into trouble.
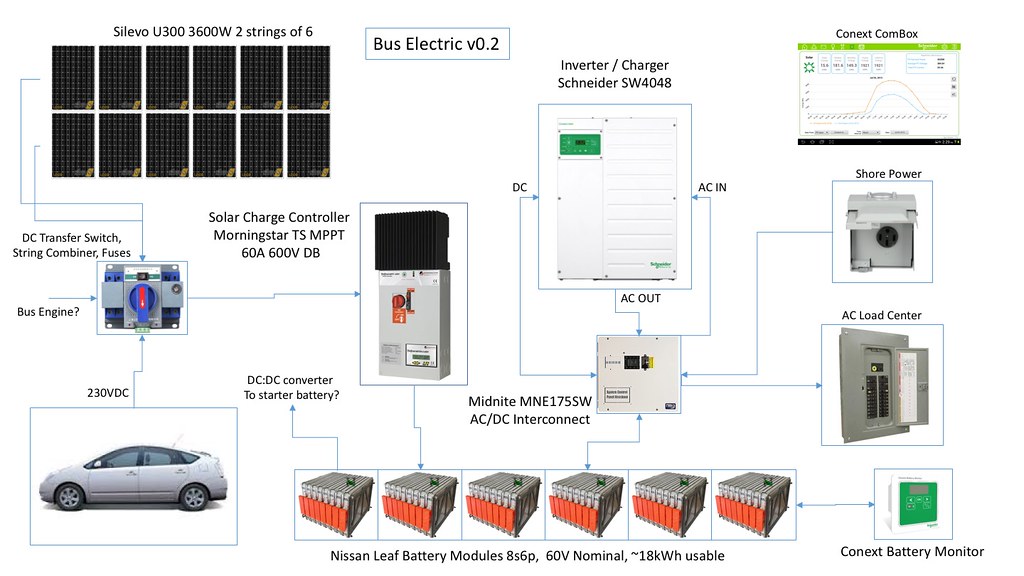
Note this is still mostly a conceptual drawing, not a real wiring diagram with all components.
I've mostly been hunting for a good deal on panels that are well matched to the controller. I still have to close the deal, but I'm talking to someone local about some new surplus Silevo Triex U300 panels. These are a little bit unusual in that they are a 96 cell panel that is higher voltage / lower current, a bit more power dense (higher efficiency), and a bit squarer than a typical 60 or 72 cell panel. This would allow me to run two strings of 6 panels without exceeding the current input spec on the controller, and hit the max 3600w (60A into 60V) charge capability without exceeding max Voc when cold or getting too low in Vmp at lower illumination.
Here's the result of the string calculator with these panels:

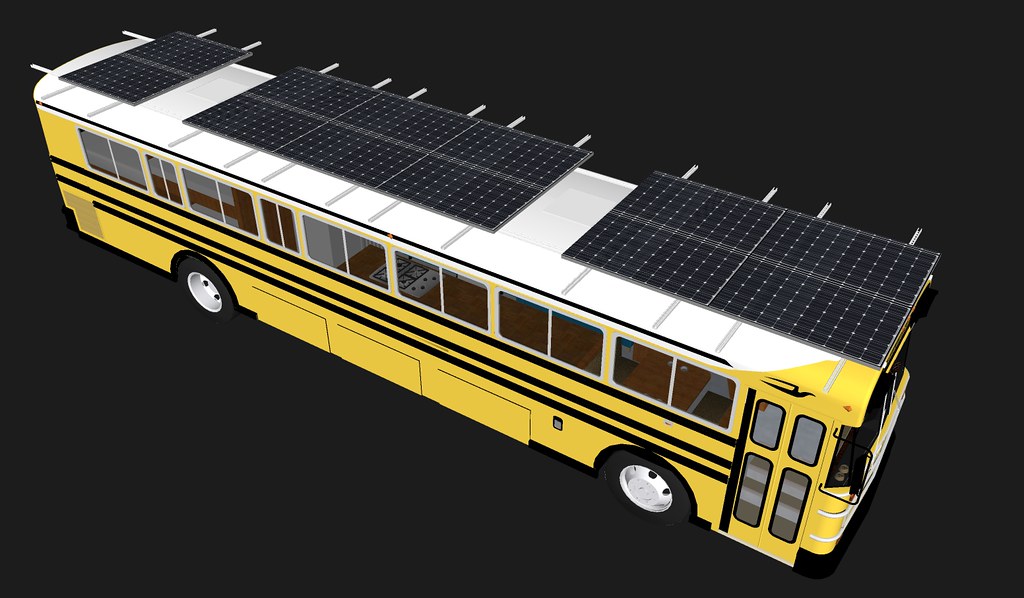
Two strings is nice as I can split them between the front and back of the bus and still get full power out of one sub-array if the other is shaded. The aspect ratio works out pretty well for two length wise rows of 6 panels and still allows enough space to open the roof hatches. Although its a bit heavy, I'm currently just looking at unistrut racking with underside mounts using stainless hardware to avoid steel / aluminum interface issues, just as I did on my home array.
So here's the equipment list so far:
Battery: Nissan Leaf battery modules harvested from a crashed / salvaged Leaf I bought at auction. Currently planning on 8s6p for the rewire for a nominal voltage of 3.75*16 = 60v. Max charge voltage will probably be 4.1V*16 = 65.6v, trying to keep the battery safe, not squeeze every last kWh out of it. With the low voltage cutout set around 3.1v/cell (49.6v) I should get around 15kWh without running out into the extremes where temperature compensation and a proper BMS become critical even with my cells being used and at about 90% of original capacity.
https://insideevs.com/dissecting-leaf-battery-wvideo/
Charge Controller: TS-MPPT-60-600V-48-DB, includes an input disconnect switch, battery breaker, and open internal DIN slots for additional accessories. 48v nominal battery voltage, but can be configured for up to 72V dc output. At the voltage / power of the array I should be running close to 98% charging efficiency.
https://www.morningstarcorp.com/prod...tar-mppt-600v/
Solar Monitor: MS TS Meter-2 600V for direct observation of current performance, plus charge controller will be connected to the system controller via modbus and/or a raspberry pi based monitor via the ethernet port for data logging.
https://www.morningstarcorp.com/prod...-meter-2-600v/
Solar Panels: Silevo Triex U-300, 96 cell 300W, 2 strings of 6s This configuration should maximize the power capability of the charge controller, and allow some shading immunity due to 2 strings without compromising low light performance due to insufficient voltage. Works out pretty nice, as 10 x 77in panels, or 12 x 63-66in panels is about the max we can fit in the area available. The best combinations I was able to come up with for 72 cell 77in panels was ~3150W in one string.
https://www.solarelectricsupply.com/...anel-wholesale
Inverter/Charger: Schneider Conext SW 4048 120/240, can only charge to 64V from grid but accepts up to 67V input for inverter. 120/240v split phase pure sine wave output, 94% efficiency, 3800w continuous, 4400w for 30 minutes, 7000w surge output. Auto AC input transfer switch (30A / 7200w), will output 120v/240v split phase from either 240 or 120v input (nice for 30A/50A shore connection compatibility), and inverter can supplement grid connection ("generator") if load exceeds shore connection capacity. 92% efficiency, 45A charger up to 64v output, will run off either 120v (at half output current) or 240v input.
https://solar.schneider-electric.com.../conext-sw-na/
Inverter Interconnect: Maybe MidNite MNE175SW for Schneider Conext SW for DC battery breaker, current shunt, ac output breaker, ac input breaker.
https://www.wholesalesolar.com/89425...ider-conext-sw
Battery Monitor: Looking at Schneider Conext Battery Monitor for starters. Not a real BMS, but seems like it would do the Coulomb counting to estimate SOC, and claims to speak modbus so may be able to talk to the charge controller. May also use cheap Celllogs to monitor/log individual cell voltages since were not using balancing. Eventually would like to upgrade to a full fancy balancing BMS and raspberry pi custom system controller.
https://solar.schneider-electric.com...ttery-monitor/
CellLog 8S - ProgressiveRC
System Monitor / Control / Logging: Looking at Schneider Conext System Control Panel and/or Com Box. Seems to have some modus functionality, but not sure how well will integrate with the Morningstar. May have to use a PC or Raspberry Pi to collect data from this and the charge controller via ethernet into a common database / display?
https://solar.schneider-electric.com...conext-combox/
https://solar.schneider-electric.com...rol-panel-scp/
Rob
|
|
|
|
|
11-22-2017, 04:45 PM
|
#25
|
|
Bus Geek
Join Date: Mar 2011
Location: Houston, Texas
Posts: 8,462
Year: 1946
Coachwork: Chevrolet/Wayne
Chassis: 1- 1/2 ton
Engine: Cummins 4BT
Rated Cap: 15
|
I don't know squat about things electrical...but whatever all that stuff above is sounds mighty expensive.
|
|
|
|
|
11-22-2017, 05:26 PM
|
#26
|
|
Skoolie
Join Date: Aug 2017
Location: Phoenix, AZ
Posts: 228
Year: 1997
Coachwork: Blue Bird
Chassis: AARE 3903
Engine: Cummins 8.3L 12v
Rated Cap: 78
|
Yeah, this is not exactly a budget build....
We might end up building furniture out of 2x4s and pallet wood and cooking over an open campfire venting through a hole in the roof, but the solar will be magnificent ;)
Rob
|
|
|
|
|
11-22-2017, 05:47 PM
|
#27
|
|
Bus Crazy
Join Date: Aug 2014
Location: SW New Hampshire
Posts: 1,334
|
I wonder how many hp/kw would be needed to keep your basic shoe box going at a steady 60 mph? And if that spare motor has that much oomph? And if you could figure out regen braking? Maybe interpose that motor where your typical retarder goes?
|
|
|
|
|
11-22-2017, 05:56 PM
|
#28
|
|
Skoolie
Join Date: Aug 2017
Location: Phoenix, AZ
Posts: 228
Year: 1997
Coachwork: Blue Bird
Chassis: AARE 3903
Engine: Cummins 8.3L 12v
Rated Cap: 78
|
This is a high spec build, which should be capable of running almost everything heating, cooling, cooking, hot water, etc off grid almost indefinitely. I am trying to do it as cheaply as possible though.
Panels: Current deal is $2300 for 3600w of those Silevos. Well under retail for those panels, but not stellar as they are somewhat hard to find. These are commercial panels that were not usually meant for the retail market, and of course Silevo has gone out of business (US made). Backup deal is $950 for 3100w of traditional 72 cell panels.
Charge Controller: ~$1300, a bit of a premium to use a higher voltage / higher efficiency model that can also take the Prius high voltage input. Another $100 if we want the remote display/control.
Inverter / Charger: ~$1500, a bit of a premium for the 120v/240v split phase capability, but that is a key to being able to run the highest SEER 240v mini splits. Probably add another couple hundred bucks for the remote system controller or com box.
Battery: luckily free ;) Probably around $3-4k if you had to find and buy a used one.
Likely another $1000-1500 for all the various wiring, mounting, and interconnect hardware. So I'll probably be in the $5-6k range all said and done. Not cheap, but not too shabby for the capacity I think.
Rob
|
|
|
|
|
11-22-2017, 07:05 PM
|
#29
|
|
Skoolie
Join Date: Aug 2017
Location: Phoenix, AZ
Posts: 228
Year: 1997
Coachwork: Blue Bird
Chassis: AARE 3903
Engine: Cummins 8.3L 12v
Rated Cap: 78
|
Quote:
Originally Posted by dan-fox
I wonder how many hp/kw would be needed to keep your basic shoe box going at a steady 60 mph? And if that spare motor has that much oomph? And if you could figure out regen braking? Maybe interpose that motor where your typical retarder goes?
|
Believe me Ive though about it ;). Bottom line is it would be very time consuming and difficult not to impact reliability on something that will be our full time home / transportation. If this was a weekender from a home base Id probably be all over it.
Ultimately thats part of the motivation to go as big on solar as possible, so our daily living is as close to zero emissions as possible to make up for the diesel well be sucking down every time we move the bus [emoji6]
Sent from my iPhone using Tapatalk
|
|
|
|
|
11-22-2017, 10:14 PM
|
#30
|
|
Bus Crazy
Join Date: Jun 2016
Location: Orange County, CA
Posts: 1,362
Year: 1990
Coachwork: Crown, integral. (With 2kW of tiltable solar)
Chassis: Crown Supercoach II (rear engine)
Engine: Detroit 6V92TAC, DDEC 2, Jake brake, Allison HT740
Rated Cap: 37,400 lbs GVWR
|
I guess with that much power you wouldn't need to tilt the panels for maximum harvest, especially at lower US latitudes like Phoenix AZ, but if you drive further north you will lose some potential power, especially in winter when the sun is much lower. I can tilt my panels up to 45 degrees above horizontal, so in winter half of them are at 21 degrees down and the opposite half are raised for better solar harvest.
One other factor to consider is how to keep them clean. Flat panels will get very dirty and dusty very quickly, and then your power production will drop. That was one of several reasons I have all my panels tilted at 21 degrees down when stowed against the roof for driving - rain sluices nicely off them along with any accumulated dust/leaves/etc. And if I need to clean them, I have two quick-connect water outlets on my roof walkway that I can plug my washdown hose into, then it's a simple and safe job to clean the panels. No need to carry heavy buckets of water up onto the roof or drag hoses up there - easy!
However you plan on attaching your panels, you'd better make them VERY secure. Driving down the road at 65 or 70 MPH is the same windload on them as a Cat.1 hurricane, and you will have wind possibly trying to pull the panels up away from the roof. FYI, I have hinged each of my panels' support frames (not the panels themselves) with stainless hinges and multiple stainless bolts to the 6061 walkway, and the walkway is secured through the roof ribs with a total of thirty-six 3/8" stainless bolts and Nylok nuts; the 6061 rails for the panels' stainless lift struts are bolted through the same ribs with another thirty-six 5/16" stainless bolts. I think 72 strong bolts should do the job! Don't underestimate the wind force on the panels.
Like you, I have split my eight 255W panels into two separate strings, each feeding its own TS-MPPT-60 that charges its own bank of four golfcart or L-16 batteries. The battery banks' outputs are combined through two 250A Schottky diodes that prevent one bank back-feeding into the other, then their combined outputs feed the Magnum MS2000 inverter and the DC load center. It's not as fancy as your system, but it's basically quite simple and should work well for a long time. I've even got space left for two solar water-heating panels, each about 20 sq.ft., and they will be hinged and tiltable just like the PV panels.
I just bought two Steca Solsum 6.6F mini charge controllers for float-charging my two Group 31 start batteries during long periods of inactivity. They will be powered directly off my panels, and their output is more than enough to keep the start batteries fully charged, especially the no.1 battery that always keeps the DDEC engine computer alive.
John
|
|
|
|
|
11-23-2017, 07:07 AM
|
#31
|
|
Bus Geek
Join Date: Dec 2015
Location: pa
Posts: 2,506
Year: 98
Coachwork: 1. Corbeil & 2. Thomas
Chassis: 1 ford 1998 e350 4x4 7.3 2 mercedes 2004
Engine: 7.3 powerstroke & MBE906
|
Looks mighty fine,
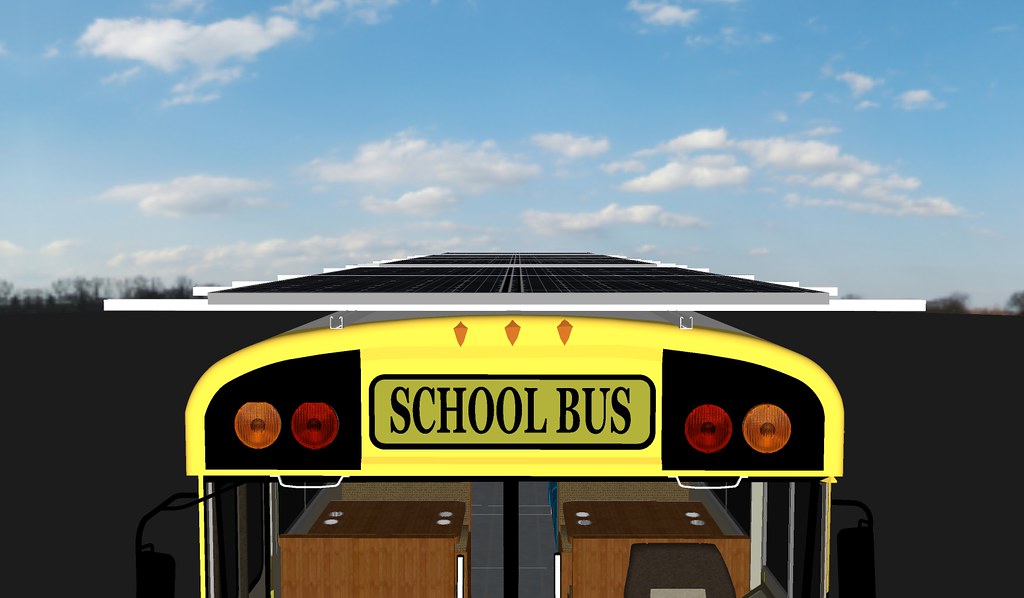
I like that your setup is almost as wide as the bus ans so gives a lot of shade.
From your sketch it looks that your panel width and rib spacing are not in the same and so I assume that is why you added the two channels running lengthwise.
I agree with IceJ about the wind loads and that probably another two length running channels are needed to secure the outside of the panels. You can see my setup under the Dory thread.
Although you are using high quality component that should not fail my approach was more strings and more charge inverters. More strings makes it less dependent on partial shading. And lower power mppt chargers are cheap.
I believe in multiple small power plants instead of one large.
You have the Leaf packs already and they are great for making any voltage you want. Per Ah the Chevy Volt packs are a lot cheaper but they are come in 48 volt modules.
48 Volt is a norm in the industry and so many inverters are available. As a result cheap and used all over the place.
There were a couple of hybrid busses for sale, broken batteries??
If you start with something like that then you could easily run all solar electric following the 70 degree weather trips because every couple of days you only move 20 miles or so.
IceJ. We have both solar pv and hot water on our house roof. The hot water divided in vacuum tube for domestic and flatpanel for floor heating. For a bus I thing it would be better to use a heatpump water heater on electric and redirect the cold air to the in side or outside depending on your liking. With a water heater COP of 3 you are not gaining efficiency with going water solar.
Separate heatpump water heater are around like hi Etech..
fleabay 272937799961 for $ 365.. a dollar a day, like the the coal heater a bucket a day for the les co2 minded people among us.
IceJ, I hear you about the imbalance on the a2 volt batteries. Dory runs on 24 volt and the starter battery and house battery are the same. At some moment to be upgraded to lithium for space and weight savings. I am rewiring one string of panels ( two panels) into two 12 volt mmpt to correct the smaller 12 volt drawing and unbalancing the battery bank..
I got a couple of over voltage relays to redirect excess solar power to the coolant heater element in the engine to preheat and keep warm as possible.
later J
|
|
|
|
|
11-23-2017, 11:52 AM
|
#32
|
|
Skoolie
Join Date: Aug 2017
Location: Phoenix, AZ
Posts: 228
Year: 1997
Coachwork: Blue Bird
Chassis: AARE 3903
Engine: Cummins 8.3L 12v
Rated Cap: 78
|
Thanks Joe and John, appreciate the insights from your experience. If you have links to your set ups Id love to see them!
Shading the bus roof is a big part of our overall strategy. We really want to keep the original interior skins rather than remove and re-insulate. So Im hoping an external layer like that with an air gap will help at least in warm weather. Were also thinking about long rollup awnings that extend down from the edges of the panels to cover the rest of the roof and the sides when parked. Probably something to go over the open area over the roof hatches as well.
Tilting is certainly desirable, but I havent come up with a straight forward arrangement for an array this big yet. Part of the thought of using unistrut is its kind of like an erector set, and we can always come back and modify it later to add that capability. My main concern for now is that its solid when driving. When I designed our home array I had to do all the wind load analysis to satisfy the city inspector, so Ive got some pretty good data on the strengths of the hardware used. So as we get closer to go time Ill certainly need to look that over again and make sure weve got plenty of margin.
Sent from my iPhone using Tapatalk
|
|
|
|
|
11-23-2017, 11:58 AM
|
#33
|
|
Bus Geek
Join Date: Sep 2014
Location: Eustis FLORIDA
Posts: 23,764
Year: 1999
Coachwork: Thomas
Chassis: Freighliner FS65
Engine: Cat 3126
Rated Cap: 15
|
Why keep the interior skins and their nasty contents?
|
|
|
|
|
11-23-2017, 12:02 PM
|
#34
|
|
Skoolie
Join Date: Aug 2017
Location: Phoenix, AZ
Posts: 228
Year: 1997
Coachwork: Blue Bird
Chassis: AARE 3903
Engine: Cummins 8.3L 12v
Rated Cap: 78
|
Solar Hybrid Electric Skoolie Adventure Begins!
We like the look, the functionality of using magnets everywhere, and were concerned about the impact on our schedule. Luckily from what weve seen so far the shell still seems water tight and the old insulation clean. Were going to do a bit more testing of that soon but if we dont find any major nastiness the plan is to leave it.
Sent from my iPhone using Tapatalk
|
|
|
|
|
11-23-2017, 12:08 PM
|
#35
|
|
Bus Geek
Join Date: Sep 2014
Location: Eustis FLORIDA
Posts: 23,764
Year: 1999
Coachwork: Thomas
Chassis: Freighliner FS65
Engine: Cat 3126
Rated Cap: 15
|
Since you're trying to be green and efficient, seems to me that actually insulating it would make your whole life much easier than heating and cooling a tin can.
The condensation is crazy on bus interior skins, too.
|
|
|
|
|
11-23-2017, 12:28 PM
|
#36
|
|
Skoolie
Join Date: Aug 2017
Location: Phoenix, AZ
Posts: 228
Year: 1997
Coachwork: Blue Bird
Chassis: AARE 3903
Engine: Cummins 8.3L 12v
Rated Cap: 78
|
Part of the inspiration are the tropical tops used on old Land Rovers in hot climates (Africa, Australia, etc) before AC was an option. They featured an extra exterior skin layer with an air gap that kept the sun off the actual roof and allowed the hot air developed in the gap to escape. They were said to be quite effective.

Ive also seen a number of cases where folks with big arrays have found the solar shading on the roof to be pretty effective at reducing the tin can baking in the sun effect.
Cold may be the bigger challenge, but were generally planning not to be in anyplace too cold. Moisture could certainly still be an issue. Though I do wonder sometimes if the attempts to super insulate and seal buses dont actually exacerbate this issue. I know moisture becomes a problem in a lot of high efficiency LEED houses as the sealing prevents the natural breathing and expulsion of humidity from the structure, and they have to end up using complex heat / air exchange systems to prevent moisture problems.
Were hoping that by minimizing interior humidity generation (no interior propane use, heat pump and forced air hydronic heating, cooking outside whenever possible) and proper ventilation we can keep the humidity under control. Only time will tell if that theory is a good one ;)
Sent from my iPhone using Tapatalk
|
|
|
|
|
11-23-2017, 12:42 PM
|
#37
|
|
Bus Geek
Join Date: May 2009
Location: Columbus Ohio
Posts: 18,835
Year: 1991
Coachwork: Carpenter
Chassis: International 3800
Engine: DTA360 / MT643
Rated Cap: 7 Row Handicap
|
Quote:
Originally Posted by miscrms
Part of the inspiration are the tropical tops used on old Land Rovers in hot climates (Africa, Australia, etc) before AC was an option. They featured an extra exterior skin layer with an air gap that kept the sun off the actual roof and allowed the hot air developed in the gap to escape. They were said to be quite effective.
Ive also seen a number of cases where folks with big arrays have found the solar shading on the roof to be pretty effective at reducing the tin can baking in the sun effect.
Cold may be the bigger challenge, but were generally planning not to be in anyplace too cold. Moisture could certainly still be an issue. Though I do wonder sometimes if the attempts to super insulate and seal buses dont actually exacerbate this issue. I know moisture becomes a problem in a lot of high efficiency LEED houses as the sealing prevents the natural breathing and expulsion of humidity from the structure, and they have to end up using complex heat / air exchange systems to prevent moisture problems.
Were hoping that by minimizing interior humidity generation (no interior propane use, heat pump and forced air hydronic heating, cooking outside whenever possible) and proper ventilation we can keep the humidity under control. Only time will tell if that theory is a good one ;)
Sent from my iPhone using Tapatalk |
Love those old rovers!! the one I was in had a top like that but also had A/C... maybe aftermarket..
humidity control is an issue in many structures.. on super cold days its very easy even in a fairly tight modern home to have too much of it.. I have a regular house.. 1400 sq ft and on days of 0 or below (even with new super-good windows).. after a couple showers. and dishwasher run, and such. there will be a little condensation on some of the windows.. yet by evening. it can be so dry that the humidifier has to kick on unless I make more moisture.. air exchange is a big deal.. if I turn on a bathroom fan and the dryer is on, my fireplace will fail to draw and i'll get a bunch of smoke in the house if im using it... (incidently when the fireplace is lit the condensation issue doesnt happen as its creating an air exchange)..
I can only imagine how variable the amount of condensation is inside a small space like a bus that has been well sealed.. I surely wouldnt want any type of open-flame heat source which makes moisture. (mister buddy type heaters)..
Christopher
|
|
|
|
|
11-23-2017, 01:08 PM
|
#38
|
|
Skoolie
Join Date: Aug 2017
Location: Phoenix, AZ
Posts: 228
Year: 1997
Coachwork: Blue Bird
Chassis: AARE 3903
Engine: Cummins 8.3L 12v
Rated Cap: 78
|
Thats my thinking too. Interior cooking will be all electric. Induction burners, convection toaster oven, microwave, electric kettle. We will have a portable propane tank underneath with some big outdoor propane burners, and a solar oven.
Hot water will likely be electric tank to use as a dump for surplus solar, probably with an engine coolant heat exchanger to harvest heat from the engine when driving. We may hook in a cheap portable propane on demand outside for supplemental water heating.
Bathing will probably be the biggest moisture source. Were planning a small stock tub, so hopefully a shallow bath will be more water efficient and less humidity raising than long steamy showers. We will have an outdoor shower option as well.
At the end of the day I see this as an experiment in progress, and assume it will develop and be refined over time. Were not really planning a fancy custom fitted interior, so if someday we need to pull every thing out and pull the skins and do foam insulation that wouldnt be the end of the world. Just the next step in the evolution.
Sent from my iPhone using Tapatalk
|
|
|
|
|
11-23-2017, 03:31 PM
|
#39
|
|
Bus Geek
Join Date: Sep 2017
Location: Owasso, OK
Posts: 2,627
Year: 1999
Coachwork: Thomas
Chassis: Saf-T-Liner MVP ER
Engine: Cummins 6CTA8.3 Mechanical MD3060
Rated Cap: 46 Coach Seats, 40 foot
|
One alternative I thought of, although I haven't yet given it a great deal of thought, is to add foam board to the top of the bus and glass over it. It wouldn't be the cheapest solution but I can't see any reasons for it not to work.
It wouldn't have to be too pretty either as you wouldn't see it and it would get a coat of white roof paint.
|
|
|
|
|
11-23-2017, 04:25 PM
|
#40
|
|
Bus Crazy
Join Date: Jun 2016
Location: Orange County, CA
Posts: 1,362
Year: 1990
Coachwork: Crown, integral. (With 2kW of tiltable solar)
Chassis: Crown Supercoach II (rear engine)
Engine: Detroit 6V92TAC, DDEC 2, Jake brake, Allison HT740
Rated Cap: 37,400 lbs GVWR
|
Quote:
Originally Posted by Twigg
One alternative I thought of, although I haven't yet given it a great deal of thought, is to add foam board to the top of the bus and glass over it. It wouldn't be the cheapest solution but I can't see any reasons for it not to work.
It wouldn't have to be too pretty either as you wouldn't see it and it would get a coat of white roof paint.
|
Like this?
Bus Nut Online - Articles Of Interest - Super Insulating the Roof - by George Myers
I have a noticeable reduction in ceiling temperature under where I have my panels compared to the rest of the roof. Simply preventing the sunlight from reaching the roof is well worth it, even with the crappy stock insulation in there.
John
|
|
|
|
|
|
 Posting Rules
|
You may not post new threads
You may not post replies
You may not post attachments
You may not edit your posts
HTML code is Off
|
|
|
|
 » Recent Threads
 |
|
|
|
|
|
|
|
|
|
|
|
|
|
|
|
|
|
|
|
|
|
|
|
|
|
|
|
|
|
|
|
|
|
|
|
|
|


 Linear Mode

