Journey with Confidence RV GPS App RV Trip Planner RV LIFE Campground Reviews RV Maintenance Take a Speed Test Free 7 Day Trial ×


Reply
 
Thread Tools Display Modes
 
Old 10-26-2018, 09:35 PM   #1
Mini-Skoolie
 
Join Date: Mar 2018
Location: Interior BC
Posts: 64
Year: 1998
Coachwork: Thomas
Chassis: Thomas
Engine: 8.3l Cummins
Plumbing System

I've been snooping on various plumbing plans and I wanted to set out my own for criticism/constructive feedback. Disclaimer 1: I'm a complete novice when it comes to plumbing so go gentle. Disclaimer 2: It's a long post, sorry. Disclaimer 3: I haven't drawn a plan yet, which would perhaps make things clearer. If anyone struggles then I'll upload something this weekend.

Context - We are 2 adults and 3 young kids (under 4yrs). Currently live in BC, Canada - Note all prices are CAD and it's harder to get stuff online here, hence the overkill on Amazon.ca. We will be full-timing and hoping to go for periods of perhaps a week off-grid. Will hopefully be hopefully in warmer climates - heading south of the border and further beyond the States in the next few years.

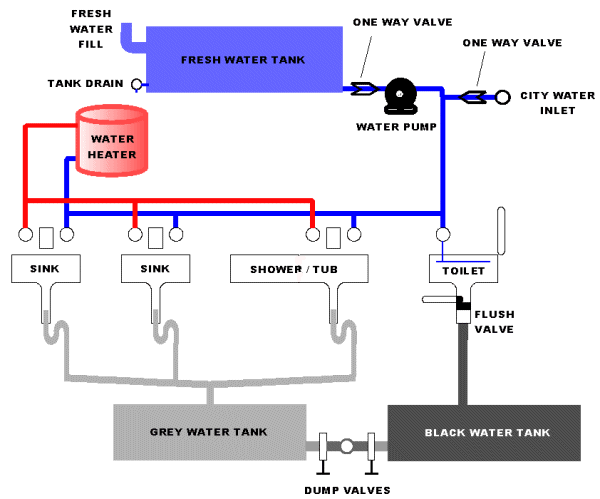
As simple people, we are trying to be simple - 2 x shower (one external), 1 x tap/sink. Compost toilet, no black water. 100 gal fresh internally mounted, smaller grey externally on the underside. LPG hot water.

Plan- I'm going to get this city water/inlet plate and mount it at the back of the bus on the driver side.

Gravity inlet feed to the top of the 100 gallon fresh water tank, which will be framed in directly on the subfloor below the master bedroom at the back of the bus (behind the rear wheels arches). Vent from fresh tank to the plate.

Gravity outlet from bottom of fresh tank to the SHURflo pump, via a strainer.

Pump to an accumulator tank (to even out the flow).

Do I need a pressure gauge at this point to check the pump output pressure?

One way 'check' valve to the rest of the system (probably going to use push-to-fit/sharkbite connections throughout the system for ease/laziness - judge away).

For city water, a regulator then another check valve to the rest of the system.

Join both lines using a T connection.

Ball shut off valve

I'd like the strainer, pump, accumulator tank, regulator/gauges and shut-off valve to be easily accessible, so potentially another access hatch on the outside of the bus.

Split using a second T connector, one line to cold water input on each of the showers + tap (2 more Ts and an elbow).

Other line to LPG On demand Water Heater (exact one TBC) vented through the roof of the bus.

Hot water outlet from this to the showers + tap (2 more Ts and an elbow).

Drains from the interior shower and the sink, trap, to the 75 gal (?) grey tank, underside mounted using angle iron frame. Tank will need to be vented (?) and also drained on the outside.

All piping will be 1/2" PEX, something like this. Hot water lines will be insulated where possible, all PEX secured and nail guards used.

Questions
- Did I miss anything obvious?
- I saw that someone suggested putting shut off valves around any component which might need fixing - i.e. the pump. Would that mean putting 3 in the access hatch - before & after the strainer/pump/accumulator and then another after the T connector to combine city/pump lines?
- This might sound stupid but can I/do I want to put the LPG water heater internally or externally? We are going to have a propane heater in the living space and will have a 12v detector anyway. Vented properly etc.
- Anyone got a good suggested ratio for fresh:water sizing?
- We are considering having an additional large charcoal filter drinking water tank in the kitchen, to prolong the boondocking by exploiting natural water sources - something like this. Does anyone have any experience with these?
- Vent for the grey tank - Any reason why this can't just be a little vent situated on top of the tank and vented to the side of the bus?
- Given that the drain for the fresh water will just be a winterizing thing, can it just be a simple gravity fed valve like this or should I go for a ball shut off valve?
Tank monitors - Looking at the Seelevel 2 tank system but $300 is hard to take. Any other suggestions?

__________________
Build thread (Started 04/18) https://www.skoolie.net/forums/f11/19...0ft-22154.html
Curious Slug is offline   Reply With Quote
Old 10-26-2018, 09:51 PM   #2
Bus Nut
 
Ninjakitty's Avatar
 
Join Date: Jan 2018
Location: Brevard County, FL
Posts: 911
Year: 1990
Coachwork: Bluebird
Chassis: Ford
Engine: 6.6 New Holland Diesel
Rated Cap: 60 kids, 10 window
Just a heads up on that Valterra inlet. Be super careful when hooking up the city water part on the inside. I just hooked mine up today and broke the clip that keeps it in place. I'll probably just epoxy it back in but just wanted to let you know.
__________________
Nick
Ninjakitty is offline   Reply With Quote
Old 10-26-2018, 09:54 PM   #3
Mini-Skoolie
 
Join Date: Mar 2018
Location: Interior BC
Posts: 64
Year: 1998
Coachwork: Thomas
Chassis: Thomas
Engine: 8.3l Cummins
Quote:
Originally Posted by Ninjakitty View Post
Just a heads up on that Valterra inlet. Be super careful when hooking up the city water part on the inside. I just hooked mine up today and broke the clip that keeps it in place. I'll probably just epoxy it back in but just wanted to let you know.
Thanks. The reviews said it was a bit flimsy, but I couldn’t find any better one-stop solutions. I went with the brass option as plastic thread seemed like a bad idea. It doesn’t seem like $70 worth of kit to me.
Curious Slug is offline   Reply With Quote
Old 10-26-2018, 09:55 PM   #4
Bus Nut
 
Ninjakitty's Avatar
 
Join Date: Jan 2018
Location: Brevard County, FL
Posts: 911
Year: 1990
Coachwork: Bluebird
Chassis: Ford
Engine: 6.6 New Holland Diesel
Rated Cap: 60 kids, 10 window
Mines the plastic one. I would have preferred a brass, didn't know they made it. Ill see how this works out, I may have to switch it up.
__________________
Nick
Ninjakitty is offline   Reply With Quote
Old 10-27-2018, 08:34 AM   #5
Bus Crazy
 
Drew Bru's Avatar
 
Join Date: May 2016
Location: Grayson County, VA
Posts: 1,428
Year: 1996
Coachwork: Amtran
Chassis: International
Engine: DT466
Rated Cap: 65
I did drafting for a living for 30 solid years, mostly of industrial piping layout, and your plan sounds pretty complete to me. Nothing really stands out as missing.....unless I'm having a brain fart this morning, which is always a possibility. If you haven't already, draw up a piping plan on paper....it might help to spot anything missing. As mentioned, it makes it easier to swap out components if you put a valve in on the inlet and outlet. If you don't mind catching and/or cleaning up water you might be able to skip this, esp. if the component is at the high point in the system. Valves are a cheap insurance though. IMO you don't really need a pressure gauge. I'd put in a bypass for the water heater in case you want to winterize the system....we didn't, but I'll add one now that I've had to go through the process of draining everything for winter.

Our system is set up pretty much like what your planning (100 gal fresh tank, composting toilet, PEX piping, etc). I used a PEX line with a ball valve to drain the tank to the underside of the bus. As far as venting the grey tank, I just left an 1/8" gap around where the PVC drain dumps into the top of the tank and it's worked fine.....it drains quickly. Don't forget a P trap in your drains. We've got the SeaLevel monitor and are happy with it, but it hasn't been time/battle tested yet. We also put a couple water alarms (like 5 bucks on Amazon) in areas that a catastrophic leak wouldn't be obvious (in tank enclosure under the couch and under sink). Again, cheap insurance. Plan on things going wrong or forgetting some small thing and needing to run to the store a few hundred times!
__________________
Our Build: https://dazzlingbluebus.wordpress.com/
Drew Bru is offline   Reply With Quote
Old 10-28-2018, 11:12 AM   #6
Mini-Skoolie
 
Join Date: Mar 2018
Location: Interior BC
Posts: 64
Year: 1998
Coachwork: Thomas
Chassis: Thomas
Engine: 8.3l Cummins
That's awesome, thanks for your post. I was a bit nervous about it all but as long as I'm roughly there I'll start ordering parts. Definitely going to have a proper plan drawn up before kicking things off, I'll post when I finish it.

How would you bypass the water heater? I'm presuming that you get a 3-way valve for this? I can't find a push-to-fit connection with a 3-way valve, which is upsetting as I may actually have to do some real work. I guess I'm going to have to clamp for the regulator and tank connections, so it's not the end of the world. Is a clamp going to be strong enough for everywhere not push-to-fit?

This is going to sound a little stupid but I'm also a little confused how it works in terms of when you're connected to the city water - will the system evenly draw from city/the tank? Do I set the regulator to slightly higher PSI to the pump to make the system favor it?
__________________
Build thread (Started 04/18) https://www.skoolie.net/forums/f11/19...0ft-22154.html
Curious Slug is offline   Reply With Quote
Old 10-28-2018, 06:24 PM   #7
Bus Crazy
 
Drew Bru's Avatar
 
Join Date: May 2016
Location: Grayson County, VA
Posts: 1,428
Year: 1996
Coachwork: Amtran
Chassis: International
Engine: DT466
Rated Cap: 65
Quote:
Originally Posted by Curious Slug View Post
How would you bypass the water heater?

This is going to sound a little stupid but I'm also a little confused how it works in terms of when you're connected to the city water - will the system evenly draw from city/the tank? Do I set the regulator to slightly higher PSI to the pump to make the system favor it?

This is a pretty concise video about setting up the water heater bypass


As far as the city water connection....well, we haven't tested ours yet, so I don't know about regulating the pressure. We have a pressure regulator that's supposed to screw on to the water hose, but we've not used city water hookup. It doesn't draw from the tank, or use the pump, when there's a pressurized water source. The tank and pump are isolated from the city water source with one way/check valves. Ours is similar to this setup
__________________
Our Build: https://dazzlingbluebus.wordpress.com/
Drew Bru is offline   Reply With Quote
Old 10-29-2018, 09:30 PM   #8
Mini-Skoolie
 
Join Date: Mar 2018
Location: Interior BC
Posts: 64
Year: 1998
Coachwork: Thomas
Chassis: Thomas
Engine: 8.3l Cummins
That video is about as concise as it gets, thanks!

My confusion about the pressurised city water is academic. I'm mainly just curious if you have a full tank AND are plugged into pressurised city water, does the system draw evenly from those two inputs? Or does the pressure of the city water mean that nothing is drawn through from the pump?

If it's the first case then perhaps I'd need to shut off the ball valve after the pump to ensure that it's not working needlessly when plugged into city water.

Don't worry about that though, thanks for your help.
__________________
Build thread (Started 04/18) https://www.skoolie.net/forums/f11/19...0ft-22154.html
Curious Slug is offline   Reply With Quote
Old 10-30-2018, 11:02 AM   #9
Bus Geek
 
Join Date: May 2016
Location: Eastern WA
Posts: 6,401
Year: 2002
Coachwork: Bluebird
Chassis: All American RE (A3RE)
Engine: Cummins ISC (8.3)
Rated Cap: 72
Your water pump has a pressure switch. When the water pressure drops below a certain point. (35psi?) then the water pump runs.

If you are connected to city water the pressure will generally be high enough to keep the pump from running.
PNW_Steve is offline   Reply With Quote
Old 10-30-2018, 11:16 AM   #10
Mini-Skoolie
 
Join Date: Mar 2018
Location: Interior BC
Posts: 64
Year: 1998
Coachwork: Thomas
Chassis: Thomas
Engine: 8.3l Cummins
Thanks Steve, that's the badger.
__________________
Build thread (Started 04/18) https://www.skoolie.net/forums/f11/19...0ft-22154.html
Curious Slug is offline   Reply With Quote
Old 11-03-2018, 06:39 PM   #11
Skoolie
 
vintageracer's Avatar
 
Join Date: Apr 2018
Posts: 127
With regard to your CITY water inlet hookup I suggest you install a water pressure regulator just before the your city water inlet on/off valve.

Water pressure can vary widely from city water system to water system. I have seen inlet pressures over 100 lbs/inch numerous times in different water systems which is way too high pressure for a water heater and other appliances/items that are hooked up to your water system.

Cheap insurance to avoid an appliance problem or a burst water pipe or connection.
__________________
Mike

Remember "Drive Fast, Turn Heads, Break Hearts"
vintageracer is offline   Reply With Quote
Old 11-03-2018, 07:55 PM   #12
Bus Geek
 
Tango's Avatar
 
Join Date: Mar 2011
Location: Houston, Texas
Posts: 8,462
Year: 1946
Coachwork: Chevrolet/Wayne
Chassis: 1- 1/2 ton
Engine: Cummins 4BT
Rated Cap: 15
What he said...100%. Install a pressure regulator BEFORE the inlet to keep everything happy.
Tango is offline   Reply With Quote
Old 12-06-2018, 09:22 PM   #13
Mini-Skoolie
 
Join Date: Mar 2018
Location: Interior BC
Posts: 64
Year: 1998
Coachwork: Thomas
Chassis: Thomas
Engine: 8.3l Cummins
I'm looking to link together two fresh tanks to get a decent amount of fresh water. Both tanks will sit at the rear of the bus, under the master bedroom - framed in, straps blah blah. Has anyone got a good method for combining two tanks? I'm thinking of -

- Cutting a second 1.5" hole in the bottom/side of tank 1.
- Inserting a 1.5" PVC pipe
- Using JB Weld (Epoxy, looks like it's good stuff) to seal/secure the PVC pipe
- Using 2 pieces of transparent PVC piping to link everything together - One between the inlet and tank 1, another between tank 1 and tank 2.
- Venting using 0.5" PEX from both tanks via a T.
- 0.5" PEX to pump etc.

Anyone spot any serious issues with the above?

I've come to the realisation that my plan to use push to fit everywhere is faulted in that I've still got to make connections to appliances/tanks. I'm thinking of using hose clamps for this to avoid having to buy a cinch tool/clamps etc. Is this a terrible idea?

The drop between the outlet of tank 2 and my pump is going to be minimal. I'm thinking this is ok, providing they are level/a little drop.

Any advice appreciated!
__________________
Build thread (Started 04/18) https://www.skoolie.net/forums/f11/19...0ft-22154.html
Curious Slug is offline   Reply With Quote
Old 12-06-2018, 10:17 PM   #14
Bus Nut
 
TJones's Avatar
 
Join Date: Jul 2017
Location: Rapid City, SD
Posts: 993
Year: 2001
Coachwork: Blue Bird
Chassis: CS RE
Engine: ISC 8.3 L 260 hp
Rated Cap: 36
For combining the tanks look at tank bulkhead fittings.

Ted
TJones is offline   Reply With Quote
Old 12-06-2018, 11:30 PM   #15
Mini-Skoolie
 
Join Date: Mar 2018
Location: Interior BC
Posts: 64
Year: 1998
Coachwork: Thomas
Chassis: Thomas
Engine: 8.3l Cummins
Basic plan attached. More questions -

I’ve scribbled out a ball valve after the accumulator in favour of having it after the inlet lines combine. I know that the pump has a built in check valve, but does it matter if the accumulator doesn’t?

Has anyone ‘hardlined’ in the urine tank of a compost toilet to the grey tank before? Saw it in a video and liked the idea.
Attached Thumbnails
568520D7-110A-4BE1-A8AC-1A9C6FA3965F.jpg  
Curious Slug is offline   Reply With Quote
Old 12-09-2018, 11:31 AM   #16
Mini-Skoolie
 
Join Date: Mar 2018
Location: Interior BC
Posts: 64
Year: 1998
Coachwork: Thomas
Chassis: Thomas
Engine: 8.3l Cummins
Quote:
Originally Posted by TJones View Post
For combining the tanks look at tank bulkhead fittings.

Ted
Thanks for this, I like the look of Blind Bulkhead fittings. This would be a contender with my 'glue in a pvc pipe' technique.

For the time being, I'm going to try just getting from the 3/4" NPT outlet from tank 1 to the 1 1/4" inlet on tank 2. I'm hoping that with both tanks vented it shouldn't necessarily be an bottleneck issue between the tanks.
__________________
Build thread (Started 04/18) https://www.skoolie.net/forums/f11/19...0ft-22154.html
Curious Slug is offline   Reply With Quote
Old 12-09-2018, 11:51 PM   #17
Bus Crazy
 
Join Date: Jun 2016
Location: Orange County, CA
Posts: 1,362
Year: 1990
Coachwork: Crown, integral. (With 2kW of tiltable solar)
Chassis: Crown Supercoach II (rear engine)
Engine: Detroit 6V92TAC, DDEC 2, Jake brake, Allison HT740
Rated Cap: 37,400 lbs GVWR
If you want to join anything PVC you'd better first check that your adhesive of choice actually bonds to PVC. Low surface-energy materials like most Polyolefins are notoriously difficult to glue. There are some special PVC adhesives out there, but they're few and far between. If you decide to go that route, you should test-glue various adhesives and substrates to check which adhesives work and which don't. Also, using a rigid adhesive such as epoxy or cyanoacrylate will not work so well on a flexible material such as PVC.

It would be better to have a rotomolder spin-weld in some threaded fittings, then you can use standard MPT connections or hose barb adapters. I have them on all four of my tanks - nothing can come unstuck or leak, ever.

John
Iceni John is offline   Reply With Quote
Reply


Posting Rules
You may not post new threads
You may not post replies
You may not post attachments
You may not edit your posts

BB code is On
Smilies are On
[IMG] code is On
HTML code is Off
Trackbacks are Off
Pingbacks are Off
Refbacks are Off


» Featured Campgrounds

Reviews provided by

Powered by vBadvanced CMPS v3.2.3

All times are GMT -5. The time now is 01:31 AM.


Powered by vBulletin® Version 3.8.8 Beta 4
Copyright ©2000 - 2024, vBulletin Solutions, Inc.