 |
|
 09-19-2021, 10:57 PM
|
#21
|
|
Bus Crazy
Join Date: Oct 2020
Location: Florida
Posts: 1,570
Coachwork: Integrated Coach Corp.
Chassis: RE-300 42ft
Engine: 466ci
Rated Cap: 90
|
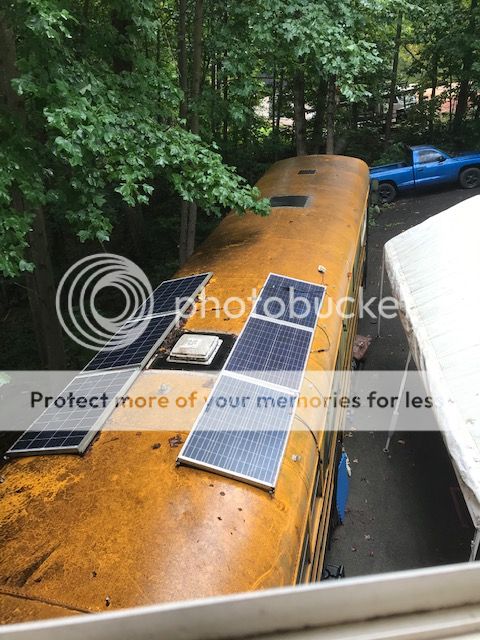
Reducing the effects of gravity
The Houghton A3800 is 100lbs of heat, ac, & dehumidifier. I intend to lift it 10'6", alone. Must also ensure it won't gravitate back to Earth.

My 24v muscles.

I used only what I had on hand. Built the track from two 5/4"x6"x12' deck boards. Supported with scraps of unistrut & 4 hole strut 90s. The sled is a bus seatback, 2 hole L brackets overhang the sides, to combat derailing.

Dura-Blocks, used for mounting conduit on rooftops, make great padded feet for the curved surface.

Warn wench, anchored to the opposite wheel, does the work, slow and steady.

Safety. Attached the track to the truck bed with strut 90s & lag bolts. Ratchet strapped to the sled to secure the load. I did not have to do this alone, when TC & the neighbors saw my contraption, they all insisted on helping (my crazy a$$).

This all worked quite well. Only had to lift the AC into the truck & drive it from the barn to Freddy, never fully lifted it after loading, just scooch and wriggle.

Checking for storm leaks with tissue: Photo taken during an all day tropical storm. Must be a good factory ac gasket as I haven't added sealant to the outside. The compression seal is surprisingly tight.

|

|

|
|
09-20-2021, 12:21 AM
|
#22
|
|
Bus Geek
Join Date: Dec 2017
Location: Dawsonville, Ga.
Posts: 10,482
Year: 1999
Coachwork: Genesis
Chassis: International
Engine: DT466/3060
Rated Cap: 77
|
__________________
I Thank God That He Gifted Me with Common Sense
|
|
|
|
|
09-20-2021, 01:04 AM
|
#23
|
|
Bus Crazy
Join Date: Oct 2020
Location: Florida
Posts: 1,570
Coachwork: Integrated Coach Corp.
Chassis: RE-300 42ft
Engine: 466ci
Rated Cap: 90
|
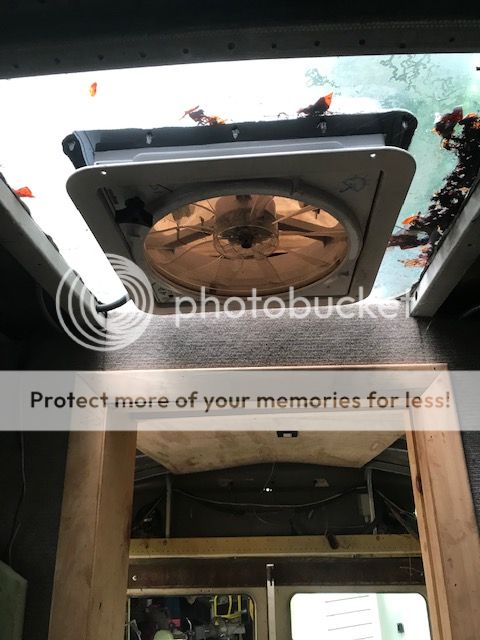
I like the look of your skylight fan. Really looks like a fine production model.
I went with the belt and suspenders philosophy. If I finish and say, "I hope that it doesn't leak", it will probably leak. If I can say, "there's no effin way that's gonna leak", it may not.
|
|
|
|
|
09-21-2021, 05:03 PM
|
#24
|
|
Bus Geek
Join Date: Sep 2014
Location: Eustis FLORIDA
Posts: 23,764
Year: 1999
Coachwork: Thomas
Chassis: Freighliner FS65
Engine: Cat 3126
Rated Cap: 15
|
Quote:
Originally Posted by DeMac

It's hard to belive how much time passes. We are looking forward to seeing you two, soon.
|
not sure exactly when but we'll be moving out to lady lake sooner or later! 
|
|
|
|
|
09-21-2021, 05:04 PM
|
#25
|
|
Bus Geek
Join Date: Sep 2014
Location: Eustis FLORIDA
Posts: 23,764
Year: 1999
Coachwork: Thomas
Chassis: Freighliner FS65
Engine: Cat 3126
Rated Cap: 15
|
BTW- your roof patch/ac job is TOP NOTCH!
|
|
|
|
|
09-21-2021, 05:55 PM
|
#26
|
|
Bus Crazy
Join Date: Oct 2020
Location: Florida
Posts: 1,570
Coachwork: Integrated Coach Corp.
Chassis: RE-300 42ft
Engine: 466ci
Rated Cap: 90
|
Quote:
Originally Posted by EastCoastCB
BTW- your roof patch/ac job is TOP NOTCH!
|
Thank you for that.
I learned alot by reading your conversations with everyone else, here at skoolie.net. so thanks for that, as well.
The 16 guage steel patches, you provided, worked perfectly. Whether square, parallel, centered or perfect circles, all were spot on.
Were they cut with a waterjet?
All by the same person? I wanna thank him, too.
‐----------------
I'm in Lady Lake almost weekly. The move will cut the travel time between us, in half. Good camping weather, soon...
TC & I have been checking in with Roxy on fb.
|
|
|
|
|
09-22-2021, 07:18 AM
|
#27
|
|
Bus Geek
Join Date: Sep 2014
Location: Eustis FLORIDA
Posts: 23,764
Year: 1999
Coachwork: Thomas
Chassis: Freighliner FS65
Engine: Cat 3126
Rated Cap: 15
|
Quote:
Originally Posted by DeMac
Thank you for that.
I learned alot by reading your conversations with everyone else, here at skoolie.net. so thanks for that, as well.
The 16 guage steel patches, you provided, worked perfectly. Whether square, parallel, centered or perfect circles, all were spot on.
Were they cut with a waterjet?
All by the same person? I wanna thank him, too.
‐----------------
I'm in Lady Lake almost weekly. The move will cut the travel time between us, in half. Good camping weather, soon...
TC & I have been checking in with Roxy on fb.
|
Nah just a properly run dry plasma table with fresh consumables and a good eye by my step dad (he cut them).
The old Komatsu dry table I used to run could cut so clean people thought it was laser cut.
I used to make some of the parts for PowerTech generators.
|
|
|
|
|
09-23-2021, 04:16 PM
|
#28
|
|
Bus Crazy
Join Date: Oct 2020
Location: Florida
Posts: 1,570
Coachwork: Integrated Coach Corp.
Chassis: RE-300 42ft
Engine: 466ci
Rated Cap: 90
|
Rivet Selection
All of Freddy's patches have been completed using 3/16" all-stainless, closed-end, blind rivets with a .020-.125 grip range & dome-head. Reamed each 3/16" hole using a #11 (.1910") drill bit, for the hole's finish size (while clamped) prior to installation.

Closed end blind rivets are a type of tubular rivet with a mandrel through the center. To install a closed end rivet, the entire fastener is inserted through drilled holes in the parts being joined, and a special tool is used to draw the mandrel into the rivet. The blind end of the rivet expands to secure the workpieces, and the mandrel snaps off. Unlike open end blind rivets, closed end blind rivets provide 100% mandrel retention. The head of the mandrel stays inside the set rivet. Closed end rivets block the passage of fluids and gases to create a tight, secure seal.

Jay Cee Sales provided the rivets. Widely recommended by many members at skoolie.net. Thanks community!
|
|
|
|
|
09-24-2021, 03:06 PM
|
#29
|
|
Mini-Skoolie
Join Date: Jul 2021
Location: Kansas City
Posts: 51
Year: 1999
Chassis: International Genesis
Engine: Navistar D466
|
This thread is awesome. Thank you so much!
|
|
|
|
|
09-24-2021, 03:37 PM
|
#30
|
|
Bus Crazy
Join Date: Oct 2020
Location: Florida
Posts: 1,570
Coachwork: Integrated Coach Corp.
Chassis: RE-300 42ft
Engine: 466ci
Rated Cap: 90
|
...
Quote:
Originally Posted by Delos356
This thread is awesome. Thank you so much!
|
You are welcome, Delos356.454129
|
|
|
|
|
09-24-2021, 09:46 PM
|
#31
|
|
Bus Crazy
Join Date: Oct 2020
Location: Florida
Posts: 1,570
Coachwork: Integrated Coach Corp.
Chassis: RE-300 42ft
Engine: 466ci
Rated Cap: 90
|
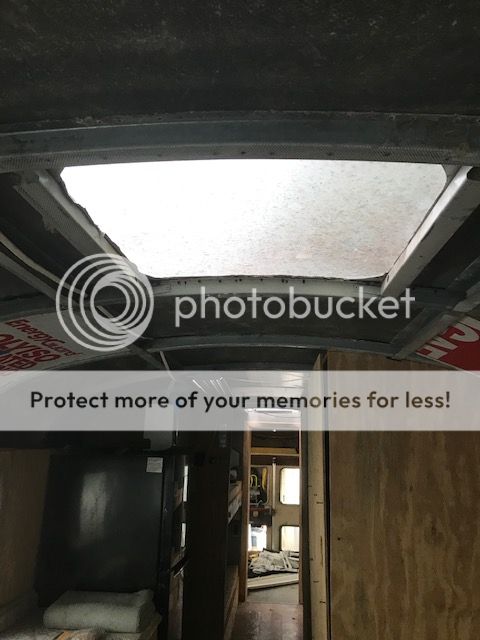
Passive Roof Vent
Passive Roof Vent, located at the very top center of the picture. Resembles a speaker or caged light.

We didn't really know if we wanted to remove this feature. Musigenesis spoke highly of it. Seemed like more work.
Heres the same spot with the ceiling panel removed. Black soot (not mold) mostly in the interior side. No evidence of a leak.

And on the 'attic' side of the ceiling skin. Do middle schools have a smoking section?

Pealing away the insulation reveals the vent hole & the tips of ten self drilling screws. Leaves and debris deposits will invite more Florida wildlife. The soot seemed noticeable worse on (originated from) the interior.

In the end, I decided that sealing all accessable penetrations would be best.
|
|
|
|
|
09-24-2021, 10:35 PM
|
#32
|
|
Bus Crazy
Join Date: Oct 2020
Location: Florida
Posts: 1,570
Coachwork: Integrated Coach Corp.
Chassis: RE-300 42ft
Engine: 466ci
Rated Cap: 90
|
Remove Vent & Prep. the Surface
Pollen & dust everywhere. The vent will come off easier than the filth.

To remove the vent I removed the 10 self drilling phillips screws, using a battery impact driver. A razor knife & putty knife helped to cut & pry it from the gooey sealant loose.
The underside is still tacky. The thick interior lip and layered box (no slots visable) seems to do well at keeping out water.

The corners appear to weap the water out. Louvers & body shape pull negative pressure up and out.

I put a sheet of cardboard on the sticky side and filed it away in the shipping container.
Following the same process as page one of this thread, I removed the sealant using a scraper, mineral spirits, wire wheel & sander. Also the same, I flattened/dimpled the self tappers' volcano holes using a wood block & ball peen hammer. Finally, I foil-taped underneath & glassed the screw holes.

The pollen cleaned up nicely. I handwashed the area with a rag and a small bucket of ACV & water.
Next, more sanding, then a thin, brush coat of bare metal primer, and lightly sand again.
|
|
|
|
|
09-24-2021, 11:06 PM
|
#33
|
|
Bus Crazy
Join Date: Oct 2020
Location: Florida
Posts: 1,570
Coachwork: Integrated Coach Corp.
Chassis: RE-300 42ft
Engine: 466ci
Rated Cap: 90
|
Drilling the: Vent Patch
I measured and marked patch and secured it to the table using C-clamps & scrap lumber.

Always dipping the bit into cutting oil before each pass. I piloted each point with a 5/64" bit, then increased the hole size to 7/64". For a tight, scratch-free sandwich, I deburred the backside 'blowout' with an 1/8" bit.
FRICTION DULLS BLADES:
Cutting Oil, Speed, Pressure, Amount of Material Removed...
I can not stress enough, the damage done by friction. One poorly cut hole can ruin a blade. A quality bit should make hundreds of cuts before having to be replaced or sharpened.
**Please, Help Save Blades' Lives by Quoting This Post.**
|
|
|
|
|
09-24-2021, 11:41 PM
|
#34
|
|
Bus Crazy
Join Date: Oct 2020
Location: Florida
Posts: 1,570
Coachwork: Integrated Coach Corp.
Chassis: RE-300 42ft
Engine: 466ci
Rated Cap: 90
|
Through the Template Tightly
I marked the interior side of the patch (aka template) with crosshairs so TC could guide me to the center of the vent hole, from inside.
I began by using the same meathod as on page one. Weighted buckets, strapped across 2x4s, to hold the piece tightly to the roof, while I drill.

Drilling one rivet position at a time, though the 'template'/patch. First using a 7/64" bit, then reaming w/ three additional bits to step up the hole size (1/8", 5/32", 3/16"). Dipping bits into cutting oil before each cut. Then adding a 3/16" cleco, before moving to next rivet position & repeating. I started at the top of the arch, one hole front, one hole rear, front left, front right, rear left, rear right... The last two were completed after the photo. IF I had a pleat, here at the bottom of the slope, is where it would least likely leak. I had no pleat, thank G.
Now, I'll pencil mark everything, top, bottom, front, back, trace the square onto the roof and the circle from underneath. Then remove the clecos so that I can clean both surfaces of oil and metal flakes.
|
|
|
|
|
09-25-2021, 12:24 AM
|
#35
|
|
Bus Crazy
Join Date: Oct 2020
Location: Florida
Posts: 1,570
Coachwork: Integrated Coach Corp.
Chassis: RE-300 42ft
Engine: 466ci
Rated Cap: 90
|
Apply Dynatron & Reattach

Using the pencil marks as a guide, I applied a thin bead of Dynatron 550, about 3/8" from the edge of the of the patch and another bead around the vent hole. Then, carefully aligned the patch using an alignment tool with the holes. Working quickly, I reinserted all of the clecos, following the same pattern used when drilling.

Next, I replaced each cleco with a rivet. First, dry reaming the 3/16" hole to the finish size (#11), then applying a dab of Dynatron 550 to the rivet, finally installing the rivet. Repeating until each cleco is replaced. The sealant will squeeze out at the edge, as each rivet is installed. The rivets are much tighter than the clecos.

|
|
|
|
|
09-25-2021, 12:37 AM
|
#36
|
|
Bus Crazy
Join Date: Oct 2020
Location: Florida
Posts: 1,570
Coachwork: Integrated Coach Corp.
Chassis: RE-300 42ft
Engine: 466ci
Rated Cap: 90
|
interior View

Interior view, after completion. You can see the 44 rivets and 10 fiberglass patches. The large patch amply covers every hole. Clearly, the fiberglass is overkill. I'm practicing with the fiberglass before I get to an exposed area. The patch is quite rigid.
|
|
|
|
|
09-25-2021, 02:26 PM
|
#37
|
|
Bus Crazy
Join Date: Oct 2020
Location: Florida
Posts: 1,570
Coachwork: Integrated Coach Corp.
Chassis: RE-300 42ft
Engine: 466ci
Rated Cap: 90
|
Size and Spacing
The 16 guage patch used to cover the passive vent is 18"x18". The pilot holes for each rivet were started 3/4" from the edge and are spaced 1-1/2"" (center-to-center) from one another. The material left after drilling is about 9/16" & 1-1/8", respectively.
|
|
|
|
|
09-25-2021, 02:32 PM
|
#38
|
|
Bus Geek
Join Date: Sep 2014
Location: Eustis FLORIDA
Posts: 23,764
Year: 1999
Coachwork: Thomas
Chassis: Freighliner FS65
Engine: Cat 3126
Rated Cap: 15
|
thank you for explaining and illustrating this much better than I ever could. A+ man!
|
|
|
|
|
09-25-2021, 03:04 PM
|
#39
|
|
Bus Crazy
Join Date: Oct 2020
Location: Florida
Posts: 1,570
Coachwork: Integrated Coach Corp.
Chassis: RE-300 42ft
Engine: 466ci
Rated Cap: 90
|
Community Property
Quote:
Originally Posted by EastCoastCB
thank you for explaining and illustrating this much better than I ever could. A+ man!
|
Thanks. I borrowed from many members of skoolie.net both active and those who have departed. Current members should feel free to offer their experience on the subject.
|
|
|
|
|
09-26-2021, 08:33 AM
|
#40
|
|
Mini-Skoolie
Join Date: Oct 2016
Posts: 34
|
Awesome post. Thanks so much for doing all of this documentation, I will definitely be using your ideas. What is the clear material you used for the RV Vent to bolt to? Did you just screw it in place or rivet?
|
|
|
|
|
|
 Posting Rules
|
You may not post new threads
You may not post replies
You may not post attachments
You may not edit your posts
HTML code is Off
|
|
|
|
 » Recent Threads
 |
|
|
|
|
|
|
|
|
|
|
|
|
|
|
|
|
|
|
|
|
|
|
|
|
|
|
|
|
|
|
|
|
|
|
|
|
|


 Linear Mode

