 |
 09-14-2020, 12:06 PM
|
#1
|
|
Mini-Skoolie
Join Date: Jul 2020
Location: State of Maine
Posts: 33
|
Question about tile-work and level.
First Tile-work:
I do like tile as a finish material and have done fair bit of it in my home. But there are places where I have not (or had to reinforce), such as floorings, due to there being too much deflection in the substrate to being within spec for tilework. And I'd love to do it in a bus if/when we find the right one and pull the trigger.
But, it seems like a bus, being mobile hitting bumps, being taken bookdocking, or just turned at a steep angle would cause some deflection/twisting action within the body/frame of the bus. Has everyone's tile work remained as good as day one? Or do you find over time the grout cracks/fails or even worse?
Second Level:
All my work to date has been in home that are very close to level. That means I can use a bubble level or, as I am with tilework right now, using a laser level to lay things out. These tools only result in everything being square with each other is you start with a level substrate (bus floor) same goes for tools like plumb bobs. And I will likely never get the bus very close to perfectly level, especially if it move during the build out phase?
So, how do you builders do it? Level the bus and park it the whole time, calibrated eye-ball, measure off a reference point and snap a chalk line?
|

|

|
|
09-14-2020, 12:43 PM
|
#2
|
|
Bus Nut
Join Date: Jul 2020
Location: Sacramento
Posts: 994
Year: 1999
|
Have no experience with tile on a vehicle yet, but I do plan to use some in my shuttle trailer project. As I see it, use small tiles, even 12 inch tiles are too big, and use epoxy grout to give some flex.
|
|
|
|
|
09-14-2020, 04:24 PM
|
#3
|
|
Bus Crazy
Join Date: Nov 2010
Location: Andrews,Indiana
Posts: 2,437
Year: 1991
Coachwork: Bluebird
Chassis: AARE
Engine: 3116 Cat 250hp
Rated Cap: Just the two of us.
|
I used string and a square, using the floor as a reference. Magnets to hold the string.
|
|
|
|
|
09-15-2020, 01:18 AM
|
#4
|
|
Bus Geek
Join Date: Sep 2018
Posts: 2,831
Year: 2007
Coachwork: Thomas Built
Chassis: Minotour
Engine: Chevy Express 3500 6.6l
|
I tiled the walls in my wet bath. To reduce problems caused by flex, I used 1 1/4” .090” wall square tubing screwed to 3/4” plywood on the outside. For the inside I used foam core tile backer. The brand I used was Hydro-Blok. The stuff is very durable and the attachment method using big fender washers makes it so the screws cant work themselves through the board:
I did a lot of up front research before I decided to do it. I came across a lot of instances of people with high end motor homes that had tile or stone flooring. I think the thing that makes it possible is having a real stout subfloor. With a bus I would guess you’re already there. You may consider the pricey foam board underlayment. Plywood may work also, however, you might want to get really specific with the thinset manufacturer when identifying the exact board you’ll use. Use a highly modified thinset and either urethane or epoxy grout.
Another thing to note: tile is heavy and it counts toward your vehicles GVWR.
There’s lots of really nice vinyl plank materials available that make more sense for durability and weight.
|
|
|
|
|
09-15-2020, 08:13 AM
|
#5
|
|
Bus Geek
Join Date: Sep 2018
Posts: 2,831
Year: 2007
Coachwork: Thomas Built
Chassis: Minotour
Engine: Chevy Express 3500 6.6l
|
Oh, I forgot to talk about level. There’s no such thing in a bus. There’s only square. I suppose you could use jacks to level the frame, but it doesn’t seem necessary. Big square, little square, tape measure.
|
|
|
|
|
09-15-2020, 10:07 AM
|
#6
|
|
Bus Nut
Join Date: Jul 2020
Location: Sacramento
Posts: 994
Year: 1999
|
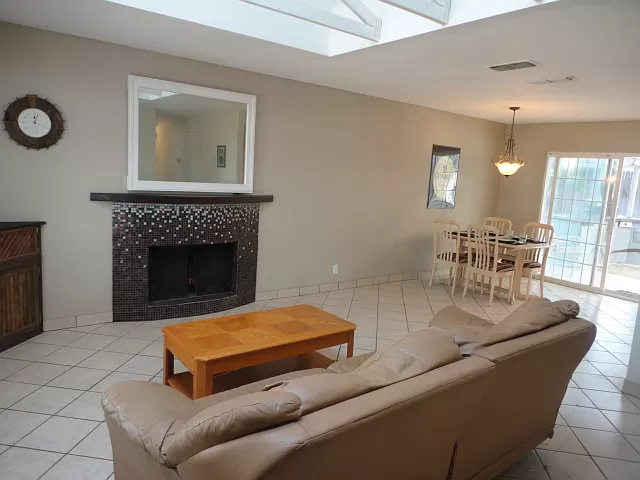
Check out some of my tile work..the floor tile also goes right out to the outdoor kitchen, which required a floating mortar on the concrete. I just laid it all down, no lines, lazers..a bus is not big enough to mess up I would think.
The fireplace took me days doing the custom pattern in 3/4 tiles at a time.
btw, the TV is behind the mirror, and the clock was custom made.
|
|
|
|
|
09-15-2020, 04:18 PM
|
#7
|
|
Mini-Skoolie
Join Date: Jul 2020
Location: State of Maine
Posts: 33
|
Quote:
Originally Posted by Danjo

I tiled the walls in my wet bath. To reduce problems caused by flex, I used 1 1/4 .090 wall square tubing screwed to 3/4 plywood on the outside. For the inside I used foam core tile backer. The brand I used was Hydro-Blok. The stuff is very durable and the attachment method using big fender washers makes it so the screws cant work themselves through the board:
I did a lot of up front research before I decided to do it. I came across a lot of instances of people with high end motor homes that had tile or stone flooring. I think the thing that makes it possible is having a real stout subfloor. With a bus I would guess youre already there. You may consider the pricey foam board underlayment. Plywood may work also, however, you might want to get really specific with the thinset manufacturer when identifying the exact board youll use. Use a highly modified thinset and either urethane or epoxy grout.
Another thing to note: tile is heavy and it counts toward your vehicles GVWR.
Theres lots of really nice vinyl plank materials available that make more sense for durability and weight.
|
Thanks sharing your experience and tips.
Regarding weight. I know. The last bathroom I did, the floor alone had 400 pounds of thinset, not counting the cement board, tiles, grout, and waterproofing membrane. For a conversion, if I used tile I would limit it to places like the shower and the kitchen backsplash.
Quote:
Originally Posted by BeNimble
Check out some of my tile work..the floor tile also goes right out to the outdoor kitchen, which required a floating mortar on the concrete. I just laid it all down, no lines, lazers..a bus is not big enough to mess up I would think.
The fireplace took me days doing the custom pattern in 3/4 tiles at a time.
btw, the TV is behind the mirror, and the clock was custom made.
|
Nice job.
When I 12x12 or larger floor tiles I don't need lasers and levels. I just map out the room and pick my starting point based on having either the same partial tiles around the room or avoid as many (hopefully all) slivers at the edge as possible. In a Normally shaped room I go for the center it at all possible. Then I do pull a couple lines to mark the center and work my way out.
It is the back splashes and shower/tub surrounds that I use the level for. The smaller the tile and the smaller the grout line the more the eye (well my eye anyways). The shower I am working on right now is 1/16th grout lines and I'm using the laser to check all my walls are aligned, that my pattern stays aligned, and every few levels to make sure the grout lines don't start to wonder up or down.
|
|
|
|
|
 Posting Rules
|
You may not post new threads
You may not post replies
You may not post attachments
You may not edit your posts
HTML code is Off
|
|
|
|
 » Recent Threads
 |
|
|
|
|
|
|
|
|
|
|
|
|
|
|
|
|
|
|
|
|
|
|
|
|
|
|
|
|
|
|
|
|
|
|
|
|
|


 Linear Mode

