 |
|
 05-18-2020, 11:20 PM
|
#1
|
|
Mini-Skoolie
Join Date: Jan 2020
Posts: 25
|
 The Complete Idiot's Guide to Bus Inspection for Purchasing and Pre-Trip
The Complete Idiot’s Guide to Bus Inspection for Purchasing and Pre-Trip
Written by me, a complete idiot.
I began this research with limited mechanical knowledge with a desire to understand what I should look for, specifically in the engine, when purchasing a bus. The mechanical section is written in plain english with photo examples to help folks like me that don’t know what they’re looking at/have never touched an engine before. All information written here comes from my sources linked below and not personal knowledge. Feel free to comment. I will keep the OP updated for the time being.
In case it needs to be said, not everything on this list should be a deal breaker for purchasing a bus and most of it is intended to make sure everything is safe, operational, and doesn’t need maintenance. I’ve marked the important things to note before buying with a *. If there’s a problem with anything in the inspection, it should be remedied before your test drive/trip home depending on severity. Use your common sense.
Before your first long drive, have your oil changed unless you’re absolutely sure it’s been changed in the last 6 months.
Since braking systems are different, I’ve covered them in their own section.
***
Things you’ll need:
-Flashlight
-Shop rag or two
-Tape measure in case you’d like to take measurements
-Tire tread depth gauge/small increment ruler/or a penny
-Tire pressure gauge/heavy object for thwacking the tire/your fist
You might also want something to take notes.
*Have a peek under the bus and look for fluids/oil on the ground. After your test drive, check again.
*RUST: Some rust is to be expected. Surface rust can be sanded away. If there’s more rust than paint spots, walk away. You might want to run a magnet around the outside. If it doesn’t stick somewhere, Bondo is present.
-around wheel well
-lights
-steps
-interior rear wall
-chassis
-Carefully inspect the bottom of the bus. You won’t be able to see if rust is present in the interior floor. Anything on the bottom pan will likely be worse on the interior. See the interior section for a note about checking the floor. *TIRES: A replacement tire costs $500+. If all the tires are bad, you should probably walk away. *Date the tires with the DOT #. The first two digits tell you the week of the year, the last two tell you the year. If there are only two digits, the tires are more than ten years old. Tires 10+ years old need to be replaced.
*There should be a 4/32 in groove on the steering (front) tires. Back tires should have a 2/32 in depth. If you don’t have a gauge, check the tread by pressing a penny upside down/head down in 2-3 different places. If you can see Lincoln’s head the tread is too thin.
*Check for abrasions, cuts, bumps, anything unusual on the tire. Feel for anything sticking out.
-PRESSURE: Commercial tires don’t become flat when they aren’t holding air. The only real way to check tire pressure is with a gauge (should read about 100 psi) but for a quick test, thwack the top of the tire with a heavy object or your fist. (Dog noses can do the steering tires with the engine cover up.) Should hear a hollow thud/echoing noise.
-Try to turn the nuts to the left with your hand. If you can turn them at all, they need to be retorqued.
-Valve stem caps are present.
-Hub not leaking fluid, tends to spray onto the tire.
-Rear tires have rim clips. Check that they aren’t rusted out, damaged. -UNDER THE HOOD: This was written for a dog nose bus. (I hope to find more resources for flat noses.) You’ll need a shop rag or two for this, avoid touching anything in the engine without a rag. When you open the hood, check the spring and cable holding it to be sure it’s not going to fall on you. We start the inspection on the driver’s side. -STEERING SHAFT COLUMN: Grab the column and wiggle it back and forth while looking at the steering wheel. The wheel should turn as much as you are turning the shaft. If there’s a significant difference, you’ve got a problem.

-Bolts in the column may have pins, check they are present.
-It’s normal to see some oil on the shaft but check for cracks. -LEAF SPRING: Long bar at the bottom side. There’s four of these on the bus near each tire as part of the suspension. Check each as you move around the bus.
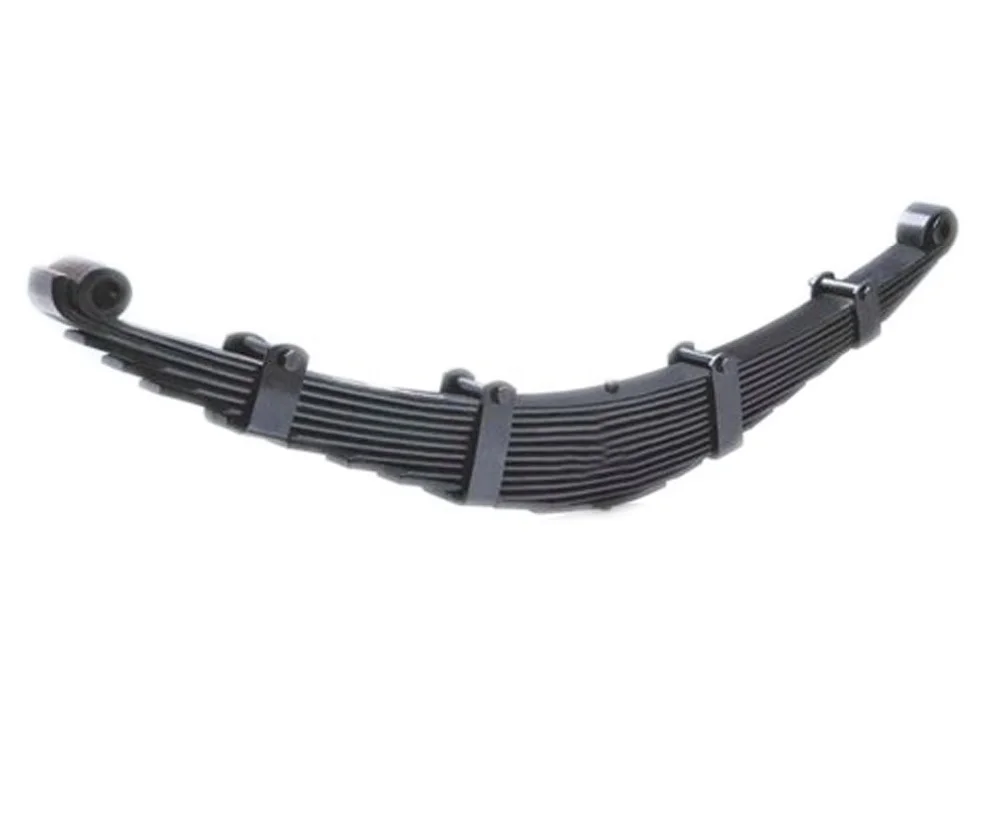
-check for cracks
-should be ‘smiling’ -SHOCKS: Check that they aren’t leaking fluid. Bus shocks are just a shaft and don’t have a spring like you may be used to.

-FLUIDS: Everything except the transmission should be checked with the engine cold. NEVER open your coolant cap when the engine is hot.
-Oil. Don’t be too alarmed if the oil is dark, diesel oil stops being clear very quickly.
-power steering
-brake fluid if present. Be sure to clean the cap before removing it as dirt in the system can cause huge problems.
-coolant
-wiper fluid on the passenger side -RADIATOR FAN: Front of engine, behind radiator.
-Check that it spins.
-Look for any damage. -BELT: Now we’re moving over to the passenger side.
-Look for any fraying or cracking.
-Check that the tension is correct by pushing on the belt a bit, there should be some give but not too much. If they’re flopping or you can move them around, they’re too loose. Belts are cheap and easy to replace. -AIR FILTER: Don’t have to check too frequently. If it doesn’t have a gauge you’ll have to unscrew it. Just make sure it’s not filthy.
 -OTHER EXTERIOR:
*BATTERY COMPARTMENT:
*Identify the battery and date the battery. Most buses have a Group 31 battery (~$150), but the bus may have a more expensive battery like a 4D or 8D, which are upwards of $400. Batteries must be replaced in pairs and last about 5 years. If the batteries are bad and the expensive kind, it’s something to consider with the price of the bus. The battery will be stamped with a date code on the label or case, and usually the first two characters - a letter and digit - indicate the date. The letter corresponds to the month (A for January) and the number for the year. B3 would be Feb 2003.
*Leaks in the compartment.
*Look for signs of corrosion on the batteries and compartment.
*Check that the wires are present, undamaged, and adequately tight. -FUEL TANK: rails aren’t rusted or sagging
-DRIVE SHAFT: In the worst case scenario that your transmission bearings come loose, you don’t want your drive shaft to fall out and trebuchet your bus, so there’s a metal safety loop to prevent this just in case. Look under the bus for it. Give it a tug the first time you check it and every so often, otherwise just check it’s present.

-If you're going to get in and drive off, check the exterior compartments are closed. INTERIOR:
*Remember to check for rust on the steps and interior rear wall. You might also want to check the bolts for the seats. If they’re heavily rusted they’ll be difficult to remove.
*FLOOR: As mentioned previously, you won’t be able to see rust on the interior metal floor because of the rubber and sub-floor, but you can walk around and test for soft spots which is an indication the floor is wet. If the floor is peeling, bubbling, or molding, it’s probably bad news.
*LEAKS: Look for any signs of water dripping down on the interior AND exterior around the windows, doors, and especially hatches which often leak badly.
*DOORS, WINDOWS, EMERGENCY EXITS: Check that these are operational. When buying the bus, have a look at the seals and take note of their condition, they may need replacing.
-RUNNING THE DARN THING ALREADY
-With the engine off check...
-That your wipers work and fluid sprays correctly.
-Interior dome lights come on if you have them.
-Defrost is working -Turn the engine on.
-Obvious warning lights. -GAUGES: Working. Some of these numbers may be different on your bus, check the manufacturer's specs for the model if you’re concerned.
-Temp should never exceed 210 degrees.
-Oil pressure should be between 30-60 psi.
-Voltmeter should read between 12.5v with the key turned and 14v with the engine running. High is just as bad as low. -Remember to check your transmission fluid after the engine has warmed and been running for a bit. If the fluid is dark or smells burnt, the transmission may be long overdue for a service or be overheating.
-LIGHTS: A helper will be.. helpful. Cycle through all your lights and check them.
-HORN: Honk it.
*EXHAUST: When the bus has warmed to the operating temp, exhaust fumes should be clean and transparent. Don’t worry about a bit of white smoke after it starts, especially if it’s cold. But if you have..
-white/gray smoke after the engine has completely warmed, you could have coolant burning in the combustion chamber. Very expensive fix.
-black smoke. Too much fuel is being burned aka ‘running rich’. Can be calibrated.
-blue/gray smoke. Oil is being burned in the combustion chamber. Could be any number of causes. *Look at the engine while it’s running. Previously unnoticeable leaks might be showing. Belts should not be bouncing up and down. BRAKES
How to identify the braking system:
If the bus has an air pressure gauge on the dash, no brake fluid, and one of these:

You’ve got air brakes.
If the brake pads measure less than 11/32 in, they are recommended to be replaced.
HYDRAULIC BRAKES: -You’ll want to check the lines, present near each tire/tire set, for corrosion, cracking, and leaks.
-Fittings properly connected.
-Fluid levels, measured cold.
-To test the brakes, put the vehicle in drive, go forward a bit and slam on the brakes to make sure everything is working properly. Do the same in reverse. AIR BRAKES:
-After turning the engine on, you will have a ‘low air’ light on the dash while the pressure builds in the system. Pay attention to how quickly the bus builds air pressure. If it takes more than two minutes for the light to go off, you’ve got a problem.
-Once the pressure is fully built, release the parking brake and fully depress the brake pedal. Watch the air supply gauge and listen for leakage. After the initial pressure drop, the system should drop no more than 3 psi per minute.
-Now we’re going to test the fail safe system. With the parking brake applied and the system fully pressurized, rapidly pump the brakes to reduce the pressure while watching the gauge. This will vary, but the warning light should come on at ~60 psi. Between 20-40 psi, the parking brake should pop out and your spring brakes will be activated.
-With the pressure fully built and the parking brake released, test the air brakes similarly to the hydraulic system with the bus moving about 5 mph.
TEST DRIVE: Finally. Before test driving, let the engine idle for about 15 minutes. Park it in a different spot when you return.
-The bus engine will be loud, but the noises it makes should be smooth and steady. It should never cough or sputter.
-HIGHWAY SPEEDS: Back tires usually aren’t balanced, and tires may become slightly warped after the bus has been sitting for a while, so you may experience some wobble when hitting speeds of 50+ mph. After the tires warm, any temporary warping should go away in a few minutes on the highway. Hope this was as helpful to you as it was to me. Even with this inspection, always get your rig checked out by a mechanic before you buy. I haven't included info about titles or other questions you should ask before buying, I recommend diving into that stuff as well.
Sources:
https://skoolie.homes/buying-a-bus-things-to-inspect/
https://wanderlounge.net/things-to-l...-buying-a-bus/
https://www.studyblue.com/?src_url=h.../view/18865857
https://www.thewilddrive.com/tips-on...hensive-guide/
https://cdldigest.com/cdl-pre-trip-i...n-brake-check/
|

|

|
|
05-18-2020, 11:21 PM
|
#2
|
|
Mini-Skoolie
Join Date: Jan 2020
Posts: 25
|
Reserved for any important additions. Also someone please let me know the code for a collapsible box/spoiler box so I can tuck the big images away.
|
|
|
|
|
05-19-2020, 12:57 AM
|
#3
|
|
Traveling
Join Date: Sep 2013
Location: Virginia
Posts: 2,302
Year: None
Coachwork: None
Chassis: None
Engine: None
Rated Cap: None
|
Very nice.
Simplified (from CDL training):
If you can see it by walking around or by crawling under, inspect it for what applies. There's no such thing as a non-essential or unimportant part. This includes tire valve stems, lug nuts and studs. Even coolant hose clamps and brake chamber dust caps.
Everything is securely mounted.
If it's metal, check for rust, bends, cracks, welds or structural damage.
If it's glass, check for breakage and visibility.
If it's fluid or holds/carries fluid, check for proper level and leaks.
If it's wiring, check it for chafing, burning or other damage.
If it holds or supplies compressed air, check for proper pressure and leaks.
If it's a light, check for damage and proper function.
If it's rubber, check for abrasions, bulges and cuts.
Check for debris between dual wheel assemblies.
Tire pressures should be uniform, most should be at 105-120 psi.
Tread depth should be minimum of 4/32 on steer tires, 2/32 on drives.
Retreads are NOT legal on front / steer wheels.
Check tire valve stems for damage or leaks. Make sure valve stem caps are in place, dirt can cause the stem stem to leak.
Check wheel hub seals for leakage and proper oil level, if applicable.
Look for rust or shiny bare metal around / on lug nuts, lug studs.
Check air brake chambers for rust, damage, ensure dust cap is in place.
Check exhaust for leaks and proper mounting.
Check driveshaft(s) for damage, excessive play or other defects.
Check underbody for structural defects and damage.
Check shocks for proper mounting and leakage.
If air ride equipped, check air bags for proper mounting and leaks or damage.
Air tanks should be drained periodically to remove moisture. DOT regs say once daily.
If equipped (air brakes), slack adjusters should be checked for excessive play.
Steering components should be checked for damage or excessive play.
All hinged components (doors, hood, hatches) should close and/or latch securely.
It's a good idea to have a fire extinguisher, spare breakers, bulbs, fuses, fluids.
Also a good idea to have a set of DOT-compliant warning triangles for breakdowns. These are to be placed at 50, 100 and 200 ft intervals to the rear, unless a curve or hill obstructs the view from the rear, in which case they should be placed at 100, 200, and 500 feet intervals.
Check all seats and/or handrails for securement and damage.
All loose items should be securely stowed.
Check and clear dash of any obstructions or foreign materials blocking defroster or visibility.
Chock drive axle wheels for air brake and parking brake tests.
AIR BRAKES: Turn on key switch, but DO NOT start engine. System air pressure should be in the 90-120 range. Apply and hold the brake pedal, then release the parking brake. Application pressure gauge should register. You should see about 10-15 psi supply pressure drop, no more than additional 3 psi supply drop in one minute holding the brake pedal.
HYDRAULIC BRAKES: Apply and hold brake pedal. Pedal should have a firm feel with limited travel. If it travels to the floor or beyond a certain point that is considered normal range of travel, the brake system should be checked and the vehicle should not be driven until the problem is found and corrected.
AIR BRAKES: Pump the brake pedal, observing supply pressure dropping. At 60 psi (85 on some), a warning tone/buzzer and/or cluster light will activate. At 20-40, the hand valve should pop out, which should re-set the parking brake.
Start the engine.
Engine should build oil pressure to a minimum of 35 psi within 2-4 seconds.
Base system voltage should be 12.0-12.5V before cranking. Alternator should boost this to 13.4-13.8 with engine running. 14.0V or more is cause for concern and should be checked.
AIR BRAKES: Pressure should steadily build up to nominal range -- between 105-120 psi, pressure will occasionally rise to 150 before the safety blow-off valve activates. Some systems may drop to 90 at times. This is somewhat acceptable if they build back up to nominal range, but should be checked by a professional.
Engine temperature should not exceed 210 degrees when not under load. 220-230 is acceptable on long climbs, but keep it in check.
Check defroster for operation.
With parking brake still engaged, automatic trans in gear or light pressure with clutch in low gear, vehicle should not move. This is commonly called a 'tug test' with combination vehicles (trailers).
If any of the air brake system checks are not satisfactory, the brake system should be checked and the vehicle should not be driven until the problem is found and corrected.
Return automatic transmission to neutral and retrieve/stow your wheel chocks. Fasten your seat belt, do a final check of all gauges and you're set to go.
Now, I'm a little rusty and haven't had to perform this inspection in nearly three years, but this is what I can remember of a proper FMCSA / DOT compliant pre-trip inspection. It may all sound a bit cumbersome and excessive, but it is all in the interest of safety to eliminate dangers that do not change with RV conversion.
|
|
|
|
|
05-19-2020, 01:24 AM
|
#4
|
|
Bus Geek
Join Date: Sep 2015
Posts: 3,856
Year: 2002
Coachwork: Thomas Built Bus
Chassis: Freightliner FS65
Engine: Caterpillar 3126E Diesel
Rated Cap: 71 Passenger- 30,000 lbs.
|
Thank you for posting this. I feel it is a decent post and should be helpful to the uninitiated.
|
|
|
|
|
05-19-2020, 07:15 AM
|
#5
|
|
Bus Nut
Join Date: Jun 2018
Location: Claremont, NH
Posts: 482
Year: 2003
Coachwork: Bluebird
Chassis: International 3800
Engine: DT466E (195hp, 520tq)
|
Great list and thanks for compiling it. One addition from my experience pertains to the lug nuts:
Quote:
|
-Try to turn the nuts to the left with your hand. If you can turn them at all, they need to be retorqued.
|
If the lug nuts have washers, just see if the washers are loose. The nuts may have backed off and are still too tight to turn by hand. Also, on any nut or bolt, look for clean metal where the surfaces meet. That indicates something has been rubbing recently and is loose.
__________________
Dave
|
|
|
|
|
05-19-2020, 07:23 AM
|
#6
|
|
Bus Geek
Join Date: Sep 2014
Location: Eustis FLORIDA
Posts: 23,764
Year: 1999
Coachwork: Thomas
Chassis: Freighliner FS65
Engine: Cat 3126
Rated Cap: 15
|
$500 is pretty high for a tire unless its a Goodyear or Michelin.
|
|
|
|
|
05-19-2020, 09:00 AM
|
#7
|
|
Mini-Skoolie
Join Date: Jan 2020
Posts: 25
|
Thanks for your input guys, I'll update the OP later.
Quote:
Originally Posted by EastCoastCB

$500 is pretty high for a tire unless its a Goodyear or Michelin.
|
That's what I've heard in multiple places, always $500+ for a new tire, thousands for a full set. Seemed like common knowledge. I'd be relieved to know it's misconception.
|
|
|
|
|
05-19-2020, 09:08 AM
|
#8
|
|
Bus Nut
Join Date: Jun 2018
Location: Claremont, NH
Posts: 482
Year: 2003
Coachwork: Bluebird
Chassis: International 3800
Engine: DT466E (195hp, 520tq)
|
Quote:
Originally Posted by Gray
Thanks for your input guys, I'll update the OP later.
That's what I've heard in multiple places, always $500+ for a new tire, thousands for a full set. Seemed like common knowledge. I'd be relieved to know it's misconception.
|
Yes, but even at $300 a pop, times 6, plus mounting isn't cheap and worth factoring into the purchase price. It's certainly good to have in the checklist.
__________________
Dave
|
|
|
|
|
05-19-2020, 09:08 AM
|
#9
|
|
Bus Geek
Join Date: Sep 2014
Location: Eustis FLORIDA
Posts: 23,764
Year: 1999
Coachwork: Thomas
Chassis: Freighliner FS65
Engine: Cat 3126
Rated Cap: 15
|
Quote:
Originally Posted by Gray
Thanks for your input guys, I'll update the OP later.
That's what I've heard in multiple places, always $500+ for a new tire, thousands for a full set. Seemed like common knowledge. I'd be relieved to know it's misconception.
|
I can get a set of chinese tires new for around $1600-$1800.
Whether or not one likes them Chinese tires are more than capable of the task and the average skoolie will age them out long before they wear out.
|
|
|
|
|
05-19-2020, 09:38 AM
|
#10
|
|
Mini-Skoolie
Join Date: Jan 2020
Posts: 25
|
Quote:
Originally Posted by EastCoastCB
I can get a set of chinese tires new for around $1600-$1800.
Whether or not one likes them Chinese tires are more than capable of the task and the average skoolie will age them out long before they wear out.
|
Seems pretty sketch, but good to know there's a poor man's alternative.
Also I feel a little dumb because I didn't realize this forum has an editing time limit for posts, just been a lurker for ages. Please excuse my drivel.
|
|
|
|
|
05-19-2020, 09:40 AM
|
#11
|
|
Bus Geek
Join Date: Sep 2014
Location: Eustis FLORIDA
Posts: 23,764
Year: 1999
Coachwork: Thomas
Chassis: Freighliner FS65
Engine: Cat 3126
Rated Cap: 15
|
Quote:
Originally Posted by Gray
Seems pretty sketch, but good to know there's a poor man's alternative.
Also I feel a little dumb because I didn't realize this forum has an editing time limit for posts, just been a lurker for ages. Please excuse my drivel.
|
That's the average $300 apiece price most common working class people buy. They're available pretty much everywhere. Nothing "sketch" about em other than some folks are dead set on having name brand.
|
|
|
|
|
05-19-2020, 09:52 AM
|
#12
|
|
Mini-Skoolie
Join Date: Jan 2020
Posts: 25
|
Well alright, didn't mean to offend, only a euphemism. Good to have this info since I'm literally about to walk out the door to have a look at a bus that may have a bad tire. Thanks.
|
|
|
|
|
05-19-2020, 09:57 AM
|
#13
|
|
Bus Geek
Join Date: Apr 2012
Location: So Cal
Posts: 3,231
Year: 1935
Coachwork: Superior
Chassis: Chevy
Engine: 317 ci/tid / Isuzu
|
You mean like Double Coin? I think they are still made in the good old USA but I could be wrong about that.
Jack 
|
|
|
|
|
05-19-2020, 10:27 AM
|
#14
|
|
Bus Geek
Join Date: Sep 2014
Location: Eustis FLORIDA
Posts: 23,764
Year: 1999
Coachwork: Thomas
Chassis: Freighliner FS65
Engine: Cat 3126
Rated Cap: 15
|
Quote:
Originally Posted by ol trunt
You mean like Double Coin? I think they are still made in the good old USA but I could be wrong about that.
Jack |
There are lots of names on them. I've had Sailun and Long March I think. The Sailun's were NICE. especially for the price. They were really aggressive open lug tires. They sure rode better than the worn out old stuff they replaced.
|
|
|
|
|
05-19-2020, 02:39 PM
|
#15
|
|
Traveling
Join Date: Sep 2013
Location: Virginia
Posts: 2,302
Year: None
Coachwork: None
Chassis: None
Engine: None
Rated Cap: None
|
Quote:
Originally Posted by ermracing
Great list and thanks for compiling it. One addition from my experience pertains to the lug nuts:
If the lug nuts have washers, just see if the washers are loose. The nuts may have backed off and are still too tight to turn by hand. Also, on any nut or bolt, look for clean metal where the surfaces meet. That indicates something has been rubbing recently and is loose.
|
Actually, a good sign the lug nuts are loose would be rust or shiny spots around or on the lug nut or lug stud. If you can turn them by hand, one, you're King Kong... two, you're lucky you weren't missing a wheel already.
|
|
|
|
|
05-19-2020, 02:41 PM
|
#16
|
|
Bus Geek
Join Date: Sep 2015
Posts: 3,856
Year: 2002
Coachwork: Thomas Built Bus
Chassis: Freightliner FS65
Engine: Caterpillar 3126E Diesel
Rated Cap: 71 Passenger- 30,000 lbs.
|
6 months ago, we purchased 6 new tires in EastCoastCB's neck of the woods and it cost us just under $500.00 per tire (environmental fees, spin balanced, installed). We checked around and the "cheap" tires were about $50.00 less per tire. Went with a decent brand name, RoadMaster.
|
|
|
|
|
05-19-2020, 02:52 PM
|
#17
|
|
Bus Geek
Join Date: Sep 2014
Location: Eustis FLORIDA
Posts: 23,764
Year: 1999
Coachwork: Thomas
Chassis: Freighliner FS65
Engine: Cat 3126
Rated Cap: 15
|
Quote:
Originally Posted by Native
6 months ago, we purchased 6 new tires in EastCoastCB's neck of the woods and it cost us just under $500.00 per tire (environmental fees, spin balanced, installed). We checked around and the "cheap" tires were about $50.00 less per tire. Went with a decent brand name, RoadMaster.
|
Dang... I coulda got you "the works" for no more than $400 per tire.
|
|
|
|
|
05-19-2020, 03:11 PM
|
#18
|
|
Traveling
Join Date: Sep 2013
Location: Virginia
Posts: 2,302
Year: None
Coachwork: None
Chassis: None
Engine: None
Rated Cap: None
|
Based on my experience with OTR trucking, I would say that bus tires are either different in terms of composition and ride quality, or perhaps some of the shops are taking advantage of people with buses and RVs.
I've seen a set of 8 drive tires in truck stops under promotional discounts for as little as $2,500 to $3,000. That's $312-$375 per tire, for tires that have to meet the stress requirements of 17,000-20,000 lbs per axle. Seems to me tires for a skoolie shouldn't need as high of a weight rating and would cost a bit less.
Average drive axle rating on a skoolie is around 15,000-16,000 lbs, less in some cases. 15,000-16,000 divided across four drive tires requires a rating of 3,750-4,000 lbs each, while the average semi tire would need to be rated 4,250-5,000 lbs each. Just my $0.02. And no, these are not retreads AFAIK. I avoid those whenever possible.
One more thing. Not sure if they even sell them anymore, but bias ply tires are prone to flat-spotting when they sit and will roll unevenly until they get warm. One reason to shoot for radials.
|
|
|
|
|
05-19-2020, 03:33 PM
|
#19
|
|
Bus Geek
Join Date: Sep 2014
Location: Eustis FLORIDA
Posts: 23,764
Year: 1999
Coachwork: Thomas
Chassis: Freighliner FS65
Engine: Cat 3126
Rated Cap: 15
|
Oh the lil tire shops see "skoolies" coming for sure!
|
|
|
|
|
05-27-2020, 04:22 PM
|
#20
|
|
New Member
Join Date: Mar 2018
Location: Los Angeles
Posts: 9
|
Wow. This guide is so generous. Thank you!
|
|
|
|
|
|
 Posting Rules
|
You may not post new threads
You may not post replies
You may not post attachments
You may not edit your posts
HTML code is Off
|
|
|
|
 » Recent Threads
 |
|
|
|
|
|
|
|
|
|
|
|
|
|
|
|
|
|
|
|
|
|
|
|
|
|
|
|
|
|
|
|
|
|
|
|
|
|


 Linear Mode

