 |
|
 12-23-2014, 05:08 PM
|
#41
|
|
Skoolie
Join Date: Dec 2014
Posts: 170
|
Ya I'm digging the attic, makes electrical/plumbing/ductwork both much easier and serviceable down the road. Got a problem? just pull a ceiling panel down and chase it down. Worse case you might have to pull some bats of insulation out. Also recommend using EMT for as much electrical as possible, or at least a few runs of it front to back, that way you can pull additional circuits later for future uses you've yet to think of. Remember to keep 90 degree bends to a minimum for easy pulls.
__________________
https://www.skoolie.net/forums/showthread.php?t=9883 - 7.3L 4x4 Shuttle Bus Toyhauler conversion
|

|

|
|
12-24-2014, 02:42 AM
|
#42
|
|
Skoolie
Join Date: Oct 2014
Location: Maple Ridge BC Canada
Posts: 200
Year: 1998
Coachwork: Blue Bird
Chassis: TC2000 Rear engine
Engine: Cummins 8.3; MD3060
Rated Cap: 84
|
Quote:
Originally Posted by dgorila1

Interesting idea for the rafters! How much headroom did you lose?Now you'll have plenty of space to run the utilities, insulate, build in some overhead storage, etc.
|
I still have 90" from steel floor to the bottom of the rafters. The floor will take another 2-2.5" (insulation+ plywood).
The main reason was to avoid fighting with curved plywood..... but extra space for utilities is a good bonus.....
I started insulating the steel roof (above rafters) with styrofoam... what a pita. I wave to cut 3" styro strips and glue them up..... hundreds and hundreds of pieces....
|
|
|
|
|
12-24-2014, 02:47 AM
|
#43
|
|
Skoolie
Join Date: Oct 2014
Location: Maple Ridge BC Canada
Posts: 200
Year: 1998
Coachwork: Blue Bird
Chassis: TC2000 Rear engine
Engine: Cummins 8.3; MD3060
Rated Cap: 84
|
Quote:
Originally Posted by headinthetrees
Ya I'm digging the attic, makes electrical/plumbing/ductwork both much easier and serviceable down the road. Got a problem? just pull a ceiling panel down and chase it down. Worse case you might have to pull some bats of insulation out. Also recommend using EMT for as much electrical as possible, or at least a few runs of it front to back, that way you can pull additional circuits later for future uses you've yet to think of. Remember to keep 90 degree bends to a minimum for easy pulls.
|
You just gave me an idea about some removable parts of the ceiling. This will definitely save some time down the road. You never know what else you will want to add later... back up camera, more lights, another camera.... even more lights...  solar panels...
|
|
|
|
|
12-24-2014, 04:20 PM
|
#44
|
|
Skoolie
Join Date: Dec 2014
Posts: 170
|
Quote:
Originally Posted by Vlad
You just gave me an idea about some removable parts of the ceiling. This will definitely save some time down the road. You never know what else you will want to add later... back up camera, more lights, another camera.... even more lights... solar panels... |
Yes, and remember to separate high and low voltage electrical. High voltage won't care, but things like camera wires and cat5 aren't very tolerant of electro-magnetic interference.
When I was wiring my tiny cabin I future-proofed everything. I ran empty hard pipe to every switch location (which was easy since I grouped them to just a couple areas) so if I ever wanted I could intercept all my lighting later for home automation reasons. My switchbanks typically had 1 or 2 empty switches for things in the future. I also ran most of my branch circuits down under the house and back up so I could intercept any circuits in the future and isolate them for whatever reason. Instead of stapling everything tight as I would in a customers home, I left service loops in a bunch of places should I ever need to make modifications. I did something similar with the plumbing wherever possible, running as much as I could under the house instead of inside closed walls so it would be serviceable.
The best thing I ever thought of, which you'll never see in any conventional electrical wire, was a 3 way switch to the bathroom heater from right next to my bed. My girlfriend absolutely loved it, and so did I. When you're waking up in a cold cabin, its a lot easier to get out of bed if you know you can run immediately to a preheated bathroom.
__________________
https://www.skoolie.net/forums/showthread.php?t=9883 - 7.3L 4x4 Shuttle Bus Toyhauler conversion
|
|
|
|
|
12-25-2014, 01:33 AM
|
#45
|
|
Skoolie
Join Date: Oct 2014
Location: Maple Ridge BC Canada
Posts: 200
Year: 1998
Coachwork: Blue Bird
Chassis: TC2000 Rear engine
Engine: Cummins 8.3; MD3060
Rated Cap: 84
|
Quote:
Originally Posted by headinthetrees
Yes, and remember to separate high and low voltage electrical. High voltage won't care, but things like camera wires and cat5 aren't very tolerant of electro-magnetic interference.
The best thing I ever thought of, which you'll never see in any conventional electrical wire, was a 3 way switch to the bathroom heater from right next to my bed. My girlfriend absolutely loved it, and so did I. When you're waking up in a cold cabin, its a lot easier to get out of bed if you know you can run immediately to a preheated bathroom.
|
This is why after checking a bunch of RVs and trailers I decided to build my own from scratch. School bus is a very good solid platform to build a very custom RV.
We simply couldn't find a good layout for 2 adults and 2 kids. We want to have lots of room, privacy, good large kitchen. Most of RVs are weekend cabins on wheels, but what if you want to stay in it for 3 or even 6 month? Little stupid things and limited space will drive us crazy.
Also I want solar panels, mobile/satellite internet, normal size fridge, dishwasher, washer, drier, normal size water tank, large Lithium batteries, etc
There is no way I can afford to buy all this in manufactured unit and to add all this to existing unit will take more money and efforts than build from scratch.
|
|
|
|
|
12-25-2014, 01:40 AM
|
#46
|
|
Skoolie
Join Date: Oct 2014
Location: Maple Ridge BC Canada
Posts: 200
Year: 1998
Coachwork: Blue Bird
Chassis: TC2000 Rear engine
Engine: Cummins 8.3; MD3060
Rated Cap: 84
|
Here is a little update on roof insulation.
Here is poor table saw after cutting a load of insulation:
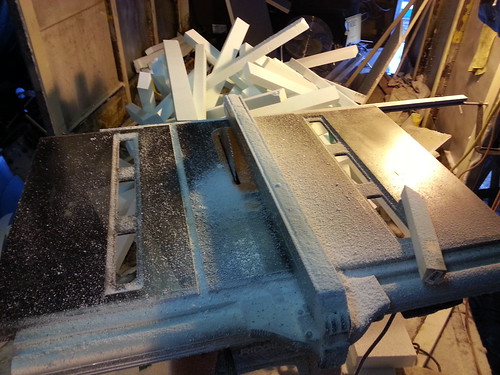
It is easy to cut polystyrene using a table saw, but you have to be very careful because sometimes it is trying to go on angle and this catches the blade and creates a very nasty kickback.
A little pile of already cut polystyrene 2"x3" strips:

A snowman:
 [
Here is an example how to work more efficient:

I made a small table from wooden step ladder and I put 5 strips together and put glue on all of them. Then I stick them to the roof. This way I save a lot of time.
|
|
|
|
|
12-25-2014, 04:52 AM
|
#47
|
|
Bus Geek
Join Date: Nov 2011
Location: MNT CITY TN
Posts: 5,158
|
Lol, you will be finding little white platic balls for years now, you can always laugh when you find them now and look at that picture ;)
__________________
Our build La Tortuga
Accept the challenges so that you can feel the exhilaration of victory.
George S. Patton
|
|
|
|
|
12-26-2014, 01:56 AM
|
#48
|
|
Skoolie
Join Date: Dec 2014
Posts: 170
|
Quote:
Originally Posted by Vlad
[ |
Nice to see you celebrating christmas in a healthy way
Quote:
Originally Posted by Vlad
This is why after checking a bunch of RVs and trailers I decided to build my own from scratch. School bus is a very good solid platform to build a very custom RV.
We simply couldn't find a good layout for 2 adults and 2 kids. We want to have lots of room, privacy, good large kitchen. Most of RVs are weekend cabins on wheels, but what if you want to stay in it for 3 or even 6 month? Little stupid things and limited space will drive us crazy.
Also I want solar panels, mobile/satellite internet, normal size fridge, dishwasher, washer, drier, normal size water tank, large Lithium batteries, etc
There is no way I can afford to buy all this in manufactured unit and to add all this to existing unit will take more money and efforts than build from scratch.
|
Ya I completely understand where you're coming from. RV's are crap, even some of the really expensive ones. You're right for doing it the right way if you want it to last. I'm really interested to see your slide out construction, please take lots of pics.
__________________
https://www.skoolie.net/forums/showthread.php?t=9883 - 7.3L 4x4 Shuttle Bus Toyhauler conversion
|
|
|
|
|
12-27-2014, 03:45 AM
|
#49
|
|
Skoolie
Join Date: Oct 2014
Location: Maple Ridge BC Canada
Posts: 200
Year: 1998
Coachwork: Blue Bird
Chassis: TC2000 Rear engine
Engine: Cummins 8.3; MD3060
Rated Cap: 84
|
Slide out box
The weather is not the best right now, so I decided to spend some time inside my garage. I know one day I will need to build slide out boxes and now is a good time to start.
I need 3 slide out boxes. Living room box is 13'x4'x6'(WxDxH). Kitchen one is 13'x2'x6'. Master bedroom one is queen bed plus few inches by about 4' high.
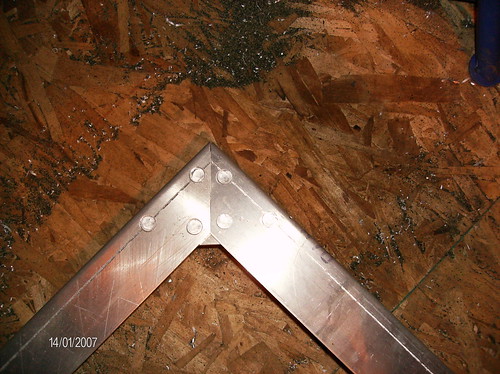
I started from the biggest one. I was thinking about material what to use steel and welds or aluminum and rivets???? Finally I decided to use aluminum and rivets. I calculated how many angles I need and how much they will cost me and decided to go the same way I did with steel angles. I took few 1/8" aluminum sheets to metal fabricating place and they cut and bent a bunch of angles. I use 2"x2" and 1.5"x1.5" angles for box frame. I used 1/4" solid aluminum rivets.
Here is a pile of angles:
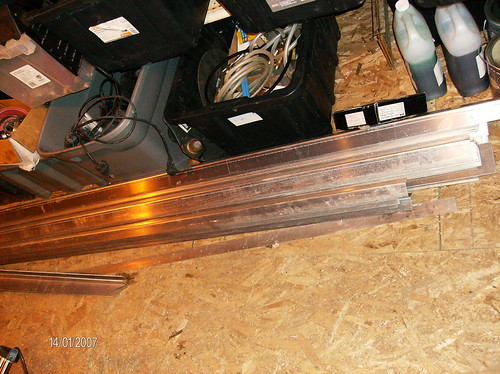
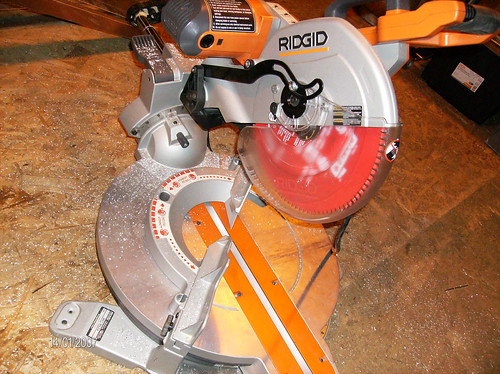
I have 12" sliding Ridgid saw I bought an aluminum blade. This was a very good idea because it cuts aluminum very fast very accurate (especially 45 degree cuts) and clean.
The longest angle I have is 10' long but I need almost 13'... not a problem just added extra angle behind:
Here is front wall frame :

One of the corners:
Window framing:

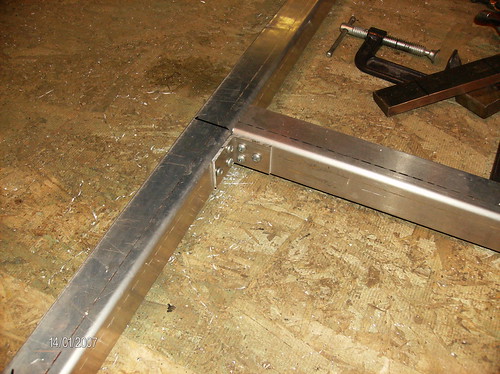
I plan to have 4 vertical windows in front wall of the living room slide out. Here is one of them. It is double glazed RV window:

I ran out of screws for windows framing. I hope to finish this front wall tomorrow....
|
|
|
|
|
12-27-2014, 06:24 AM
|
#50
|
|
Bus Geek
Join Date: Nov 2011
Location: MNT CITY TN
Posts: 5,158
|
Looks good, how will slide work?manual,crank,electric or hydraulic?
__________________
Our build La Tortuga
Accept the challenges so that you can feel the exhilaration of victory.
George S. Patton
|
|
|
|
|
12-27-2014, 09:58 AM
|
#51
|
|
Skoolie
Join Date: Dec 2014
Posts: 170
|
Quote:
Originally Posted by bansil
Looks good, how will slide work?manual,crank,electric or hydraulic?
|
I vote hamster powered.
__________________
https://www.skoolie.net/forums/showthread.php?t=9883 - 7.3L 4x4 Shuttle Bus Toyhauler conversion
|
|
|
|
|
12-27-2014, 01:43 PM
|
#52
|
|
Skoolie
Join Date: Oct 2014
Location: Maple Ridge BC Canada
Posts: 200
Year: 1998
Coachwork: Blue Bird
Chassis: TC2000 Rear engine
Engine: Cummins 8.3; MD3060
Rated Cap: 84
|
Quote:
Originally Posted by bansil
Looks good, how will slide work?manual,crank,electric or hydraulic?
|
I am thinking about using 1.5" hydraulic cylinders to push/pull the slide out steel frame. I am not sure yet how many cylinders per slide out to use. The bottom steel frame is very heavy duty all welded, so I might get away with just one cylinder per slide out in the middle.
I wanted to finish building bottom steel frame first but weather is thinking different 
|
|
|
|
|
12-29-2014, 12:11 AM
|
#53
|
|
Skoolie
Join Date: Oct 2014
Location: Maple Ridge BC Canada
Posts: 200
Year: 1998
Coachwork: Blue Bird
Chassis: TC2000 Rear engine
Engine: Cummins 8.3; MD3060
Rated Cap: 84
|
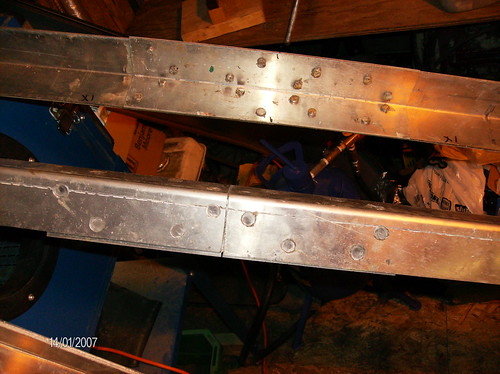
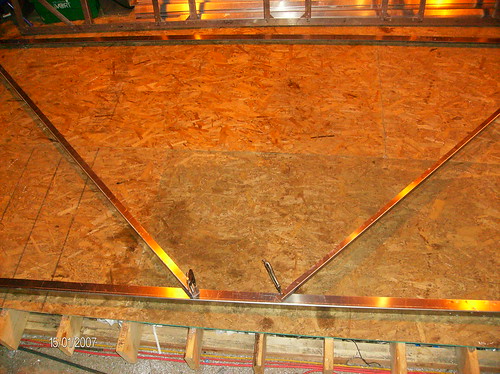
Slide out frame
Here is a small update. I keep building living room slide out frame.
The outside wall frame is done:

The other side:
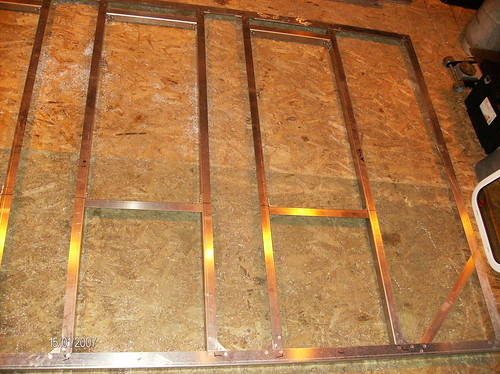
The same frame is up:
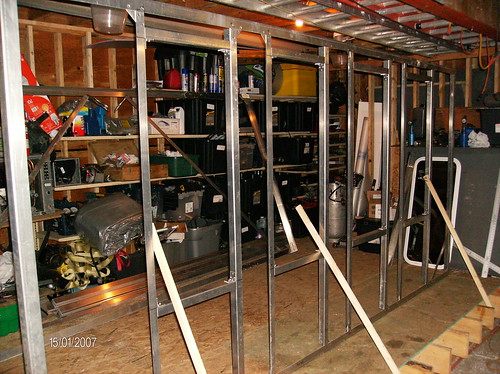
The inside "wall" frame. It is actually just a big opening... I added 2 temp cross brackets to keep it square:
|
|
|
|
|
12-29-2014, 12:20 AM
|
#54
|
|
Skoolie
Join Date: Oct 2014
Location: Maple Ridge BC Canada
Posts: 200
Year: 1998
Coachwork: Blue Bird
Chassis: TC2000 Rear engine
Engine: Cummins 8.3; MD3060
Rated Cap: 84
|
Rivet tool DIY
I use solid aluminum rivets to attach frame members together. I used air chisel and a heavy steel piece:

But after 300 rivets I started thinking about how to make my life easier.... Air chisel works well but it is time consuming and because of strong vibrations I have to clamp everything like crazy.
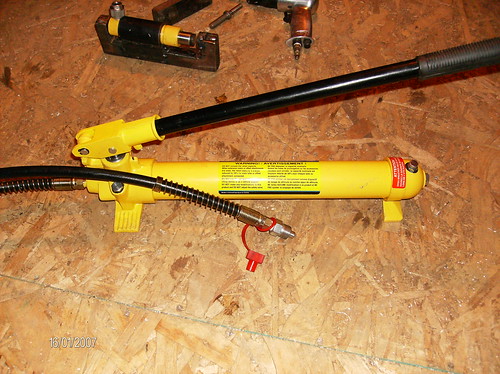
Today I went to Princess Auto (Canadian HF)and bought few bits and pieces: 2 ton mini hydraulic ram, manual hydraulic pump. After I built a heavy "C" frame from 2 layers of 1/2" steel. Here is what I got after couple of hours:
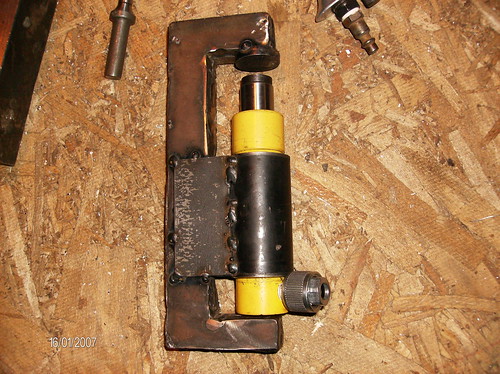

This tool squeezes 1/4" rivets just like nothing with a few pump strokes. Now what used to take minutes now takes seconds.
|
|
|
|
|
12-30-2014, 02:18 AM
|
#55
|
|
Skoolie
Join Date: Dec 2014
Posts: 170
|
once again necessity is the mother of invention. You're gonna have a nice build when this is done, I can already tell.
__________________
https://www.skoolie.net/forums/showthread.php?t=9883 - 7.3L 4x4 Shuttle Bus Toyhauler conversion
|
|
|
|
|
12-30-2014, 02:44 AM
|
#56
|
|
Skoolie
Join Date: Oct 2014
Location: Maple Ridge BC Canada
Posts: 200
Year: 1998
Coachwork: Blue Bird
Chassis: TC2000 Rear engine
Engine: Cummins 8.3; MD3060
Rated Cap: 84
|
Quote:
Originally Posted by headinthetrees
once again necessity is the mother of invention. You're gonna have a nice build when this is done, I can already tell.
|
Thanks...;) Saving money on RV is a good motivator to start skoolie conversion, but it is not enough for most of us here... we love to reinvent the wheel..... 
BTW I checked eBay for hydraulic rivet press tools and was shocked buy price tag $600 and up. The tool I built cost me just under 100 CAD+ 2 hours and it works perfectly.
|
|
|
|
|
12-31-2014, 04:40 PM
|
#57
|
|
Bus Nut
Join Date: Oct 2011
Location: Snowflake, Arizona
Posts: 343
Year: 1996
Coachwork: Blue Bird
Chassis: All American Rear Engine
Engine: C-8.3-300 Cummins MD3060
Rated Cap: 40 Prisoners
|
tools
A man after my own heart. One can never have enough tools. Only addition
to the rivet tool is an air powered pump with a foot pedal so you can have
your hands free to position tool and rivets. Harbor freight makes an air powered pump on a long ram for an engine hoist maybe you could re-purpose the pump unit and save the pumping action for better items like
wrenching and building. You've got a great build going with high quality workmanship, keep up the good work.
|
|
|
|
|
01-02-2015, 02:43 AM
|
#58
|
|
Bus Nut
Join Date: Jul 2014
Posts: 722
Year: 1998
Coachwork: Bluebird
Chassis: TC2000 RE
Engine: 8.3l Cummins
Rated Cap: 78
|
So how come you're not just welding the aluminum frame?
|
|
|
|
|
01-02-2015, 02:41 PM
|
#59
|
|
Skoolie
Join Date: Oct 2014
Location: Maple Ridge BC Canada
Posts: 200
Year: 1998
Coachwork: Blue Bird
Chassis: TC2000 Rear engine
Engine: Cummins 8.3; MD3060
Rated Cap: 84
|
Quote:
Originally Posted by aaronsb
So how come you're not just welding the aluminum frame?
|
I was thinking about welding but aluminium welding is tricky. This are just few things to consider when welding aluminium:
1. Welded aluminium is much weaker near the welds unless heat treated.
2. Tig aluminium welding requires major parts cleaning.
3. Aluminium needs raised seam. In my case because I attach aluminium panels from outside of the box frame I will need to grind seam down and this is a bad idea when it comes to aluminium.
Also when I build the frame I use 1 revet at each corner/ "T", so everything is still "flexible". Then I make sure everything is square and straight, then I add extra rivets.
Using hydraulic rivet tool I made makes riveting is not very time consuming.
If I decided to use steel for a box frame I would definitely weld it all.
|
|
|
|
|
01-02-2015, 02:44 PM
|
#60
|
|
Skoolie
Join Date: Oct 2014
Location: Maple Ridge BC Canada
Posts: 200
Year: 1998
Coachwork: Blue Bird
Chassis: TC2000 Rear engine
Engine: Cummins 8.3; MD3060
Rated Cap: 84
|
Quote:
Originally Posted by Dragonpop
A man after my own heart. One can never have enough tools. Only addition
to the rivet tool is an air powered pump with a foot pedal so you can have
your hands free to position tool and rivets. Harbor freight makes an air powered pump on a long ram for an engine hoist maybe you could re-purpose the pump unit and save the pumping action for better items like
wrenching and building. You've got a great build going with high quality workmanship, keep up the good work.
|
I use air/hydraulic pump since day 2 (day 1 made me thinking about it) I started using this hydraulic tool. It saves hours and hours of time and elbow grease....
|
|
|
|
|
|
 Posting Rules
|
You may not post new threads
You may not post replies
You may not post attachments
You may not edit your posts
HTML code is Off
|
|
|
|
 » Recent Threads
 |
|
|
|
|
|
|
|
|
|
|
|
|
|
|
|
|
|
|
|
|
|
|
|
|
|
|
|
|
|
|
|
|
|
|
|
|
|


 Linear Mode

