 |
|
 03-30-2020, 02:33 PM
|
#1
|
|
Mini-Skoolie
Join Date: Mar 2020
Location: Linden, Iowa
Posts: 20
Year: 2004
Coachwork: Thomas Built
Chassis: Freightliner FS65
Engine: Cat 3126
Rated Cap: 71
|
"Andee" the Toy Hauler
Howdy Everyone,
Just starting a thread for my conversion project "Andee"
2004 Thomas built 71 passenger on FS65 chassis w/ CAT 3126 and Allison 2000 series transmission. Picked it up for 3k from a fella 20 minutes away from my home.
Basic goal of the project is to take the bus, and turn it into a "barebones" camper and toy hauler. Outside of that, not too many defined plans at this point.
I'll try to document the process as much as I can, but no promises i'll post every little detail! hopefully something I post at some point is helpful to someone else down the road.
that's it for now. pictures of bus to follow
__________________
Chris
|

|

|
|
03-30-2020, 02:39 PM
|
#2
|
|
Mini-Skoolie
Join Date: Mar 2020
Location: Linden, Iowa
Posts: 20
Year: 2004
Coachwork: Thomas Built
Chassis: Freightliner FS65
Engine: Cat 3126
Rated Cap: 71
|
[IMG]/https://photos.google.com/photo/AF1QipNWSvaZOS34rGaitP4Q8GviBr5FjsZaZ8dLOVUs[/IMG]

my cat Ragu is the lil fluffball in the corner of this one

came with all the seats.. fun

A few of the seats out. used angle grinder and cut the tops of the bolts off as far down as I could, then put a bottle jack under the seat to pop it off all the way. That was at the center aisle. The side rails were easy, just a couple bolts.
__________________
Chris
|
|
|
|
|
03-30-2020, 03:01 PM
|
#3
|
|
Mini-Skoolie
Join Date: Mar 2020
Location: Linden, Iowa
Posts: 20
Year: 2004
Coachwork: Thomas Built
Chassis: Freightliner FS65
Engine: Cat 3126
Rated Cap: 71
|
__________________
Chris
|
|
|
|
|
03-30-2020, 03:13 PM
|
#4
|
|
Mini-Skoolie
Join Date: Mar 2020
Location: Linden, Iowa
Posts: 20
Year: 2004
Coachwork: Thomas Built
Chassis: Freightliner FS65
Engine: Cat 3126
Rated Cap: 71
|
__________________
Chris
|
|
|
|
|
03-30-2020, 03:22 PM
|
#5
|
|
Mini-Skoolie
Join Date: Mar 2020
Location: Linden, Iowa
Posts: 20
Year: 2004
Coachwork: Thomas Built
Chassis: Freightliner FS65
Engine: Cat 3126
Rated Cap: 71
|


not exactly the least rusty floor, but not the most. 2 corners around wheel wells were rusted thru but I'm just going to patch over with metal on the inside then fill the hole w/ great stuff foam and smooth over w/ bondo then flex seal on the outside.

this is the floor after taking a wire wheel to the rust spots, and pressure washing

here it is after using some Krud Kutter rust converter on it, and filling holes with dynaflex sealant.
__________________
Chris
|
|
|
|
|
03-30-2020, 03:25 PM
|
#6
|
|
Mini-Skoolie
Join Date: Mar 2020
Location: Linden, Iowa
Posts: 20
Year: 2004
Coachwork: Thomas Built
Chassis: Freightliner FS65
Engine: Cat 3126
Rated Cap: 71
|

rusty metal primer down.

here's the day after the first coat of rustoleum paint. I forget the exact type. will look it up and post later.
Also will post a few pictures and some more words about getting the cruise control working. when I get time.
__________________
Chris
|
|
|
|
|
03-30-2020, 04:34 PM
|
#7
|
|
Bus Crazy
Join Date: Aug 2019
Location: Moved to Zealand!
Posts: 1,517
Year: 2002
Coachwork: Thomas
Chassis: Freightliner FS-65
Engine: 7.2L Cat 3126 turbo diesel
Rated Cap: 71 passenger 30,000 gvwr
|
So that's what they look like all cleaned up and not all graffitied?! 
Very nice!
What kinda "toys"? Will you be doing a ramp on the back?
|
|
|
|
|
03-31-2020, 02:19 PM
|
#8
|
|
Mini-Skoolie
Join Date: Mar 2020
Location: Joshua Tree, California, USA
Posts: 17
|
DO you plan on insulating the interior?
|
|
|
|
|
04-04-2020, 10:19 AM
|
#9
|
|
Mini-Skoolie
Join Date: Mar 2020
Location: Linden, Iowa
Posts: 20
Year: 2004
Coachwork: Thomas Built
Chassis: Freightliner FS65
Engine: Cat 3126
Rated Cap: 71
|
Quote:
Originally Posted by banman

So that's what they look like all cleaned up and not all graffitied?!
Very nice!
What kinda "toys"? Will you be doing a ramp on the back? |
Graffiti? The wonderful kids of Ankeny Iowa would never dream of defacing public property!
Priority number one for the toys is dirtbikes. I take a trip most summers out to colorado to ride with some buddies. (3) bikes + gear for a week gets really tight in the back of a pickup. I'm not certain of how much space i'm commiting to the garage area of the bus (hovering around 8') but I'm thinking you could get creative with arrangement and fit at least 5 back there at a time.
Priority number two is an ATV or two. This would require expanding the back door. That's what she said.
I wouldn't mind being able to chuck a couple kayaks in the back as well, but that's low on the list because it would be just as easy to mount those on the roof.
__________________
Chris
|
|
|
|
|
04-04-2020, 10:29 AM
|
#10
|
|
Mini-Skoolie
Join Date: Mar 2020
Location: Linden, Iowa
Posts: 20
Year: 2004
Coachwork: Thomas Built
Chassis: Freightliner FS65
Engine: Cat 3126
Rated Cap: 71
|
Quote:
Originally Posted by ben_marko
DO you plan on insulating the interior?
|
yes I do. I think that will be one of my next steps. Not the best at planning, but I probably should layout my course of action here pretty soon, before I get ahead of myself with one step! I think traditionally (like building a house) electrical and plumbing come before insulation.. not sure if going the reverse for the bus will cause me lots of pain. I'm not planning on having a ton of plumbing, but there will be electrical, and probably a few lines for LP since I want to run a generator, stove, and possibly furnace) I'm leaning towards a spray foam for the walls and roof. Floor I'm going to go rigid, the pink stuff. Any recommendations from yourself?
Per earlier comments about hauling toys/back ramps/expanding the door, here is my preferred idea for expanding the back door. I feel like doing a full back end ramp/opening is going to be more trouble than its worth for what I want to haul. For loading I think I'm just going to get a decent set of 12' long folding ramps and position the bus to lower the back end a bit.
https://atvconnection.com/forums/att...331bus0003.jpg
I've got a neighbor who also rides and is excited to help with this part of the project, so I think it will be one of the next steps.
__________________
Chris
|
|
|
|
|
04-04-2020, 10:35 AM
|
#11
|
|
Mini-Skoolie
Join Date: Mar 2020
Location: Linden, Iowa
Posts: 20
Year: 2004
Coachwork: Thomas Built
Chassis: Freightliner FS65
Engine: Cat 3126
Rated Cap: 71
|
__________________
Chris
|
|
|
|
|
04-04-2020, 10:55 AM
|
#12
|
|
Mini-Skoolie
Join Date: Mar 2020
Location: Linden, Iowa
Posts: 20
Year: 2004
Coachwork: Thomas Built
Chassis: Freightliner FS65
Engine: Cat 3126
Rated Cap: 71
|
as promised - some info on getting cruise control up and running
a big help in this was this thread:
https://www.skoolie.net/forums/f33/c...a-26329-6.html
I found this youtube video helpful as well:
I'm not a seasoned vet at electrical issues - i usually avoid them at all costs, but I've done a bit of wiring on my house, the 4 wheelers/dirt bikes, and the tractor. Looking back this one really wasn't that big of a hassle, but of course everything is challenging the first time you do it. Gotta hit your head against problems for a bit until the answer comes to you.
Things you will need: multimeter, multistrand wire (i think 18 ga to match, I had heavier on hand so I used it), electrical connectors, tape, the CC switches, a positive attitude, beverage of choice, flashlight.
OK
step 1) took bus to CAT dealer so they could hook up computer and change ECM parameters. from what I understand CC is always "enabled" but the computer is set to not allowing it to be funtional until like 127 MPH. Get them to switch that parameter to 25 or 30 MPH. See video above - you may be able to get the ECM CC pin locations from the software at this point.
While I was there I also had them turn off my speed governor (now Andee tops out at about 74) and turn my automatic idle shuttoff timer to an hour (it was 10 minutes before)
step 2) bought switches. I bought a couple aftermarket Dorman switches, one for set/resume/coast/acc. and the other for on/off. all in all about $85. You can probably find something cheaper out there
step 3) open the hood, rearrange a few things for easier access, and get your cab controls to ECM connector disconnected. This is on the drivers side and it is the closer 70 pin connector to the driver.

it's buried. not too fun to get to. in the above pic you are standing at front drivers side wheel looking back and accross the bus. see the yellow dipstick? follow that bad boy down the side of the engine. it's gonna be right by the ECM connector you need.
__________________
Chris
|
|
|
|
|
04-04-2020, 11:18 AM
|
#13
|
|
Mini-Skoolie
Join Date: Mar 2020
Location: Linden, Iowa
Posts: 20
Year: 2004
Coachwork: Thomas Built
Chassis: Freightliner FS65
Engine: Cat 3126
Rated Cap: 71
|

there she is all disconnected.
you need a hex key to disconnect. giant pain in the hiny. the bolt is centered in the connector... right between all of the wires....

alright neat, we're disconnected. at this point I looked to see if the electrical "pin" connectors were in the spots the other thread said they were.
sure enough I had pins at 5 (i think all should have this since it is also used for throttle position sensor), 59 (cruise enable), 44 (cruise resume), and 36 (cruise set). see earlier note about the CAT software telling you which pins are where (i learned about that after I was done at CAT, but maybe helpful to you.)
step 4) follow that ECM cab control connector wire bunch up to where it connects to the cab at the firewall. Mine was on the passenger side, about even with top of engine. disconnect this. Use your multimeter and find out which wires line up with the ones you need. Mark them.

My connector was of course the lower, harder to get to connector pictured.
step 5) Rip into the dash from the inside of the bus. Really not too many coverings to pull off to get access. the more you pull off the easier it is to work.
I'm not a fan of dustbunnies, hairs, rodents, gross kid germ stuff. It was a nightmare back there.

have gloves and a shop vac handy.
step 6) find where that connector from engine side lines up on the interior.
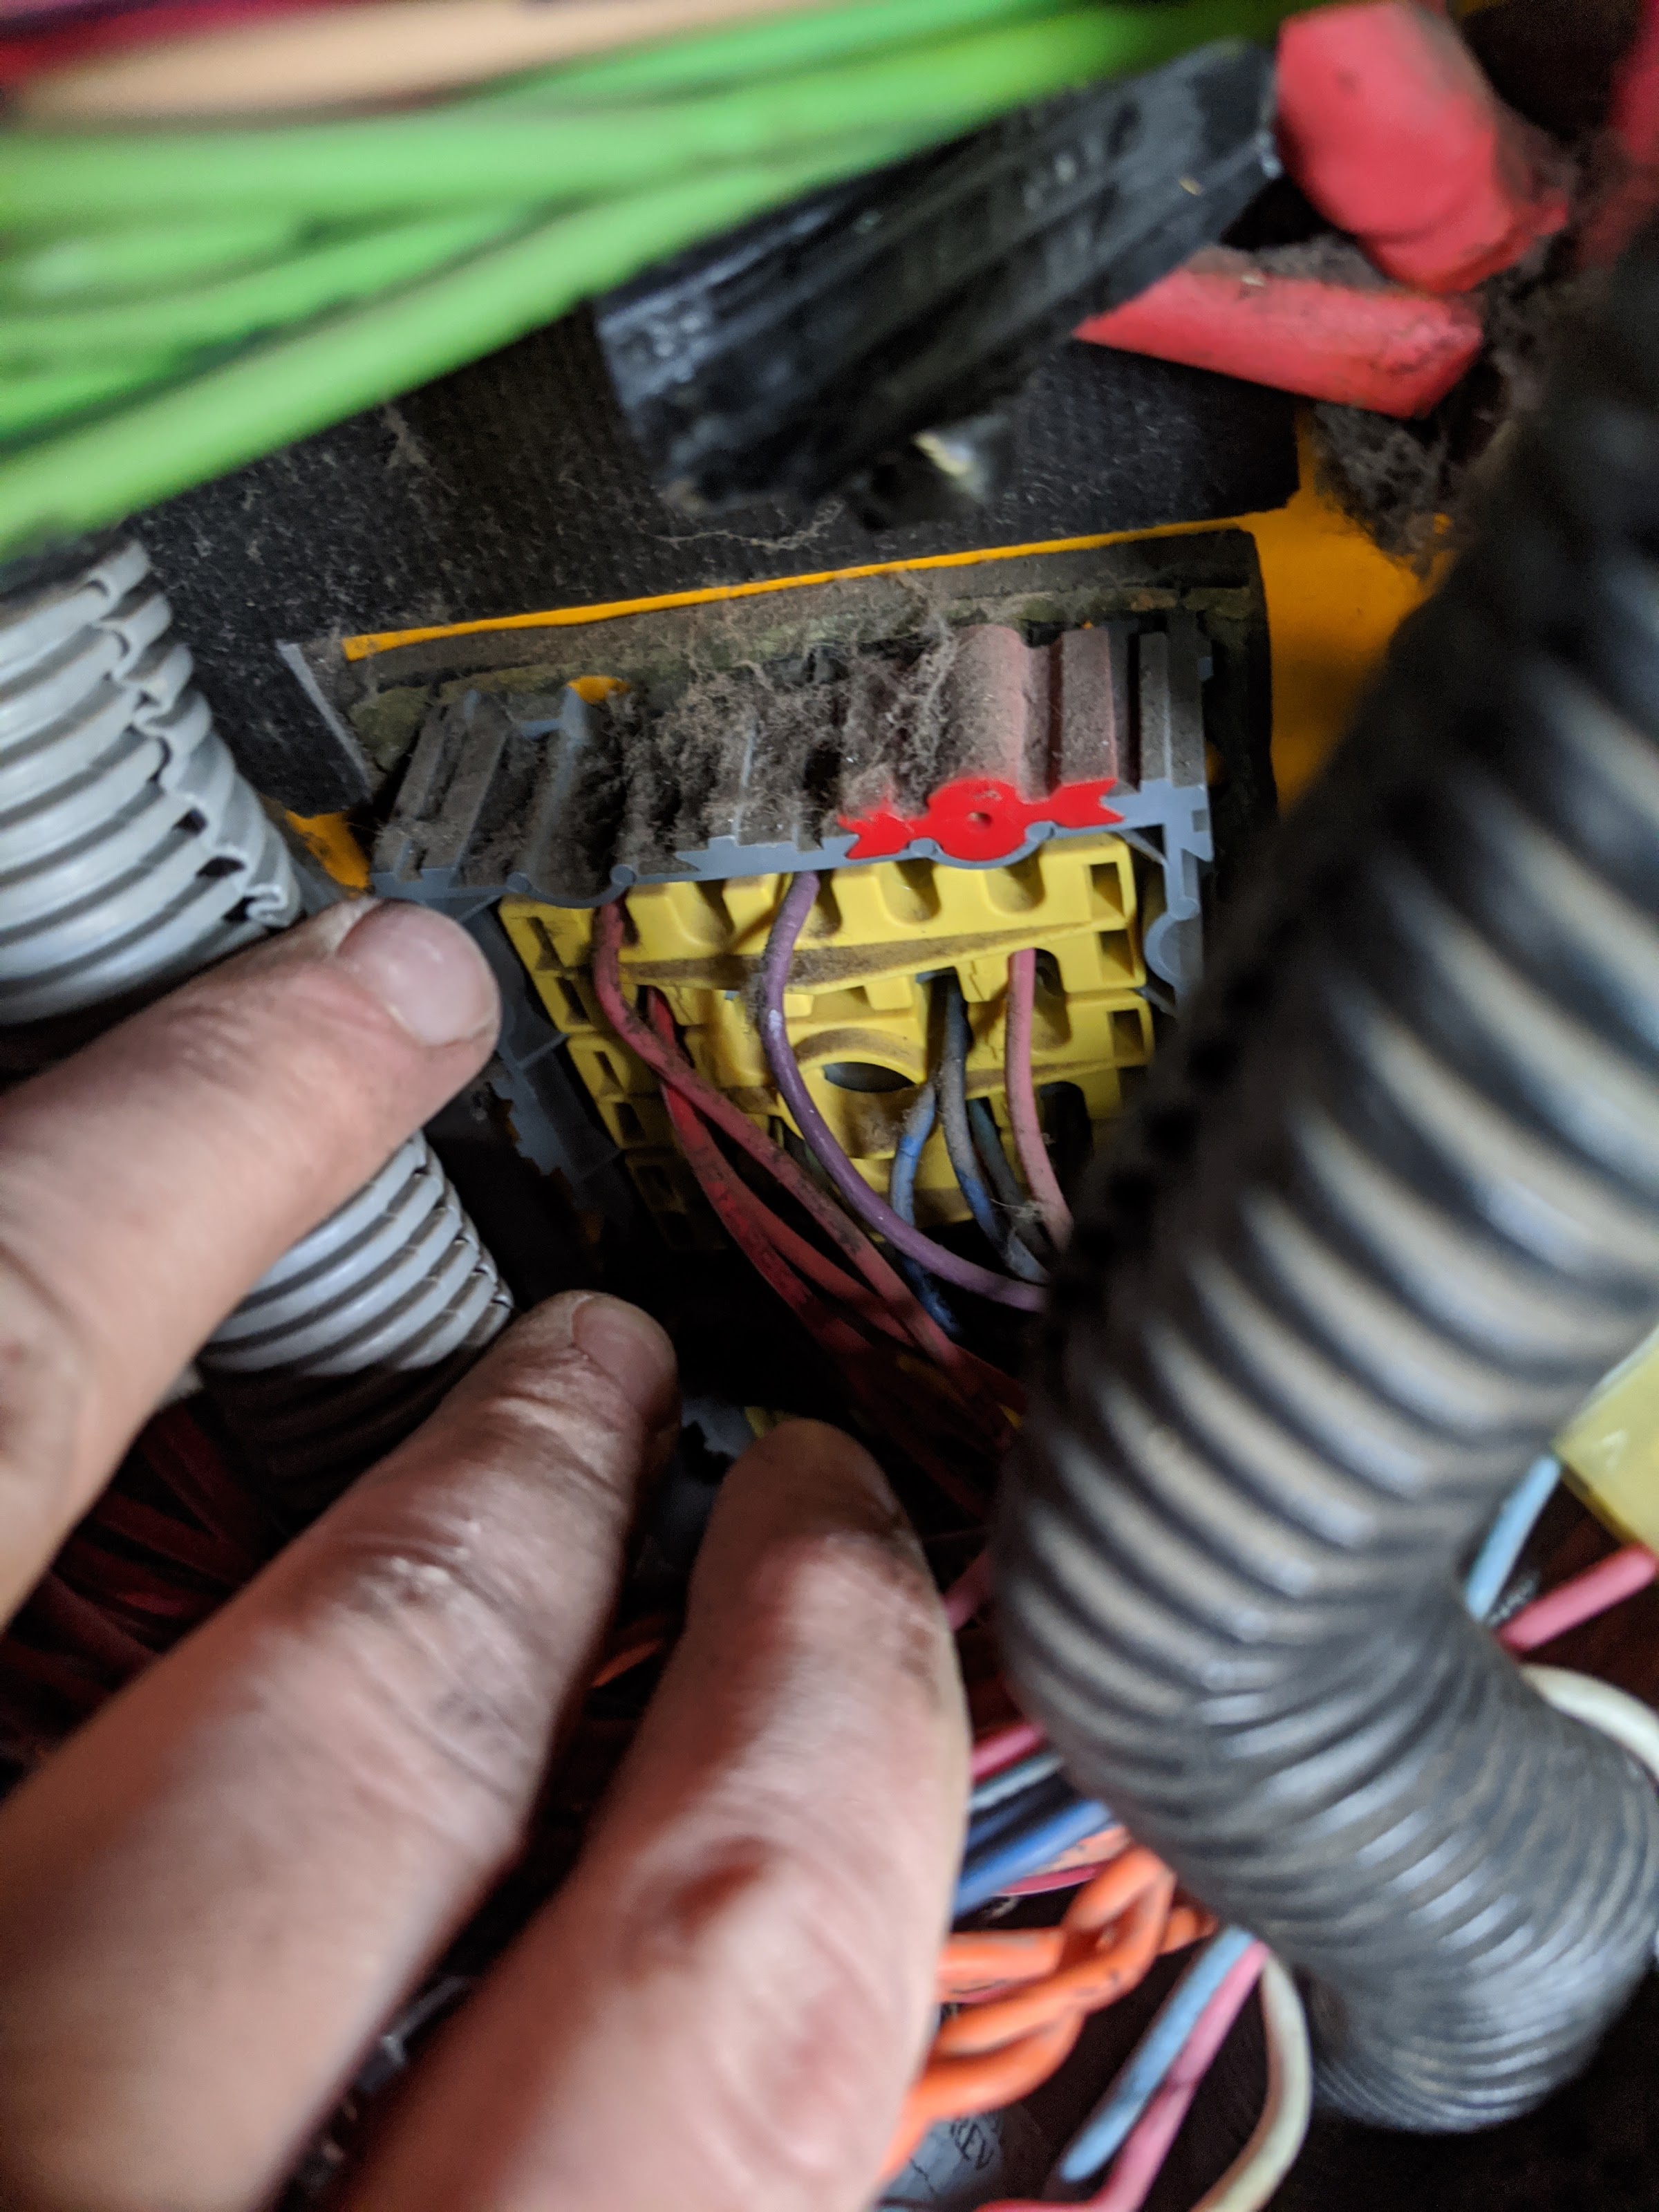
its buried. in this pic you are actually looking at the connector that is above the one I needed. Hard to get a pic of the lower one.
OK now knowing which wires on the outside connector are the ones you need, you should be able to look at the backside of the interior connector and tell if they pass thru or not.
3 of my wires did not. the only wire that did was for pin #5 since it is a common wire used for other circuits, i.e. TPS
__________________
Chris
|
|
|
|
|
04-04-2020, 11:27 AM
|
#14
|
|
Bus Crazy
Join Date: Aug 2019
Location: Moved to Zealand!
Posts: 1,517
Year: 2002
Coachwork: Thomas
Chassis: Freightliner FS-65
Engine: 7.2L Cat 3126 turbo diesel
Rated Cap: 71 passenger 30,000 gvwr
|
I see all your bulkhead connections are as corroded as mine were...
Take the time to remove / clean/ grease / reinstall.
(I was motivated by a "no start" condition but why wait...)
|
|
|
|
|
04-04-2020, 11:42 AM
|
#15
|
|
Mini-Skoolie
Join Date: Mar 2020
Location: Linden, Iowa
Posts: 20
Year: 2004
Coachwork: Thomas Built
Chassis: Freightliner FS65
Engine: Cat 3126
Rated Cap: 71
|
step 7) since 3 of my wires didn't run thru the firewall I had to add them. I didn't want to dick with the fancy CAT connector anymore since they were hard to get to and I didn't know what I was dealing with there. So I cut the 3 wires I needed on the engine side, and spliced in 3 new wires. I drilled a 1/2" dia. hole thru the firewall, just above the other 2 big connectors, and ran the new wires thru that.
to make sure that metal edge doesn't wear thru the wires, I made a little tube out of some of that rubbery stuff you line kitchen cabinets with and passed the wires thru that at the hole. Glued it up there so it shouldn't move away.
Not too many pics at this point cause things all happened fast!
step 8 ) run those 3 wires up to the dash where you will be connecting your switches.
step 9) Find your 4th wire (the common wire from pin #5) somewhere on the interior and splice in. I had a lot of extra length of wire at the TPS, so I made my splice there. Group that new wire in with your other 3 up at the dash.
step 10) you need a lead from that common wire to both switches, so make a jumper wherever is easiest
step 11) wire in your switches. Can be a pain depending on how your switches are set up and how much of a perfectionist you are. Getting the CC to work right was easy, getting the CC to work right and the lighted switches to work/function the way I thought they should function (indicator light on CC on/off switch only on when the switch is set to on) was a different story. but anything is possible with beer and infinite time.
my switches had the control lights in them as well, that part of it was super easy to get. my bus actually had 2 sets of extra wires for this behind the instrument panel. All I had to do was connect them.
while wiring up the switches the dash lights will work whenever, but the CC wires are only hot when the engine is on. So for verifying things are put in correct you need to start that puppy up. with the bus running I was able to test out the CC while parked by turning it on then fiddling with it. I think the ECM treats it the same as an idle speed adjuster when the parking brake is set.


the right side of my instrument panel was pretty crowded, and the left side was completely blank. So I took that metal plate off, went inside and took a dremel to it. Slapped some spray paint on it and I don't think it looks too bad.
step 12) sober up
step 13) take the bus out and really test your handy work. pull up next to a pretty lady (or dude, IDC) at a stop light, give em a little smile, and tell em what you just did with your brain and brawn. Perhaps a new friend, perhaps more than that.. depends on if you washed up during step 12 I suppose
long winded. hopefully this helps someone else out. thats all
__________________
Chris
|
|
|
|
|
04-04-2020, 10:43 PM
|
#16
|
|
Bus Geek
Join Date: Sep 2015
Posts: 3,856
Year: 2002
Coachwork: Thomas Built Bus
Chassis: Freightliner FS65
Engine: Caterpillar 3126E Diesel
Rated Cap: 71 Passenger- 30,000 lbs.
|
Thank you for posting your step-by-step for cruise control. It may have inspired me to do it before our next trip!
|
|
|
|
|
04-05-2020, 12:05 PM
|
#17
|
|
Mini-Skoolie
Join Date: Mar 2020
Location: Linden, Iowa
Posts: 20
Year: 2004
Coachwork: Thomas Built
Chassis: Freightliner FS65
Engine: Cat 3126
Rated Cap: 71
|
Quote:
Originally Posted by banman
I see all your bulkhead connections are as corroded as mine were...
Take the time to remove / clean/ grease / reinstall.
(I was motivated by a "no start" condition but why wait...)
|
Banman, probably wouldn't hurt but I'm also I believer in if it ain't broke don't fix it!
__________________
Chris
|
|
|
|
|
04-05-2020, 12:08 PM
|
#18
|
|
Mini-Skoolie
Join Date: Mar 2020
Location: Linden, Iowa
Posts: 20
Year: 2004
Coachwork: Thomas Built
Chassis: Freightliner FS65
Engine: Cat 3126
Rated Cap: 71
|
Quote:
Originally Posted by Native
Thank you for posting your step-by-step for cruise control. It may have inspired me to do it before our next trip!
|
Do it buddy. Really not that terrible of a job. I can't imagine driving a long trip without CC. You can pm me for any more details or questions u come up with if you go for it
__________________
Chris
|
|
|
|
|
04-05-2020, 06:42 PM
|
#19
|
|
Bus Geek
Join Date: Sep 2015
Posts: 3,856
Year: 2002
Coachwork: Thomas Built Bus
Chassis: Freightliner FS65
Engine: Caterpillar 3126E Diesel
Rated Cap: 71 Passenger- 30,000 lbs.
|
Quote:
Originally Posted by Ctharre
Do it buddy. Really not that terrible of a job. I can't imagine driving a long trip without CC. You can pm me for any more details or questions u come up with if you go for it
|
At the present time, I think the biggest hurdle may be the switches. I'll have to start an online search. I know the local Freightliner dealer has them, but I believe they were more than you spent ... or I may have a faulty memory. Well, I do have a faulty memory but it may or may not come into play when remembering how much they were a few months ago. At least I have the "lowest cruise speed" setting at 15 MPH or so. I had that done at my last PM at the CAT dealer. 
|
|
|
|
|
04-06-2020, 08:33 PM
|
#20
|
|
Mini-Skoolie
Join Date: Mar 2020
Location: Linden, Iowa
Posts: 20
Year: 2004
Coachwork: Thomas Built
Chassis: Freightliner FS65
Engine: Cat 3126
Rated Cap: 71
|
https://www.ebay.com/itm/Dorman-901-...EAAOSw2CRdZ43a
https://www.ebay.com/itm/Dorman-901-....c100005.m1851
those are essentially what I got. I'm not sure it says anywhere that it is the correct fit for our make/model/year, but a switch is a switch for the most part. I'm partial to Ebay, but I think if you just google "dorman cruise control switch" you could find some for even cheaper
__________________
Chris
|
|
|
|
|
|
 Posting Rules
|
You may not post new threads
You may not post replies
You may not post attachments
You may not edit your posts
HTML code is Off
|
|
|
|
 » Recent Threads
 |
|
|
|
|
|
|
|
|
|
|
|
|
|
|
|
|
|
|
|
|
|
|
|
|
|
|
|
|
|
|
|
|
|
|
|
|
|


 Linear Mode

