Journey with Confidence RV GPS App RV Trip Planner RV LIFE Campground Reviews RV Maintenance Take a Speed Test Free 7 Day Trial ×


Reply
 
Thread Tools Display Modes
 
Old 02-23-2014, 04:09 PM   #21
Mini-Skoolie
 
Join Date: Feb 2014
Posts: 65
Year: 2001
Coachwork: bluebird
Chassis: bluebird
Engine: 5.9 Cummins
Rated Cap: 16
Re: Betsy

Nope, it's definitely a TC2000. The 1000 has different roof caps that look the same as Bluebird uses on the airport shuttle buses, also I think I read somewhere that it was only available with 19.5"rubber.

I agree it is absolutely an oddly specced bus. I mean come on, it's a 10 window bus that has a seating capacity of 16. That's what it actually says on the body tag Bluebird put in it. There is only one other bus set up for that many wheelchairs in the country for sale right now but it had more rust than the one I bought.....

I do not have any pictures I took yet. But that odd sister I mentioned is still for sale. Here http://www.midwesttransit.com/Bus-Searc ... p?i=100028

I would like to state for the record that while I did buy it from this dealership, I did not pay anywhere near that for it.

orangepeel91 is offline   Reply With Quote
Old 02-24-2014, 03:37 PM   #22
Mini-Skoolie
 
Join Date: Feb 2014
Posts: 65
Year: 2001
Coachwork: bluebird
Chassis: bluebird
Engine: 5.9 Cummins
Rated Cap: 16
Re: Betsy

Nope, that's what Bluebird did with the TC1000.

My bus has low profile 22.5" tires now but was built with 10R22.5".

Bluebird raised the steel floor themselves. Stuck my head under it when I had the dealership pull it into the shop so we could inspect the bottom. The sheet metal underneath has a rise in it that matches the one on the floor inside. There is no bridge between wheel wells. There are no wheel wells under the bus. The sheet metal part except for the ridges that are built in is flat from the front tires to the rear bumper.
orangepeel91 is offline   Reply With Quote
Old 02-24-2014, 08:23 PM   #23
Moderator
 
crazycal's Avatar
 
Join Date: Feb 2007
Location: NUNYA
Posts: 4,236
Year: 1995
Coachwork: Thomas
Chassis: 3800
Engine: DT408, AT545
Rated Cap: 23 500 gvw
Re: Betsy

So your floor looks like this?

__________________
I'm hungry!

You Gotta Let Me Fly
crazycal is offline   Reply With Quote
Old 02-25-2014, 01:23 PM   #24
Bus Nut
 
PDBreske's Avatar
 
Join Date: Sep 2010
Location: Ocala, FL
Posts: 635
Year: 1995
Coachwork: Bookmobile body by Farber
Chassis: International 3800
Engine: Navistar DT466/Alison MT643
Rated Cap: 1
Re: Betsy

Does that mean you have an extra five or six inches of room under the floor for tanks/storage/etc? That’s kinda nice.
PDBreske is offline   Reply With Quote
Old 02-25-2014, 05:22 PM   #25
Mini-Skoolie
 
Join Date: Feb 2014
Posts: 65
Year: 2001
Coachwork: bluebird
Chassis: bluebird
Engine: 5.9 Cummins
Rated Cap: 16
Re: Betsy

Yes. The link I posted is to the same dealer I bought my bus from. The bus in the ad is the sister bus to mine. Different miles but otherwise they are the same. Dealership listed the seating cap at 16 but the bus itself lists 17. 10 seated 7 wheelchairs. My floor looks just like that. No wheel wells at all.

I do have plenty of room for under body storage. There is 20" of sheet metal below the floor level. Of course as with every other schoolbus on planet Earth the rear wheels are going to make plumbing fun. I wish they were 2' farther back. Heck even another 12" would be handy.

In all honesty my initial hope was that bluebird had gone cheap and used a standard metal floor with wheel wells and just added wood spacers or something and raised the plywood and rubber above the wheels, but no such luck. They raised the metal too. I have more room under for tanks etc, but If the bus had been built with a false floor I could have removed it and gained all sorts of headroom. Oh well.
orangepeel91 is offline   Reply With Quote
Old 04-29-2014, 08:55 PM   #26
Mini-Skoolie
 
Join Date: Feb 2014
Posts: 65
Year: 2001
Coachwork: bluebird
Chassis: bluebird
Engine: 5.9 Cummins
Rated Cap: 16
Re: Betsy

Well I finally did some work on the bus today.
First time my buddy has been able to come over and help. Got the seats and divider things out, you know the upholstered bulkheads that keep the front row from falling into the step well when the driver hits the brakes?
Only had to grind off four of the bolts. The rest we got out with hand tools.
Started pulling up the rubber a bit too. Like most others I have rotten plywood. Not too terrible but at least my plans have always included removing the original plywood so I'm not exactly heart broken about it. The real joy is going to be removing the seatbelt track for the wheelchairs. That for those who may not be absolutely positive was sarcasm. Each section of track has a big fat allen head bolt every 6 inches or so. I had an allen wrench that fit em, but turning one is a whole different story. Hopefully they go all the way through the floor like the normal bolts did.
I have a truck show this weekend and the wifes birthday the next weekend so I won't be finding out just what a nightmare those turn out to be for 2 weeks. If I can get my buddy over again.
Then it will be pull up the plywood time. Once that's up I get to go buy new materials! Yay. Yup, plywood. Which will be covering the windows while I cut off the rivits holding up the ceiling panels. That will get me access to replace the factory insulation and find the one leak I seem to have which leaves a puddle about a foot from the rear door a little to the drivers side.
in other news I seem to have a moving van type ramp for the back door. Have absolutely no idea how to get it out, I suspect the rear bumper was replaced because there is no way to move it like a hinge for example and definitely no slot for it to extend through. Sure would be handy if I can figure out how to deploy it.
The carriage bolts holding the lift in will have to be ground off. Again this is going to be fun given all the rust there. The rust is on the lift base itself. As much steel is in that thing I think I'll haul it to the scrap yard my self. Getting that bad boy into my pickup is going to be a joy. Of course by the time I get it out I may well be entirely out of give a damn and just let the neighborhood scrapper take it. I have to admit I figure the easiest way to actually remove it from the bus is once the fasteners are removed just pull to the end of the driveway, open the door and give it a shove. But That's most likely 3rd week of may or so. Maybe I'll get inspired and grind the bolts after work tomorrow in celebration of my last day on day shift. until June anyway.
orangepeel91 is offline   Reply With Quote
Old 04-29-2014, 09:32 PM   #27
Mini-Skoolie
 
wash with gasoline's Avatar
 
Join Date: Nov 2012
Location: SoCal
Posts: 12
Re: Betsy

Those wheelchair mounts were the worst thing to remove on my whole tear down.
Ended up having to use the angle grinder and just grind down threw all the heads and then use a big pry bar to pop them off. ...sucked
__________________
Dry with match
wash with gasoline is offline   Reply With Quote
Old 05-04-2014, 08:24 PM   #28
Mini-Skoolie
 
Join Date: Feb 2014
Posts: 65
Year: 2001
Coachwork: bluebird
Chassis: bluebird
Engine: 5.9 Cummins
Rated Cap: 16
Re: Betsy

Sorry Nat but not happening unless I can do it from my flickr account.
But at the moment there's nothing worth taking a picture of.
The seats are no longer attached to the bus, but they are all still in it. My buddy wanted to take a couple but the day he came over the only vehicle he had with enough fuel in it to make the trip to my house was his VW. this weekend I had a truck show out of state and my wife has plans for my other day off so looks like nothing going for another week.
orangepeel91 is offline   Reply With Quote
Old 05-04-2014, 09:06 PM   #29
Mini-Skoolie
 
Join Date: Feb 2014
Posts: 65
Year: 2001
Coachwork: bluebird
Chassis: bluebird
Engine: 5.9 Cummins
Rated Cap: 16
Re: Betsy

I agree with both of your sentiments. It's just that I've had my flickr account for several years. maybe I'll start a photobucket account strictly for the conversion. No promises yet though.
orangepeel91 is offline   Reply With Quote
Old 05-04-2014, 10:06 PM   #30
Bus Crazy
 
Join Date: Nov 2011
Location: Sault Ste. Marie, Ontario
Posts: 1,793
Year: 1997
Coachwork: Thomas
Chassis: B3800 Short bus
Engine: T444E
Rated Cap: 36
Re: Betsy

Flickr works fine. I use flickr for posting my pictures to these forums since I don't like Photobucket's interface.

When you click to view an image in Flickr there will be a "Share" icon on the right hand side. It looks like a square with an arrow pointing out of it. After clicking on it a pop-out box will appear. Click the "BB Code" link then select the image size. I prefer "Medium 640x480" or "Medium 500x374". Copy the text below the link into your post and the image will magically appear when you click "Preview" or "Submit".

The code for posting will look something like this:
Code:
IMG_20140313_122528 by kahtavajesse, on Flickr
__________________
My build page: Armageddon - The Smell of Airborne Rust
jazty is offline   Reply With Quote
Old 05-05-2014, 12:34 PM   #31
Bus Geek
 
Tango's Avatar
 
Join Date: Mar 2011
Location: Houston, Texas
Posts: 8,462
Year: 1946
Coachwork: Chevrolet/Wayne
Chassis: 1- 1/2 ton
Engine: Cummins 4BT
Rated Cap: 15
Re: Betsy

I prefer Flickr myself but hate the BS little icons the geeks come up with. They have twice shuffled them around over the past two months because so many people complained. There were even a number of Blogs that sprang up dedicated to trying to sort out the WTF aspect of the changes. OK once you get the gag but a really stupid and unnecessary move on Flickrs' part. The old system was one anyone could understand.
Tango is offline   Reply With Quote
Old 05-05-2014, 06:19 PM   #32
Mini-Skoolie
 
Join Date: Feb 2014
Posts: 65
Year: 2001
Coachwork: bluebird
Chassis: bluebird
Engine: 5.9 Cummins
Rated Cap: 16
Re: Betsy

Tango, thanks much for the flckr version of the photo sharing directions. I will be using this when there's something worth taking a picture of. I can't imagine anyone is interested in the inside of a bus where the seats have been removed from their factory location but are still piled inside.
Still have to get my buddy over again so we can get the wheelchair tiedown tracks out. Since the bus had 7 wheelchair spaces and tiedowns for an 8th under one of the seats there are a crapload of those things. I haven't counted but there are definitely at least two for each space, just on the floor. At least the track on the walls didn't rust. Ok so nobody mops the walls unless some kid pukes on it and that almost never happens ABOVE the windows.

On a separate note I'm right with you on the changes flickr has made. Downloading others pics is a lot more difficult than it used to be. Especially if you need to rename the file. I download a lot of truck pics and I prefer to store them by owner and fleet number. I have to rename almost all of them. It was easier when you could see the original version on the screen while doing it and not just the large version while still downloading the big one. It was easier to read the info on the door.
orangepeel91 is offline   Reply With Quote
Old 05-05-2014, 07:46 PM   #33
Bus Geek
 
Tango's Avatar
 
Join Date: Mar 2011
Location: Houston, Texas
Posts: 8,462
Year: 1946
Coachwork: Chevrolet/Wayne
Chassis: 1- 1/2 ton
Engine: Cummins 4BT
Rated Cap: 15
Re: Betsy

Quote:
Originally Posted by orangepeel91
I can't imagine anyone is interested in the inside of a bus where the seats have been removed from their factory location but are still piled inside.
Are you kiddin'! That's just the kind of image that gets this crowd all wet & giggly!
Tango is offline   Reply With Quote
Old 05-09-2014, 10:49 AM   #34
Mini-Skoolie
 
Join Date: Feb 2014
Posts: 65
Year: 2001
Coachwork: bluebird
Chassis: bluebird
Engine: 5.9 Cummins
Rated Cap: 16
Re: Betsy

To quote the not so great Homer Simpson Doh!
Thank you Jatsy for posting the flickr version of the directions and to Nat for pointing out my error.
orangepeel91 is offline   Reply With Quote
Old 05-12-2014, 11:19 PM   #35
Mini-Skoolie
 
Join Date: Feb 2014
Posts: 65
Year: 2001
Coachwork: bluebird
Chassis: bluebird
Engine: 5.9 Cummins
Rated Cap: 16
Re: Betsy

Did a little work on the bus today. Very little actually accomplished. Discovered the bane of my buses existence is not the seats or even the wheelchair lift, which still isn't out. No the troublemakers are the wheel chair tiedown points. There are four of them for each wheelchair position. My bus was setup to carry 7 wheelchairs and had tiedown points for an eighth under one of the seats. With four tracks per wheelchair that means there are 32 of these little bas$&*%s in here. The fasteners on top are allen bolts, flush mounted. They are not moving. Snapped 2 allen bits and an allen key. At least the ones that didn't round off anyway.

So I present here in all her glory pulled forward so we could use the wheelchair lift Betsy the bus I couldn't think of a better name for.
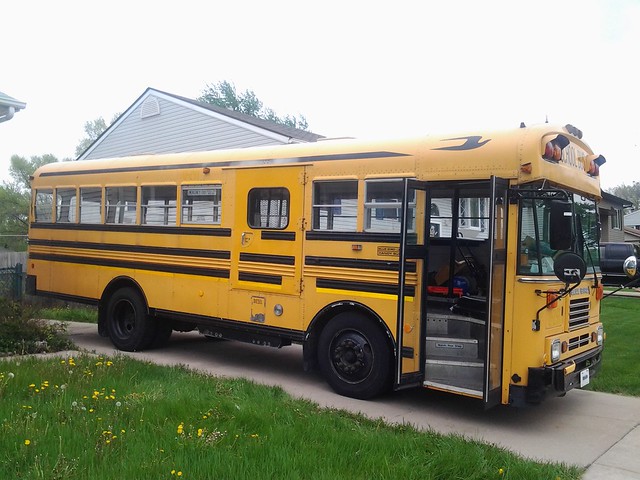
IMG_20140512_144226 by orangepeel91us, on Flickr

Turns out the wheelchair lift does in fact work.
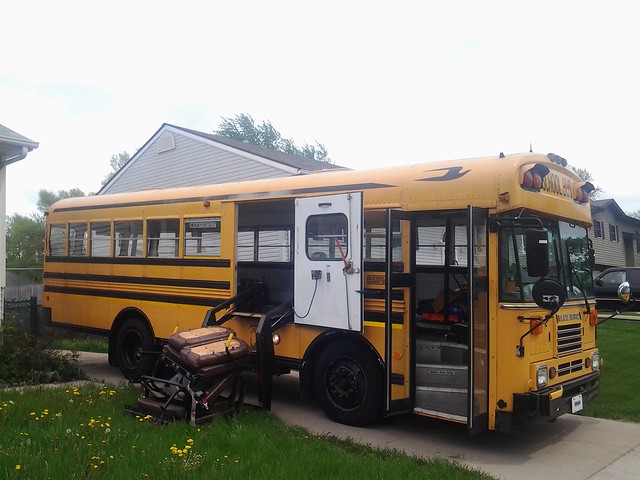
IMG_20140512_143537 by orangepeel91us, on Flickr

Now who mentioned pics of buses with seats no longer attached but still in the bus making people feel all squishy inside I have this.
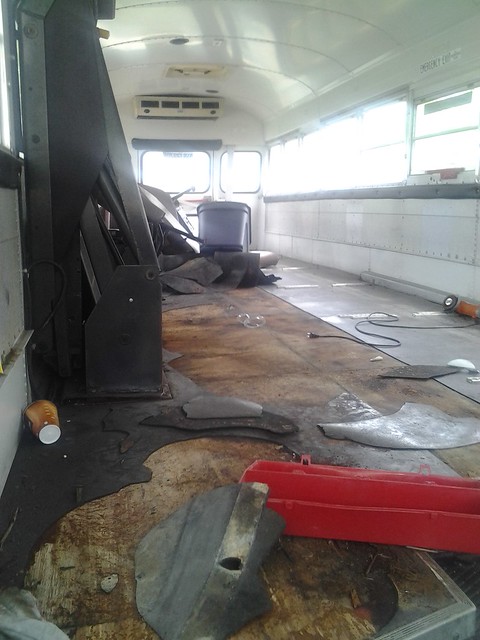
IMG_20140512_133833 by orangepeel91us, on Flickr

And this, let the squishiness begin!!
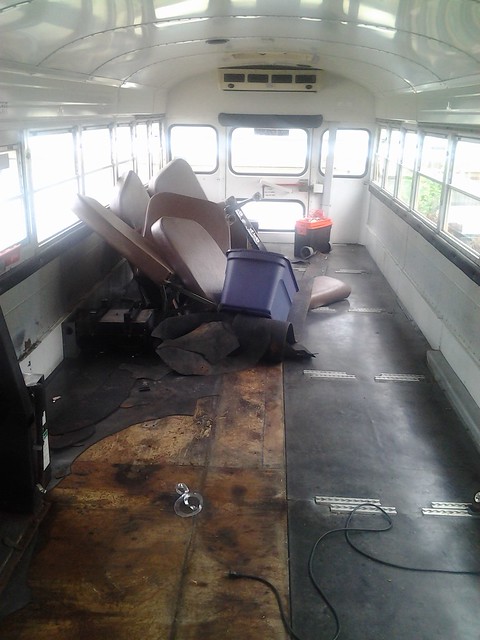
IMG_20140512_133852 by orangepeel91us, on Flickr

Notice there are NO wheel wells in this bus. A nice little feature if you ask me. I can hang 20" side boxes under the floor and not change the current ground clearance a bit. That said I do intend to go a bit lower between the axles.

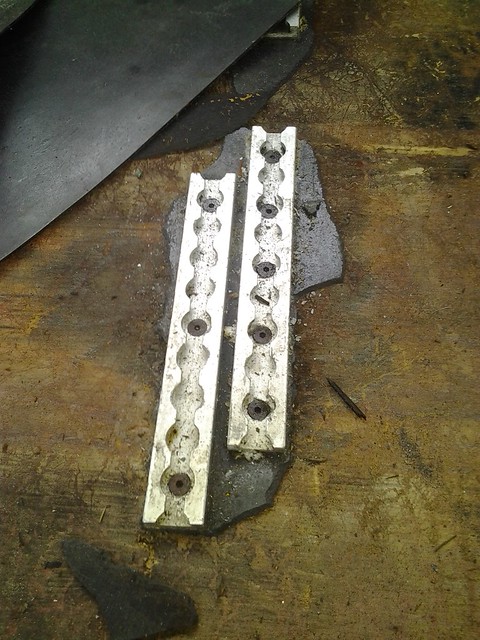
The trade off for not having wheel wells is having a crapload of these little sh&$s.

IMG_20140512_163725 by orangepeel91us, on Flickr

Notice that there are 3 bolts in one and 5 bolts in another of these brackets. It alternates like that with all of them. So half have 3 and the other half have 5.

We managed to cut one.

ONE.

So at least when I call the local Snap On guy for super hard drill bits I have something to show him.
The bottom side of these suckers is a nightmare of another type. Not just bolts and nuts like the seats. There are plates to go with them to keep them from pulling through the floor.

The problem with this concept is where half of them are located. To start with there is an emergency wheelchair escape ramp-like the kind on a moving van mounted in back. Behind a panel with 7 rivets holding it on so it could not be pulled out. Once that was removed we discovered the release handle is so rusty it wouldn't move with a sledge, prybar and penetrating oil. We soaked the crap out of it with the oil. Will see what happens in a couple of days. No pics of this.

Now then ofr those of you who figure they don't need to pull up their plywood because the bus is from a rust free state like Texas, you are probably wrong.
See here is the problem, my rubber cracked in several locations. Besides this everywhere there is a hole, like where a bolt holds a seat for example, water will travel down the bolt from inside. Yes I said INSIDE.
I don't know about where you're from, but schools and private bus operators in my area mop the bus floors on a regular basis.

This is what my plywood looks like. Every sheet visible so far has areas that are fine and fit for use and other areas that are absolutely rotten. Just in case you needed more fun, the rotten parts are also soaking wet.

I made this ppic bigger so you can see just how black and disgusting some of that wood has gotten.

IMG_20140512_163645 by orangepeel91us, on Flickr
orangepeel91 is offline   Reply With Quote
Old 05-12-2014, 11:59 PM   #36
Mini-Skoolie
 
wash with gasoline's Avatar
 
Join Date: Nov 2012
Location: SoCal
Posts: 12
Re: Betsy

4in angle grinder with a cutting wheel works the best that i have found.
cut straight down on the allen heads, like you are trying to put a slot in them for a flat blade screwdriver.
cut down deep and angle the grinder side to side to get threw the whole bolt shaft.
it will mix the aluminum and steel a little when you grind, use a big prybar and pop them up
went threw 3 cutting wheels on mine

Had a 8 foot section with 4 of those tie down things running threw it. ...i feel your pain

dont forget a face shield and ear plugs...
__________________
Dry with match
wash with gasoline is offline   Reply With Quote
Old 05-13-2014, 07:49 PM   #37
Mini-Skoolie
 
Join Date: Feb 2014
Posts: 65
Year: 2001
Coachwork: bluebird
Chassis: bluebird
Engine: 5.9 Cummins
Rated Cap: 16
Re: Betsy

Only 4 tiedowns? Puhleasee. I've got 32 of them!

Nat thought about your suggestion using the circular saw to cut the ply into sections around the brackets. What took the longest yesterday was digging the ply out from under the bracket. To dig out the area around it basically we just hacked at it with chisels pry bar and very large screw driver. The reason we did it primarily was to confirm the thickness of the ply. Then since we had it dug out anyway it became a debate on how to get rid of the brackets. One of the ideas we tossed around was using the skill saw idea too.
Was also considering the recip saw I think buying a bunch of metal blades for it would be worth trying after the ply is sectioned out. Without trying to chip out the ply under the bracket first. I figure a bunch of blades would be needed just because when I've had to bend one for any length of time they break.

your idea about breaking the ply out from under those @#%^%%%@@ things, that was for dry not rotten plywood wasn't it?

I'm sure some of it is fine somewhere. The one we dug into was rotten as all heck. You can see how black it is in the pic. That ply, using chisels was very difficult to get out from under the bracket. Those bad boys were definitely cinched down tight!

I'll give Bluebird for making the seatbelt mounts for wheelchair passengers secure. I certainly can't fault what they did.

But the school district that owned the bus blocking off the escape ramp is reprehensible on a scale that infuriates me.

Google 7 angels crossing.

It wouldn't have helped in that crash, but ever since I have been more than a little touchy about school bus safety and it really chaps my ass to see an important safety device intentionally disabled.
orangepeel91 is offline   Reply With Quote
Old 05-13-2014, 11:30 PM   #38
Mini-Skoolie
 
wash with gasoline's Avatar
 
Join Date: Nov 2012
Location: SoCal
Posts: 12
Re: Betsy

just to clarify...
it was 4x 8ft long strips of those brackets. so 32 feet of that aluminum rail with a ton of those allen heads to kill
I do feel your pain

many ways to skin a cat

Interested to see what works for you, I had the grinder handy and went with it.

At nat, I will have to check out the milwaukee blades. They really have there A game out across there product lines rite now!
__________________
Dry with match
wash with gasoline is offline   Reply With Quote
Old 05-14-2014, 10:13 AM   #39
Mini-Skoolie
 
Join Date: Feb 2014
Posts: 65
Year: 2001
Coachwork: bluebird
Chassis: bluebird
Engine: 5.9 Cummins
Rated Cap: 16
Re: Betsy

Your tie downs were 8' long! Wow! That must have been a real joy.

Milwaukee blades should work, it's a Milwaukee saw!

But I wasn't going to cut into the aluminum tie downs. My idea was to use the skill saw to cut the plywood around them then remove plywood from floor. This would leave plywood directly under the tie downs but no where else. Then bring in the Milwaukee to cut the remaining plywood and bolts at the same time.
Thoughts?

Have an angle grinder and cut off discs too. My buddy has the Milwaukee recip saw. We used it to cut up a junk suburban once just to see what it could do. I'm sure he'd be okay with me borrowing it-especially if I'm buying blades, it's his angle grinder that's in the bus now.

Will let you know how it worked out. Next bus work day is probably going to be Saturday.
orangepeel91 is offline   Reply With Quote
Old 05-14-2014, 09:23 PM   #40
Bus Geek
 
Tango's Avatar
 
Join Date: Mar 2011
Location: Houston, Texas
Posts: 8,462
Year: 1946
Coachwork: Chevrolet/Wayne
Chassis: 1- 1/2 ton
Engine: Cummins 4BT
Rated Cap: 15
Re: Betsy

I was a die-hard Milwaukee fan & supporter for several decades. But now...every one of their tools are made in China. Screw'em. I'll never buy another of their products again whether they work or not. Just another corporate sell out.
Tango is offline   Reply With Quote
Reply


Posting Rules
You may not post new threads
You may not post replies
You may not post attachments
You may not edit your posts

BB code is On
Smilies are On
[IMG] code is On
HTML code is Off
Trackbacks are Off
Pingbacks are Off
Refbacks are Off


» Featured Campgrounds

Reviews provided by

Powered by vBadvanced CMPS v3.2.3

All times are GMT -5. The time now is 02:14 PM.


Powered by vBulletin® Version 3.8.8 Beta 4
Copyright ©2000 - 2024, vBulletin Solutions, Inc.