 |
|
 01-02-2017, 11:28 AM
|
#21
|
|
Bus Crazy
Join Date: Jul 2011
Location: Winlcok, WA
Posts: 2,233
|
I would agree on not drilling out the lock.
IIRC, there are only four or five different key cuts that will fit that lock set. Every bus OEM uses the same lock sets which makes it easy for owners to spe'c locks that have a common key. The locks are not for security so much as to keep honest people honest. A determined thief isn't going to be slowed down very much by those locks.
|

|

|
|
01-02-2017, 03:14 PM
|
#22
|
|
Skoolie
Join Date: Sep 2016
Location: Colorado
Posts: 129
Year: 2000
Coachwork: International
Chassis: CE
Engine: DT466E
|
Hey Rameses! I wondered where you disappeared to. 
You're right....Impact driver. Duh. Thanks for correcting me.  Once I got an adapter, an extension, and a universal joint, the bolts were easy peasy.
I have the keys for the locks, but they look like they've been intentionally damaged. It looks like someone took a center punch or something to the middle of each of them.

The key will go in (with tons of force--like the first time, I tapped it in with a mallet), but won't turn. The whole assembly (not just the cylinder) turns a little bit, but nothing else. I've given it several good shots of WD40 Penetrator, and no luck. There's only one of the keyholes I've even been able to get a key into.  This is on all five of the cargo compartments, plus another locked rear compartment that I have no idea what it's for. Short of paying a locksmith $120 to come out, I'm not sure what else to do besides drilling the locks out. I'm open to suggestions!
|
|
|
|
|
01-02-2017, 06:24 PM
|
#23
|
|
Skoolie
Join Date: Sep 2016
Location: Colorado
Posts: 129
Year: 2000
Coachwork: International
Chassis: CE
Engine: DT466E
|
Day 3-4
Well, the seats are gone! And that's it. The seats are gone. Gotta start somewhere, right? Ugh, the FILTH the little monsters leave behind, though. Probably no working for a few days, but I'll start on the floor as I have time.

|
|
|
|
|
01-02-2017, 08:40 PM
|
#24
|
|
Bus Crazy
Join Date: Jul 2011
Location: Winlcok, WA
Posts: 2,233
|
The lock looks to be in pretty typical condition. The little spring loaded "door" that is supposed to keep moisture and gunk out of the key way is pretty whimpy in design. I have rarely seen locks like that which really closed up once the key was removed. Even if you teased it with the key they rarely ever closed all the way up.
IIRC those lock sets are only about $8.00-$12.00 per lock and are available just about anywhere including Ace Hardware.
If the locks continue to be a problem I would drill them out and replace them for no more than what they cost to replace--your time is worth more than spending just a few minutes on each lock.
I have found that using Brake Kleen or starting fluid can clean everything out. If you then follow up with PB Blaster or WD40 you can get things lubed up and working again.
|
|
|
|
|
01-02-2017, 08:49 PM
|
#25
|
|
Skoolie
Join Date: Sep 2016
Location: Colorado
Posts: 129
Year: 2000
Coachwork: International
Chassis: CE
Engine: DT466E
|
Quote:
Originally Posted by cowlitzcoach

IIRC those lock sets are only about $8.00-$12.00 per lock and are available just about anywhere including Ace Hardware.
If the locks continue to be a problem I would drill them out and replace them for no more than what they cost to replace--your time is worth more than spending just a few minutes on each lock.
|
They're enough of a problem I can't get into my cargo boxes. I think they should be easy to replace, overall. Unfortunately, I can't see the inside to know what I'm dealing with (as far as getting a replacement) until I bite the bullet and drill one out. I don't need them to lock right now, so hopefully it won't be the end of the world if I drill one and then find out they're a nightmare to replace. I also have a feeling that "just drilling it out" won't be as easy as it sounds. I have wimpy girl arms/hands, and I am not sure my 12v cordless drill will be up to the challenge. I did buy some cobalt drill bits specifically for this little project.... Only one way to find out! Maybe next weekend.
|
|
|
|
|
01-02-2017, 09:06 PM
|
#26
|
|
Bus Nut
Join Date: Sep 2016
Location: Chapel Hill, NC
Posts: 855
Year: 2002
Coachwork: Blue Bird
Chassis: All American
Engine: Cummins 8.3/Allison MD3060
Rated Cap: 84
|
I think I'd try drilling out the rivets holding the latch assembly in place first.
Once the latch is free, you'll probably find a couple of very thin cables on the back side hooked to a mechanism that pulls on them when the handle is lifted. (I'll take a picture of the ones on my cargo doors for you tomorrow.) Once those cables are unhooked, the entire handle assembly should be free to put on a workbench or table and figure out how to take the lock out without drilling it. Go ahead and put the handle assembly back in with new rivets, and then install new locks into the handles whenever you have a chance.
|
|
|
|
|
01-02-2017, 09:09 PM
|
#27
|
|
Skoolie
Join Date: Sep 2016
Location: Colorado
Posts: 129
Year: 2000
Coachwork: International
Chassis: CE
Engine: DT466E
|
Quote:
Originally Posted by Rameses
I think I'd try drilling out the rivets holding the latch assembly in place first.
Once the latch is free, you'll probably find a couple of very thin cables on the back side hooked to a mechanism that pulls on them when the handle is lifted. (I'll take a picture of the ones on my cargo doors for you tomorrow.) Once those cables are unhooked, the entire handle assembly should be free to put on a workbench or table and figure out how to take the lock out without drilling it. Go ahead and put the handle assembly back in with new rivets, and then install new locks into the handles whenever you have a chance.
|
Not a bad idea. I may have to replace at least one of the handle assemblies entirely, due to rust. Pics would be appreciated of yours, when you have time.

|
|
|
|
|
01-02-2017, 10:06 PM
|
#28
|
|
Bus Nut
Join Date: Sep 2016
Location: Chapel Hill, NC
Posts: 855
Year: 2002
Coachwork: Blue Bird
Chassis: All American
Engine: Cummins 8.3/Allison MD3060
Rated Cap: 84
|
And isn't it amazing how big it feels inside the bus after all of the seats are out??
|
|
|
|
|
01-03-2017, 08:07 AM
|
#29
|
|
Skoolie
Join Date: Sep 2016
Location: Colorado
Posts: 129
Year: 2000
Coachwork: International
Chassis: CE
Engine: DT466E
|
Quote:
Originally Posted by Rameses
And isn't it amazing how big it feels inside the bus after all of the seats are out??
|
It's awesome! It's amazing what a huge difference it makes. I stayed up waaaaaaaaaaay too late last night messing around with floor plans. lol
|
|
|
|
|
01-03-2017, 11:52 AM
|
#30
|
|
Bus Nut
Join Date: Sep 2016
Location: Chapel Hill, NC
Posts: 855
Year: 2002
Coachwork: Blue Bird
Chassis: All American
Engine: Cummins 8.3/Allison MD3060
Rated Cap: 84
|
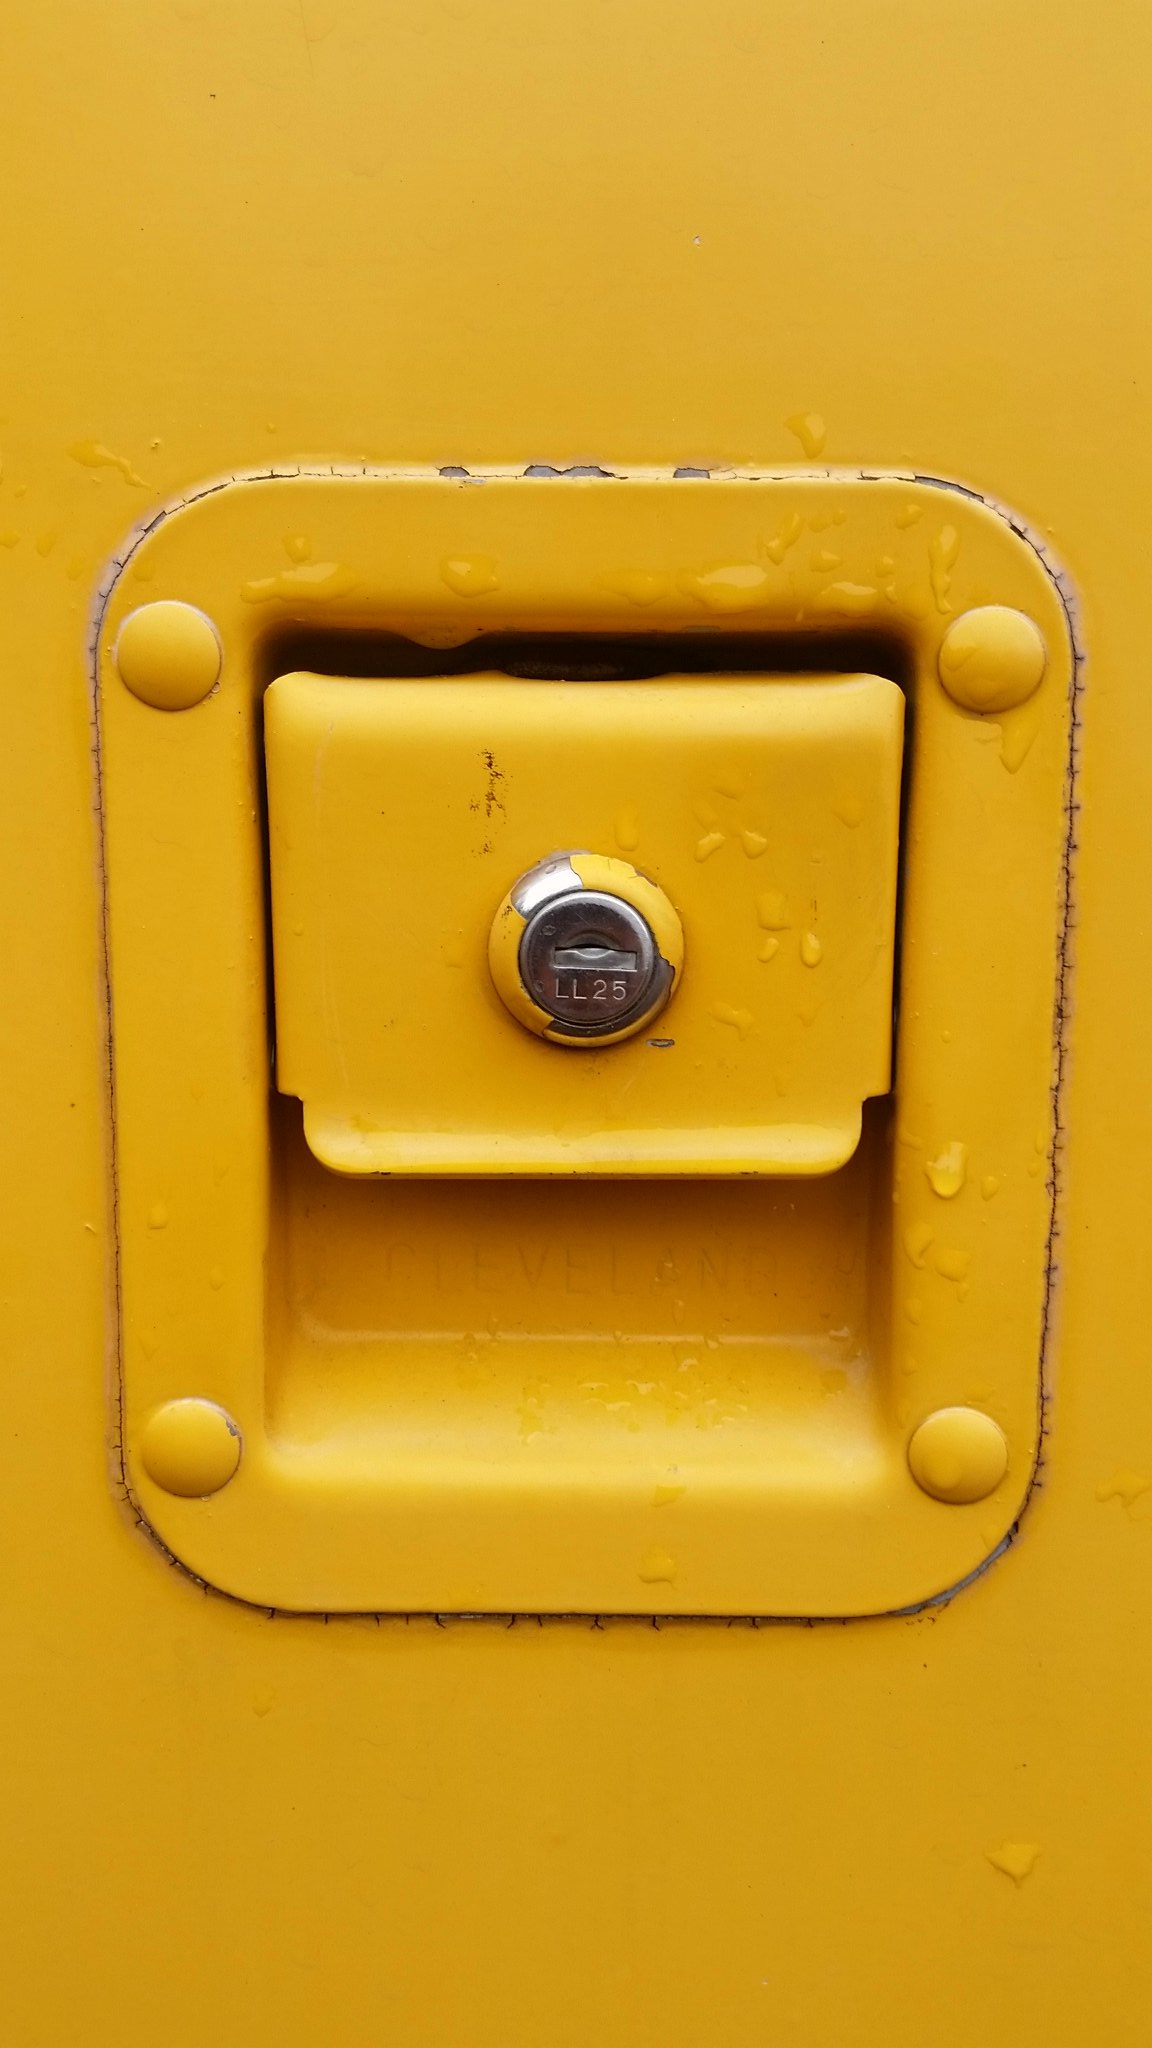
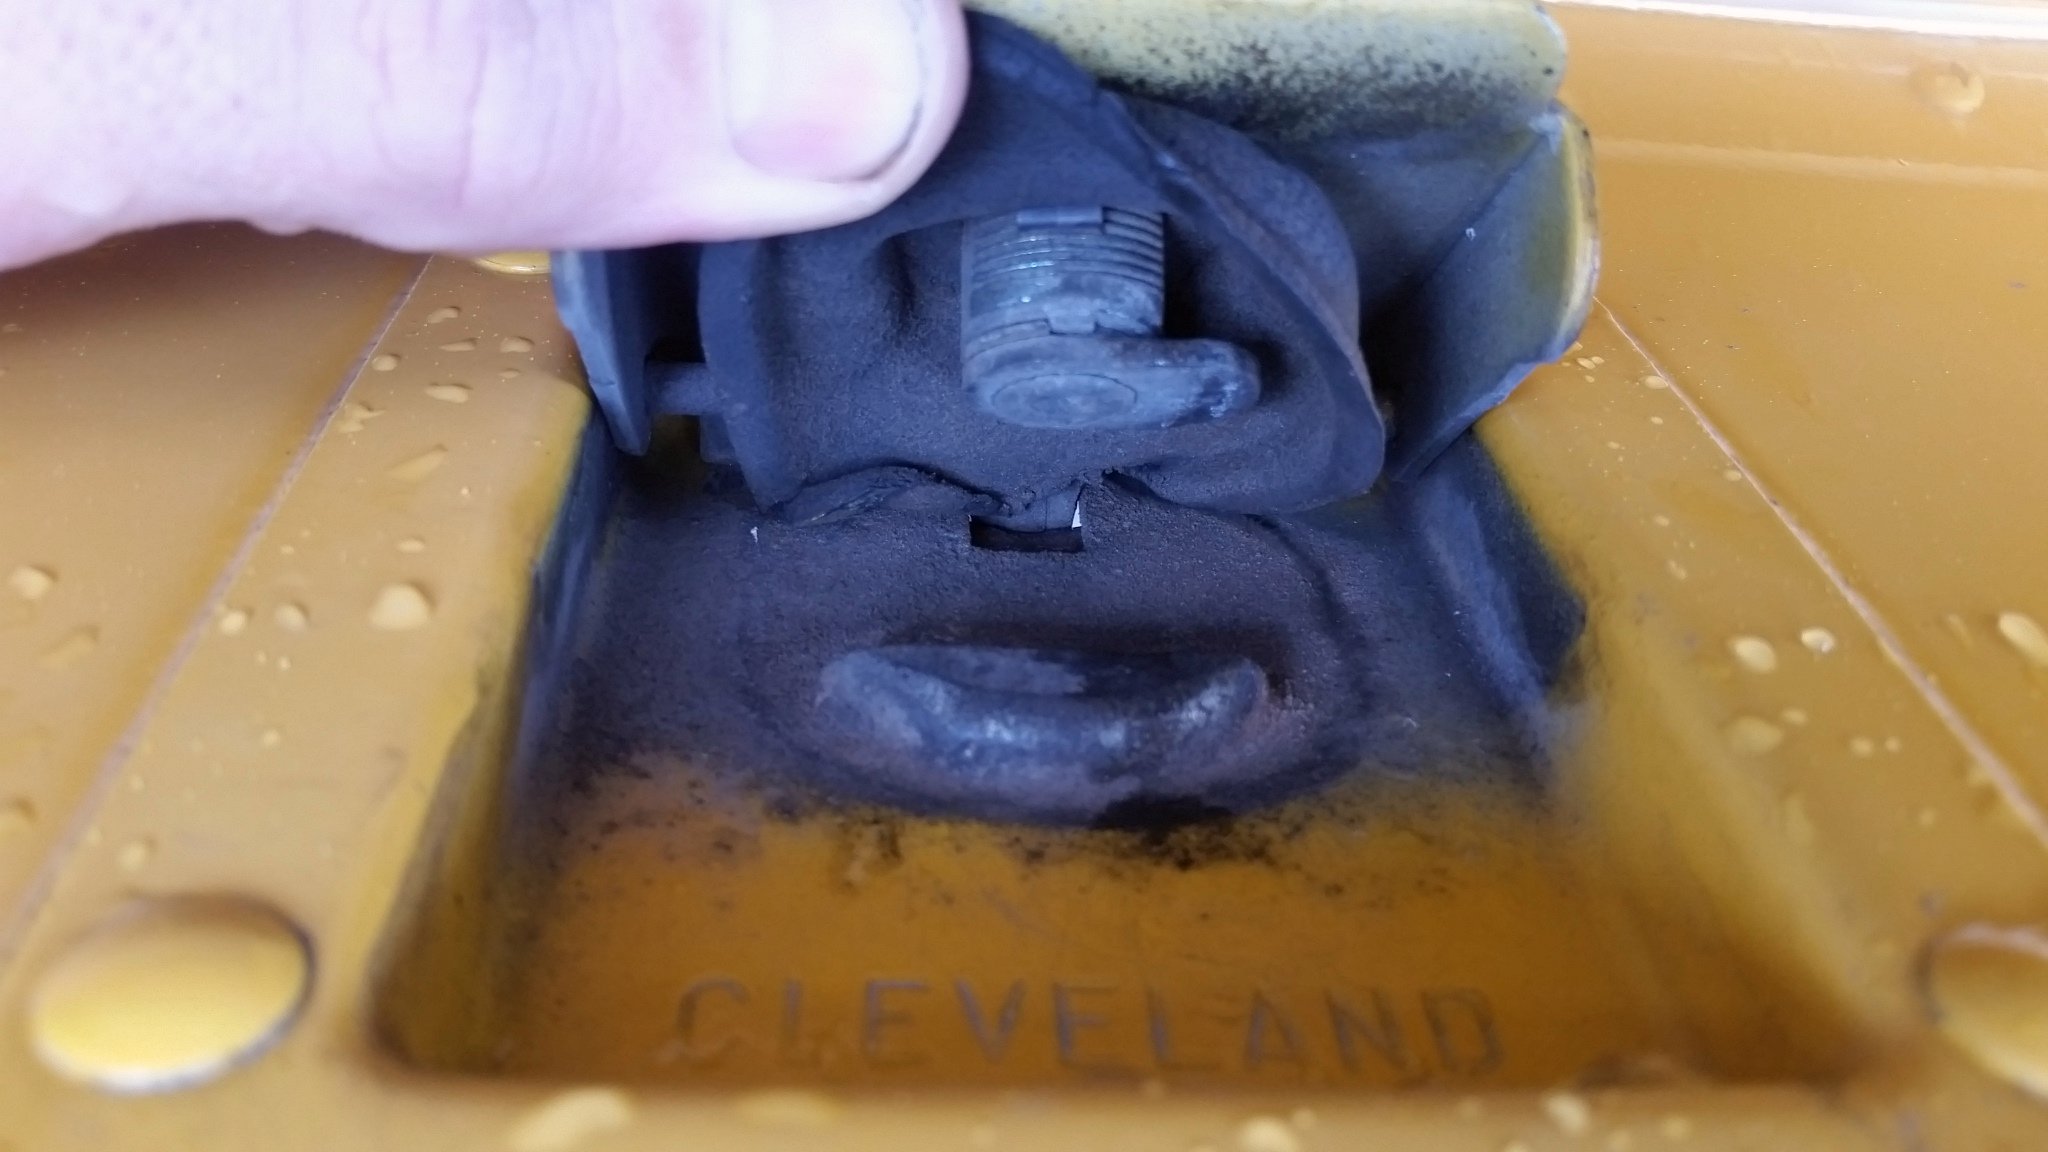
Okay, picture time.
First is a pic of the outside of one of my handle assemblies. It's also a Cleveland, like yours. Looks like the exact same handle except yours is installed with pop rivets, which should be considerably easier to drill out.
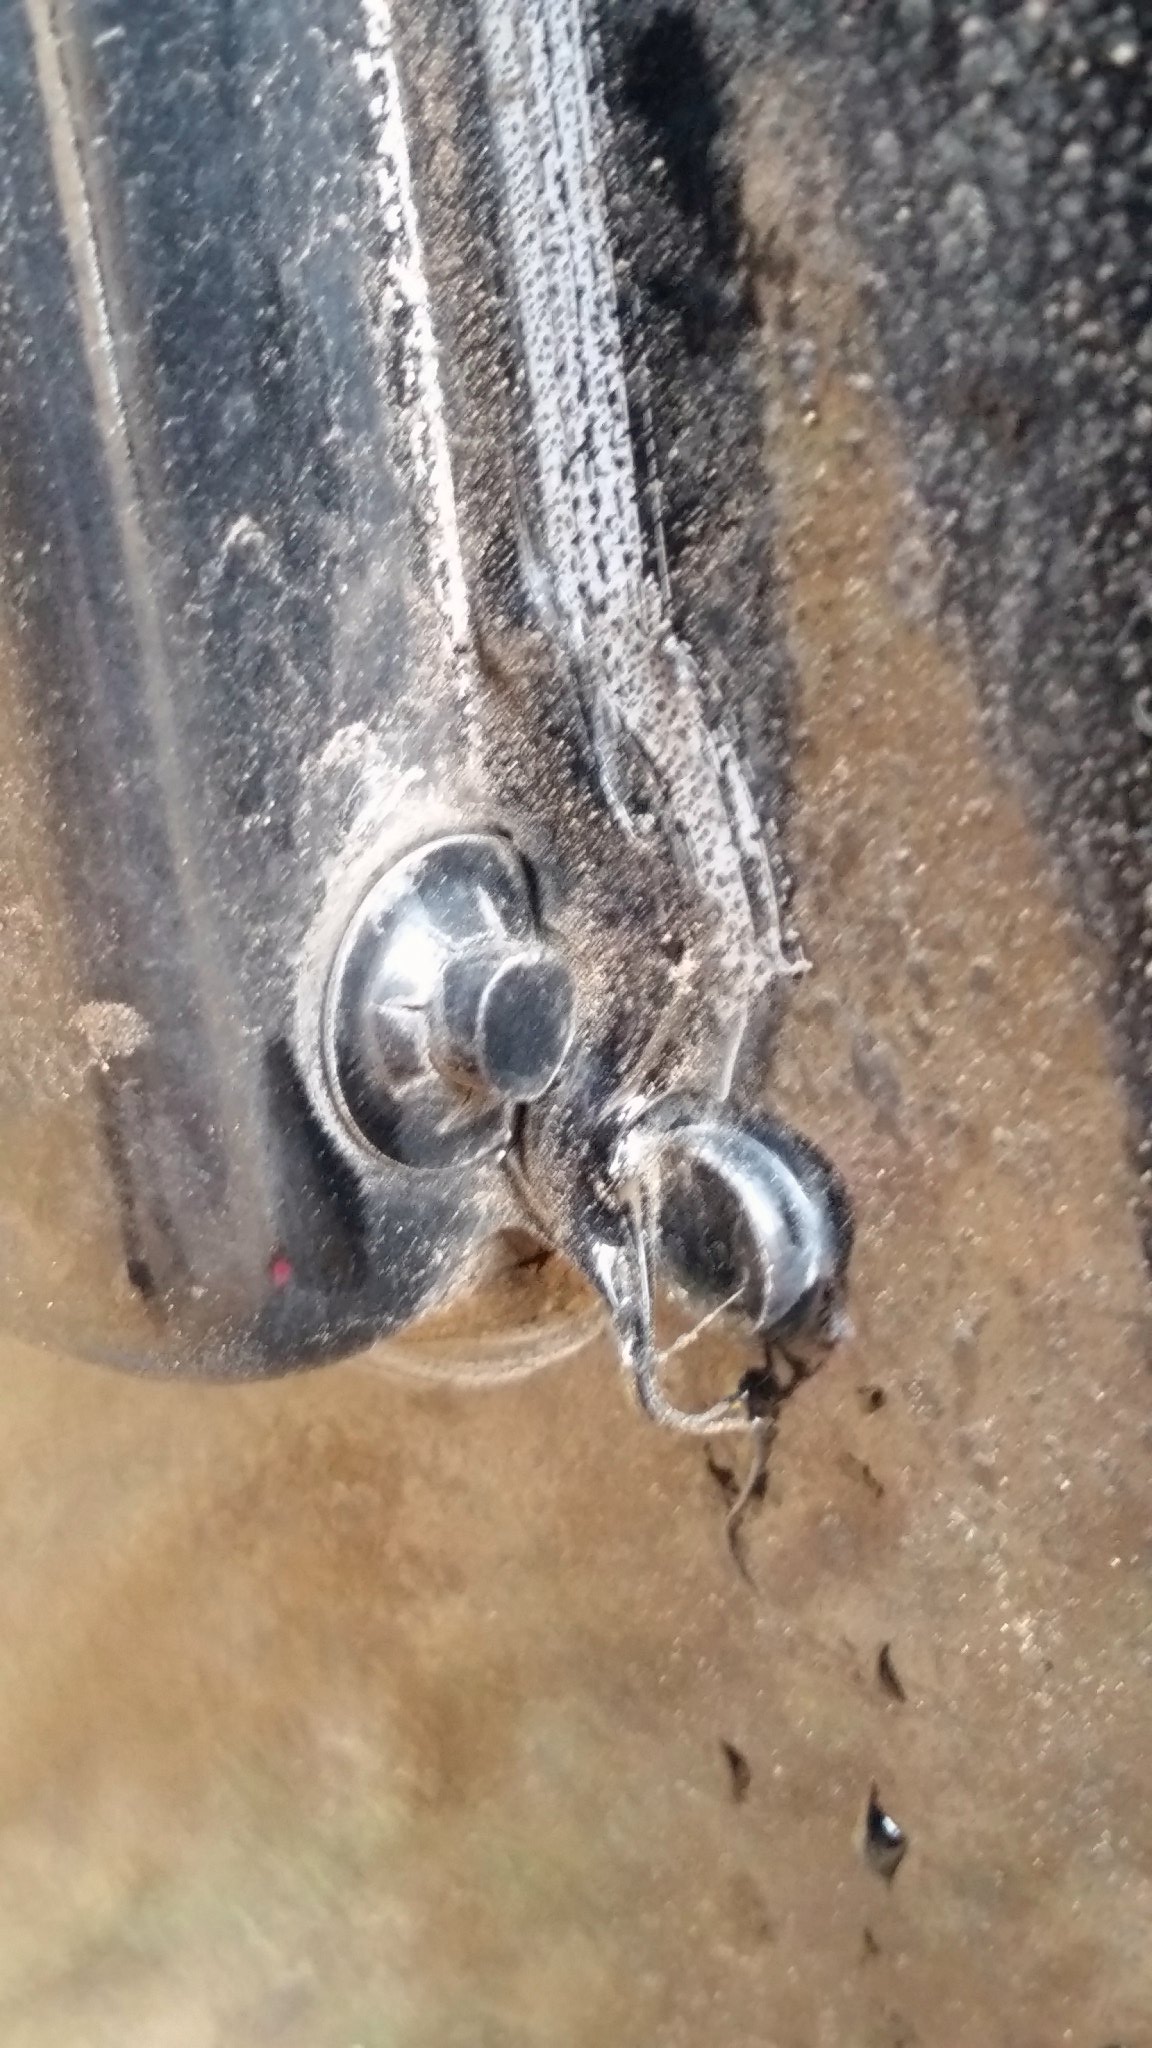
Next is the inside view with the handle in the "default" position. This's picture's with the door flipped up, so the mechanism is upside down now, and the handle on the backside of what you're looking at now has it's hinge on the bottom.
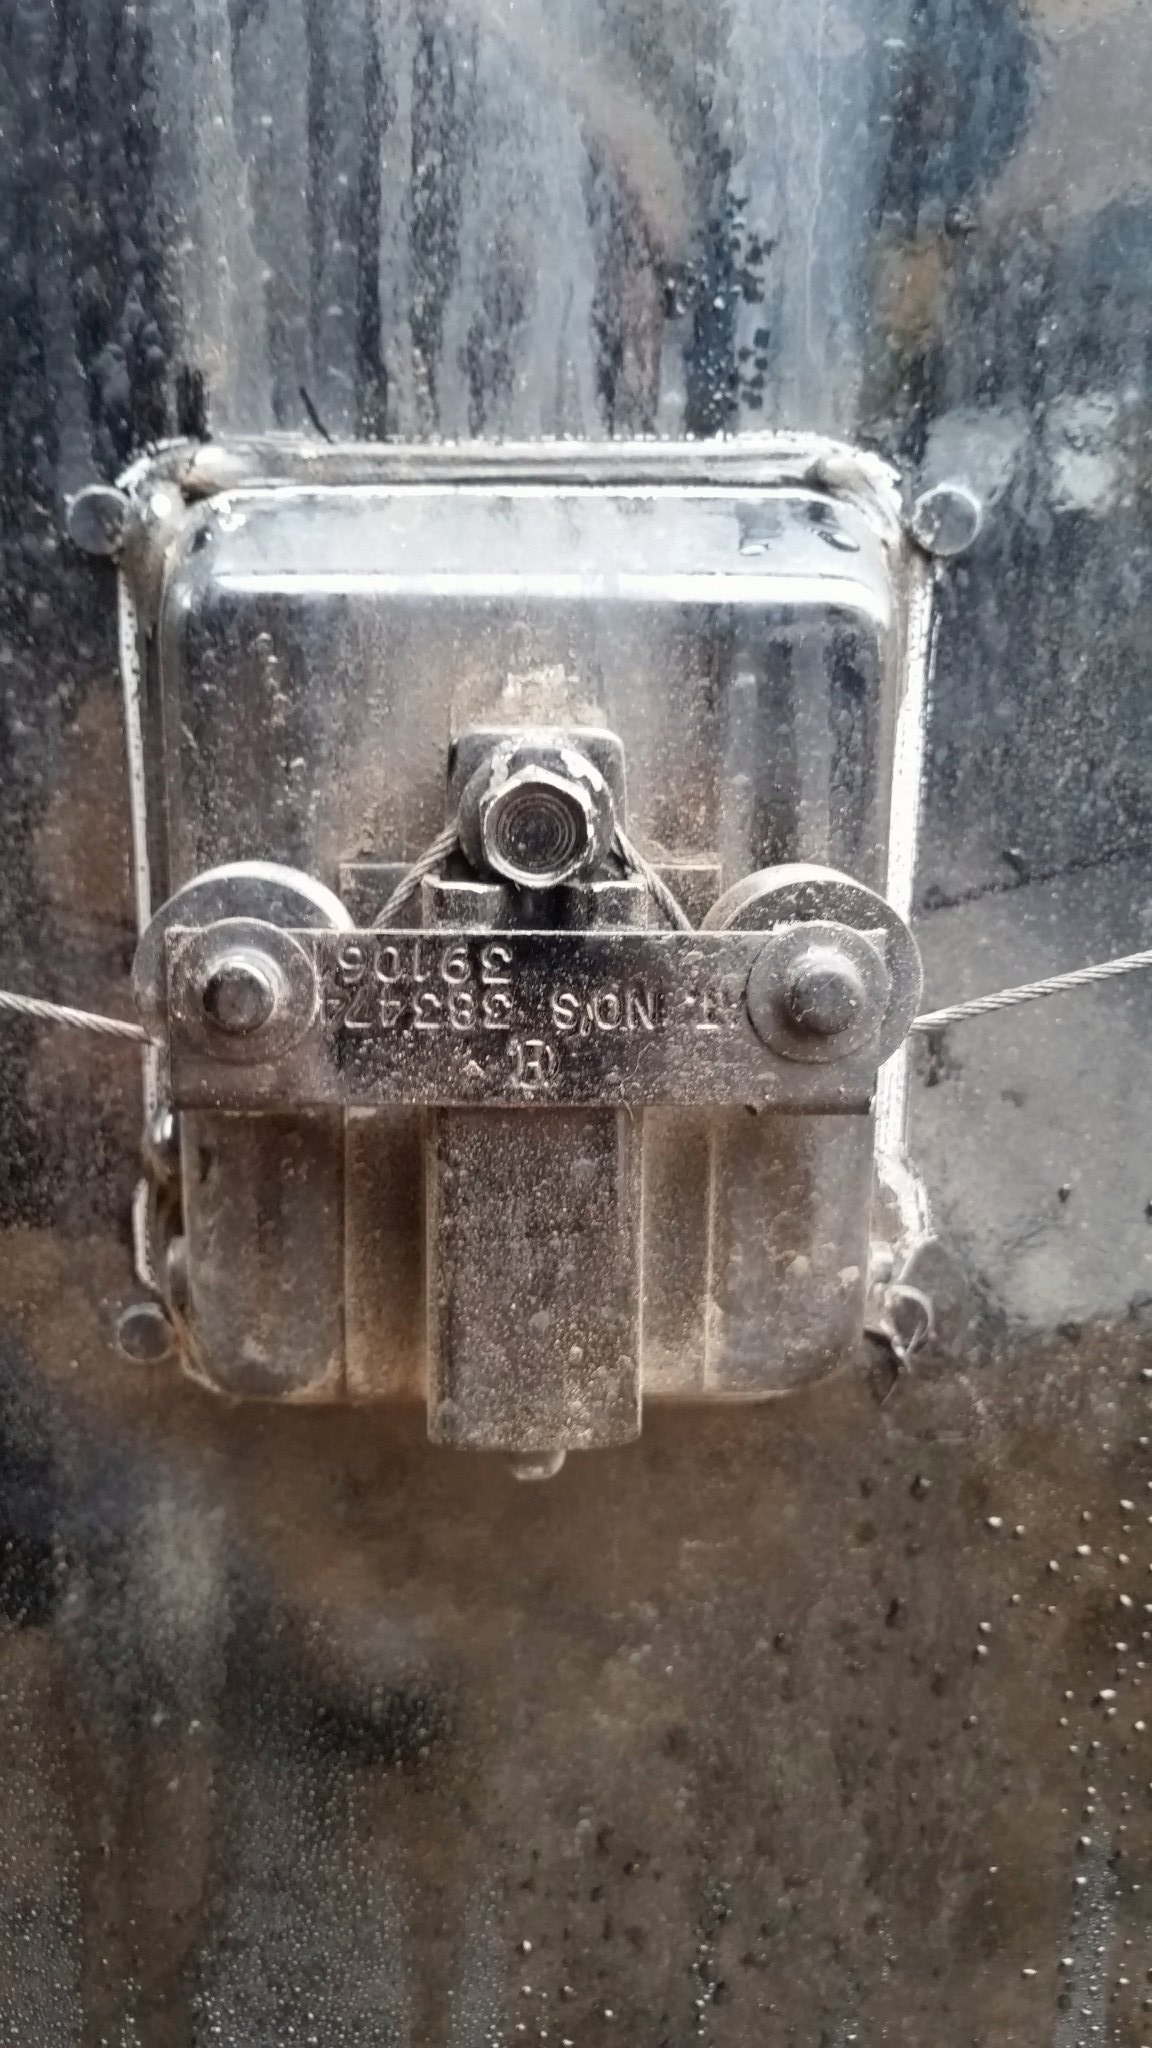
Now the same thing, but with the handle pulled to the "open" position.
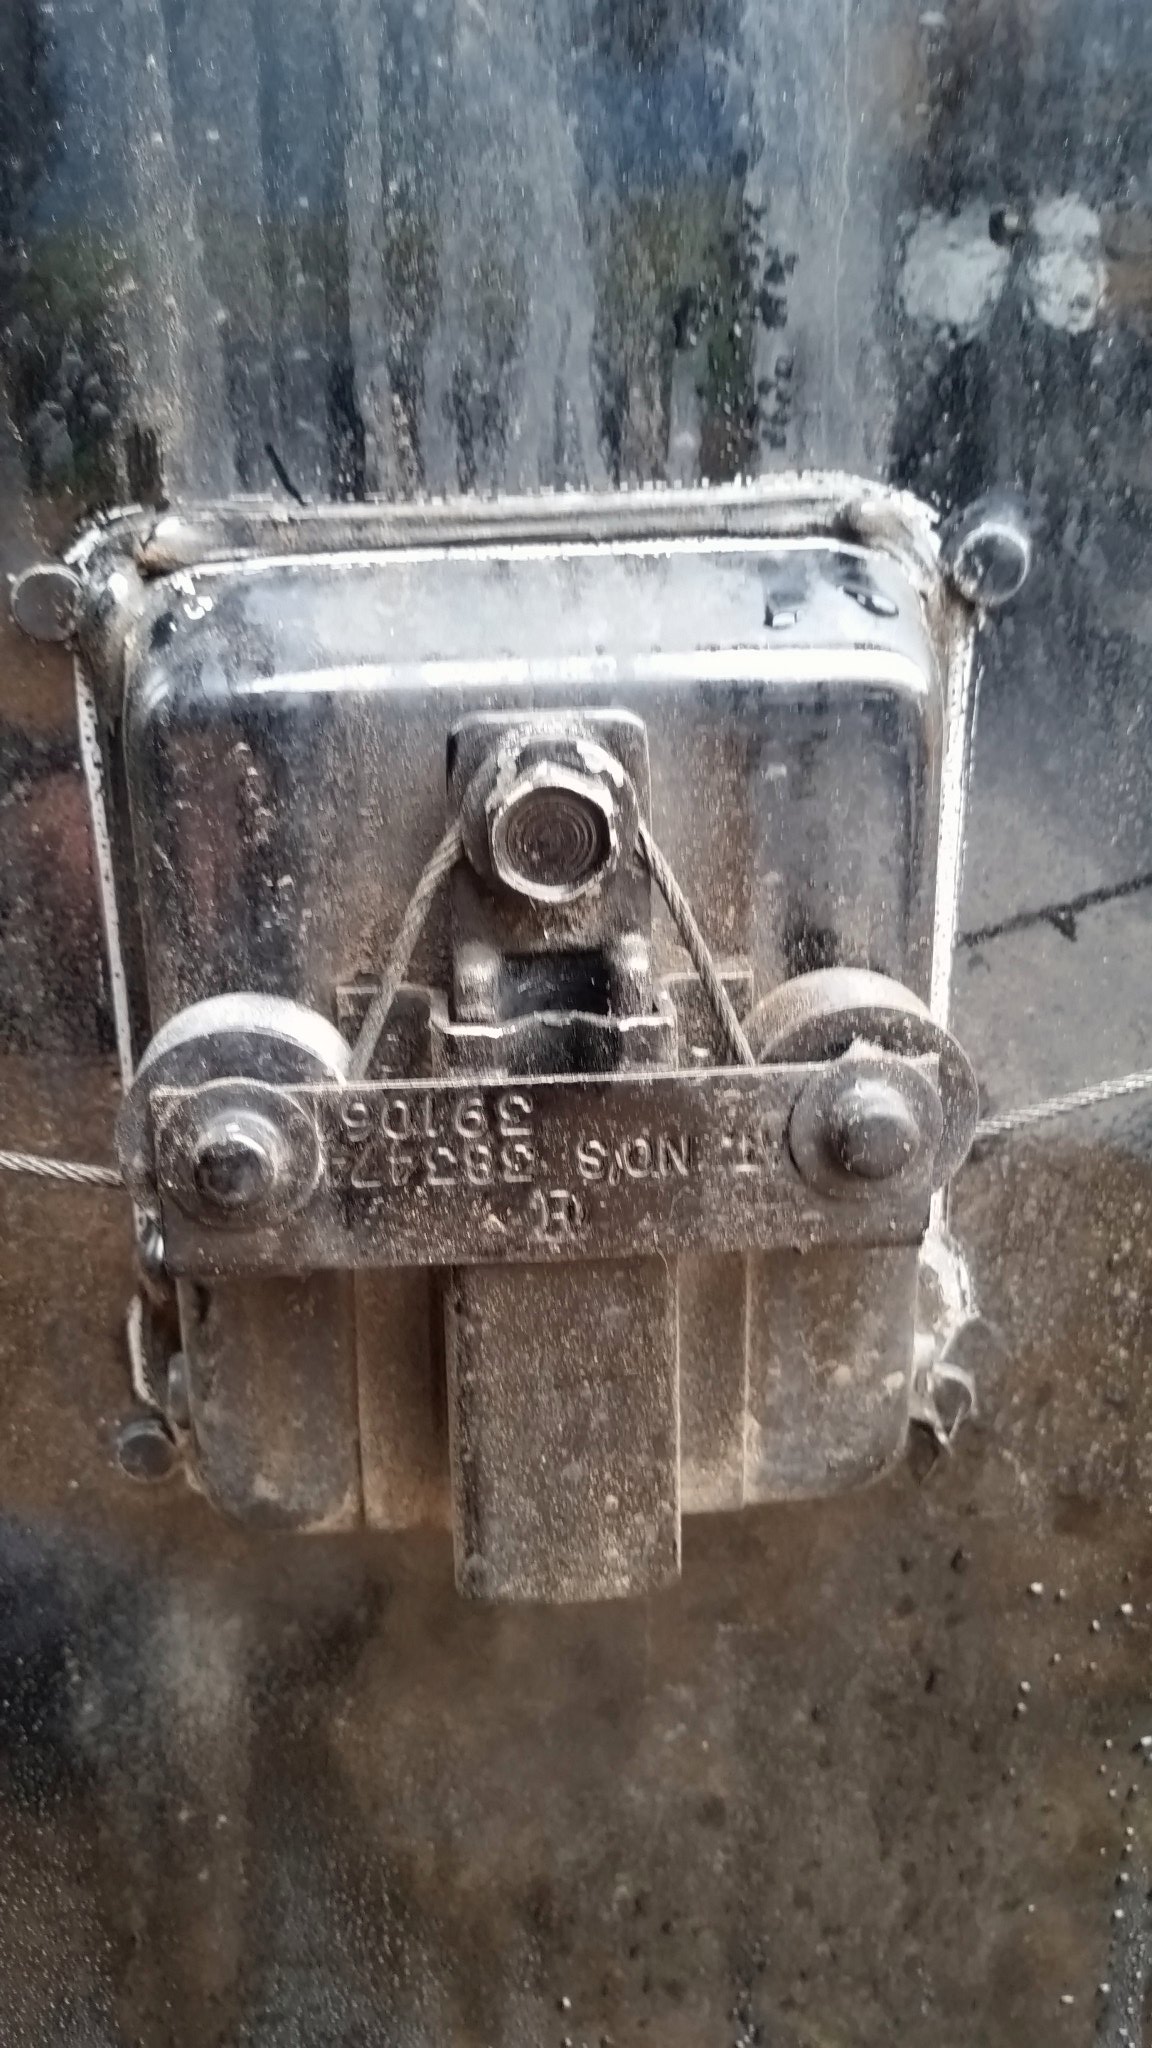
You can see that the bolt the clamps the cable in place is pushed about 1/2" when the handle is pulled, pulling the two sides of the cable around the rollers on the outside of the assembly.
|
|
|
|
|
01-03-2017, 12:02 PM
|
#31
|
|
Bus Nut
Join Date: Sep 2016
Location: Chapel Hill, NC
Posts: 855
Year: 2002
Coachwork: Blue Bird
Chassis: All American
Engine: Cummins 8.3/Allison MD3060
Rated Cap: 84
|
I decided to break this up into a couple posts since I've been having a problem with my phone's browser crashing recently. Would hate to lose a bunch of picture links and have to start over.
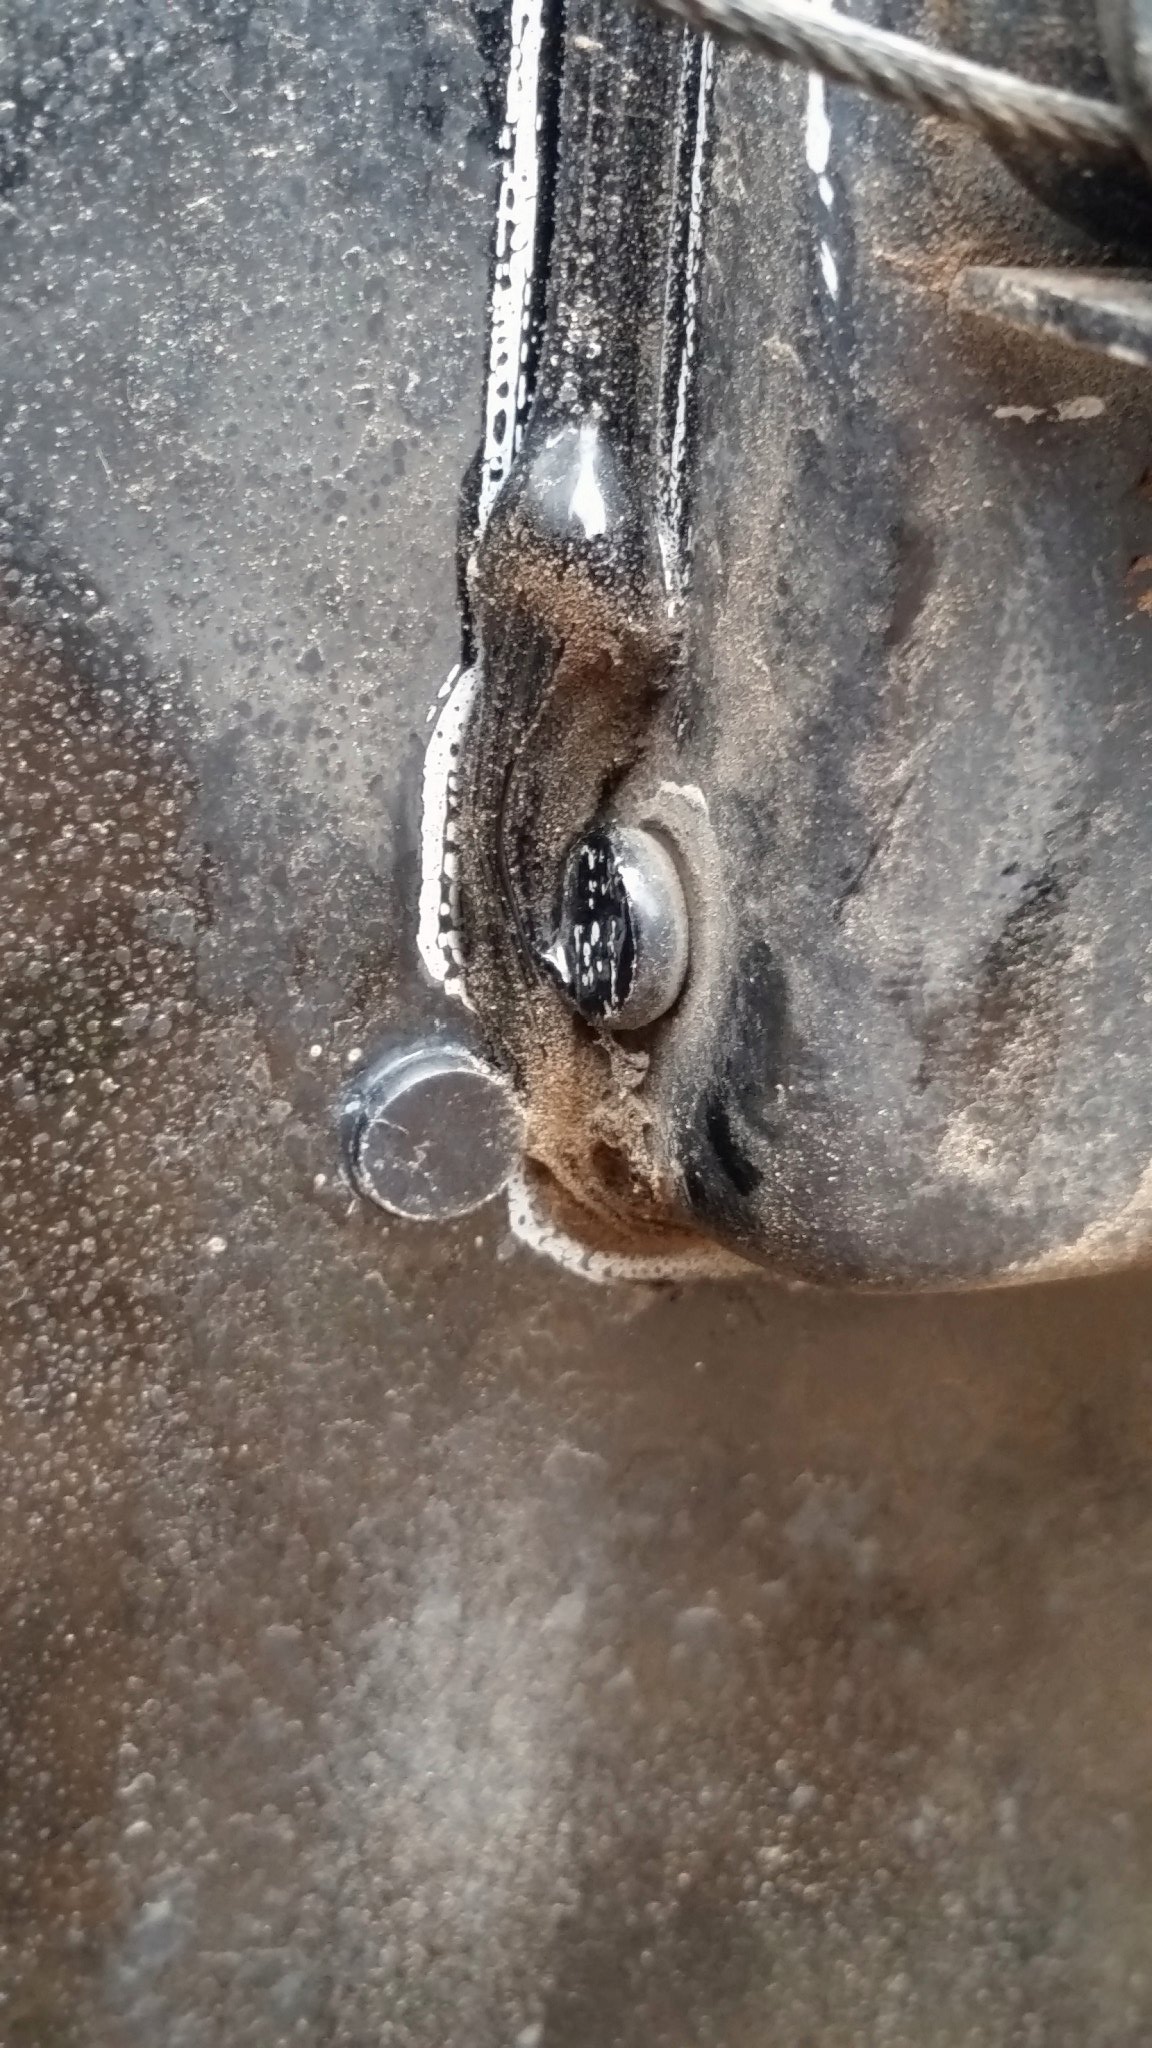
Okay, now a shot from farther back. You can see how the cable transfers the pull to a latch on the side of the door. (There's another one on the far side just like it.) The latches are spring loaded so that when the handle is released they return to the "latched" position on their own, and maintain tension on the cable to keep everything where it belongs.
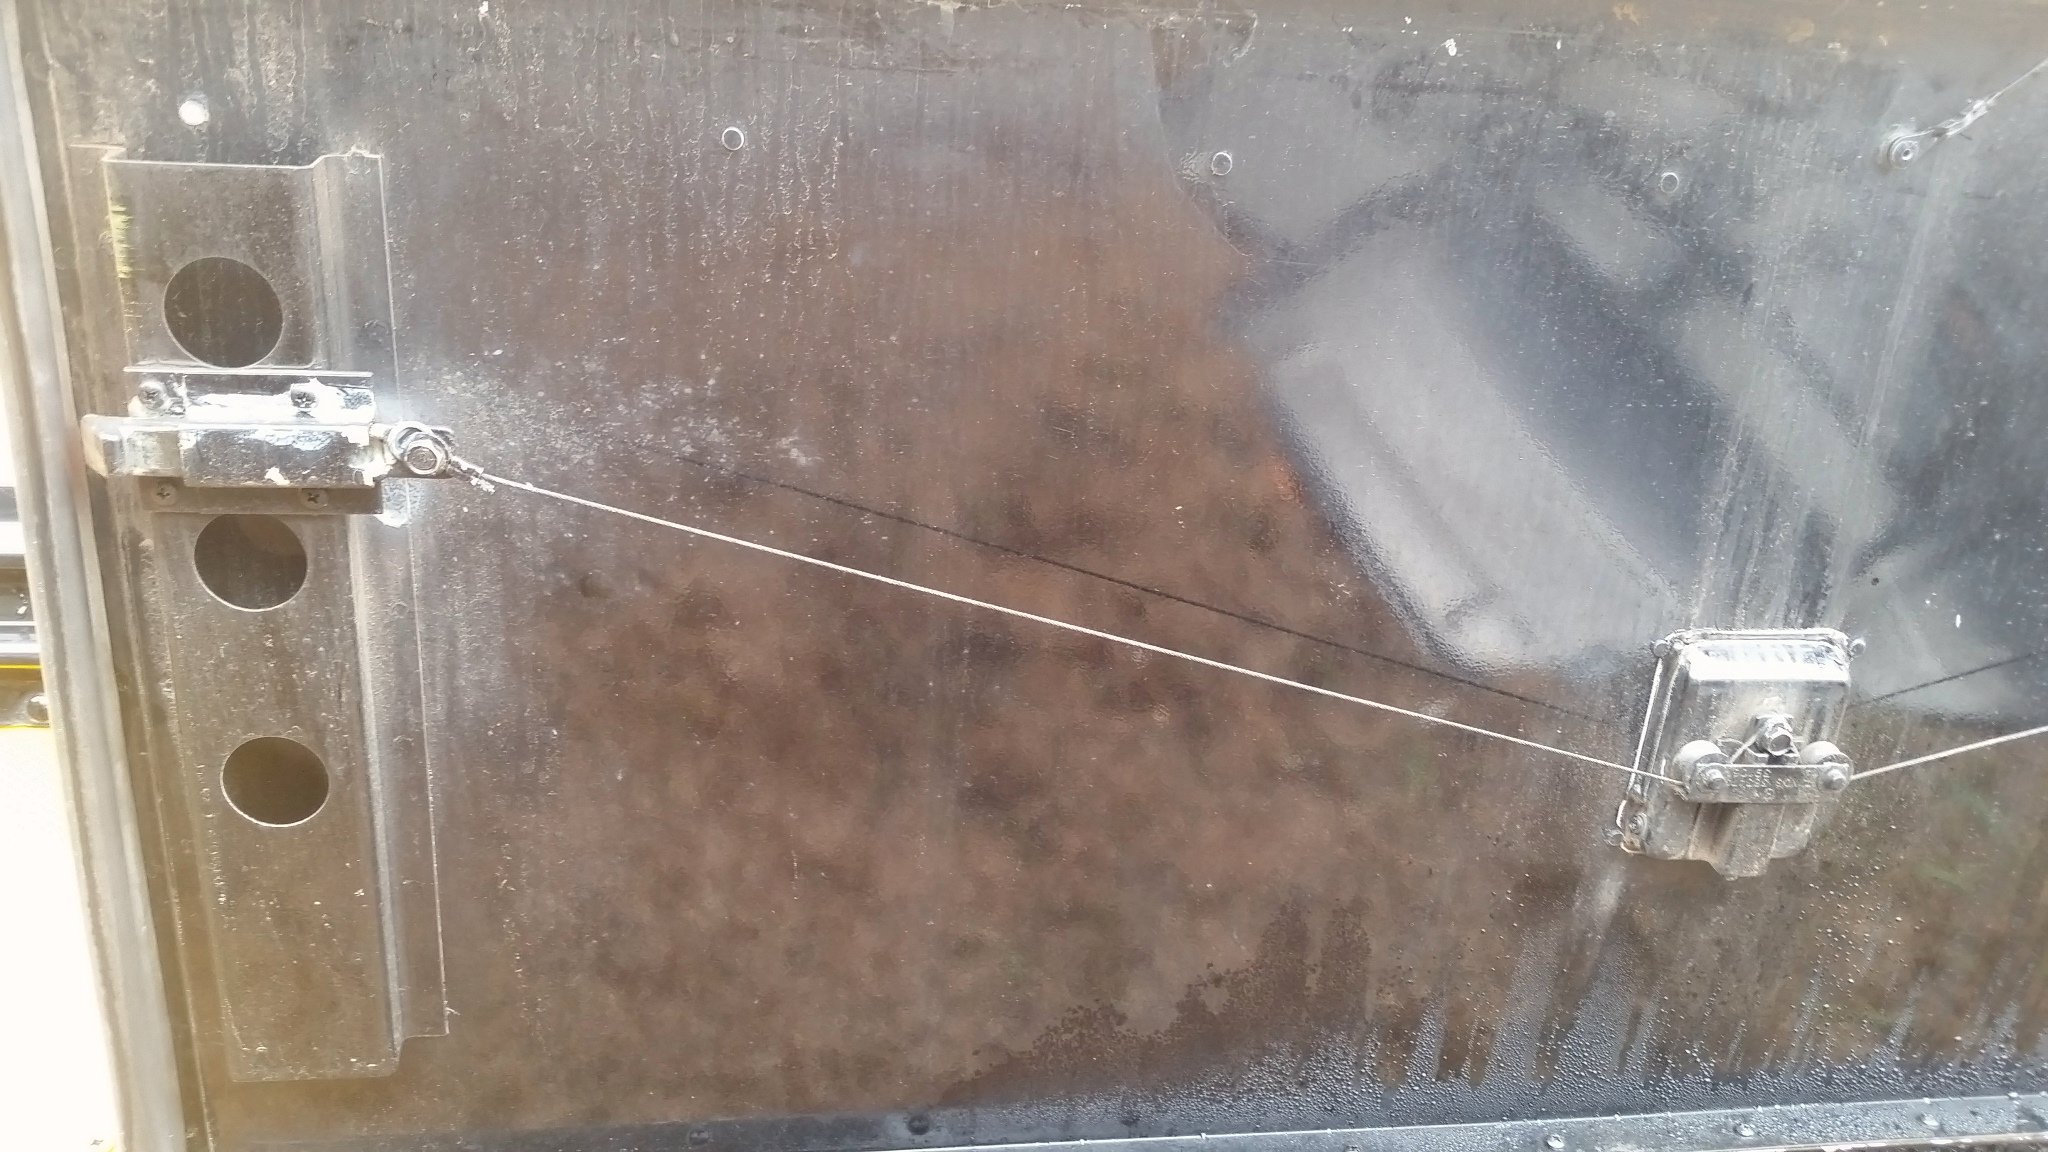
Next, I realized that the backside of the lock doesn't protrude through the backside of the handle assembly. Thus, even with the handle out, you wouldn't be able to get to the lock to disassemble it. But because of the nature of the cable and latch system, once the rivets are drilled out, it should be possible to pull out on the entire handle assembly, which will pull on both sides of the cable, pull the latches and open the door.
|
|
|
|
|
01-03-2017, 12:14 PM
|
#32
|
|
Bus Nut
Join Date: Sep 2016
Location: Chapel Hill, NC
Posts: 855
Year: 2002
Coachwork: Blue Bird
Chassis: All American
Engine: Cummins 8.3/Allison MD3060
Rated Cap: 84
|
Now, once the door is open, the bolts can be pulled that hold the ends of the cable to the latches. Then the handle assembly and cable will be free to come out of the door. Here's a look at the backside of the lock. You can see that it isn't possible to remove the lock without having the handle either in the open position or removed from the rest of the assembly.
Taking the handle off of the assembly shouldn't be too difficult though. It's held in by a pin with a spring clip on one end.
Pull the spring clip...
And then pull the pin out from the other side...
At that point, the handle should pull out of the frame even though the lock is still locked, and you can then pull the nut off the back side of the lock, install a new lock, and reassemble everything.
Hope that helps!
|
|
|
|
|
01-03-2017, 06:46 PM
|
#33
|
|
Skoolie
Join Date: Sep 2016
Location: Colorado
Posts: 129
Year: 2000
Coachwork: International
Chassis: CE
Engine: DT466E
|
Quote:
Originally Posted by Rameses
At that point, the handle should pull out of the frame even though the lock is still locked, and you can then pull the nut off the back side of the lock, install a new lock, and reassemble everything.
Hope that helps!
|
Holy cow...Super helpful! Thanks Rameses. Seems like that's going to be the best way to go about it overall, especially since I have to replace one of the latch assemblies anyway. It also looks like even if I do drill out the lock itself, I may not be able to get it to unlatch, depending.
Again, thanks so much!
|
|
|
|
|
01-03-2017, 06:59 PM
|
#34
|
|
Bus Nut
Join Date: Sep 2016
Location: Chapel Hill, NC
Posts: 855
Year: 2002
Coachwork: Blue Bird
Chassis: All American
Engine: Cummins 8.3/Allison MD3060
Rated Cap: 84
|
Quote:
Originally Posted by FuzzWantsABus
Holy cow...Super helpful! Thanks Rameses. Seems like that's going to be the best way to go about it overall, especially since I have to replace one of the latch assemblies anyway. It also looks like even if I do drill out the lock itself, I may not be able to get it to unlatch, depending.
Again, thanks so much! |
 Glad I could help!
I'll be watching to see how it works out for you.
Oh, and I forgot to mention... If you notice in the last couple pics, it looks like there's some sealants between the handle assembly and the door skin. Even after the rivets are drilled out, it'll probably take some serious prying with a bar or a big screwdriver to peel the two pieces of metal apart with that sealant between them.
|
|
|
|
|
01-06-2017, 07:47 PM
|
#35
|
|
Skoolie
Join Date: Sep 2016
Location: Colorado
Posts: 129
Year: 2000
Coachwork: International
Chassis: CE
Engine: DT466E
|
Well, since it's been a wee bit chilly here the last couple of days, not much has happened. So I thought I'd sit down and start a list of what's really important to me about my bus build, so that I can start to strategize and plan accordingly. If I don't know what I really want/need/don't want, how do I build what I really need? I'm definitely going to raise the roof, and after that.........Who knows? This list is by no means exhaustive, and will change plenty, I'm sure. Stuff with a "?" I'm not sure about, or don't think is as important. I welcome suggestions and feedback!
Things that are important in the bus
-Hidden litterbox w/vent or fan
-Must feel open and not crowded
-Modular spaces (able to use for several different functions with minimal changes)
-Built in travel cages for dog and cats?
-REAL shower that doesn't feel cramped (maybe with a bit higher sides so that there is a basin in the bottom)
-Some sort of air filtration system to help with allergies from stuff outside and pets inside
-Plenty of counter space & full sized kitchen sink (no sink in bathroom)
-Windows either: Lots of them above head height, or fewer, bigger, at regular height. All windows must blackout completely.
-Completely walled off driving area (Maybe door? Maybe not?)
-Storage area inside rear e-exit?
-Would be nice to run off of solar, generator, or shore power. Solar is most optional.
-Some sort of air conditioning both for living space and for driver's area. A/C in living space must be full time for pets.
-Some sort of heating for both living space and for driver's area. Heat in living space must be at least tolerable full time for pets.
-Built in computer would be COOL.
-Backup camera
-4 season water system (either insulated, or inside)
-Towing for trailer
-Some sort of modular outdoor pet containment system?
-Awning?
-Would be nice to run everything (stove, fridge, generator) off of diesel, or off of propane, instead of having to have both
-Second gas tank
-Flooring that is durable, easy to clean, and feels warm. Different kinds?-industrial carpet tiles in bedroom area, laminate elsewhere?
-Limited horizontal surfaces for dirt/dust to gather on for ease of cleaning
|
|
|
|
|
01-07-2017, 01:06 AM
|
#36
|
|
Bus Nut
Join Date: Apr 2010
Location: Lebanon, IN
Posts: 272
Year: 1998
Chassis: TC 2000 bluebird
Engine: 5.9 cummins
Rated Cap: 66
|
I had the same problem with my left rear cargo compartment. I removed the center latch but the slide latches at both sides were rusted tight and would not move. I pulled on the cables so hard the cable broke, still no luck.
The solution was the bracket bolted to the side of the cargo compartment. Look at the outside end of the cargo compArtment and you should see two bolts thAt hold the small bracket on, inside the box, that the end latches slide behind to hold the door shut. Just grind the heads of the bolts off and the bracket will fall off inside the box and the door should open right up.
Bill
Michigan
|
|
|
|
|
01-07-2017, 07:10 AM
|
#37
|
|
Skoolie
Join Date: Sep 2016
Location: Colorado
Posts: 129
Year: 2000
Coachwork: International
Chassis: CE
Engine: DT466E
|
Quote:
Originally Posted by miltruckman
I had the same problem with my left rear cargo compartment. I removed the center latch but the slide latches at both sides were rusted tight and would not move. I pulled on the cables so hard the cable broke, still no luck.
The solution was the bracket bolted to the side of the cargo compartment. Look at the outside end of the cargo compArtment and you should see two bolts thAt hold the small bracket on, inside the box, that the end latches slide behind to hold the door shut. Just grind the heads of the bolts off and the bracket will fall off inside the box and the door should open right up.
Michigan
|
Brilliant!! I will look and see....Thanks!
|
|
|
|
|
01-08-2017, 08:28 PM
|
#38
|
|
Skoolie
Join Date: Sep 2016
Location: Colorado
Posts: 129
Year: 2000
Coachwork: International
Chassis: CE
Engine: DT466E
|
Day 5
Well, this went a lot quicker than I expected. I only had to go to the hardware store once (killed my screwdriver bit). WD40 Penetrator is amazing stuff!
Lots of surface rust, but nothing that looks penetrating. No holes at the wheel wells (yippee!!)
The flooring was just linoleum over the metal floor, so once I got all of the metal strips off of the edges and off of the middle, plus the metal shrouds for the heater pipes, it came up like nothing. Now I have to figure out what to do with the giant pile of linoleum in my yard......


|
|
|
|
|
01-11-2017, 08:58 PM
|
#39
|
|
Skoolie
Join Date: Oct 2015
Location: Columbus, Ohio
Posts: 142
Year: 1992
Coachwork: Fisher Body
Chassis: GM "B" Platform
Engine: 350 TBI Chevrolet
Rated Cap: 8
|
That floor looks really solid, maybe the boxes helped protect it?
|
|
|
|
|
01-12-2017, 05:34 AM
|
#40
|
|
Bus Geek
Join Date: Sep 2014
Location: Eustis FLORIDA
Posts: 23,764
Year: 1999
Coachwork: Thomas
Chassis: Freighliner FS65
Engine: Cat 3126
Rated Cap: 15
|
Looks like it needs some Ospho.
|
|
|
|
|
|
| Thread Tools |
|
|
| Display Modes |
 Linear Mode Linear Mode
|
 Posting Rules
|
You may not post new threads
You may not post replies
You may not post attachments
You may not edit your posts
HTML code is Off
|
|
|
|
 » Recent Threads
 |
|
|
|
|
|
|
|
|
|
|
|
|
|
|
|
|
|
|
|
|
|
|
|
|
|
|
|
|
|
|
|
|
|
|
|
|
|


