 |
|
 08-11-2021, 09:12 AM
|
#41
|
|
Bus Geek
Join Date: Jan 2019
Location: Philadelphia
Posts: 7,000
Year: 2003
Coachwork: International
Chassis: CE 300
Engine: DT466e
Rated Cap: 65C-43A
|
Quote:
Originally Posted by dbsoundman

Thanks, your insights as a fellow rust belt dweller are always valued!
I had planned to screw in my other patches for simplicity, but I may at least try to get some rivets for the stair patches since its a tighter space. My free time to work on this build is already limited so Im not sure learning how to weld (again) is in the cards for me, and my welder friend is busy for the foreseeable future.
We will have to have a meet up sometime in PA, there has to be a nice state park somewhere between here and there.
|
Since you can access the underside of the steps pretty easily, you could also use bolts and nuts to attach the patches - assuming you have a helper.
It would be cool to meet up in PA somewhere. I'm hoping to take my bus on its first camping trip this fall in that direction and do some bicycling. Maybe you could bring me a replacement bumper in return for some patching work - I've found a number of bumpers in the Cleveland area but absolutely nothing on the east coast anywhere.
|

|

|
|
08-11-2021, 09:42 AM
|
#42
|
|
Bus Nut
Join Date: Jun 2015
Location: Toledo OH
Posts: 781
Year: 2006
Coachwork: Thomas
Chassis: MVP-EF
Engine: Cat C7 + Allison 3000PTS
|
Quote:
Originally Posted by musigenesis
Since you can access the underside of the steps pretty easily, you could also use bolts and nuts to attach the patches - assuming you have a helper.
It would be cool to meet up in PA somewhere. I'm hoping to take my bus on its first camping trip this fall in that direction and do some bicycling. Maybe you could bring me a replacement bumper in return for some patching work - I've found a number of bumpers in the Cleveland area but absolutely nothing on the east coast anywhere.
|
Yeah the steps are very easily accessible since theyre in front of the wheel!
I have one of those Chicago Electric 125 welders that my brother in law sort of indefinitely borrowed, I can take it back but from what Im seeing on line it kind of looks like a pain to work with.
Im really hoping to have patching done by the end of September and get a wood floor in at least so I can go to New York State in October. I may leave the stairs to work on later though so there may yet be some work to be done at that point. Id love to meet up either way and would be happy to pick up a bumper! Hopefully by then Ill have a radio in the bus too [emoji6]
|
|
|
|
|
08-11-2021, 10:19 AM
|
#43
|
|
Bus Geek
Join Date: Jan 2019
Location: Philadelphia
Posts: 7,000
Year: 2003
Coachwork: International
Chassis: CE 300
Engine: DT466e
Rated Cap: 65C-43A
|
Quote:
Originally Posted by dbsoundman
Hopefully by then Ill have a radio in the bus too [emoji6]
|
Ooh, thanks for reminding me!
|
|
|
|
|
08-11-2021, 02:36 PM
|
#44
|
|
Bus Nut
Join Date: Jul 2019
Location: Suburbs of Winterset, OH
Posts: 802
Year: 2005
Coachwork: Thomas
Chassis: FS65
Engine: Mercedes 6.4L
Rated Cap: just the 2 of us
|
here's how I fixed the rust holes at the wheel wells...knocked off the loose rust, sanded with 80 grit, painted rust converter on it, after rust converter was dry, I put a generous amount of seem sealer to contain water that would find it's way into the hole, applied sheet metal. Used the edge of a board and a hammer to fit the sheet metal, attached with stainless screws.
|
|
|
|
|
08-11-2021, 02:41 PM
|
#45
|
|
Bus Nut
Join Date: Jun 2015
Location: Toledo OH
Posts: 781
Year: 2006
Coachwork: Thomas
Chassis: MVP-EF
Engine: Cat C7 + Allison 3000PTS
|
RE: wheel well patching, thats almost exactly what I was thinking. I like the idea of using a board to help fit the patch to the curve!
Im currently standing in the bus during a heavy rain storm. Its pretty amazing how quickly all the windows fogged up with just me inside! Definitely have leaks at the bottom of the windows, no surprise there. Im still trying to figure out how to fix the leak at the back door; it seems that its just water seeping in below the bottom of the door gasket, since the back of the bus is always angled up a little bit. Not sure how I can fix that.
Also realized that with the covers on the stairs removed theres like a 1 gap between the bottom of the doors and the edge of the bottom step. Ill have to fill that in when I do the stairs somehow.
|
|
|
|
|
08-11-2021, 08:22 PM
|
#46
|
|
Bus Nut
Join Date: Jun 2015
Location: Toledo OH
Posts: 781
Year: 2006
Coachwork: Thomas
Chassis: MVP-EF
Engine: Cat C7 + Allison 3000PTS
|
I didnt quite have enough time to get all my stuff together to start grinding metal tonight, so I worked on another project
retrofitting the dome lights with LED modules I got from super bright LEDs. And super bright they are! Each one consumes 2.4W, so about 0.2 A. Definitely makes me feel better about using the interior lights off the starter batteries!
Ive attached a few pictures of my process. The hardest part is butt splicing the LED into the 12v wire. I hate butt splices but at least I have a great crimper!
|
|
|
|
|
08-11-2021, 09:02 PM
|
#47
|
|
Bus Geek
Join Date: Dec 2017
Location: Dawsonville, Ga.
Posts: 10,482
Year: 1999
Coachwork: Genesis
Chassis: International
Engine: DT466/3060
Rated Cap: 77
|
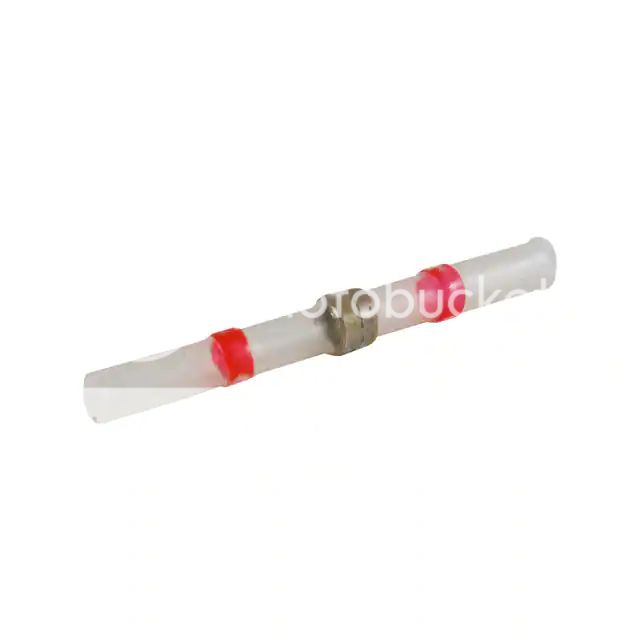
I've been using these lately for butt splicing. The red rings are hot glue, the gray, low heat solder, the tube is heat shrink. These work with a cigarette lighter. Push both wires till they touch and hit it with the lighter, bam done. Cheap in quantity, come in different sizes. I have a kit. 
__________________
I Thank God That He Gifted Me with Common Sense
|
|
|
|
|
08-12-2021, 01:26 PM
|
#48
|
|
Bus Nut
Join Date: Jun 2015
Location: Toledo OH
Posts: 781
Year: 2006
Coachwork: Thomas
Chassis: MVP-EF
Engine: Cat C7 + Allison 3000PTS
|
Quote:
Originally Posted by o1marc
I've been using these lately for butt splicing. The red rings are hot glue, the gray, low heat solder, the tube is heat shrink. These work with a cigarette lighter. Push both wires till they touch and hit it with the lighter, bam done. Cheap in quantity, come in different sizes. I have a kit. |
That's fascinating, what are those called?
I too a day off today while I had a babysitter so I could tackle the initial rust cutting. Here's a smattering of pictures. As I had figured, the passenger side rear was the worst. Someone at some point used caulk to "patch" a rusted out floor member just behind the wheel well...it didn't provide any structural support, it was just there. I suspect this was mainly to pass inspection; the floors seem to be pretty strong even with the missing support there, but I'll put some square tube or something in there when I patch the floor, somehow.
Passenger rear:
"Random piece of metal"

All the crap that was in the void:

The final cutouts:

Driver rear:
Little hole in the actual fender I cut out too, but not terrible.

Passenger front. The cross member is there, but I accidentally cut it a bit, and it has a hole in the top; looks like this is supposed to be square tube. I'm not keen on cutting it out as that would require cutting out more flooring, I'm thinking I'll just try to treat and seal the existing piece, it's still plenty strong, especially considering it's just a supplemental support behind the wheel well, with a floor cross member not too far behind it.


I'll upload pictures of the stairs later once I actually take one...
|
|
|
|
|
08-12-2021, 02:56 PM
|
#49
|
|
Bus Geek
Join Date: Dec 2017
Location: Dawsonville, Ga.
Posts: 10,482
Year: 1999
Coachwork: Genesis
Chassis: International
Engine: DT466/3060
Rated Cap: 77
|
Waterproof Solder Seal Heat Shrink Wire Butt Terminal Connectors
https://www.ebay.com/itm/37364140162...Cclp%3A2334524
__________________
I Thank God That He Gifted Me with Common Sense
|
|
|
|
|
08-17-2021, 12:07 PM
|
#50
|
|
Bus Nut
Join Date: Jun 2015
Location: Toledo OH
Posts: 781
Year: 2006
Coachwork: Thomas
Chassis: MVP-EF
Engine: Cat C7 + Allison 3000PTS
|
Back from the mechanic again, this time for a radiator flush. I noticed the sight bubble on mine was so murky I couldn't see anything, so I figured it was due. Mechanic said there was probably a couple inches of sludge in the bottom of the radiator. He said he wasn't sure exactly what it came from, but it's possible someone put some stop-leak in there at some point. I guess I'll find out now!
Good news is that they were able to clean and re-seal the sight bubble, so now I can at least see the coolant level. Took the long way home and temps stayed just over 200 F so things seem good so far.
I have a few pending tasks to work on in the coming weeks, roughly in order:
- Replace air dryer and main air hose
- Install new shocks
- Remove old cracked sealant around the windows and re-seal (just on the outside, I'm not pulling the windows, that's crazy)
- Cut out 16 or 22 ga steel panels for the holes in my floor (16 for the big holes, 22 for the smaller ones maybe, or I might just do all 16)
- Paint said panels front and back with rust preventative primer/paint
- Vacuum and clean the walls
- Ospho the floor
- Install the patches with sealant and self tapping screws (stair patches may get riveted)
- Prime/paint the whole metal floor
- Put kilmat on the wheel wells (I considered painting them but they're covered in sticky adhesive from the old rubber)
Then it's on to construction, finally!
|
|
|
|
|
08-24-2021, 09:00 AM
|
#51
|
|
Bus Nut
Join Date: Jun 2015
Location: Toledo OH
Posts: 781
Year: 2006
Coachwork: Thomas
Chassis: MVP-EF
Engine: Cat C7 + Allison 3000PTS
|
I forgot to take progress pictures as usual, but I got all of my sheet metal patches cut out and primed on Sunday.
Here's my "workbench", actually worked really well as I could clamp the metal as shown so it didn't flop around as I was cutting with the grinder.


Picked up another "project" which will help prepare the little bit of angle iron I need to set up to fix a missing support behind the passenger rear wheel well. Interestingly this one has a keyless chuck, but the bit seems to be on there pretty good and the whole thing was covered in oil when I got it so I'll have to do some cleaning before I can change out the drill bit. Needs a new belt as well, standard 43" automotive V belt.
 
Still haven't had time to change out the air dryer, I'll try to get to that later this week once I take the bus out to pick up a 13' long wooden workbench I found on Facebook marketplace. I keep stacking up projects to take care of my project, which is really a problem since I'm trying to plan a trip in October...
I also think I may have a failing injector, no loss of power but I think that's the source of my "knocking" sound at certain RPMs. I also noticed some shuddering/stuttering when taking off from a stop one time. Hoping I can get by without having to address that immediately, that job will undoubtedly take a $1k or two and I'm fresh out of those right now.
Anyone have experience with weak injectors and how long you can get by before replacing them?
|
|
|
|
|
09-03-2021, 09:35 AM
|
#52
|
|
Bus Nut
Join Date: Jun 2015
Location: Toledo OH
Posts: 781
Year: 2006
Coachwork: Thomas
Chassis: MVP-EF
Engine: Cat C7 + Allison 3000PTS
|
Hosed off the floor earlier this week, wife sprayed on Ospho on Wednesday, hosed down the floor again this morning.
I'll have to do some hand cleaning to get all that white powder though, I have a good bit of it. Yay more cleaning.
 
Hoping to get some primer down Monday morning or something and top coat of paint by Monday night, but I have to clean the floor and install/seal all the patches first. Then it will likely go back to the mechanic to have the new air dryer and shocks installed. Oh, and I still need to redo the sealant on the outside of the windows...
Also trying to figure out how to build my electrical/house battery compartment over this wheel well. I left some of the old plywood there because it was going to be a massive PITA to get it out with that heater which is connected to the coolant lines through the floor. I will at least cover the old plywood with new plywood to match the level of the new floor. I had initially planned to use 2x4 uprights but I'm not sure I have enough space between the wheel well and the heater. I'll come up with something...hoping to work on that in the garage while the bus is in the shop this week.

|
|
|
|
|
09-03-2021, 08:21 PM
|
#53
|
|
Bus Nut
Join Date: Jun 2015
Location: Toledo OH
Posts: 781
Year: 2006
Coachwork: Thomas
Chassis: MVP-EF
Engine: Cat C7 + Allison 3000PTS
|
Wife bought me one of those blue scrubber brushes on a long handle today, I got back in there, wetted the floor with the shower setting on my hose, scrubbed it down to get the white stuff loose, then used the jet setting to push it all to the front of the bus and out my yet-to-be-patched drain holes. Looks much better now!
Also did some poking around in the electrical compartment, I see how all the switches work, and I think it will be easy to repower certain switches from my house batteries; just pull off the black factory connector block and Im left with metal tabs on the switch which are perfect for faston connectors.
And I finally figured out my brights
turns out the bright/dim switch is a misnomer, I have a feeling it may have been for daytime running lights but they seem to have been long deleted. To activate the brights, just pull back on the turn signal stem until it clicks! Duh. Ordered some 3 fog lights from super bright LEDs anyway so Ill put those on as well, still havent decided what replacement headlights I want so I think Ill take the stock ones out on my maiden voyage.
|
|
|
|
|
09-05-2021, 12:32 PM
|
#54
|
|
Bus Nut
Join Date: Jun 2015
Location: Toledo OH
Posts: 781
Year: 2006
Coachwork: Thomas
Chassis: MVP-EF
Engine: Cat C7 + Allison 3000PTS
|
So the blue brush didnt really help. Ended up going through one more time and wiping the floor down with a wet rag, cleaning by bucket of water out several times in the process. I then used a hand brush to get all the dirt/dust of the corners and edges, then used a wide flat attachment on my shop vac to sweep the whole floor. At that point I was sick of paint prep and finally got to priming the floor! Hand-painting 100 feet of edges literally gave me a blister, and I was just slapping that primer on. I then used a medium nap roller to do the main floor.
For the next layer of actual paint, I got some heavier nap rollers as I had trouble getting the paint into the divots/creases in the floor with the medium nap. I asked my wife what color to paint the floor, she said yellow off hand
guess what I picked up at Home Depot last night! Its all going under the subfloor anyway, although some might end up on the lower part of the walls. I bought grey as well just in case
|
|
|
|
|
09-07-2021, 01:25 PM
|
#55
|
|
Bus Nut
Join Date: Jun 2015
Location: Toledo OH
Posts: 781
Year: 2006
Coachwork: Thomas
Chassis: MVP-EF
Engine: Cat C7 + Allison 3000PTS
|
I HAVE PAINTED THE FLOOR. FINALLY!
Just had to add photo evidence. I put down primer on Saturday, and painted on Monday. I see now that a lot of folks just do primer, but I chose to do both since Rustoleum and conventional wisdom seemed to indicate that the primer on its own doesn't hold up well. Even though I'm covering it with other flooring, now I can be more confident that the metal floor is covered.
You may be wondering why the floor is yellow. Well, I was talking to my wife and asked what color I should get, since Rustoleum offers several basic selections in enamel...she jokingly threw out yellow, and I was like, sure, why not! We won't see it again once it's all said and done.
|
|
|
|
|
09-07-2021, 02:14 PM
|
#56
|
|
Bus Geek
Join Date: Jan 2019
Location: Philadelphia
Posts: 7,000
Year: 2003
Coachwork: International
Chassis: CE 300
Engine: DT466e
Rated Cap: 65C-43A
|
My floor is yellow as well, as is part of the underside. My theory was that yellow would clearly show any continuing rust areas that darker colors might hide, and since I bought a bunch for the underside I just used the same color on the inside as well. I bought blue for the cab since parts of it show underneath the plywood (which I kept 2" away from the edges so I could clearly see any leaking) and that's when I discovered that the blue seems to require only one coat to thoroughly cover the primer, while the yellow requires two coats.
|
|
|
|
|
09-07-2021, 02:16 PM
|
#57
|
|
Bus Nut
Join Date: Jun 2015
Location: Toledo OH
Posts: 781
Year: 2006
Coachwork: Thomas
Chassis: MVP-EF
Engine: Cat C7 + Allison 3000PTS
|
Quote:
Originally Posted by musigenesis
My floor is yellow as well, as is part of the underside. My theory was that yellow would clearly show any continuing rust areas that darker colors might hide, and since I bought a bunch for the underside I just used the same color on the inside as well. I bought blue for the cab since parts of it show underneath the plywood (which I kept 2" away from the edges so I could clearly see any leaking) and that's when I discovered that the blue seems to require only one coat to thoroughly cover the primer, while the yellow requires two coats.
|
Yeah, I dont care about coverage and oil paint is a pain in the butt so Im only doing the one coat of yellow. I bought brush cleaner (nasty stuff) and soaked my brushes in it for multiple days
still think Im going to have to throw them away.
|
|
|
|
|
09-07-2021, 02:19 PM
|
#58
|
|
Bus Geek
Join Date: Jan 2019
Location: Philadelphia
Posts: 7,000
Year: 2003
Coachwork: International
Chassis: CE 300
Engine: DT466e
Rated Cap: 65C-43A
|
Quote:
Originally Posted by dbsoundman
Yeah, I dont care about coverage and oil paint is a pain in the butt so Im only doing the one coat of yellow. I bought brush cleaner (nasty stuff) and soaked my brushes in it for multiple days
still think Im going to have to throw them away.
|
Nothing I hate more than cleaning painting gear. I bought a bunch of chip brushes from Harbor Freight and just tossed them when I was done with them. This is also a big reason why I went with rattle cans for painting the outside - I definitely didn't want to deal with cleaning a sprayer.
|
|
|
|
|
09-20-2021, 05:13 PM
|
#59
|
|
Bus Nut
Join Date: Jun 2015
Location: Toledo OH
Posts: 781
Year: 2006
Coachwork: Thomas
Chassis: MVP-EF
Engine: Cat C7 + Allison 3000PTS
|
Ed came back from almost two weeks at the shop today!
I took it in to have the air dryer and main air line replaced, as well as the shocks. I also asked them to figure out why the air alarm wouldnt shut off.
The air alarm turned into a week long saga of parts hunting. Fortunately the shop knew what they were doing and were able to hunt down the right part. Long story short, most of these sensors are normally closed, but THIS particular one was normally open.
The trip ended up costing about twice what I had budgeted, but that was lol my fault; I underestimated the amount of time each job would need. Not a big deal.
They did tell me that the dash gauges were acting up; with the key on engine off, they initialize just fine (sweep all the way up the back down), but when the engine is on, they just plain dont work. Battery indicator and brake light stays on but those things are working fine (verified), and NONE of the gauges work. Ill work on that in a separate thread but at least I bought a BlueFire so I can build a virtual dashboard instead!
Funny, when I bought my bus there was an identical bus for half the price because the gauges didnt work. Now Im thinking I should have just bought that one and saved myself a step [emoji1787]
|
|
|
|
|
09-20-2021, 06:45 PM
|
#60
|
|
Bus Geek
Join Date: Jan 2019
Location: Philadelphia
Posts: 7,000
Year: 2003
Coachwork: International
Chassis: CE 300
Engine: DT466e
Rated Cap: 65C-43A
|
One thing I wonder about as a user of a BlueFire to compensate for my gauges not working at all half the time, is whether my bus would pass an inspection this way.
|
|
|
|
|
|
 Posting Rules
|
You may not post new threads
You may not post replies
You may not post attachments
You may not edit your posts
HTML code is Off
|
|
|
|
 » Recent Threads
 |
|
|
|
|
|
|
|
|
|
|
|
|
|
|
|
|
|
|
|
|
|
|
|
|
|
|
|
|
|
|
|
|
|
|
|
|
|


 Linear Mode

