 |
|
 08-23-2020, 07:27 PM
|
#41
|
|
Bus Nut
Join Date: Feb 2019
Location: Communist State of New Jersey
Posts: 964
Year: 2004
Coachwork: IC
Chassis: CE200
Engine: T444e
Rated Cap: 27,500
|
Quote:
Originally Posted by o1marc

Cut off section would make a nice trailer or inlaw suite.  |
Yea, I actually mentioned using it as a trailer to my friend who was helping me. The reality is I have to cut it into small enough pieces to haul to a scrap yard. The seat frames and a few inner roof panels weighed just about 1000 pounds. I didn't get a weight on the 35'x90" of water logged plywood but it was heavy and the cushions all went to the dump as well. I suspect I'm probably removing well over a ton from this bus including this shortening.
|

|

|
|
08-23-2020, 08:56 PM
|
#42
|
|
Bus Geek
Join Date: Jan 2019
Location: Philadelphia
Posts: 7,000
Year: 2003
Coachwork: International
Chassis: CE 300
Engine: DT466e
Rated Cap: 65C-43A
|
Have you considered riveting the seam instead of welding?
|
|
|
|
|
08-23-2020, 09:48 PM
|
#43
|
|
Bus Nut
Join Date: Feb 2019
Location: Communist State of New Jersey
Posts: 964
Year: 2004
Coachwork: IC
Chassis: CE200
Engine: T444e
Rated Cap: 27,500
|
Quote:
Originally Posted by musigenesis
Have you considered riveting the seam instead of welding?
|
Yes, I was going to go in that direction originally, drill out all the rivets then use the existing rivet holes on the end cap as a template and redrill new holes after cutting out the section. I decided against it when I drilled a few out as an experiment. I'd have been drilling rivets until I died of old age. I assume my bus is like every other one, using what I take to be bucked rivets, they're very time consuming to drill then drive out. The thought of sitting or laying on the roof drilling out all those rivets at my age just didn't make sense. I could consider riveting together even at the point at which I am now. If I can't find a welder I might consider it but just thinking about all the 1/4" holes I'd have to drill is daunting. Add to that the cost of Clekos and the pliers . . . .
|
|
|
|
|
08-23-2020, 09:58 PM
|
#44
|
|
Bus Geek
Join Date: Jan 2019
Location: Philadelphia
Posts: 7,000
Year: 2003
Coachwork: International
Chassis: CE 300
Engine: DT466e
Rated Cap: 65C-43A
|
Quote:
Originally Posted by Oldyeller
Yes, I was going to go in that direction originally, drill out all the rivets then use the existing rivet holes on the end cap as a template and redrill new holes after cutting out the section. I decided against it when I drilled a few out as an experiment. I'd have been drilling rivets until I died of old age. I assume my bus is like every other one, using what I take to be bucked rivets, they're very time consuming to drill then drive out. The thought of sitting or laying on the roof drilling out all those rivets at my age just didn't make sense. I could consider riveting together even at the point at which I am now. If I can't find a welder I might consider it but just thinking about all the 1/4" holes I'd have to drill is daunting. Add to that the cost of Clekos and the pliers . . . .
|
I wasn't thinking about drilling out any rivets, just that you could join up your current seams with something like a 2" wide strip of sheet and two rows of rivets (one row on each side of the seam). Maybe 150 holes in total, which is not so bad with a good drill bit. Cost of clecos and the pliers would be less than the cost of the rivets (which are about $0.50 each - 3/16 are more cost-effective at about $0.20 each); the cost of all the gear and fasteners needed (including the pneumatic riveter and a compressor) would probably be about the same as the cost of hiring a mobile welder for three or four hours.
|
|
|
|
|
08-23-2020, 10:20 PM
|
#45
|
|
Bus Nut
Join Date: Feb 2019
Location: Communist State of New Jersey
Posts: 964
Year: 2004
Coachwork: IC
Chassis: CE200
Engine: T444e
Rated Cap: 27,500
|
Quote:
Originally Posted by musigenesis
I wasn't thinking about drilling out any rivets, just that you could join up your current seams with something like a 2" wide strip of sheet and two rows of rivets (one row on each side of the seam). Maybe 150 holes in total, which is not so bad with a good drill bit. Cost of clecos and the pliers would be less than the cost of the rivets (which are about $0.50 each - 3/16 are more cost-effective at about $0.20 each); the cost of all the gear and fasteners needed (including the pneumatic riveter and a compressor) would probably be about the same as the cost of hiring a mobile welder for three or four hours.
|
You think 3/16" rivets would be sufficient? I was considering 1/4" but I guess that was because 1/4" is what's there so it was a natural assumption to go with those. I was already considering harvesting a strip of the roof from the discarded section. I guess I could also cut out a couple pieces from the sides of the discarded section too.
I know you can get water tight rivets, does it matter whether you install those from the outside or the inside? I had already been thinking about making the 'joint' over the ribs to enhance strength which would be even more important for riveting and would improve the chances of seam sealer doing it's job if the seam is more stable.
I have an adequate compressor already. I also had bought the Harbor Freight air riveter but I took it back when I decided to weld instead. I suspect that same riveter is back on the shelf by now if I decide to go that route. 
Thanks for this suggestion. It gives me another option. I'll decide which way to go once I get an estimate from a welder, both time and money estimates. At this point saving time is almost more important than saving money. My goal is to roll out of New Jersey in this bus before snow flies. I may do it with the bus full of 'stuff' necessary to finish AND furnish it when I get to Daytona Beach but getting there is the key.
|
|
|
|
|
08-25-2020, 06:03 PM
|
#46
|
|
Bus Nut
Join Date: Feb 2019
Location: Communist State of New Jersey
Posts: 964
Year: 2004
Coachwork: IC
Chassis: CE200
Engine: T444e
Rated Cap: 27,500
|
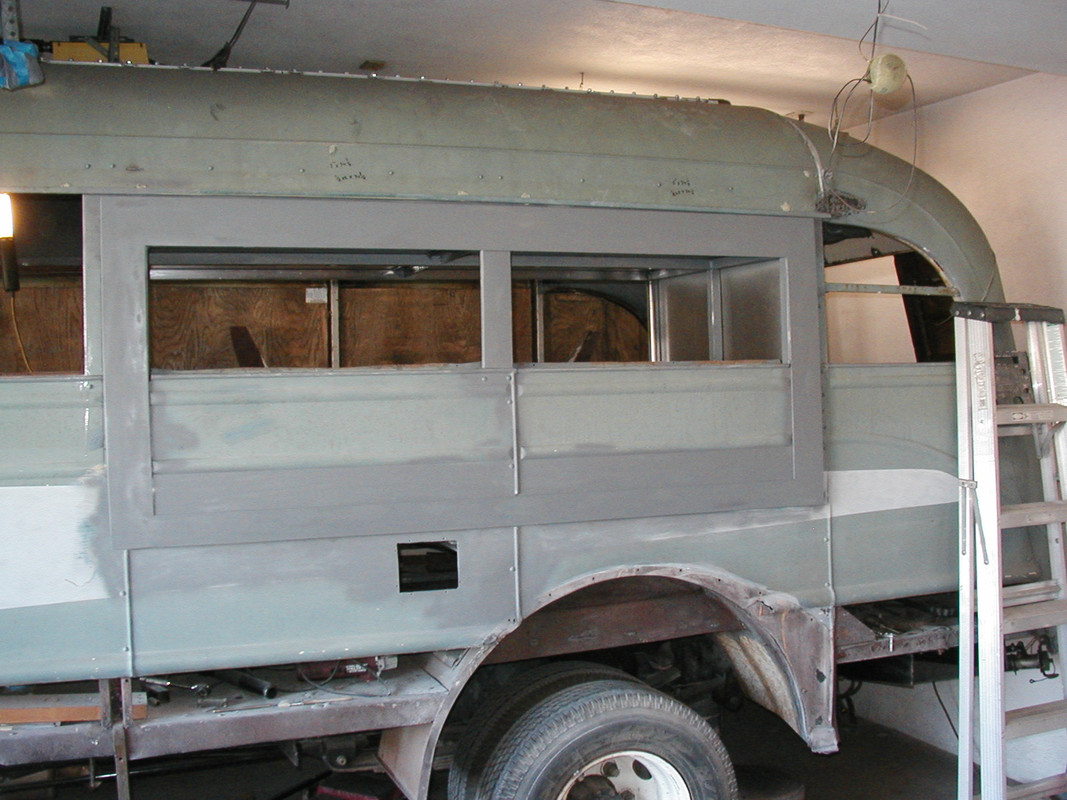
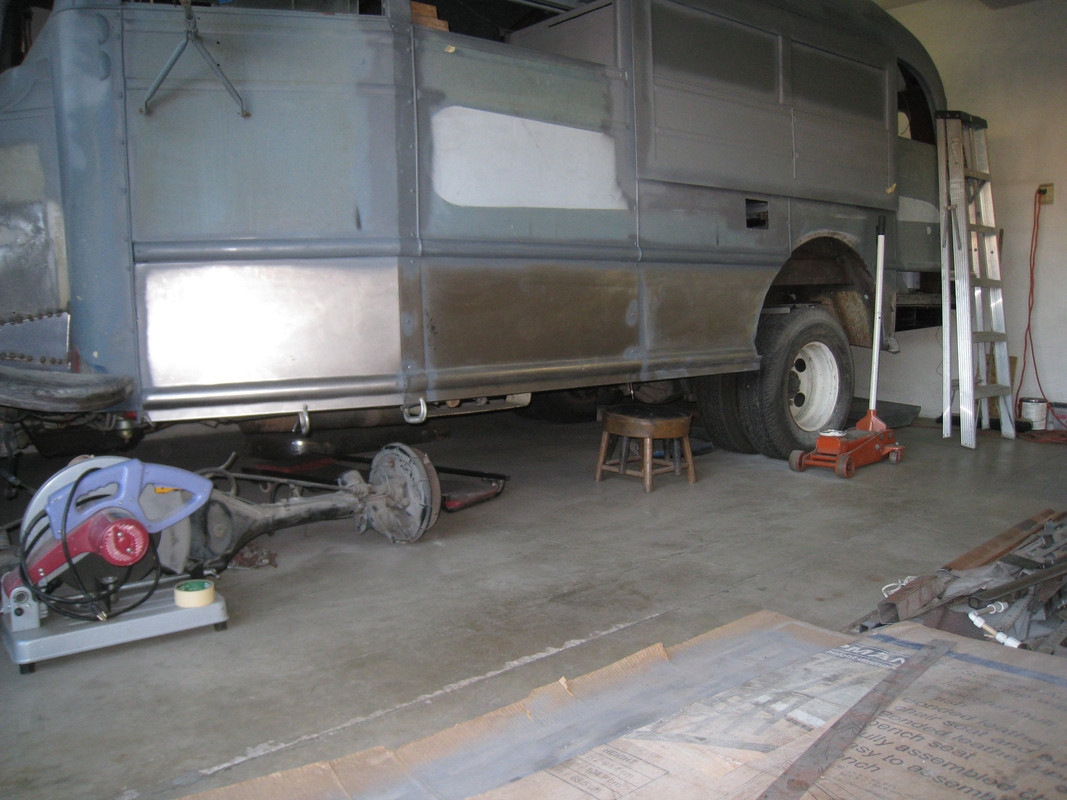
Today I spent the day getting the rear cap to fit to the new rear of the bus. Last week when I cut the clamping bolts (2) that hold the rear cap I notice it sprung up. When I dropped the rear cap back on the frame it was clear it was too high because the rubber isolator pads weren't compressed like the ones on the rest of the bus body. This caused the roof of the cap to be higher than the rest of the roof. I knew I had to make relief cuts on the roof forward of the cap roof edge to allow it to slide under the forward roof edge. I got that done today and got the cap roof edge under it and pulled the cap forward. I'm almost close enough to do some welding, if I can find a welder to come in and do it.
It might actually fit together better than I hoped but I don't want to jinx myself so I never said that. There's not much more I can do until I have a welder look at it and give me input and/or agree to take on the job.
I just talked to my friend, the one at who's farm I'm staying, and his iron worker friend will stop by this weekend and look at the bus. Hopefully he or a co-worker will agree to do the job.
The rest of the week I'll be sanding on the body. I've got to get paint on it by mid-September.
Here are some pics. of the bus as of the end of today.
|
|
|
|
|
08-25-2020, 06:09 PM
|
#47
|
|
Bus Nut
Join Date: Feb 2019
Location: Communist State of New Jersey
Posts: 964
Year: 2004
Coachwork: IC
Chassis: CE200
Engine: T444e
Rated Cap: 27,500
|
More pics.
|
|
|
|
|
08-25-2020, 08:12 PM
|
#48
|
|
Bus Geek
Join Date: Jan 2019
Location: Philadelphia
Posts: 7,000
Year: 2003
Coachwork: International
Chassis: CE 300
Engine: DT466e
Rated Cap: 65C-43A
|
Pop rivets you want to install from the outside, since the rounded head is on the side you do the installation. The other side ends up looking like a little squashed barrel, not very attractive and it would look very weird on the outside.
Closed-end rivets are watertight as far as the rivet itself is concerned (i.e. no water will leak through the mandrel in the center) but you can still get leaking between the clamped parts as well as around the rivet and through the hole the rivet is occupying. So you'll want seam sealer between the pieces and also a dab around each hole before a rivet goes in.
This is a handy table of rivet strengths. 3/16" SS rivets have a shear strength of 1650 pounds while 1/4" rivets have a shear strength of 2450 pounds, so 3/16" rivets every 2" is roughly equivalent structurally to 1/4" rivets every 3". 3/16" rivets are 67% as strong as 1/4" rivets but cost 40% as much, so they're a more cost-effective choice. It does mean more holes to use 3/16", but the holes are smaller at least. There's also the issue that the 1/4" HF rivet gun does great with 3/16" but doesn't seem to quite have enough oomph to properly pull the 1/4" rivets - I pretty much just use 3/16" everywhere now because of this.
Having hired a local welder and been less than happy with his ability and his ethics (not to mention his sanity), I would definitely make a welder demonstrate to me what he can do before letting him work on my bus. Welding thin sheet metal (probably 20 ga. in the case of your roof panels) is difficult to do, and there's a risk of heat warpage making the whole thing look very wonky at the end.
FWIW I would offer to weld your bus up for you, but I am not at all confident of dealing with the heat warping.
|
|
|
|
|
08-25-2020, 08:14 PM
|
#49
|
|
Bus Geek
Join Date: Jan 2019
Location: Philadelphia
Posts: 7,000
Year: 2003
Coachwork: International
Chassis: CE 300
Engine: DT466e
Rated Cap: 65C-43A
|
I can't tell from the pics, but do you have any overlap between the cut rear section and the forward part? If so, that would make welding the end back on about 1/2 as difficult as what I described with a seam-covering band.
|
|
|
|
|
08-25-2020, 10:15 PM
|
#50
|
|
Bus Geek
Join Date: Dec 2017
Location: Dawsonville, Ga.
Posts: 10,482
Year: 1999
Coachwork: Genesis
Chassis: International
Engine: DT466/3060
Rated Cap: 77
|
With all the work on the back of mine I followed suit with what International did and that was use screws instead of rivets in many places. A zinc coated #10 panhead screw used with a #2 square drive bit makes easy work using the existing holes left by rivets. Cosmetically almost unnoticeable difference and just as strong a connection with no leakage worries.
__________________
I Thank God That He Gifted Me with Common Sense
|
|
|
|
|
08-26-2020, 10:28 AM
|
#51
|
|
Bus Nut
Join Date: Feb 2019
Location: Communist State of New Jersey
Posts: 964
Year: 2004
Coachwork: IC
Chassis: CE200
Engine: T444e
Rated Cap: 27,500
|
Quote:
Originally Posted by musigenesis
Pop rivets you want to install from the outside, since the rounded head is on the side you do the installation. The other side ends up looking like a little squashed barrel, not very attractive and it would look very weird on the outside.
Closed-end rivets are watertight as far as the rivet itself is concerned (i.e. no water will leak through the mandrel in the center) but you can still get leaking between the clamped parts as well as around the rivet and through the hole the rivet is occupying. So you'll want seam sealer between the pieces and also a dab around each hole before a rivet goes in.
This is a handy table of rivet strengths. 3/16" SS rivets have a shear strength of 1650 pounds while 1/4" rivets have a shear strength of 2450 pounds, so 3/16" rivets every 2" is roughly equivalent structurally to 1/4" rivets every 3". 3/16" rivets are 67% as strong as 1/4" rivets but cost 40% as much, so they're a more cost-effective choice. It does mean more holes to use 3/16", but the holes are smaller at least. There's also the issue that the 1/4" HF rivet gun does great with 3/16" but doesn't seem to quite have enough oomph to properly pull the 1/4" rivets - I pretty much just use 3/16" everywhere now because of this.
Having hired a local welder and been less than happy with his ability and his ethics (not to mention his sanity), I would definitely make a welder demonstrate to me what he can do before letting him work on my bus. Welding thin sheet metal (probably 20 ga. in the case of your roof panels) is difficult to do, and there's a risk of heat warpage making the whole thing look very wonky at the end.
FWIW I would offer to weld your bus up for you, but I am not at all confident of dealing with the heat warping. |
Thanks for the primer on rivets and riveting, it might come in handy.
As I mentioned, the welder I would use is a friend of the guy on who's farm I'm staying on. I suspect he'd tell me if he doesn't think he could handle welding the sheet metal. I'm hoping he will, at least, weld the sides. Worst case I'll rivet the roof and the floor. I don't WANT to rivet on the roof but I'll do what I have to.
|
|
|
|
|
08-26-2020, 10:35 AM
|
#52
|
|
Bus Nut
Join Date: Feb 2019
Location: Communist State of New Jersey
Posts: 964
Year: 2004
Coachwork: IC
Chassis: CE200
Engine: T444e
Rated Cap: 27,500
|
Quote:
Originally Posted by musigenesis
I can't tell from the pics, but do you have any overlap between the cut rear section and the forward part? If so, that would make welding the end back on about 1/2 as difficult as what I described with a seam-covering band.
|
I left some overlap on the roof sections. That made it more difficult to fit the end cap because when I cut the 2 1/2" bolts clamping the end cap to the frame the rubber isolaters expanded, when I put the cap back on the end cap was higher than the forward section due to the thicker isolaters. I had to make relief cuts in the forward section of the roof in order to wedge the cap roof section under it. It's quite ugly and it remains to be seen if it's even workable. Maybe once I tighten those half inch bolts the end cap will come down and I can pound the roof into submission - there's always hope?
In terms of overlap, I have a whole section of the bus body I can cut pieces from so if the welder suggested lapping anything I just have to cut the pieces off the discarded section.
|
|
|
|
|
08-26-2020, 10:45 AM
|
#53
|
|
Bus Nut
Join Date: Feb 2019
Location: Communist State of New Jersey
Posts: 964
Year: 2004
Coachwork: IC
Chassis: CE200
Engine: T444e
Rated Cap: 27,500
|
Quote:
Originally Posted by o1marc
With all the work on the back of mine I followed suit with what International did and that was use screws instead of rivets in many places. A zinc coated #10 panhead screw used with a #2 square drive bit makes easy work using the existing holes left by rivets. Cosmetically almost unnoticeable difference and just as strong a connection with no leakage worries.
|
I'd have to go with self tapping screws since I didn't drill out all those rivets. I've thought about doing that but didn't know if it would be adequate, thank you for telling me it will work. I recall seeing a post somewhere by someone who used screws and mentioned which ones worked well and which didn't.
I guess I could also use screws on the floor, to join the seam and fix the rusty spots. I was thinking rivets or welding but self tapping screws would be easier and on patches there's no concern about strength.
I appreciate all the good suggestions you folks are providing. I feel better knowing that I have a couple alternatives to welding.
|
|
|
|
|
08-26-2020, 11:00 AM
|
#54
|
|
Bus Geek
Join Date: Jan 2019
Location: Philadelphia
Posts: 7,000
Year: 2003
Coachwork: International
Chassis: CE 300
Engine: DT466e
Rated Cap: 65C-43A
|
One other thing: if you do decide to rivet the back part on, clecos don't really exert any pulling power, and with SS rivets the HF riveter has all it can handle just compressing the rivet, so it also will not exert a whole lot of force to pull the two pieces of sheet together (especially with the 1/4"); the sheets need to be already closely joined for the rivets to work well. Since you have access to the inside as well as the outside (and presumably a helper), you can use nuts and bolts instead of clecos to tightly join the sheets initially, then rivet all the empty holes, then remove the bolts and rivet behind them as you go. Or just use bolts entirely - I can never remember if they're cheaper or more expensive than rivets.
|
|
|
|
|
08-26-2020, 01:52 PM
|
#55
|
|
Bus Geek
Join Date: Dec 2017
Location: Dawsonville, Ga.
Posts: 10,482
Year: 1999
Coachwork: Genesis
Chassis: International
Engine: DT466/3060
Rated Cap: 77
|
Quote:
Originally Posted by Oldyeller
I'd have to go with self tapping screws since I didn't drill out all those rivets. I've thought about doing that but didn't know if it would be adequate, thank you for telling me it will work. I recall seeing a post somewhere by someone who used screws and mentioned which ones worked well and which didn't.
I guess I could also use screws on the floor, to join the seam and fix the rusty spots. I was thinking rivets or welding but self tapping screws would be easier and on patches there's no concern about strength.
I appreciate all the good suggestions you folks are providing. I feel better knowing that I have a couple alternatives to welding.
|
You can see factory screws as well as replacements in the rub rail. Anywhere a rivet came out, a crew will replace it. Saves a ton of labor.
__________________
I Thank God That He Gifted Me with Common Sense
|
|
|
|
|
08-26-2020, 05:04 PM
|
#56
|
|
Bus Nut
Join Date: Feb 2019
Location: Communist State of New Jersey
Posts: 964
Year: 2004
Coachwork: IC
Chassis: CE200
Engine: T444e
Rated Cap: 27,500
|
Quote:
Originally Posted by musigenesis
One other thing: if you do decide to rivet the back part on, clecos don't really exert any pulling power, and with SS rivets the HF riveter has all it can handle just compressing the rivet, so it also will not exert a whole lot of force to pull the two pieces of sheet together (especially with the 1/4"); the sheets need to be already closely joined for the rivets to work well. Since you have access to the inside as well as the outside (and presumably a helper), you can use nuts and bolts instead of clecos to tightly join the sheets initially, then rivet all the empty holes, then remove the bolts and rivet behind them as you go. Or just use bolts entirely - I can never remember if they're cheaper or more expensive than rivets.
|
So you believe that, for instance, a 5/16" bolt with a nyloc (or loctited) nut would provide sufficient strength?
BTW, where did you get your rivets? I have a bookmark for BoltDepot.com, is that where you got yours?
|
|
|
|
|
08-26-2020, 05:21 PM
|
#57
|
|
Bus Nut
Join Date: Feb 2019
Location: Communist State of New Jersey
Posts: 964
Year: 2004
Coachwork: IC
Chassis: CE200
Engine: T444e
Rated Cap: 27,500
|
Quote:
Originally Posted by o1marc
You can see factory screws as well as replacements in the rub rail. Anywhere a rivet came out, a crew will replace it. Saves a ton of labor.
|
Yes, my bus has bucked rivets, blind rivets and screws and mine looks much like yours.
What prompted you to NOT use the original rivet holes in that top picture? When I tried to get a few of my rivets out some of the holes were damaged. That, plus the amount of time to remove each rivet, is what prompted me to skip that and simply cut the sheet metal as you can see in the pictures I've posted. I'll have to look back when it's done and decide if my approach actually saves time. If my freehand cuts are close enough it might pay off.
What source did you use for your screws and do they penetrate well? Do they pull the sheet metal together tightly?
Did you consider using roofing screws with integrated rubber watertight washers? What length did you choose?
|
|
|
|
|
08-26-2020, 07:12 PM
|
#58
|
|
Bus Geek
Join Date: Dec 2017
Location: Dawsonville, Ga.
Posts: 10,482
Year: 1999
Coachwork: Genesis
Chassis: International
Engine: DT466/3060
Rated Cap: 77
|
Quote:
Originally Posted by Oldyeller
Yes, my bus has bucked rivets, blind rivets and screws and mine looks much like yours.
What prompted you to NOT use the original rivet holes in that top picture? When I tried to get a few of my rivets out some of the holes were damaged. That, plus the amount of time to remove each rivet, is what prompted me to skip that and simply cut the sheet metal as you can see in the pictures I've posted. I'll have to look back when it's done and decide if my approach actually saves time. If my freehand cuts are close enough it might pay off.
What source did you use for your screws and do they penetrate well? Do they pull the sheet metal together tightly?
Did you consider using roofing screws with integrated rubber watertight washers? What length did you choose?
|
Since I installed double doors in mine, I had to make new corner pieces. that one side came up a bit short, so drilled new holes. The old ones will be bondo or sealed up.
Yes, they pull together as well as a rivet. Use a 1/2-3/4" length. I sealed the seams inside so don't see watertite being an issue. I got mine from Home Depot, tractor supply is much cheaper, because they sell the nuts and bolts by the pound, not the piece. If the hole is wallored at all, you can jump up to a 1/4" screw which I think is the next oversize, and doesn't look out of place with the #10's.
https://www.homedepot.com/p/Everbilt...0202/204275122
__________________
I Thank God That He Gifted Me with Common Sense
|
|
|
|
|
08-26-2020, 07:31 PM
|
#59
|
|
Bus Geek
Join Date: Apr 2012
Location: So Cal
Posts: 3,231
Year: 1935
Coachwork: Superior
Chassis: Chevy
Engine: 317 ci/tid / Isuzu
|
Since you can use either a weld or a pop rivet or a bolt, maybe a combination approach would work.
I replaced all the lower panels on my bus and I wanted the exterior look to be stock. Therefore I welded inside and used smooth round head 3/16" carriage bolts with nuts, washers and lock tight where the original buck rivets were replaced. Once completed a scared Nun trying to get out of the cross walk in front of me could hardly notice the difference between the buck rivet and the carriage bolt.
Jack 
 .
 .
|
|
|
|
|
08-26-2020, 07:47 PM
|
#60
|
|
Bus Geek
Join Date: Jan 2019
Location: Philadelphia
Posts: 7,000
Year: 2003
Coachwork: International
Chassis: CE 300
Engine: DT466e
Rated Cap: 65C-43A
|
Quote:
Originally Posted by Oldyeller
So you believe that, for instance, a 5/16" bolt with a nyloc (or loctited) nut would provide sufficient strength?
BTW, where did you get your rivets? I have a bookmark for BoltDepot.com, is that where you got yours?
|
5/16 would be more than you'd need (again, depending on how many fasteners per inch you're using). 1/4-20 would be fine.
I got most of my rivets here: https://www.rivetsonline.com/, recently got a batch from BoltDepot. Seems about the same price either way.
|
|
|
|
|
|
 Posting Rules
|
You may not post new threads
You may not post replies
You may not post attachments
You may not edit your posts
HTML code is Off
|
|
|
|
 » Recent Threads
 |
|
|
|
|
|
|
|
|
|
|
|
|
|
|
|
|
|
|
|
|
|
|
|
|
|
|
|
|
|
|
|
|
|
|
|
|
|


 Linear Mode

