 |
|
 08-29-2021, 02:45 PM
|
#2201
|
|
Bus Nut
Join Date: Feb 2019
Location: Communist State of New Jersey
Posts: 964
Year: 2004
Coachwork: IC
Chassis: CE200
Engine: T444e
Rated Cap: 27,500
|
I recall you had rust issues underneath so - yea - discretion being the better part valor, masking is safer.
|

|

|
|
08-29-2021, 04:19 PM
|
#2202
|
|
Bus Geek
Join Date: Jan 2019
Location: Philadelphia
Posts: 7,000
Year: 2003
Coachwork: International
Chassis: CE 300
Engine: DT466e
Rated Cap: 65C-43A
|
|
|
|
|
|
08-29-2021, 04:23 PM
|
#2203
|
|
Bus Geek
Join Date: Jan 2019
Location: Philadelphia
Posts: 7,000
Year: 2003
Coachwork: International
Chassis: CE 300
Engine: DT466e
Rated Cap: 65C-43A
|
Final painting tally: 34 cans of antique white, 12 cans of burgundy, 8 cans of navy blue. About $250 worth of rattle cans, plus about 6 rolls of tape @ $6 each, 6 rolls of masking paper @ $4 each, and about $30 worth of orbital sander sheets. About $340 total, not counting the grueling labor.
|
|
|
|
|
08-29-2021, 04:23 PM
|
#2204
|
|
Bus Nut
Join Date: Jun 2015
Location: Toledo OH
Posts: 781
Year: 2006
Coachwork: Thomas
Chassis: MVP-EF
Engine: Cat C7 + Allison 3000PTS
|
Quote:
Originally Posted by musigenesis

Final painting tally: 34 cans of antique white, 12 cans of burgundy, 8 cans of navy blue. About $250 worth of rattle cans, plus about 6 rolls of tape @ $6 each, 6 rolls of masking paper @ $4 each, and about $30 worth of orbital sander sheets. About $340 total, not counting the grueling labor.
|
Trying to quantify labor in terms of money on a bus build will never turn out well.
|
|
|
|
|
08-29-2021, 10:06 PM
|
#2205
|
|
Bus Nut
Join Date: Mar 2020
Location: Western MT
Posts: 629
Year: 1990
Chassis: Crown Supercoach
Engine: Detroit 6-71TA, 10 sp.
Rated Cap: 90 (40')
|
Quote:
Originally Posted by musigenesis
Painting complete. Yay! On to the next job: painting. Yay!
|
Way to go man! It's inspiring to see you plow through these huge tasks. And it looks fantastic to boot!
|
|
|
|
|
08-29-2021, 10:51 PM
|
#2206
|
|
Bus Nut
Join Date: Aug 2020
Location: Mesa, AZ
Posts: 787
Year: 1993
Coachwork: 44' Newell Coach
Engine: 8v92T Detroit
Rated Cap: 2 adults and two pigeons
|
Looks really nice!
__________________
--Simon
|
|
|
|
|
08-29-2021, 11:27 PM
|
#2207
|
|
Bus Nut
Join Date: Jan 2015
Location: Brazoria County, Texas
Posts: 819
Year: 1997
Coachwork: Carpenter
Chassis: International
Engine: T444E
Rated Cap: 32 Passenger
|
Im really diggin it MG !!! 
|
|
|
|
|
08-29-2021, 11:45 PM
|
#2208
|
|
Skoolie
Join Date: Nov 2020
Location: Long Island, NY
Posts: 167
Year: 2009
Coachwork: Girardin
Chassis: Chevy
Engine: 6.6 turbo diesel
Rated Cap: ?
|
You should feel quite accomplished. Your labor really paid off. It looks great!
|
|
|
|
|
08-30-2021, 07:52 PM
|
#2209
|
|
Bus Geek
Join Date: Jan 2019
Location: Philadelphia
Posts: 7,000
Year: 2003
Coachwork: International
Chassis: CE 300
Engine: DT466e
Rated Cap: 65C-43A
|
Installed my new round reflectors. Took a look at the old ones and realized that other than the rusted screws, they cleaned up fine and look perfectly new. $42 down the drain, oh well.


Painted the brackets for my mud flaps. Took a look at my new front 20" x 18" flaps and realized they fit perfectly, other than the fact that they have four holes instead of three. I guess my old 19" x 14.5" ones were too short.

Spent the rest of the day on my four amber upper clearance lights. The middle ones didn't work initially and it took me a bit of searching to locate the wires for them running to the cab. My wiring harness is now even messier and more jury-rigged than before.


The two lower middle clearance lights are going to require me to go back into the cut wires running out of my electrical box and figure out which ones feed them. As I understand it, these lights are supposed to come on with the clearance lights but also blink on and off with their respective turn signals. I only have two unused white wires coming out of the box and I think those are the grounds for these two lights but locating the positives are going to take some work.
Other than those two, I need to install the three identification lamps on the front cap. I should be street-legal tomorrow for the first time in over two years.
|
|
|
|
|
08-30-2021, 07:53 PM
|
#2210
|
|
Bus Geek
Join Date: Jan 2019
Location: Philadelphia
Posts: 7,000
Year: 2003
Coachwork: International
Chassis: CE 300
Engine: DT466e
Rated Cap: 65C-43A
|
Quote:
Originally Posted by Tejon7
Way to go man! It's inspiring to see you plow through these huge tasks. And it looks fantastic to boot!
|
Quote:
Originally Posted by Bus'n it
Looks really nice!
|
Quote:
Originally Posted by Phatman
Im really diggin it MG !!! |
Quote:
Originally Posted by Buster Junior
You should feel quite accomplished. Your labor really paid off. It looks great!
|
Thanks all!
|
|
|
|
|
08-30-2021, 08:19 PM
|
#2211
|
|
Bus Nut
Join Date: Jun 2015
Location: Toledo OH
Posts: 781
Year: 2006
Coachwork: Thomas
Chassis: MVP-EF
Engine: Cat C7 + Allison 3000PTS
|
Where did you get the replacement reflector? I need two for the rear of my bus.
|
|
|
|
|
08-30-2021, 09:18 PM
|
#2212
|
|
Bus Geek
Join Date: Jan 2019
Location: Philadelphia
Posts: 7,000
Year: 2003
Coachwork: International
Chassis: CE 300
Engine: DT466e
Rated Cap: 65C-43A
|
Quote:
Originally Posted by dbsoundman
Where did you get the replacement reflector? I need two for the rear of my bus.
|
I can mail you two of my old red ones if you like. I got the new ones from these guys: https://www.ohiodieselparts.com/ on Amazon.
I don't completely trust them, however. I communicated with them via text because I ordered amber and red reflectors with a black plastic backing so they would match my LED clearance lights (which have black gaskets), but the red ones were plain without the black plastic. The guy explained that they just have whatever their supplier sends them which was fine, but I finished with a "Go Browns!" message and he never responded. Their company is in Twinsburg which is very close to where I grew up, but he's probably a Steelers fan.
|
|
|
|
|
08-31-2021, 10:42 AM
|
#2213
|
|
Bus Nut
Join Date: Jul 2017
Posts: 819
Year: 1993
Chassis: IH 3800
Engine: DT360
Rated Cap: 66
|
Looking good bud. Yeah I still need to get my marker lights fixed from altering the rear of the bus. One side works but the other side is dead. Just have to splice some wiring yet... thinking about going to LED while I'm at it.
Anyways, keep up the good work!
|
|
|
|
|
08-31-2021, 01:28 PM
|
#2214
|
|
Bus Nut
Join Date: Jun 2015
Location: Toledo OH
Posts: 781
Year: 2006
Coachwork: Thomas
Chassis: MVP-EF
Engine: Cat C7 + Allison 3000PTS
|
Quote:
Originally Posted by musigenesis
I can mail you two of my old red ones if you like. I got the new ones from these guys: https://www.ohiodieselparts.com/ on Amazon.
I don't completely trust them, however. I communicated with them via text because I ordered amber and red reflectors with a black plastic backing so they would match my LED clearance lights (which have black gaskets), but the red ones were plain without the black plastic. The guy explained that they just have whatever their supplier sends them which was fine, but I finished with a "Go Browns!" message and he never responded. Their company is in Twinsburg which is very close to where I grew up, but he's probably a Steelers fan. |
Yeah I'll take the old ones, thanks!
Did you get my other PM?
|
|
|
|
|
08-31-2021, 03:49 PM
|
#2215
|
|
Bus Geek
Join Date: Jan 2019
Location: Philadelphia
Posts: 7,000
Year: 2003
Coachwork: International
Chassis: CE 300
Engine: DT466e
Rated Cap: 65C-43A
|
Quote:
Originally Posted by dbsoundman
Yeah I'll take the old ones, thanks!
Did you get my other PM?
|
Yeah, I got your PM. I thought I had replied to it before but apparently I did not. I replied again just now.
|
|
|
|
|
08-31-2021, 08:23 PM
|
#2216
|
|
Bus Geek
Join Date: Jan 2019
Location: Philadelphia
Posts: 7,000
Year: 2003
Coachwork: International
Chassis: CE 300
Engine: DT466e
Rated Cap: 65C-43A
|
The hole positions I chose for my new front ID lamps happened to hit exactly on the old holes so it was super-easy to drill them out through the bondo. I'm left wondering, though, why I even bondoed over the holes in the first place. I put quite a lot of time into bondoing the front cap, but I think it was mainly to cover over an antenna hole on the top of it. Can't remember, this was before I started a build thread here and started taking regular pics.
A build thread with pics is really worth the tiny investment of time, just so you know what the heck you even did and why you did it that way.


Rear mud flap brackets painted and flaps reinstalled.


Decided my new front laps would fit with new holes and a small notch cut off one corner.


These were an absolute bear to install, since there was essentially no room to get the center bolt in between the fender and the body front behind it. Still not exactly sure how I managed it.

It hangs down about 3" lower than the original, but it's still 6" above the ground, which is ... legal? I dunno. I tried googling it but all I could find was the maximum height above the ground, and that seems to vary from state to state.

Driver's side flap was even harder.


It's a great comfort to not particularly care what your cab looks like, makes running wires a lot easier. The expanded steel sheet was also handy since I can attach wires to it with cable ties.

Now with even more of a tangled mess to eventually clean up somehow.

An attempt at some night shots of my new lights and reflectors, something my iPod is not at all capable of.


|
|
|
|
|
08-31-2021, 08:36 PM
|
#2217
|
|
Bus Geek
Join Date: Jan 2019
Location: Philadelphia
Posts: 7,000
Year: 2003
Coachwork: International
Chassis: CE 300
Engine: DT466e
Rated Cap: 65C-43A
|
Drove back to my lot tonight and heard a super-loud crash/bang from the back as I went around a corner. I figured I had just trashed my second microwave oven, but it was actually my 100 pound dumbbell cart smashing into my desk. I showed it to my neighbor yesterday but forgot to run the retaining deadbolt back into the floor afterwards. Nice little dent in the desk now.
I'm really going to need to continue with my plan of wiring up the starter interlock circuit (which I left intact) to all the stuff in my living space that I need to have secured before driving.
|
|
|
|
|
08-31-2021, 09:56 PM
|
#2218
|
|
Bus Geek
Join Date: Apr 2012
Location: So Cal
Posts: 3,231
Year: 1935
Coachwork: Superior
Chassis: Chevy
Engine: 317 ci/tid / Isuzu
|
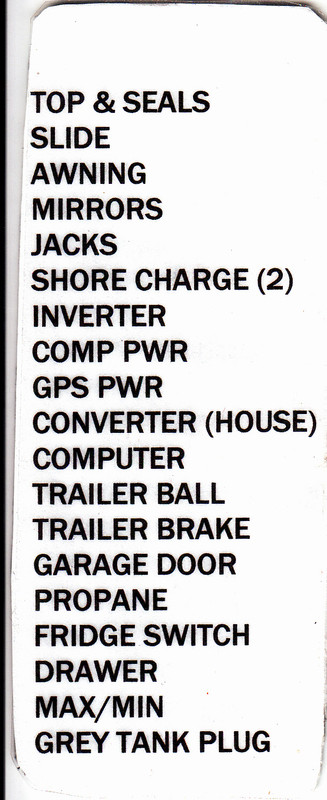
You need one of these posted on the left front "A" pillar--sure has saved my a$$ a couple of times!
Jack 
 .
|
|
|
|
|
08-31-2021, 10:01 PM
|
#2219
|
|
Bus Geek
Join Date: Jan 2019
Location: Philadelphia
Posts: 7,000
Year: 2003
Coachwork: International
Chassis: CE 300
Engine: DT466e
Rated Cap: 65C-43A
|
Quote:
Originally Posted by ol trunt
You need one of these posted on the left front "A" pillar--sure has saved my a$$ a couple of times!
|
Amen. What is "MAX/MIN"?
|
|
|
|
|
08-31-2021, 10:55 PM
|
#2220
|
|
Bus Geek
Join Date: Apr 2012
Location: So Cal
Posts: 3,231
Year: 1935
Coachwork: Superior
Chassis: Chevy
Engine: 317 ci/tid / Isuzu
|
A Max/Min is an old school mercury thermometer made by Taylor. It reads present temp and last lowest temp and last highest temp. Can't get 'em any more and it's easy to forget if it is hanging outside the bus hence the reminder.
Jack
|
|
|
|
|
|
 Posting Rules
|
You may not post new threads
You may not post replies
You may not post attachments
You may not edit your posts
HTML code is Off
|
|
|
|
 » Recent Threads
 |
|
|
|
|
|
|
|
|
|
|
|
|
|
|
|
|
|
|
|
|
|
|
|
|
|
|
|
|
|
|
|
|
|
|
|
|
|


 Linear Mode

