 |
|
 07-15-2021, 05:19 AM
|
#2041
|
|
Bus Geek
Join Date: Jan 2019
Location: Philadelphia
Posts: 7,000
Year: 2003
Coachwork: International
Chassis: CE 300
Engine: DT466e
Rated Cap: 65C-43A
|
Quote:
Originally Posted by Kentucky Dreaming

|
Don't worry, the drawer is only a threat to my DIY toilet.
|

|

|
|
07-15-2021, 06:39 PM
|
#2042
|
|
Bus Geek
Join Date: Jan 2019
Location: Philadelphia
Posts: 7,000
Year: 2003
Coachwork: International
Chassis: CE 300
Engine: DT466e
Rated Cap: 65C-43A
|
|
|
|
|
|
07-15-2021, 08:53 PM
|
#2043
|
|
Bus Nut
Join Date: Jan 2015
Location: Brazoria County, Texas
Posts: 819
Year: 1997
Coachwork: Carpenter
Chassis: International
Engine: T444E
Rated Cap: 32 Passenger
|
The more you post, the more impressive it gets!! Keep up the GREAT work MG !!
|
|
|
|
|
07-16-2021, 04:14 PM
|
#2044
|
|
Bus Geek
Join Date: Jan 2019
Location: Philadelphia
Posts: 7,000
Year: 2003
Coachwork: International
Chassis: CE 300
Engine: DT466e
Rated Cap: 65C-43A
|
Built the rolling cart thing to hold my dial-a-weight dumbbells. This will go under my couch with a pair of track/guides and have one of my usual cabinet faces on the front. I'm going to need something a bit beefier than my roller clasps to hold it in place, of course.


100 pounds of rolling death (each one can be dialed up to 50 pounds). It's funny, I weigh about 175 pounds right now but at my heaviest some years ago I was at 225. It's hard for me to imagine walking around all day carrying one of these things, but that's exactly what I was doing.
|
|
|
|
|
07-17-2021, 04:34 PM
|
#2045
|
|
Bus Geek
Join Date: Jan 2019
Location: Philadelphia
Posts: 7,000
Year: 2003
Coachwork: International
Chassis: CE 300
Engine: DT466e
Rated Cap: 65C-43A
|
Started trimming out the front side of my couch.

One of the runners for my dumbbell cart.

These were incredibly unpleasant to install. There's 9" of clearance and I had to use my right-angle attachment on the drill. Would have been much easier to do this before the couch went in.

The guides keep the cart pretty well in line and it doesn't bind going in and out. I'll add some stops just above the 2x4s so it can't bounce up.

Finished framing and trimming the front and measured for the doors and panels. The left side will have a door that opens downward, the middle door will be fixed to the dumbbell cart and the right opening will have a fixed panel in front of it, since that space can be accessed via the hinged couch headrest above it. Thought about doing drawers on each side of the cart, but I didn't feel like trying to reach in under the couch to install the sliders for them.

|
|
|
|
|
07-19-2021, 04:30 PM
|
#2046
|
|
Bus Geek
Join Date: Jan 2019
Location: Philadelphia
Posts: 7,000
Year: 2003
Coachwork: International
Chassis: CE 300
Engine: DT466e
Rated Cap: 65C-43A
|
Panels for the undercouch storage.

Attached the hinges and clasp for the door. I put the clasp on the right side since that corner was bowing out slightly. It did nothing - this variety of clasp is pretty secure but it doesn't seem to do any really pulling-in. I might try adjusting it but the tiny screws they come with are just such a pain.


The front for the dumbbell cart fit perfectly. I assumed I would have to do a bunch of tweaking like I did with everything else and add some angle bracing to get it snug against the framing, but none of that was necessary.

I did manage to screw up and not place the pull handle in the center - another victim of me trying to read a ruler upside-down. Fortunately easy to fix.

These blocks on the back of the door will keep the cart from bouncing up. I'll add a cargo strap to keep the dumbbells themselves from bouncing up.

Mamma-jamma deadbolt to keep the cart in place. Hopefully this will be sufficient.

Screwed in the fixed panel on the right. If this looks like the couch is bowing out somewhat between the left and center doors, that's only because it is. 
Once I put the final flooring in place, I'll add the piece of framing for underneath the middle door, but this will be fixed to the door itself and slide out with it. Have to do it this way since the cart's wheels wouldn't go over it otherwise.


|
|
|
|
|
07-21-2021, 04:52 PM
|
#2047
|
|
Bus Geek
Join Date: Jan 2019
Location: Philadelphia
Posts: 7,000
Year: 2003
Coachwork: International
Chassis: CE 300
Engine: DT466e
Rated Cap: 65C-43A
|
|
|
|
|
|
07-22-2021, 07:18 PM
|
#2048
|
|
Bus Geek
Join Date: Jan 2019
Location: Philadelphia
Posts: 7,000
Year: 2003
Coachwork: International
Chassis: CE 300
Engine: DT466e
Rated Cap: 65C-43A
|
Did an experiment (fortunately) riveting 1/4" Lexan to some plastic from my roof hatch with 3/16" SS rivets.

Complete fail. I guess the plastic is too soft and the SS deforms through the hole and the piece pulls right out.

I guess I need to try this with aluminum rivets or just use screws.
|
|
|
|
|
07-22-2021, 08:32 PM
|
#2049
|
|
Bus Geek
Join Date: Apr 2012
Location: So Cal
Posts: 3,231
Year: 1935
Coachwork: Superior
Chassis: Chevy
Engine: 317 ci/tid / Isuzu
|
I have had good luck using 3M brand double stick (foam) tape to attach lexan to various surfaces. It also works well with polycarbonate which otherwise is about impossible to secure. I used 1/2" angle iron along the front and rear edges on my polycarbonate as insurance against wind lift and it has held up for ten years without leaking. If you follow this idea, be sure to pay the bit extra for "real" 3M double stick tape--there is a difference!
Be absolutely sure there is no "oily" or silicone residue on either surface before you apply the tape.
Jack 
 .
|
|
|
|
|
07-22-2021, 08:58 PM
|
#2050
|
|
Bus Geek
Join Date: Jan 2019
Location: Philadelphia
Posts: 7,000
Year: 2003
Coachwork: International
Chassis: CE 300
Engine: DT466e
Rated Cap: 65C-43A
|
Quote:
Originally Posted by ol trunt
I have had good luck using 3M brand double stick (foam) tape to attach lexan to various surfaces. It also works well with polycarbonate which otherwise is about impossible to secure. I used 1/2" angle iron along the front and rear edges on my polycarbonate as insurance against wind lift and it has held up for ten years without leaking. If you follow this idea, be sure to pay the bit extra for "real" 3M double stick tape--there is a difference!
Be absolutely sure there is no "oily" or silicone residue on either surface before you apply the tape.
|
Hmm, that's an interesting idea. It would certainly be easier than rivets or screws. I have a strong bias towards mechanical fasteners, though.
|
|
|
|
|
07-22-2021, 09:01 PM
|
#2051
|
|
Bus Geek
Join Date: Apr 2012
Location: So Cal
Posts: 3,231
Year: 1935
Coachwork: Superior
Chassis: Chevy
Engine: 317 ci/tid / Isuzu
|
Me too---that's why I used both.
Jack
|
|
|
|
|
07-22-2021, 10:26 PM
|
#2052
|
|
Bus Crazy
Join Date: Oct 2020
Location: Florida
Posts: 1,570
Coachwork: Integrated Coach Corp.
Chassis: RE-300 42ft
Engine: 466ci
Rated Cap: 90
|
Quote:
Originally Posted by musigenesis
Did an experiment (fortunately) riveting 1/4" Lexan to some plastic from my roof hatch with 3/16" SS rivets.
Attachment 59756
Complete fail. I guess the plastic is too soft and the SS deforms through the hole and the piece pulls right out.
Attachment 59757
I guess I need to try this with aluminum rivets or just use screws. |
A washer on each side, is used to rivet hinges & light brackets to fiberglass on aircraft. The rivet squeezes the two together, pinching the resin & limiting the rivet expansion. Often a backer strip of aluminum or steel on each side. Maybe this would work for you? (With .1910 holes)
|
|
|
|
|
07-22-2021, 10:56 PM
|
#2053
|
|
Bus Geek
Join Date: Jan 2019
Location: Philadelphia
Posts: 7,000
Year: 2003
Coachwork: International
Chassis: CE 300
Engine: DT466e
Rated Cap: 65C-43A
|
Quote:
Originally Posted by DeMac
A washer on each side, is used to rivet hinges & light brackets to fiberglass on aircraft. The rivet squeezes the two together, pinching the resin & limiting the rivet expansion. Often a backer strip of aluminum or steel on each side. Maybe this would work for you? (With .1910 holes)
|
No, I have no access to the inside of the hatch to do this, unfortunately. I should have experimented with this before filling the inside with XPS and bondoing over the inside of the square cut-out.
|
|
|
|
|
07-24-2021, 05:05 PM
|
#2054
|
|
Bus Geek
Join Date: Jan 2019
Location: Philadelphia
Posts: 7,000
Year: 2003
Coachwork: International
Chassis: CE 300
Engine: DT466e
Rated Cap: 65C-43A
|
I knew aluminum rivets were going to fail but I had to try anyway.

Drilled the holes for the latch cover.

Two dabs of construction adhesive and Dynatron-570 (the white stuff!) around the edges to seal it.

Decided to use 3/4" #12 SS machine screws to attach to the plastic of the hatch. They grip pretty well and a lot easier than riveting anyway.

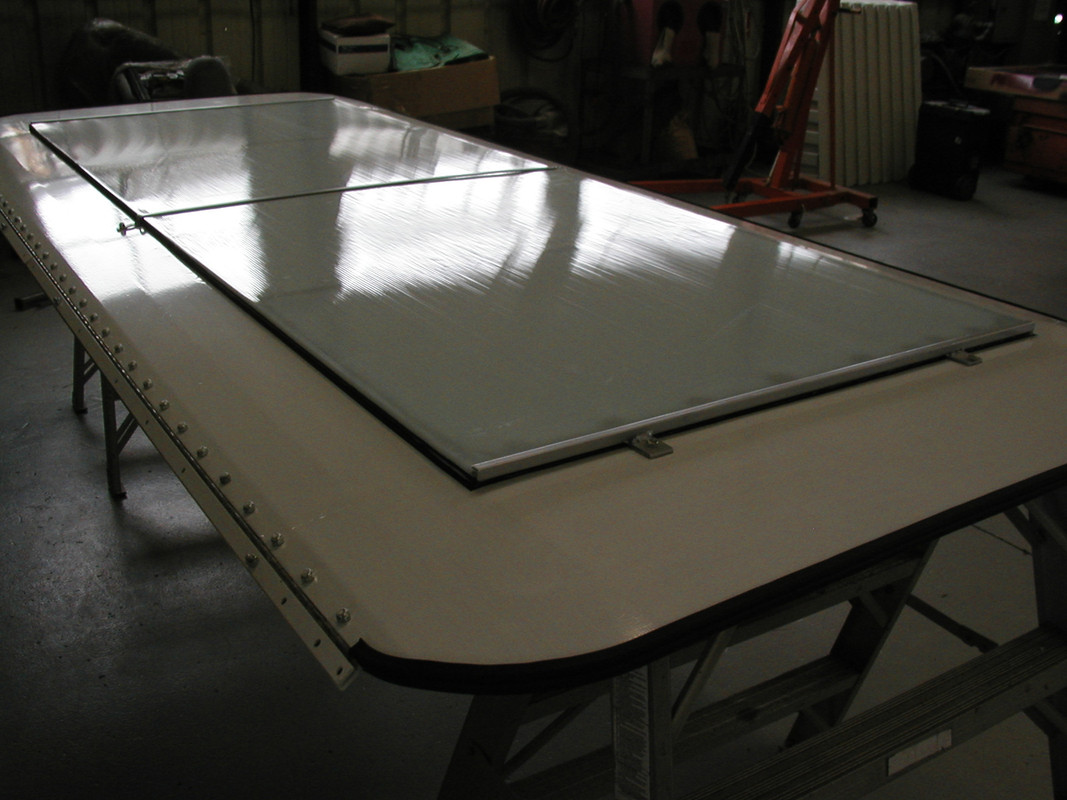
Cut the plexiglass to fit around the latch cover and the rounded corners.


Marked out the screw holes (every 2").

Lexan is so easy to drill. Love this stuff.

Ran in two screws to hold it in place and then drilled the rest of the pilot holes in the hatch.

Bead of Dynatron-570 around the edges. I decided not to use construction adhesive as well as screws since it doesn't really seem to adhere too well to Lexan and I think (hope) the screws will be sufficient.

All screwed in and glopped up. I got good squeeze-out all around with the edge bead, so I think this thing will be watertight - at least initially. My big concern will be what happens to it after it sits in direct sunlight all day for a long time.

Looks good from the underside, which is all I care about.

We're supposed to get some thunderstorms tomorrow night, so I'll install this on the bus tomorrow and see how it does.
|
|
|
|
|
07-24-2021, 11:28 PM
|
#2055
|
|
Bus Nut
Join Date: Dec 2017
Location: Sandpoint, ID
Posts: 542
Year: 2003
Coachwork: Girardin Microbird MB-IV
Chassis: Ford E450
Engine: 7.3 Diesel
Rated Cap: 25
|
Great looking skylight! And your interior is really coming along. You are making great progress!
|
|
|
|
|
07-25-2021, 09:08 AM
|
#2056
|
|
Bus Nut
Join Date: May 2018
Location: Wamego Ks
Posts: 617
Year: 2007
Chassis: Collins
Engine: 6.6L LMM Duramax
|
Quote:
Originally Posted by musigenesis
I knew aluminum rivets were going to fail but I had to try anyway.
Attachment 59774
Drilled the holes for the latch cover.
Attachment 59775
Two dabs of construction adhesive and Dynatron-570 (the white stuff!) around the edges to seal it.
Attachment 59776
Decided to use 3/4" #12 SS machine screws to attach to the plastic of the hatch. They grip pretty well and a lot easier than riveting anyway.
Attachment 59777
Cut the plexiglass to fit around the latch cover and the rounded corners.
Attachment 59778
Attachment 59779
Marked out the screw holes (every 2").
Attachment 59780
Lexan is so easy to drill. Love this stuff.
Attachment 59781
Ran in two screws to hold it in place and then drilled the rest of the pilot holes in the hatch.
Attachment 59782
Bead of Dynatron-570 around the edges. I decided not to use construction adhesive as well as screws since it doesn't really seem to adhere too well to Lexan and I think (hope) the screws will be sufficient.
Attachment 59783
All screwed in and glopped up. I got good squeeze-out all around with the edge bead, so I think this thing will be watertight - at least initially. My big concern will be what happens to it after it sits in direct sunlight all day for a long time.
Attachment 59784
Looks good from the underside, which is all I care about.
Attachment 59785
We're supposed to get some thunderstorms tomorrow night, so I'll install this on the bus tomorrow and see how it does. |
Looking great! Hope it holds up during the thunderstorm test!!
|
|
|
|
|
07-25-2021, 09:51 AM
|
#2057
|
|
Bus Geek
Join Date: Jan 2019
Location: Philadelphia
Posts: 7,000
Year: 2003
Coachwork: International
Chassis: CE 300
Engine: DT466e
Rated Cap: 65C-43A
|
Bored this morning so I decided to go over and install the skyhatch.


The Lexan got a little scuffed at some point (probably from the band saw) but it's not super-noticeable.

Another happy accident: the other hatch fits perfectly under the couch. The Lexan is pretty heavy, so both of these hatches weigh about the same amount.

Since I'm not 100% confident yet that the skyhatch doesn't leak.

I like how it's not visible from the outside that this is anything but an ordinary emergency hatch.

First time since I've owned the bus that nobody can break in without literally breaking something (or picking the MasterLock on the door, I guess).
|
|
|
|
|
07-25-2021, 11:20 AM
|
#2058
|
|
Bus Nut
Join Date: Mar 2021
Location: Connecticut
Posts: 638
Year: 2009
Coachwork: Gillig
Chassis: G27E102
Engine: Cummins ISL 280
Rated Cap: 26,000 lbs
|
Great progress! The entertainment keeps coming.
Quote:
Originally Posted by musigenesis
I like how it's not visible from the outside that this is anything but an ordinary emergency hatch.
|
Yeah, Im into that too. Going to put a strip of white material (aluminum or PVC I think) around my solar panels so a casual observer will be none the wiser.
Quote:
|
First time since I've owned the bus that nobody can break in without literally breaking something (or picking the MasterLock on the door, I guess).
|
Im not there yet. These buses are incredibly easy to steal. Mine doesnt even have an ignition key. Nor a lockable door.
|
|
|
|
|
07-25-2021, 02:15 PM
|
#2059
|
|
Bus Geek
Join Date: Jan 2019
Location: Philadelphia
Posts: 7,000
Year: 2003
Coachwork: International
Chassis: CE 300
Engine: DT466e
Rated Cap: 65C-43A
|
Quote:
Originally Posted by peakbus
Great looking skylight! And your interior is really coming along. You are making great progress!
|
Quote:
Originally Posted by Frochevy
Looking great! Hope it holds up during the thunderstorm test!!
|
Quote:
Originally Posted by Bert06840
Great progress! The entertainment keeps coming.
|
Thanks guys!
|
|
|
|
|
07-25-2021, 09:40 PM
|
#2060
|
|
Bus Geek
Join Date: Jan 2019
Location: Philadelphia
Posts: 7,000
Year: 2003
Coachwork: International
Chassis: CE 300
Engine: DT466e
Rated Cap: 65C-43A
|
Oh well, so much for testing my skyhatch's watertightness any time soon.

Good time for me to paint the darn thing, I guess.
|
|
|
|
|
|
 Posting Rules
|
You may not post new threads
You may not post replies
You may not post attachments
You may not edit your posts
HTML code is Off
|
|
|
|
 » Recent Threads
 |
|
|
|
|
|
|
|
|
|
|
|
|
|
|
|
|
|
|
|
|
|
|
|
|
|
|
|
|
|
|
|
|
|
|
|
|
|


 Linear Mode

