 |
|
 10-17-2004, 01:56 PM
|
#1
|
|
Bus Nut
Join Date: Nov 2003
Location: Whidbey Island, Washington (USA)
Posts: 465
|
S-caper Conversion News
Hi All,
It's been a while since I had time to participate here...too much work! 
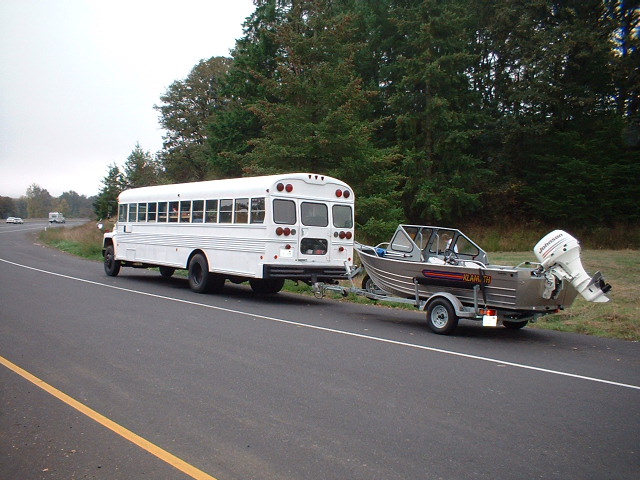
Around the first part of September we decided to use the bus for our transportation to Lake Shasta for our annual vacation there. We usually go in our Class C motorhome but it needed 6 new tires (ouch!) and gets about 6.5mpg on premium fuel. The tires on the bus are great and I get just a tad over 9mpg on diesel so we decided to put our money and efforts into the bus.
Of couse, the only work I had done on the bus at the point of the decision was to remove all the seats (almost a year ago!); we had a lot to do to get ready for the trip. Here's what happened:
1) I removed the two rear underseat heaters and their hoses and tubing
2) We painted the bus white; Kool Seal on the roof and Rust Stop (from Ace) on the rest of the body
3) I had a hitch installed so we could pull our boat and I wired for lights
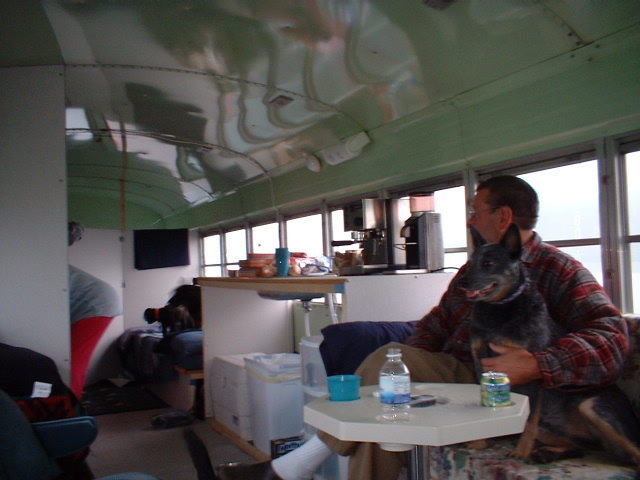
4) I installed a "quickie" interior with:
- A couch and table
- Two swivel seats (these came from a '92 Astro van; very comfy!)
- A galley counter with sink and running water
- Enclosed bathroom with portable toilet
- Two bunks; one on each side of the bus with reading lights
- A 1200-watt inverter for the Espresso machine
- A rear partition to form a "trunk" for all the stuff we haul
And...we made it. The trip was fun and the bus ran just great. Now I'm really excitied about doing the "real" conversion. I posted a revised floor plan in our photo album here:
http://www.skoolie.net/albums/S-cape...r_Workshop.jpg.
After doing the Quick & Dirty interior and seeing how things looked "in real life" we decided we really wanted to find a way to get the work shop area into the rear of the bus to take advantage of all the windows and the large rear opening door. Plus, I'll be able to seal up the wall between the shop and the rest of the bus really well to avoid pastel dust and fumes from varnish, fixitives, etc reaching the living area. This meant giving up the large queen-sized bed across the back of the bus and due to the wheel well location I couldn't just move it forward in the same orientation without losing major space so we decided to settle for bunk beds on the right side. The lower bed will pull out into a double when we're parked for any length of time (and for those cold winter nights  ).
I also split the galley and while a it's a little uncoventional it sure opened up a lot of counter space and gives a really nice work area. Certainly an arguement can be made against having to negotiate a route through the kitchen to the bathroom past a busy cook but it's usually going to be just the two of us and we get along just fine. Again, the position of the wheel wells dictated where the shower and toilet had to go. Had I moved them to a position ahead of the wheel wells things up front would get really tight. I could have placed the them ahead of the galley near the living area but that would have effectively formed a "wall" and closed off the rear of the bus and left the living area feeling isolated. I found I really liked being able to see everything going on in the bus from the driver's seat (I left the school bus mirror in place); I could see when folks were moving around so I could be extra careful in my manuevers or warn them if we were getting into rough or curvy sections of highway. I also really enjoyed the open, airy feeling and the visibility; I could open the rear door in the rear partition and look striaght our the back door, which was great for launching the boat.
I'll get some photos (if the rain will just stop for a bit) of the bus and post them in our album as soon as I can.
All the best...
|

|

|
|
10-27-2004, 08:48 AM
|
#2
|
|
Bus Nut
Join Date: Nov 2003
Location: Whidbey Island, Washington (USA)
Posts: 465
|
I still haven't gotten out to get good photos of the bus after our "Quickie" conversion but Bill (1/2 of the other couple that went with us to Lake Shasta) got a few shots during the trip. I've updated our gallery page and the photos can be found here (click the photos):
 and here:  and here: 
|
|
|
|
|
10-27-2004, 11:58 AM
|
#3
|
|
Almost There
Join Date: Mar 2004
Location: Fir Island, Washington
Posts: 83
|
Hi Les,  Like you I have been working on my boats this summer. But, Fall is here and for the past week I have been framing inside the bus. Boy is this fun. I am going to finish the head today. The chest of drawers is in place and framed in and the hanging closet is pretty much done. Next will be the queen size bed frame and mattress. The Crown is painted Maroon & Cream with a white heat reflective roof. I have removed some of the windows in the Crown so if any has any questions I may be able to assist. The nice thing about working on the interior is that the weather is really not much of a factor here on Fir Island.
Later,J.B.Phillips 
|
|
|
|
|
10-27-2004, 12:03 PM
|
#4
|
|
Almost There
Join Date: Mar 2004
Location: Fir Island, Washington
Posts: 83
|
HI Again,  OOP's, I forgot to tell you that I have cut a new door in on the passenger side. With a mid entry I will be able to sit side by side with my riding comppanion with a console in the middle while I am driving.
Later, J.B.
|
|
|
|
|
10-28-2004, 08:30 AM
|
#5
|
|
Bus Nut
Join Date: Nov 2003
Location: Whidbey Island, Washington (USA)
Posts: 465
|
Hi J.B.,
I did this first conversion in about 2 weeks time just before we left on vacation; the decision to use the bus came at the last minute. Depending on time and funds I may gut the bus again over the winter and start into the "real" (as in "my goodness that looks really nice") conversion.  The roof was done with Kool Seal and the "it looks real good if you stand pretty far away" paint job on the rest of the bus was done with Rust Stop high cover white from Ace Hardware. I'll leave the Kool Seal but the white on the remainder will not be the final paint scheme.
Doing the "quikie" conversion turned out to be a useful project; not only did it give us a neat vehicle to use for our vacation trip but I learned alot about the floorplan and how to install things in the bus (and it got me motivated!).
I'll have to wander over to Fir Island again one of these days to see your work-of-art in progress.
|
|
|
|
|
10-28-2004, 09:33 AM
|
#6
|
|
Skoolie
Join Date: Dec 2003
Location: Summit, Oregon
Posts: 125
Year: 1975
Coachwork: Crown
Chassis: Supercoach
Engine: DD 6-71N
|
Hey J B,
Got any pictures of that Crown.
Jerry
'75 two axel Crown
|
|
|
|
|
10-28-2004, 10:58 AM
|
#7
|
|
Almost There
Join Date: Mar 2004
Location: Fir Island, Washington
Posts: 83
|
Hi Jerry, , I do not have any pictures curently but when I do I will try to post them for all to see. I am trying to find a sheet metal shop to make my window covers to replace the current cardboard covers.
Later, J.B.
|
|
|
|
|
10-28-2004, 11:45 AM
|
#8
|
|
Skoolie
Join Date: Dec 2003
Location: Summit, Oregon
Posts: 125
Year: 1975
Coachwork: Crown
Chassis: Supercoach
Engine: DD 6-71N
|
I had a utility and horsetrailer building place make mine for me.
Good luck
Jerry
|
|
|
|
|
10-29-2004, 10:02 AM
|
#9
|
|
Bus Nut
Join Date: Nov 2003
Location: Whidbey Island, Washington (USA)
Posts: 465
|
After more hours than I care to recount I believe I've finally gotten our Final Floorplan worked out. Everyone's got to figure out a layout that works for them and no two need to be the same. I learned so much from looking at other floorplans that I post mine here to foster other ideas for folks. We have very specific needs in our bus; mostly to accommodate a workshop area for my artist wife and for our piano (she plays, I plunk) so the floorplan is unique. But, that's why we choose to convert a Skoolie in the first place!
Here's a small version of the plan, click on it to go to a larger version:

The thought process:
We decided we just had to have the workshop in the rear of the bus in order to take advantage of all those windows and the large rear door; it also allows us to have a small "porch" on the back with steps to come and go without traipsing through the rest of the bus. The wall separating the workshop from the rest of the bus can be well sealed to keep pastel dust, fixative spray, varnish odors and such out of the main living area.
The wheelwells turned out to be a major hassle from a layout standpoint; about the only elegant way to deal with them is to span them with a cabinet or bed and this starts to dictate where certain things have to go. The toilet room and shower obviously had to miss them.
I tried bunk beds (as shown earlier in this thread) but couldn't get enough height for the water tank under the lower bunk, the lower mattress, decent headroom for the lower bunk, the upper bunk frame and mattress, and headroom for the upper bunk...so I gave up on that.
One requirement was that we'd have a double bed when desired. I finally hit on the idea of installing a 30" wide bunk on each side of the bus exactly opposite from each other; the mattress flats (frame, support, whatever you call it) will be mounted on heavy-duty drawer slides and each bunk will roll inward 15" to the middle of the bus to form a Queen sized bed when together. Since each bunk only has to move half of its width (and because they make some really skookum drawer slides) supporting the bunks won't be a problem. The bunks will be set up like Captain's beds on a boat; they'll be fairly high off the floor and each will have a 50-gallon fresh water tank under it and storage drawers for clothing. The cabinets at the head of the bed will provide small bookcases (for paperback-sized books) along with reading lights and angled headboards for reading in bed. There's a pocket door or curtain between the walls at the forward end of the bunks to close off the bedroom/bath area for privacy.
I gave up one swiveling lounge seat on the passenger side (from earlier floorplans) to get more counter space for the kitchen but I gained an area that will allow me to install a floor-to-ceiling forward-facing cabinet at the forward end of the kitchen counter. This will have a bookcase in the upper part (with appropriate book retainers), a desk in the middle part with a flip down or pull out shelf which we can use for writing or for a place to work on the laptop, and the lower portion will be a storage (probably wine) cabinet. The inboard end of the cabinet (facing the passageway) will house the various control panels (AC, DC, etc) for the bus; probably behind a smoked glass (plexi) door.
Based on a coffee table we have in our house where the top lifts up on an articulated mount to make a dining height table I devised a similar mount to use on the piano (it's a Yamaha electronic model, not an acoustic!) so that it can live under the couch when not in use. When desired one would lift the seat cushion off the couch, remove a lift-off seat section of the couch seat and then the piano will lift up and at the same time move toward the middle of the bus (it's just the way the mount works). We'll use a folding piano stool for seating.
Well, that's it for now; now all I've got to do is build it! At least, finally, I know how I'll build it and the actual construction will be fun (I hope ).
|
|
|
|
|
10-29-2004, 01:17 PM
|
#10
|
|
Skoolie
Join Date: Jul 2004
Location: Duluth, MN
Posts: 243
|
Looks like a cool layout. One question...skookum?
|
|
|
|
|
10-29-2004, 06:06 PM
|
#11
|
|
Bus Nut
Join Date: Feb 2004
Location: Grundy, Virginia
Posts: 632
Year: 1985
Coachwork: ThomasBuilt
Chassis: International Harvester S-1700
Engine: 9L IHC V-8 Diesel 180HP
Rated Cap: 60
|
Very clever!
The idea about the beds meeting in the center of the bus is a VERY CLEVER idea! I may appropriate it (one day.) Where is it writ that a bed *has to* be against an exterior wall?
Doh!
Very nice layout, too.
Two things I have considered:
Roof deck -- most are as wide as (or narrower than) the bus. How about one with pull-outs (from underneath) that extended the deck width by 50% on each side, AND could also function as window awnings/shades AND drop down to cover the windows so no one could break them out if you left it parked somewhere.
The "back porches" that I have seen make me think about adding "side porches" that would fold up against the sides of the bus. Park and drop the porches (even one in front) and you could have a walk-around deck.
|
|
|
|
|
10-30-2004, 08:54 AM
|
#12
|
|
Bus Nut
Join Date: Nov 2003
Location: Whidbey Island, Washington (USA)
Posts: 465
|
Quote:
|
Originally Posted by Firearm
Looks like a cool layout. One question...skookum?
|
Hi Firearm,
It should actually be Skookum (with a capital 'S') since it's a proper Native American name. In our parts it means stout, strong, built like a brick sh*thouse, etc. Nowadays it's become part of the northwest vocabulary with a small "s"; kinda like kleenex (which should have a capital "K" and only refer to that specific brand).
|
|
|
|
|
10-30-2004, 09:31 AM
|
#13
|
|
Bus Nut
Join Date: Nov 2003
Location: Whidbey Island, Washington (USA)
Posts: 465
|
Re: Very clever!
Quote:
|
Originally Posted by Eric von Kleist
The idea about the beds meeting in the center of the bus is a VERY CLEVER idea! I may appropriate it (one day.) Where is it writ that a bed *has to* be against an exterior wall?
|
Given a long enough bus and the right layout I'd just as soon have an island queen (with all 'round access) like the Big Boys do but I think that takes a 35 to 40-foot flat nose and the bus needs to be 8-1/2 feet wide to make it work really well. I didn't have that with our 35-foot flip-nose, 8' wide bus and with the last 5 feet of the bus designated as the work shop. I really ended up with about 21-feet of bus to get the "living quarters" in to (equivalent to a 9-window bus).
This layout was really a response to a set of specific requirements. It's like those little puzzles where you've got a bunch of squares that slide around and only one open space. Each of the requirements was one of those squares and I just kept moving them around the bus until they fit.
Quote:
Two things I have considered:
Roof deck -- most are as wide as (or narrower than) the bus. How about one with pull-outs (from underneath) that extended the deck width by 50% on each side, AND could also function as window awnings/shades AND drop down to cover the windows so no one could break them out if you left it parked somewhere.
|
Kewl idea! I've resisted the idea of adding anything on top; one of the reasons I chose a school bus was for it's low profile (compared to a road coach) and not having to worry quite as much about low underpasses, tree branches and such. I will end up with a couple of AC units up there so maybe a deck could be designed to stay below that height and utilize your slideout idea. I like it!
Quote:
|
The "back porches" that I have seen make me think about adding "side porches" that would fold up against the sides of the bus. Park and drop the porches (even one in front) and you could have a walk-around deck.
|
I've see nicer back porches than the one I added to my drawing but what I was really after was a convenient way to use the back door to the work shop area and not really someplace to "hang out". The porch in my plan sits about 7" to 9" below the level of the bus floor and then has the fold-down steps at the end (probably both) to complete the trip to the gound. It also gave me a place to carry one or two of the Honda EU2000i portable generators.
The genset issue is the thing I've wrestled with the most. I've got to have one to run the AC units and I've got to have AC so I don't kill our dogs if we park the RV in 100-degree plus temps while we grocery shop or something. If we get caught in some sweltering heat it will be nice to stay cool. And we will have a microwave which can take a set of batteries down fast; it's really easier on the batteries if the microwave gets powered by a genset (or shorepower).
The dilemma hasn't been about having a genset but about what fuel to run a genset with. The bus is diesel but the diesel generators I've seen are much bigger than we need, are way expensive, and probably a bit noisy. I'd hate to have to install a separate fuel tank to run a gasoline powered genset; fillups would be a pain in the rear with diesel, gasoline and propane to contend with. I could choose a propane powered generator since we'll have propane aboard anyway but I wasn't planning on having much propane because only the water heater and stove use it; a propane powered genset run many hours would deplete our supplies pretty fast.
Eventually I came to the conclusion that a couple of EU2000's in stainless or aluminum boxes on the rear porch would be less expensive to buy and install. We'd almost always just use one except when both AC units were needed; in a sense we'd always have one backup unit if one had trouble. Since they're so fuel efficient it wouldn't be a problem to carry a couple of 5-gallon Jeep-style gas can to keep them going (probably mount them on the porch too). And, they can be moved around so if I need power somewhere away from the bus I can just tote the EU2000i over to where I'm working. Well, it sounds good on paper anyway; we'll see what we do when it time to make the final decision.
|
|
|
|
|
11-01-2004, 08:31 AM
|
#14
|
|
Bus Crazy
Join Date: Oct 2004
Location: New England
Posts: 1,009
Year: 1993
Coachwork: Ward Genesis
Chassis: International
Engine: DT466/MT643
Rated Cap: 77
|
Question: can the Eu2000 produce 12V power?
__________________
Jarlaxle
---------------------------------------------------------------------------------
Optimism is a mental disorder.
|
|
|
|
|
11-01-2004, 02:54 PM
|
#15
|
|
Bus Geek
Join Date: Nov 2003
Location: near flint michigan
Posts: 2,657
|
the honda eu2000 is rated for 96 W @ 12vdc. That's 8 amps.
according to the honda website http://www.hondapowerequipment.com/eu2000.htm
__________________
Quis custodiet ipsos custodes (who will watch the watchmen?)
|
|
|
|
|
11-01-2004, 03:25 PM
|
#16
|
|
Bus Crazy
Join Date: Jul 2002
Location: Central Iowa
Posts: 1,839
|
One thing to note is that these are not 120V generators they are 12 volt generators that use an inverter just like you would in a car to get up to 120V
|
|
|
|
|
11-03-2004, 10:07 AM
|
#17
|
|
Bus Crazy
Join Date: Oct 2004
Location: New England
Posts: 1,009
Year: 1993
Coachwork: Ward Genesis
Chassis: International
Engine: DT466/MT643
Rated Cap: 77
|
8 amps? OK..............back to the drawing board..........
__________________
Jarlaxle
---------------------------------------------------------------------------------
Optimism is a mental disorder.
|
|
|
|
|
11-05-2004, 08:34 AM
|
#18
|
|
Bus Nut
Join Date: Nov 2003
Location: Whidbey Island, Washington (USA)
Posts: 465
|
Quote:
|
Originally Posted by Jarlaxle
Question: can the Eu2000 produce 12V power?
|
OK, you've got me curious! What would you use the 12-volt power from the EU2000i for?
|
|
|
|
|
11-05-2004, 09:10 AM
|
#19
|
|
Bus Crazy
Join Date: Oct 2004
Location: New England
Posts: 1,009
Year: 1993
Coachwork: Ward Genesis
Chassis: International
Engine: DT466/MT643
Rated Cap: 77
|
My entire conversion--My plans are for no 120V except the shore power connection. EVERYTHING will be 12V, includintg the A/C.
__________________
Jarlaxle
---------------------------------------------------------------------------------
Optimism is a mental disorder.
|
|
|
|
|
11-08-2004, 06:50 PM
|
#20
|
|
Mini-Skoolie
Join Date: Oct 2004
Posts: 21
|
get yourself a Ford large case alternator (around here $35 rebuilt) and an electric start lawnmower motor..you can make your own generator pretty darn cheap.. an 11hp motor should run a couple of alternators pretty easily.
|
|
|
|
|
|
 Posting Rules
|
You may not post new threads
You may not post replies
You may not post attachments
You may not edit your posts
HTML code is Off
|
|
|
 Similar Threads
|
| Thread |
Thread Starter |
Forum |
Replies |
Last Post |
|
Good News Bus Conversion Project
|
Bus Project |
Skoolie Conversion Projects |
276 |
02-23-2019 07:50 PM |
|
and now for the bad news...
|
spirit_of_76 |
Everything Else | General Skoolie Discussions |
4 |
01-13-2011 12:48 PM |
|
Sad News
|
Sojakai |
Everything Else | General Skoolie Discussions |
0 |
01-27-2010 07:04 PM |
|
S-caper...Part 2
|
Les Lampman |
Skoolie Conversion Projects |
27 |
05-02-2008 05:04 PM |
|
News Archive
|
Steve |
Forum Admin | Account Help | Suggestion Box |
0 |
12-02-2003 10:34 PM |
|
|
» Recent Threads |
|
|
|
|
|
|
|
|
|
|
|
|
|
|
|
|
|
|
|
|
|
|
|
|
|
|
|
|
|
|
|
|
|
|
|
|
|


 Linear Mode

