 |
|
 07-15-2015, 02:25 AM
|
#41
|
|
Bus Geek
Join Date: Aug 2011
Location: Stony Plain Alberta Canada
Posts: 2,937
Year: 1992
Coachwork: Bluebird
Chassis: TC2000 FE
Engine: 190hp 5.9 Cummins
Rated Cap: 72
|
Quote:
Originally Posted by allwthrrider

Are you saying it was a bad idea??  |
No, I think its a great idea.
Im going air cleaner on the passenger side, and stack on the drivers side on my 8.3 Cummins rear engine. Strait in, and strait out.
If I could find a spare hood for my 86 Trans am, I would mount a bus air cleaner element on top of the carb, sticking 2 feet through the hood.
I like big air cleaners.
Nat
__________________
"Don't argue with stupid people. They will just drag you down to their level, and beat you up with experience."
Patently waiting for the apocalypses to level the playing field in this physiological game of life commonly known as Civilization
|

|

|
|
07-15-2015, 08:15 AM
|
#42
|
|
Bus Geek
Join Date: Mar 2011
Location: Houston, Texas
Posts: 8,462
Year: 1946
Coachwork: Chevrolet/Wayne
Chassis: 1- 1/2 ton
Engine: Cummins 4BT
Rated Cap: 15
|
I'm with you on the "big air cleaner" plan Nat --- I have been looking all over for a stainless steel housing I can mount on the outside of the cab like the 18 wheelers do. Can't go nearly as big as they do but want something a whole lot larger and better flowing than the typical Dodge Ram under-the-hood set ups. Will probably have to fabricate my own can/container around the largest filter that I can put in that area.
Just what I need...one more "one-off" project to build. But diesels can live or die by how well they breathe. Likewise on the exhaust side.
|
|
|
|
|
07-15-2015, 10:55 PM
|
#43
|
|
Bus Crazy
Join Date: Sep 2013
Location: Vacaville, Ca
Posts: 1,634
Year: 1988
Coachwork: Crown / Pusher
Engine: 8.3 Cummins
|
Quote:
Originally Posted by nat_ster
Sure you can, right through the roof.
Nat
|
Like Nat said.
|
|
|
|
|
07-17-2015, 03:36 PM
|
#44
|
|
Bus Geek
Join Date: Aug 2011
Location: Stony Plain Alberta Canada
Posts: 2,937
Year: 1992
Coachwork: Bluebird
Chassis: TC2000 FE
Engine: 190hp 5.9 Cummins
Rated Cap: 72
|
Quote:
Originally Posted by allwthrrider
Like Nat said.
|
Working at the bus shop, I wish we were allowed to do that while the bus is still on route moving kids on dirt roads. It would save so many repairs caused by dust and dirt.
But the department of transportation says the the buses moving kids must stay stock. We're not even allowed to turn the engines up.
Nat
__________________
"Don't argue with stupid people. They will just drag you down to their level, and beat you up with experience."
Patently waiting for the apocalypses to level the playing field in this physiological game of life commonly known as Civilization
|
|
|
|
|
09-15-2015, 01:41 PM
|
#45
|
|
Skoolie
Join Date: Feb 2015
Location: South Dakota
Posts: 217
Year: 2002
Coachwork: Thomas
Chassis: Freightliner HDX
Engine: CAT 3126B250
Rated Cap: 84
|
I can hardly believe it's been 2 months since I posted something, and it really feels like I haven't done much. I've worked more than a few 60+ hour weeks, but when I get to the shop, I just want to sleep. I have made some progress including:
I removed the rear window and had a piece fabricated to cover it. The cover will remain off with the fan in place until the floor is completely rust and hole free, so a few years. HA! I use the fan to vent out the dust and fumes from working on the inside. Weight savings: about 40 pounds.
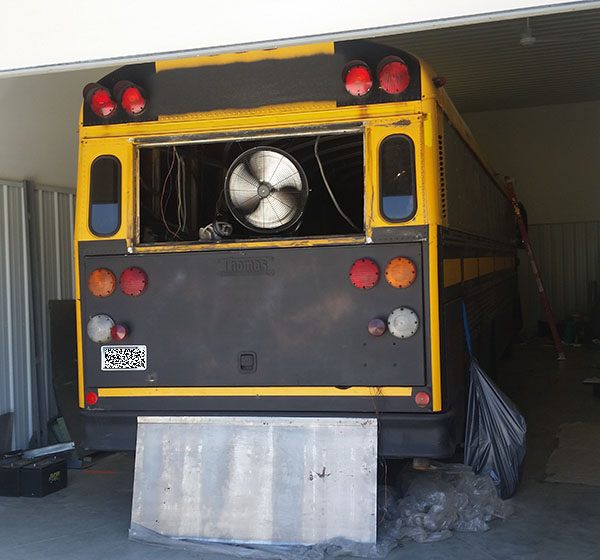
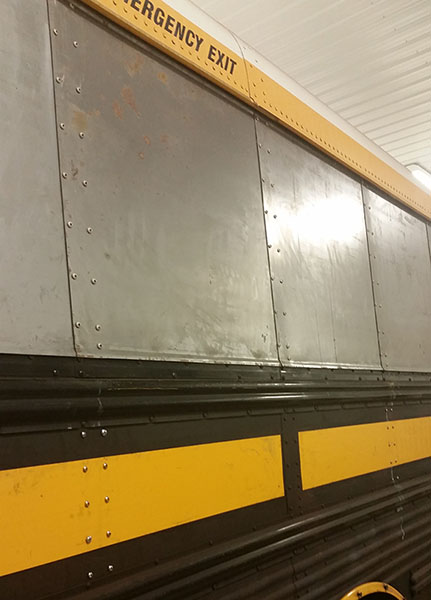
I finished installing all of the metal panels over all windows except the driver's window, the windshield (of course), the side door window, and the 2 mini windows at the rear. All panels overlap and are fastened to the ribs with 16 screws per rib, perhaps a few more or less at the ends. Total weight savings: 52 pounds (2 pounds per window)
Of course, when drilling the pilot holes through existing holes on the ribs from the inside, there are a few places that didn't line up as I had hoped. I'm not satisfied with the result from an appearance aspect, but then I remind myself that I'm sure any buses in Mad Max land aren't perfectly constructed either. I'm not worried about the panels becoming loose, or leaking, so that's the main point.
.
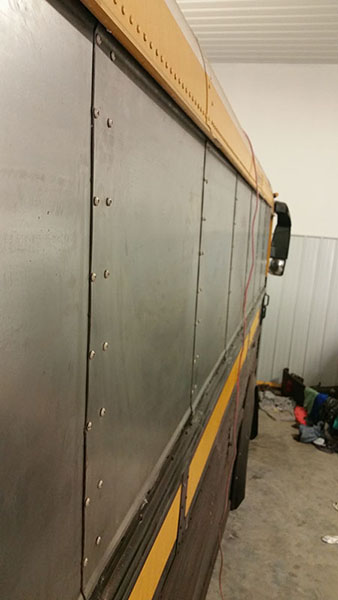
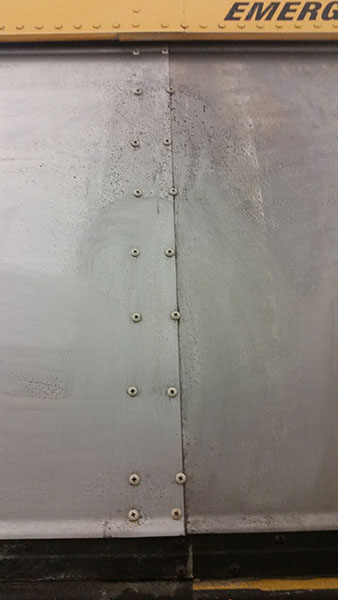
While exploring the ribs and body panels from the inside, I noticed that the side panels are only rivetted every 4th rib. This bothered me since I don't want to hear the panels rattling as I go down the road, and I don't want flexing to dislodge the spray insulation when applied, so I took the liberty of fastening the body to those other ribs using existing holes in the ribs in 10 places per rib. If you're keeping count, that's 780 or so screws pilotted, drilled and screwed for the windows and sides so far.
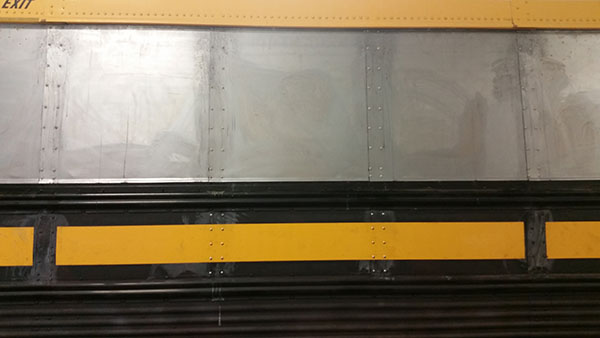
The end result will look pretty heavy duty, and I may continue the screws all the way down the rib to the bottom, not sure just yet. The white haze is Ospho treatment on the screws, existing rivets and panels.
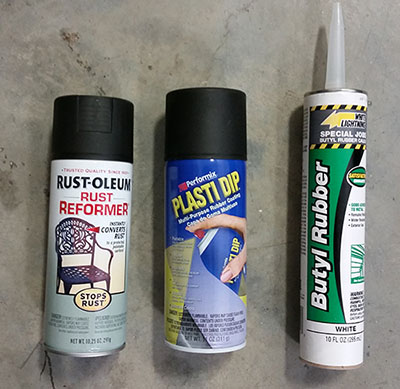
As for the interior, at each location where a rivet or screw penetrated the body, whether installed by me or the manufacturer, I applied Ospho, at least 1 coat of rust reforming primer, and 3 coats of Plastidip to prevent corrosion and water intrusion.
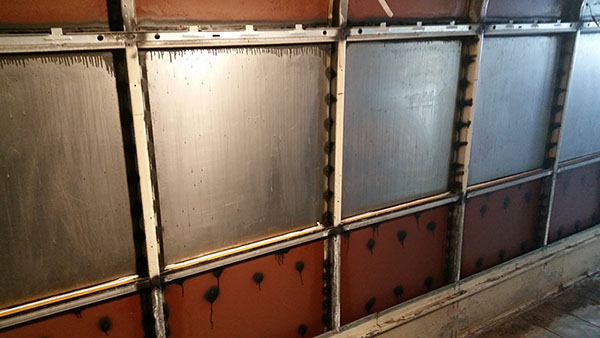
Also, when the butyl caulk dries at the top and bottom, more Plastidip will be applied as a last effort in case any water wants to make it through. I am also in the process of caulking the exterior. At the top of the panels where they duck under the rain gutter, it's taking about 1 tube of caulk for every 3 windows. I bought out the local store and am waiting for restock.
I have also ordered my fridge and it will sit in the shop, a much welcomed addition to my living arrangement. I will also get to MadMaxify the fridge before installation. I selected a Whirlpool WRT134TFDW after literally a month of research. The price ($500), the energy usage (336kWh/yr) and the dimensions all played a part. I really wanted a stainless steel look, but since I'm going to decorate it anyway, why waste the money.
Additionally, I designed and ordered some custom made 18ga louvered panels that might be nothing more than for show on the exterior, but may serve as vent covers, light diffusers or anything else I can think of.
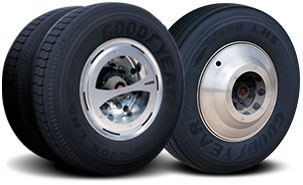
I've been looking seriously at getting a set of these wheel covers as well, again, for looks, since I doubt I'll realize any mileage efficiency improvement on my bus.
I'm going to wait to do the insulation until I know I won't need any wiring, venting or other holes that pass through the roof or sides. That way, I can block them all off, and in the future, if something goes wrong, I won't have to dig out the insulation.
My next big design elements are going to be the under-bus supports for water, propane, battery, grey water and storage areas, as well as the roof rack. I was thining about drilling through the rib flanges at the roof and running about 8-12 bolts through to a steel plate on the outside as a foot, but closer to the edges than the middle. Any suggestions? Advice? It won't be a full length rack since the solar panels will be up there, 6 of them, and I'd like it strong enough so that, if I decide to later, I can put some planks up there to serve as a deck if I'm not hauling anything.
|
|
|
|
|
09-15-2015, 07:43 PM
|
#46
|
|
Bus Geek
Join Date: Aug 2011
Location: Stony Plain Alberta Canada
Posts: 2,937
Year: 1992
Coachwork: Bluebird
Chassis: TC2000 FE
Engine: 190hp 5.9 Cummins
Rated Cap: 72
|
Thanks for swinging in to give us a update.
I hear you on the work getting in the way. Story of my life. Years go by sometimes between changes.
I think I posted this before, but will say again how much I like the way you bent the profile at the bottoms of the new sheets. It turned out great.
You also got the sheets nice and flat, with nice even rivet installation.
Nat
__________________
"Don't argue with stupid people. They will just drag you down to their level, and beat you up with experience."
Patently waiting for the apocalypses to level the playing field in this physiological game of life commonly known as Civilization
|
|
|
|
|
09-16-2015, 08:26 AM
|
#47
|
|
New Member
Join Date: Mar 2015
Location: North Carolina
Posts: 7
Year: 1995
Coachwork: Thomas
Chassis: Vista 3600
Engine: Navistar DT-466
|
I'm going to be following your thread with rapt attention as I have similar design hopes and ideas for my own build. (doesn't hurt mine is also a Thomas, albeit a shorty Vista model)
I'm also aiming to do a half roof rack with solar so i'm very keen on seeing how you do that with yours. I'm planning on doing the rack in fairly heavy gauge aluminum square tube with built in storage boxes and wide spaced wood plank decking.
I do have some welding experience and training from classes at the local community college, so feel free to bounce ideas off me. (and know a few who are actually employed for their welding and fabricating skills, unlike myself)
Good luck and keep us updated!
__________________
______________
Mercury
|
|
|
|
|
09-16-2015, 10:41 AM
|
#48
|
|
Bus Nut
Join Date: May 2015
Location: Minnesota
Posts: 502
Year: 92
Coachwork: Thomas Built
Chassis: International 3800
Engine: DTA360 5.9L
Rated Cap: 77
|
Just want to say great work on your bus, looks like its coming together. I hear you on the 60+ hours a week and then just wanting to sleep when you go work on it. Mines 45 minutes from where I live so many times I get in the car and just like "**** I am exhausted, would I even get much done if I go work ono it?"
|
|
|
|
|
09-16-2015, 11:15 AM
|
#49
|
|
New Member
Join Date: Sep 2015
Location: N.E. Wy.
Posts: 7
|
For a mad max type exhaust, use the rear stack that is used in cold climate areas. Nothing major, just a stack that has expanded sheet metal around it for a heat gaurd.
|
|
|
|
|
09-28-2015, 08:02 PM
|
#50
|
|
Mini-Skoolie
Join Date: Jul 2015
Location: Arkansas (For Now)
Posts: 26
Year: 2001
Chassis: Thomas
Engine: 3126b CAT
|
RHOMBUS, did you ever figure out what was causing your electrical issues? The gauges on my Thomas HDX we're dropping whilst driving down the road. Sometimes they would work, but often they would stop working and not work again until I restarted the bus. I made it within 300 miles of home and the bus died on me and has not started back since. I was thinking bad ground somewhere, but I can't be sure. Just wondering if you figured yours out or have any ideas for what it could be? Love the progress you have made on yours so far and it gives me hope for mine! 
__________________
The adventures of two full-time travelers from the Natural State, living in a bus and exploring life, one road at a time.
Follow along at: www.naturalstatenomads.com
|
|
|
|
|
10-03-2015, 11:33 PM
|
#51
|
|
Skoolie
Join Date: Feb 2015
Location: South Dakota
Posts: 217
Year: 2002
Coachwork: Thomas
Chassis: Freightliner HDX
Engine: CAT 3126B250
Rated Cap: 84
|
Since I have removed all of the wiring harnesses and haven't hooked them back up yet, I don't know if I encountered and fixed the problem or not. I found problems in a few areas (burnt wires, disconnected/loose wires, blown diodes on the boards) but don't know if they affect the gauges. Needlesstosay, when I do start reconnecting things, all ground connections will be "shiny and chrome" : sanded, sealed, protected. There are data wires that run everywhere as well so I need to verify all of those connections. When your gauges are out, do you notice a difference in performance and shift pattern for the transmission?
Right now I priced my spray-foam insulation and it will be something like $3000 for just the materials. I won't be buying that just yet, since I need to buy and install windows, fix rust behind the sidewalls at the floor, and develop a nuclear fusion reactor. It really feels like that sometimes when I look at the floor.
|
|
|
|
|
10-04-2015, 12:09 AM
|
#52
|
|
Bus Geek
Join Date: Aug 2011
Location: Stony Plain Alberta Canada
Posts: 2,937
Year: 1992
Coachwork: Bluebird
Chassis: TC2000 FE
Engine: 190hp 5.9 Cummins
Rated Cap: 72
|
If you had a mechanical engine bus, I would say just use stand alone gauges.
I pulled my entire wiring harness and will be starting from scratch.
I know nothing about the engine you have.
I look forward to updates.
Nat
__________________
"Don't argue with stupid people. They will just drag you down to their level, and beat you up with experience."
Patently waiting for the apocalypses to level the playing field in this physiological game of life commonly known as Civilization
|
|
|
|
|
10-05-2015, 07:42 PM
|
#53
|
|
Mini-Skoolie
Join Date: Jul 2015
Location: Arkansas (For Now)
Posts: 26
Year: 2001
Chassis: Thomas
Engine: 3126b CAT
|
Quote:
Originally Posted by RHOMBUS
When your gauges are out, do you notice a difference in performance and shift pattern for the transmission?
|
Not at all; I've never noticed anything strange happening when they drop, just that they're dropping. I ripped my dash open and found two small connectors to the back, both look fine, but there is something jumped off of one side. I need to try and figure out where that goes, because I imagine it has something to do with it.
Good news is, I just talked to a guy who works for International this past weekend who knows someone here in town (literally a block away from my house) that works on school buses. I may just have them take a look. I don't want to mess with the wiring of the bus, as I'm not that knowledgeable about it. I could build my own no problem, but looking at the diagrams for this bus has my head spinning.
__________________
The adventures of two full-time travelers from the Natural State, living in a bus and exploring life, one road at a time.
Follow along at: www.naturalstatenomads.com
|
|
|
|
|
10-14-2015, 02:27 PM
|
#54
|
|
Skoolie
Join Date: Feb 2015
Location: South Dakota
Posts: 217
Year: 2002
Coachwork: Thomas
Chassis: Freightliner HDX
Engine: CAT 3126B250
Rated Cap: 84
|
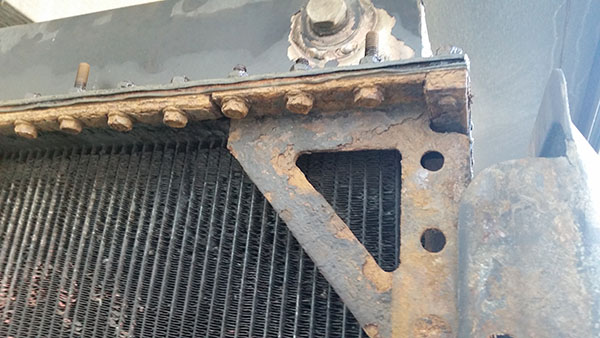
I am in the process of removing the radiator to have it rebuilt. A shop right next door does all of that, and it will be a lot cheaper than buying a new one. The original radiator is so badly corroded from road salt that I can literally crumble the fins right off of the tubes. "Just remove the radiator and bring it to me and I can get started." Sounds simple, right? Not at all. Every bolt is rusted, some in nearly impossible places to reach with 2 wrenches to prevent spin which happens to EVERY last one of these. I had to remove about 10 screws from a lower body panel to remove another panel to get full access to the radiator, and now I think I'm going to have to cut the transmission lines going into the bottom of the radiator because the hose is frozen solid to the fittings. I'm okay with that though because the fittings on both ends, at the transmission and at the radiator, are looking really poor.
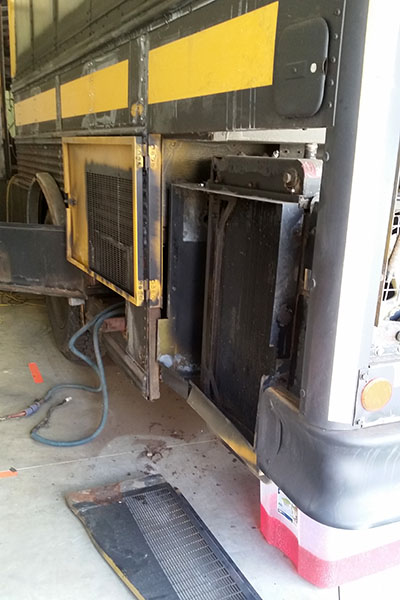
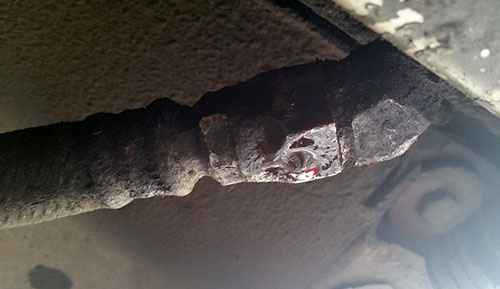
This fitting looks okay but is pretty much welded to the hose. The ones at the transmission are so rusted I think they might shatter when I go to remove them.
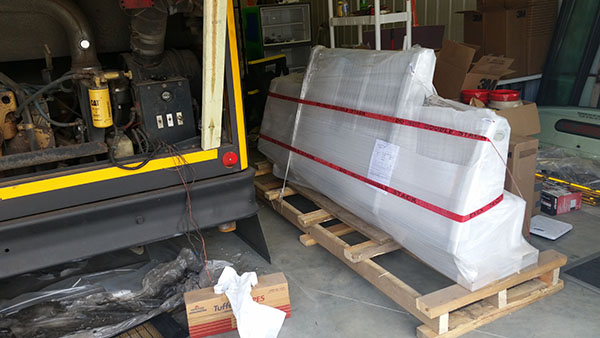
On a positive note, my bumper arrived today, and thanks to the radiator guy's forklift, it now sits in my shop. It is HUGE!
All of the steel widow panels are caulked inside and out, top and bottom, and I am trimming caulk and priming the exterior (interior is already primed). Then it will be window shopping literally. I've seen some inexpensive windows on the 'bay, but I'm a little hesitant. They are half the cost of Atwood windows from their online custom window store, but I wonder if they are disasters waiting to happen. My bus will really only have 4 or 5 windows at most, and a new driver's window.
I should really be sleeping.
|
|
|
|
|
10-17-2015, 03:15 PM
|
#55
|
|
Skoolie
Join Date: Feb 2015
Location: South Dakota
Posts: 217
Year: 2002
Coachwork: Thomas
Chassis: Freightliner HDX
Engine: CAT 3126B250
Rated Cap: 84
|
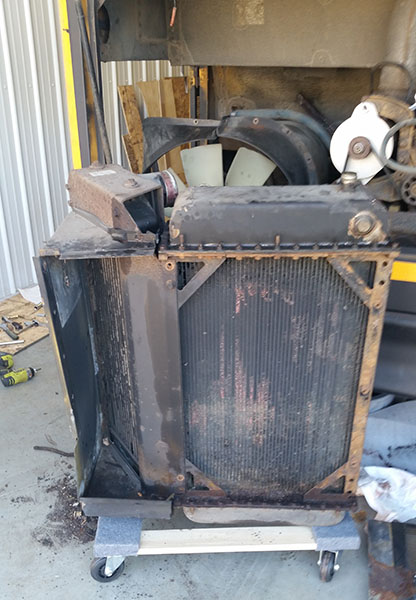
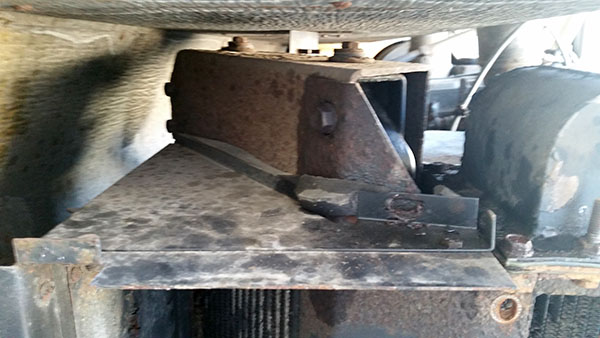
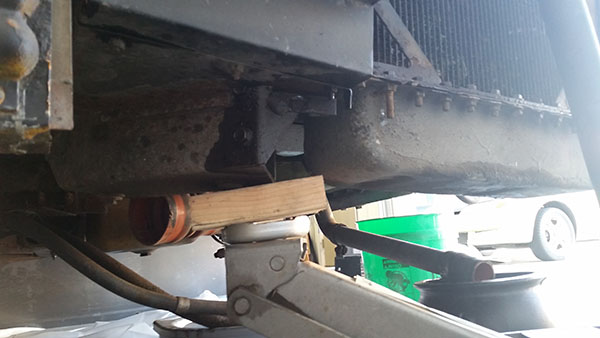
So, day 3 with the !@%#$ radiator. I'm beginning to think that the whole frame with the radiator and intercooler has to come out just to get the radiator out. Everything is bolted together in a such a way that I just don't know to get it out any other way. Not to mention how I will get it all back together again. Photos aren't really going to help much here since it would be very time consuming to explain what is bolted where and why. Suffice it to say that the radiator and intercooler have their own shared subframe that is bolted to the frame rails in the engine compartment. The individual pieces are then bolted to that subframe. The subframe seems to be designed so that even if you unbolted the components from it, you still would not be able to remove them. Brackets bolted through the upper and lower tanks bolt to the subframe, some in places behind the radiator making access nearly impossible while the assembly is still part of the bus. I read somewhere else online that an experienced mechanic with a full shop of tools take about an entire shift to replace one of these.
Also, DO NOT attempt to cut the transmission lines going to the radiator. I spent about 30 minutes with hacksaw and go nowhere other than needing to buy a new line. These lines are super tough. Plus, I discovered that if you grip the metal cap on the lines just before the fitting begins, then turn the fitting with a meaty wrench, they spin off like they should.
On another note:
Belt-driven air-actuated cooling fan (stock) vs multiple electric fans? I'm not sure what the power drain would be, but I would think that running the stock system would rob a little more power than the electric fans would. Thoughts? I figure if I'm going to get down this far into it, I might as well consider any upgrades.
Number of bolts sheared in half: 8
Knuckles scarred: 5
Obscenities uttered: often
|
|
|
|
|
10-18-2015, 10:52 AM
|
#56
|
|
Bus Geek
Join Date: Aug 2011
Location: Stony Plain Alberta Canada
Posts: 2,937
Year: 1992
Coachwork: Bluebird
Chassis: TC2000 FE
Engine: 190hp 5.9 Cummins
Rated Cap: 72
|
The transmission lines you speak of are braided hydraulic lines. New ones can be made up at any farm supply store.
Nat
__________________
"Don't argue with stupid people. They will just drag you down to their level, and beat you up with experience."
Patently waiting for the apocalypses to level the playing field in this physiological game of life commonly known as Civilization
|
|
|
|
|
10-22-2015, 05:08 PM
|
#57
|
|
Skoolie
Join Date: Feb 2015
Location: South Dakota
Posts: 217
Year: 2002
Coachwork: Thomas
Chassis: Freightliner HDX
Engine: CAT 3126B250
Rated Cap: 84
|
Quick note before I try to get a few hours of sleep before work:
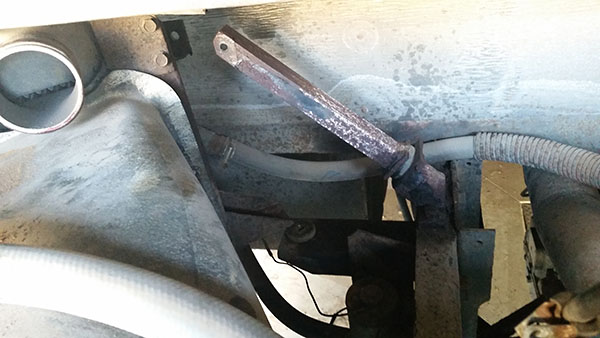
Even if it costs $500 or more in just labor to remove and reinstall a radiator in a rear engine Thomas, it's worth it. I just blew another 2 hours and sheared 2 more bolts. That leaves me with 1 left holding the subframe in place, but 3 on the shroud where it bolts into the subframe. All of those bolts are nearly impossible to access. I'm wondering if the radiator assembly was put in before the engine, it's just that inaccessible.
|
|
|
|
|
10-23-2015, 05:00 AM
|
#58
|
|
Bus Crazy
Join Date: Dec 2014
Location: Dowdy Lakes, Colorado
Posts: 1,444
Year: 1989
Coachwork: Thomas
Chassis: Saf-T-Liner ER
Engine: 3208 CAT/MT643 tranny
Rated Cap: 87
|
Quote:
Originally Posted by RHOMBUS
Quick note before I try to get a few hours of sleep before work:
Even if it costs $500 or more in just labor to remove and reinstall a radiator in a rear engine Thomas, it's worth it. I just blew another 2 hours and sheared 2 more bolts. That leaves me with 1 left holding the subframe in place, but 3 on the shroud where it bolts into the subframe. All of those bolts are nearly impossible to access. I'm wondering if the radiator assembly was put in before the engine, it's just that inaccessible.
|
From what I understand from our shop foreman, yes, it was. And yes, it's worth going to a professional shop to get it done right. Apparently there are some heavy duty tools that are needed to do it right. In addition, I've been told it's more than a one-person job.
__________________
Firearms stand next in importance to the Constitution itself. They are the American peoples liberty teeth and keystone under independence. George Washington
|
|
|
|
|
10-24-2015, 12:57 PM
|
#59
|
|
Skoolie
Join Date: Feb 2015
Location: South Dakota
Posts: 217
Year: 2002
Coachwork: Thomas
Chassis: Freightliner HDX
Engine: CAT 3126B250
Rated Cap: 84
|
All I have to say is...
SUCCESS!
This was the last point of contact I had to remove a bolt from, AND it didn't shear, AND I'm confident I can reattach it.
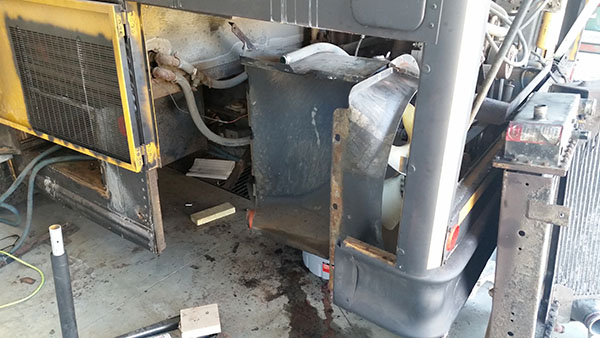
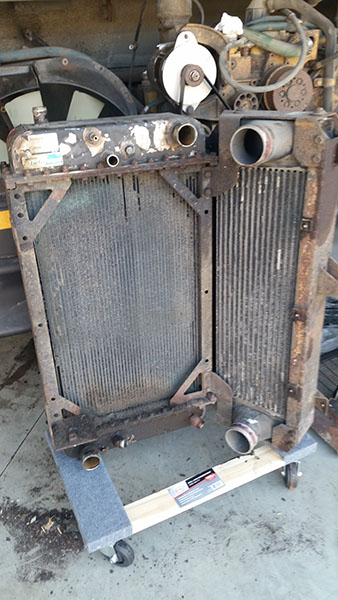
So, here's a look at some of the issues. The radiator and intercooler are bolted into a surrounding subframe so that even if you managed to detach them from that subframe, there's no room to remove them because of the subframe.
Using my 3 ton floor jack as a balance point on the lower portion of the subframe, I was able to slowly lower the whole assembly onto a cart. The whole thing is pretty heavy. I haven't weighed it, but could lift it and carry it for a few feet before needing to stop.
So, eventhough it was very frustrating, and I sheared more than half of the bolts involved, I would do it again now that I know how it all goes.
Time to get to work cleaning up that part of the engine compartment.
|
|
|
|
|
10-24-2015, 02:33 PM
|
#60
|
|
Bus Geek
Join Date: Mar 2011
Location: Houston, Texas
Posts: 8,462
Year: 1946
Coachwork: Chevrolet/Wayne
Chassis: 1- 1/2 ton
Engine: Cummins 4BT
Rated Cap: 15
|
Replacing the offending fasteners with all stainless would certainly make any future such removal a tad easier.
|
|
|
|
|
|
 Posting Rules
|
You may not post new threads
You may not post replies
You may not post attachments
You may not edit your posts
HTML code is Off
|
|
|
|
 » Recent Threads
 |
|
|
|
|
|
|
|
|
|
|
|
|
|
|
|
|
|
|
|
|
|
|
|
|
|
|
|
|
|
|
|
|
|
|
|
|
|


 Linear Mode

