 |
|
 03-01-2013, 05:00 AM
|
#21
|
|
Bus Crazy
Join Date: Aug 2011
Location: Central Tennessee
Posts: 1,093
Year: 1973
Coachwork: Blue Bird
Chassis: All American
Engine: CAT 1160 V-8 Diesel
Rated Cap: 72
|
Re: Skoolie Conversions ---- a great group!
Very nice engineering. A clean looking job.
I have two (non functioning) roof airs on my bus.They are old. Someday, I will replace them when I win the lottery. For now, I use a window (10,000 BTU) AC. I am semi-permanently parked, so I can get away with it.
When I bought this bus, it had been an Emergency Management Vehicle. A lot of cool things had been done to it. There is a big propane tank underneath, and great looking exhaust stacks.
The two holes where the ACs are were there, but the ACs were not. Somehow, the wires were already run to the holes. I don't quite know how they did that. Also, the generator was missing, but all the wiring was still there. I now have the Onan generator that came out of my Dodge class C in that compartment.
There are lots of pics on my thread called Best Home Yet.
|

|

|
|
03-03-2013, 07:12 PM
|
#22
|
|
Skoolie
Join Date: Feb 2013
Posts: 133
Year: 2000
Coachwork: Phantom
Chassis: Gillig
Engine: Series 50
|
Re: Skoolie Conversions ---- a great group!
|
|
|
|
|
03-04-2013, 09:21 AM
|
#23
|
|
Bus Geek
Join Date: Mar 2011
Location: Houston, Texas
Posts: 8,462
Year: 1946
Coachwork: Chevrolet/Wayne
Chassis: 1- 1/2 ton
Engine: Cummins 4BT
Rated Cap: 15
|
Re: Skoolie Conversions ---- a great group!
Excellent call on that one --- Looks like new from here...(and we promise not to tell what's under there!)
BTW...I'm very likely going to use the same technique to correct some "issues" on my exterior metal. I figure if it's not actually holding anything important together and just needs to look better...what the hey?...cover it up.
|
|
|
|
|
03-04-2013, 11:12 AM
|
#24
|
|
Skoolie
Join Date: Feb 2013
Posts: 133
Year: 2000
Coachwork: Phantom
Chassis: Gillig
Engine: Series 50
|
Re: Skoolie Conversions ---- a great group!
Quote:
|
Originally Posted by Tango
Excellent call on that one --- Looks like new from here...(and we promise not to tell what's under there!)
BTW...I'm very likely going to use the same technique to correct some "issues" on my exterior metal. I figure if it's not actually holding anything important together and just needs to look better...what the hey?...cover it up.
|
Yep, sometimes it's the best option.
|
|
|
|
|
03-05-2013, 11:14 PM
|
#25
|
|
Skoolie
Join Date: Feb 2013
Posts: 133
Year: 2000
Coachwork: Phantom
Chassis: Gillig
Engine: Series 50
|
Re: Skoolie Conversions ---- a great group!
Windows
Since this is a transit, and not a million dollar Prevost conversion, I decided to try something different this time for my windows. On my previous conversions I removed unwanted windows and skinned over with aluminum on the outside. As many of you know, this is a lot of work. Back in the 70's, it was fairly common for bus conversions to keep the windows and panel over them inside. There are issues with this, including unwanted heat gain, windows that leak, seeing the paneling from outside through the windows, etc. But, it is less expensive. Some people want to keep the bus look on the outside as well. My reasoning for keeping them was purely expense and time. Not sure if I saved much time, but it sure was easier. I applied a blackout window tint to them, spaced out with an inch of sheet insulation, and then put laminate on 1/4 luan. I trimmed out the luan so that it just fit inside the large outer window frame and glued them to the inside window trim with Sikaflex 252.

On the window in the bedroom, I only covered half of it with the paneling, leaving the emergency escape release handle workable in case I ever needed it. A window curtain/blind will be used at the top.


Long term, I don't know how this is going to work out, but I'm going to give it a try.
The bedroom is finished now. My fresh water tank is located across the bus, under the beds. That is why the rear appears so deep.

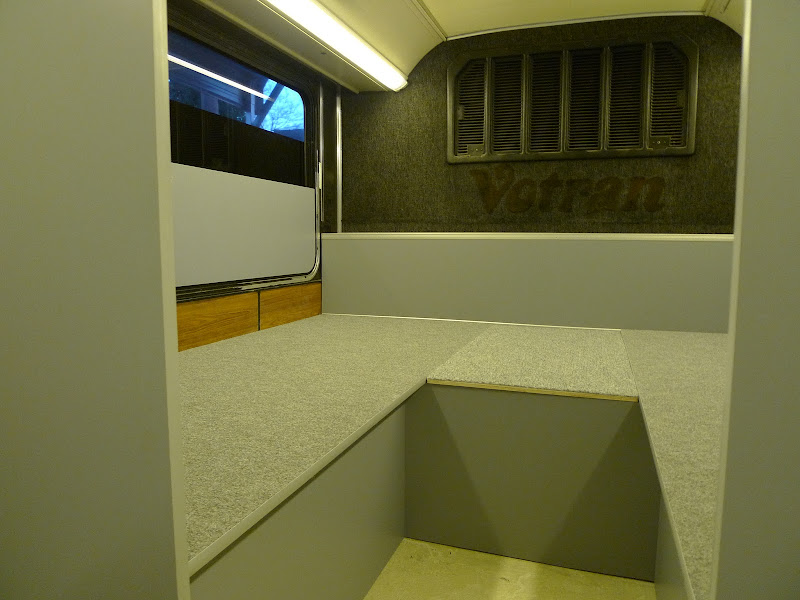


Here's the detail on the headboard. It is made of plywood (with laminate over it) and extruded aluminum on the corner.

Here's a closeup of the aluminum trim. The boarding fits into grooves on both ends of the angle. Makes a nice 90 degree corner.

Here's a different view of how it goes together.

Finding this trim locally (at least here) is impossible. I always have to order it. There's a company on the internet you can order it from by just using their shopping cart on the website. I usually try to order slighly more than I need at one time to minimize shipping cost. You never know when you're going to have a duh moment and cut something wrong. 
|
|
|
|
|
03-06-2013, 12:27 AM
|
#26
|
|
Skoolie
Join Date: Feb 2013
Location: Southeast raleigh
Posts: 221
Year: 1974
Coachwork: Crown
Chassis: Supercoach
Engine: Detroit Diesel 6-71
|
Re: Skoolie Conversions ---- a great group!
LuckyChow,
Your bus is coming along beautifully! You are quite a craftsman!! How big is the interior of your bus? (Height/width?) If it's already been posted here I apologize!
|
|
|
|
|
03-06-2013, 02:19 AM
|
#27
|
|
Bus Crazy
Join Date: May 2007
Location: Whidbey Island, WA.
Posts: 1,109
Year: 1984
Coachwork: Blue Bird
Chassis: All American
Engine: 3208 na boat anchor
Rated Cap: 2
|
Re: Skoolie Conversions ---- a great group!
You sure know how to do a bus conversion. Some of us here are still in the trial and error phase. It's good to see your pictures. You've figured it out! 
|
|
|
|
|
03-06-2013, 05:35 AM
|
#28
|
|
Bus Geek
Join Date: Nov 2011
Location: MNT CITY TN
Posts: 5,158
|
Re: Skoolie Conversions ---- a great group!
what size are the mattresses?We are playing hell trying to get anything locally, I need 30 x 80
They are everywhere on the internet but $200 shipping is steep...or I'm cheap 
__________________
Our build La Tortuga
Accept the challenges so that you can feel the exhilaration of victory.
George S. Patton
|
|
|
|
|
03-06-2013, 08:21 AM
|
#29
|
|
Bus Geek
Join Date: Mar 2011
Location: Houston, Texas
Posts: 8,462
Year: 1946
Coachwork: Chevrolet/Wayne
Chassis: 1- 1/2 ton
Engine: Cummins 4BT
Rated Cap: 15
|
Re: Skoolie Conversions ---- a great group!
Hey Lucky --- Great looking work and excellent progress. Really like the clean look of the paneling and laminate. I'm planning on skipping using 2 x 4's myself and going with just ply and some kind of thin finishing material. Mine is so short that a few extra inches will make a world of difference. Keep the pix coming!
|
|
|
|
|
03-06-2013, 12:19 PM
|
#30
|
|
Skoolie
Join Date: Feb 2013
Posts: 133
Year: 2000
Coachwork: Phantom
Chassis: Gillig
Engine: Series 50
|
Re: Skoolie Conversions ---- a great group!
Inkblots, thanks for the comment, but I'm just a weekend wanna-be craftsman.  Believe me, I make plenty of mistakes. I have a desk job through the week. My bus is a 35 footer. Measured at the floor I have 32 feet of usuable space. The bus itself is 102" wide, but that translates to 8 feet wide inside. I think the interior ceiling height is around 80 inches, but I'd have to measure again to be sure.
Bus-bro, I'm not sure you ever figure it all out. I still learn something everytime I try to build anything. (If I showed you my scrap pile, it'd be embarassing)
Bansil, I know exactly what you mean. I went through the same thing. I finally settled on 36" X 80" mattresses. This is the normal size for a dorm bed. I bought my mattresses here: http://www.esteebedding.com/dorm-mattress.html . I bought the Ergo Rest Dorm Mattress. I am pleased with it. It was more than I wanted to pay, but getting the right size mattress was important for me. I picked this size out before I started building the bedroom and built everything to fit it. This company seems like a good one.
Tango, thanks for your kind comments. Building without framing is a bit more challenging, but do-able! You just have to use thicker ply (and straight).
|
|
|
|
|
03-06-2013, 12:30 PM
|
#31
|
|
Mini-Skoolie
Join Date: Feb 2013
Posts: 27
|
Re: Skoolie Conversions ---- a great group!
Quote:
|
Originally Posted by LuckyChow
Windows
Not sure if I saved much time, but it sure was easier. I applied a blackout window tint to them, spaced out with an inch of sheet insulation, and then put laminate on 1/4 luan. I trimmed out the luan so that it just fit inside the large outer window frame and glued them to the inside window trim with Sikaflex 252.
On the window in the bedroom, I only covered half of it with the paneling, leaving the emergency escape release handle workable in case I ever needed it. A window curtain/blind will be used at the top.
..............Long term, I don't know how this is going to work out, but I'm going to give it a try.
|
I really like that look. With transit bus windows, it still has good looks on the outside and the inside has a really nice look. I'll need to look into this adhesive you mentioned. Is there any concern with how well it will hold up to the vibration of long trips? Sure looks like a lot of weight to glue to the window frames, but it may be just fine.
Quote:
|
Originally Posted by LuckyChow
Here's a closeup of the aluminum trim. The boarding fits into grooves on both ends of the angle. Makes a nice 90 degree corner.
Here's a different view of how it goes together.
Finding this trim locally (at least here) is impossible. I always have to order it. There's a company on the internet you can order it from by just using their shopping cart on the website. I usually try to order slighly more than I need at one time to minimize shipping cost. You never know when you're going to have a duh moment and cut something wrong. |
It's amazing the number of products made from extruded aluminum. This looks like some really cool stuff. I know what you mean about making an errant cut, I'm a woodworker. Like a friend of mine said one time in jest... "I don't know what's wrong... I've cut this two times already and it's STILL too short". Hehhh, hehhh......
Keep up the good work and great photo documentation.
__________________
Steve
|
|
|
|
|
03-06-2013, 01:31 PM
|
#32
|
|
Bus Geek
Join Date: Nov 2011
Location: MNT CITY TN
Posts: 5,158
|
Re: Skoolie Conversions ---- a great group!
since your bus is wider than mine by 6 inches thats why we went for 30x80
I may do some measuring and see if 36 will work
Thank you
Doug
__________________
Our build La Tortuga
Accept the challenges so that you can feel the exhilaration of victory.
George S. Patton
|
|
|
|
|
03-06-2013, 04:37 PM
|
#33
|
|
Bus Crazy
Join Date: Nov 2010
Location: Andrews,Indiana
Posts: 2,436
Year: 1991
Coachwork: Bluebird
Chassis: AARE
Engine: 3116 Cat 250hp
Rated Cap: Just the two of us.
|
Re: Skoolie Conversions ---- a great group!
Hey Lucky, great looking bus. I've been looking for that aluminum channel you used, but aren't having much luck. Do you have a link to their website?
Thanks, Dick
|
|
|
|
|
03-06-2013, 06:03 PM
|
#34
|
|
Skoolie
Join Date: Feb 2013
Posts: 133
Year: 2000
Coachwork: Phantom
Chassis: Gillig
Engine: Series 50
|
Re: Skoolie Conversions ---- a great group!
Scooter, I think the window covers will hold fine. They are only 1/4 with laminate. Not very heavy. As far as the Sikaflex 252 is concerned, that stuff is incredibly strong. It is used by some shops as an adhesive to glue on the outside body panels on MCI buses. I'm not concerned about the adhesive strength at all. What does concern me is the fact that it is sticking to smooth painted aluminum. As with most adhesives, it needs something with a little "tooth" to adhere to. The painted aluminum trim doesn't have much tooth. As a backup, there is enough flange on the window trim piece that I can put some 1/8 pop rivets in if I need to. They are so small, you don't really notice the head on it, especially if you paint it to match the background. Just a heads-up on this adhesive. It is so thick you cannot use a regular hand-pumped calk gun. You just can't squeeze the handle hard enough to get it out of the tube. I had to buy a Dewalt power gun to dispense it out of the tube. If you go to checking where to buy this online, you're going to get some pricey quotes. The cheapest place I've found is Austin Hardware. They have multiple locations across the US. Their online order system was not working the last two times I bought it. I had to call them and order in person.
Doug/Bansil, check out their Truck Mattress line. They have a 32" X 80" in the same model I bought. I think the insides are the same on them, but the Truck line will have a different cover to meet DOT flammability requirements. It is called the Ergo Rest Truck Mattress.
SomewhereinUSA/Dick, here's the link to the website: http://www.brunnerent.com/Tools/Portfol ... geNumber=1 . The top row has all the right angle extrusions. The extrusions will accept up to one piece of laminate on the plywood and still fit in the slot. It you cover both sides of the plywood with laminate, it is too thick to fit into the extrusion. Most of the time one piece will be all you need as the back side will not be seen. The one I used (with my 3/4" plywood) is their model G750. It should be the one on the top row, to the right.
Hope this helps! Thanks everybody for your comments.
|
|
|
|
|
03-06-2013, 06:19 PM
|
#35
|
|
Bus Crazy
Join Date: Nov 2010
Location: Andrews,Indiana
Posts: 2,436
Year: 1991
Coachwork: Bluebird
Chassis: AARE
Engine: 3116 Cat 250hp
Rated Cap: Just the two of us.
|
Re: Skoolie Conversions ---- a great group!
Bansil, I just checked out the mattress site. If you don't need the 80 long the rollaway model comes in a 30x75. That's plenty for me.
|
|
|
|
|
03-06-2013, 07:37 PM
|
#36
|
|
Bus Crazy
Join Date: Apr 2010
Posts: 1,485
|
Re: Skoolie Conversions ---- a great group!
wow it looks good! love that you get built in lighting the whole way around!
the AC wiring was done really nice! i want to do that in the RV for a ceiling fan in the bedroom
|
|
|
|
|
03-06-2013, 07:59 PM
|
#37
|
|
Skoolie
Join Date: Feb 2013
Posts: 133
Year: 2000
Coachwork: Phantom
Chassis: Gillig
Engine: Series 50
|
Re: Skoolie Conversions ---- a great group!
Quote:
|
Originally Posted by somewhereinusa
Bansil, I just checked out the mattress site. If you don't need the 80 long the rollaway model comes in a 30x75. That's plenty for me.
|
The rollaway models are 5 inches think though, not 7 like the others.
|
|
|
|
|
03-06-2013, 08:38 PM
|
#38
|
|
Bus Crazy
Join Date: Nov 2010
Location: Andrews,Indiana
Posts: 2,436
Year: 1991
Coachwork: Bluebird
Chassis: AARE
Engine: 3116 Cat 250hp
Rated Cap: Just the two of us.
|
Re: Skoolie Conversions ---- a great group!
Well I have been sleeping on a feather pad, so 5 inches is a lot.
|
|
|
|
|
03-07-2013, 05:52 AM
|
#39
|
|
Bus Geek
Join Date: Nov 2011
Location: MNT CITY TN
Posts: 5,158
|
Re: Skoolie Conversions ---- a great group!
We can't stand our feet hanging off the bed so we need the 80 in and the 32 may work even if it's only 5in thick we can always put a topper on it
__________________
Our build La Tortuga
Accept the challenges so that you can feel the exhilaration of victory.
George S. Patton
|
|
|
|
|
03-08-2013, 10:29 PM
|
#40
|
|
Skoolie
Join Date: Feb 2013
Posts: 133
Year: 2000
Coachwork: Phantom
Chassis: Gillig
Engine: Series 50
|
Re: Skoolie Conversions ---- a great group!
Some Useful Things
Working on a bus conversion usually starts off with a good hammer, chisel, set of wrenches, side grinder, and prybar. Later on you'll need different tools to build your future home, week end get-a-way, or favorite toy. I thought I'd show a few of the odds-n-ends I'm using in building my conversion. Your list may be similar to mine, but because we all build differently, some things will likely be different.
Because I'm using sheet material (aka plywood) without a subframe, there have been instances where I've used a super strong adhesive to bond two surfaces together. One instance of that is the window coverings I used inside my coach. I used 1/4" plywood, covered with laminate, to cover my windows inside. Being a transit conversion and not a 1 million dollar Vantare', I'm trying to keep cost down as much as possible. Instead of tearing everything out of the walls and replacing it, I try to use what's there already there and perhaps alter it a bit to suit my purposes. Such is the case with my windows. I bonded the backside of my plywood to my window frames with Sikaflex 252. This is an exceptionally strong adhesive, cured by moisture I am told. Because Sikaflex 252 is very thick I couldn't squeeze it out of the tube with an ordinary caulk gun. I had to get the electric model shown below.

Ordinarily I wouldn't have bought one of these. At first glance they seem to be quite an unnecessary item. But after trying it without one, I quickly found it was necessary. The electric gun was not required for the other varities of Sikaflex I've used.
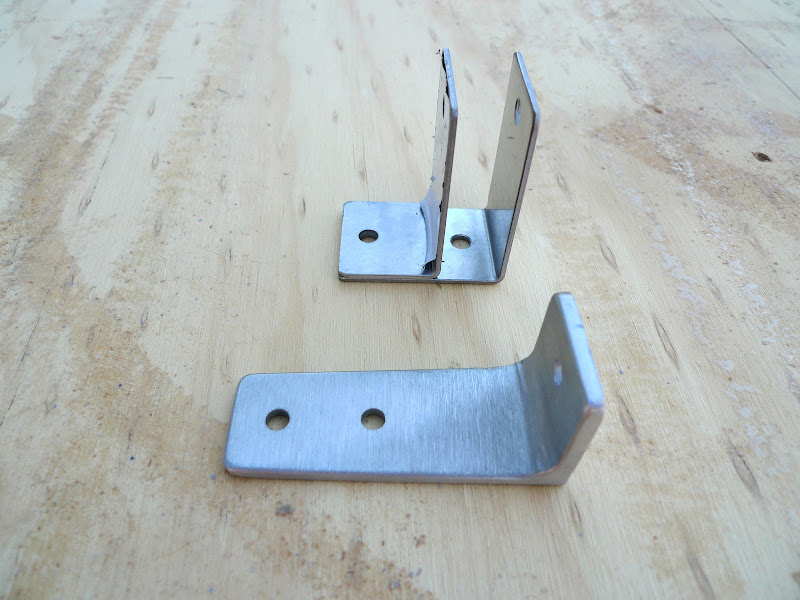
Although these aren't tools, here are some angle brackets I used in areas that would be visible. These brackets are commonly used in commercial bathrooms stalls. They are stainless and offer a more attractive alternative to the more common framing brackets.

Here's an item that has been extremely useful. I'm not sure of the proper name for it, but it is extremely helpful for marking sheet panels like plywood and 4 X 8 sheets of laminate for cutting. You can find these any any of the big box stores.

Here's an item that I couldn't live without. It's homemade, simple (and cheap) to make, and probably the most used tool I have. It's a homemade "fence", constructed of 1/2" plywood. There are endless examples on Youtube for making these. If you don't have a $2,000 panel saw, this is the next best thing.

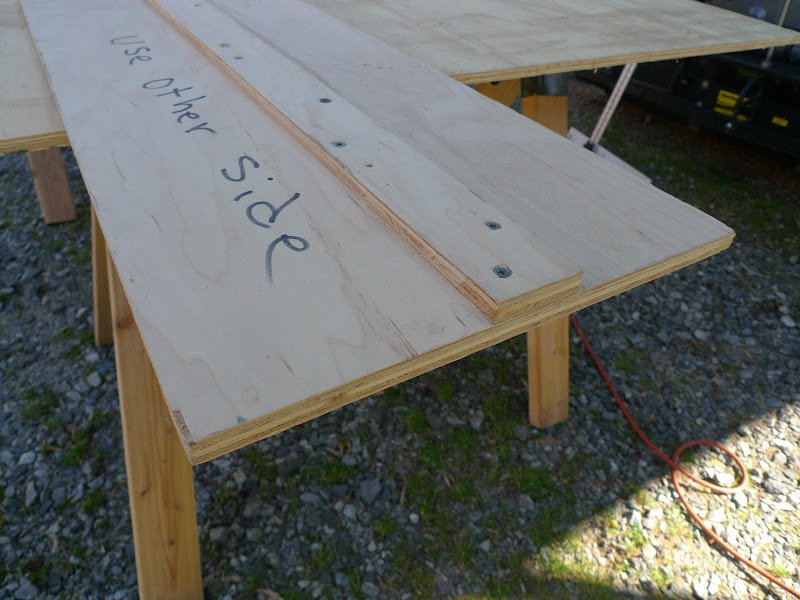
I used these C-clamps to clamp the ends of the fence to the board I'm cutting. This gives you a perfectly straight cut with your ordinary Skill saw.

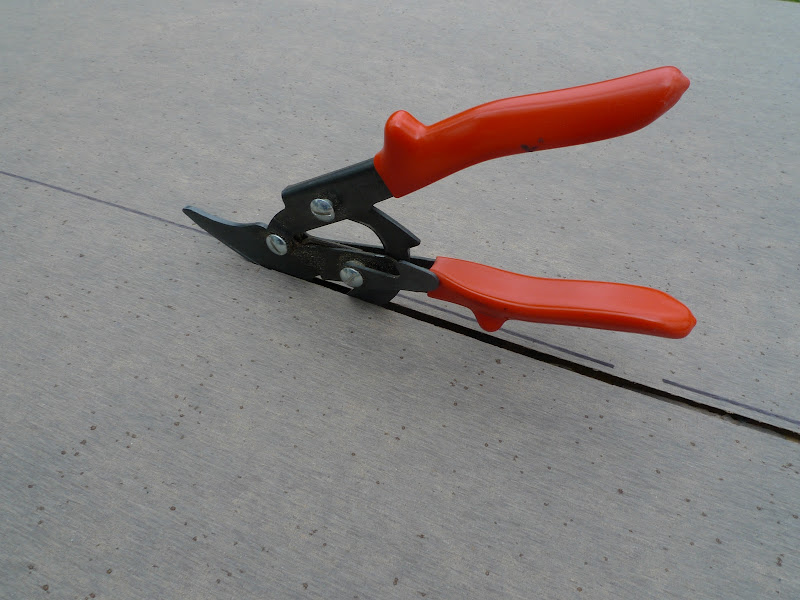
As you've seen in my prior photos I frequently use laminate to cover my panels. Last weekend I laminated a common "slab door" from Home Depot to use for my bathroom door. I'll show you the steps (and the tools) I used to do that job. First off you need something to cut the laminate to a workable size for the door. An inexpensive laminate cutter is one way to do it. You can also use a table saw (more trouble unless you have a big table around the saw for the whole sheet to lay on) or a power sheet metal cutter, which resembles a drill with sissors on the end. I've always used this hand cutter because I don't do much at one time and it works just fine. You can find these at the big box stores as well. If you try to use ordinary sissors, you run the risk of splitting the laminate. The hand tool made for this is fairly inexpensive and does a fine job.

The other tool in the picture is a roller that is used to press the laminate against the wood. More often than not, I use a hand towel under the palm of my hand to do the same thing. It slides over the laminte easily and is quick.
I start with a couple of saw horses with a sheet of plywood laid on top. This makes a fine table to work on. I then lay the laminate on the table upside down so I can mark my cut without later having to clean the marker off the finished side. I then lay whatever I'm applying the laminate to (in this case a slab door) on top of the laminte. I usually allow a couple inches overage on each side/end of the door/panel and mark it with a permanent marker. Take the door off and set it aside. You now have the laminate on the table and it is marked where you want to cut it. This is much easier than trying to handle a full size sheet of laminate. I use the hand laminate cutter to make the cut along the line I marked and lay the unsed part of the laminate aside for later use.

At this point, we have the slab door and the laminate, both ready to have glue applied and get mated up. Using a good adhesive, you'll apply adhesive to both the door and the back side of your laminte. The adhesive you'll need is also called contact cemet and is available in both cans and preprepared spray cans. Since I only do small stuff I usually use the spray cans. It costs more, but the time it saves with cleanup is worth it to me. The convenience factor is great on the spray cans. Regardless of which one you use, be aware that there are different grades available. Since this is a vehicle that can get very warm inside (when parked and not being used), always look for a high-heat/high strength adhesive. All of them stick for a while, but the really goods ones will be there for many years without turning loose. Here's the one I've been using for the last 8 years or so.

I get this at my local shop that caters to the cabinet making crowd. I have not been able to find a suitable spray can adhesive at either Home Depot or Lowes. They carry a great brand (3M), but not the high strength model. Your store may be different. If I remember correctly, my local HD carries 3M "77". Although it's from a great company, I don't think it works well for my purposes. 3M does make one that is excellent for this, however, it is not carried locally in my store. I've used 3 or 4 different brands over time. One of the things I've noticed is that the really strong ones always have a shaker ball in them, much like spray can paint. I'm guessing it's because the adhesive is thicker and needs the ball to mix things up before spraying.
After you get the adhesive applied to both the door and the laminate, you will wait until the surface is tacky before joining the two. Because of the time it takes to apply the glue to both the door and the laminate with a spray can, I rarely have to wait at all. If you were using a roller to apply the glue, you would finish much faster and might have to wait for it to tack up. Be aware that contact cement/adhesive/glue is not like construction adhesive, silicone, or any of the tube adhesives. You do not get a "work time" where you can place the laminate on top of the door and move the laminate to the spot you want it to be. When you use contact adhesive and both pieces touch, it's sticks immediately. You can rarely move it. So it's important that you place it in the right position before you let them touch. To aid in this process, get some round dowel sticks to lay on top of your door. You can lay them right on top of the door even though it has the glue applied. They will not stick to the door because they do not have any glue on them. What they will do is let you position your laminate sheet to just the right position before removing the sticks. When you get the laminate lined up correctly, you can start pulling the sticks out. Start at one end, pulling each stick out in order and press down on the laminate so that it meets the door. If you don't do it in order, you may end up with a hump in the middle because the ends adhered first and there is no way for the middle to lay down.


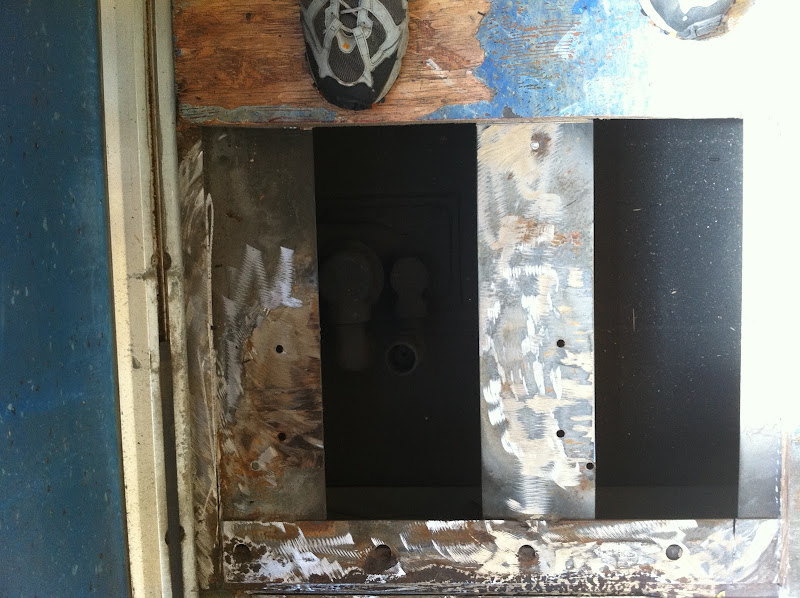
After the laminate is stuck to the door, use a trim router (with a trim bit) to trim off the excess material around the door. Here is my door after I've finished it.


Trimming out this mortis was a bit tricky. The place where the door knob fits was done with the trim router, but the latch part was done by freehand with a dremel tool. A word of caution --- after you get through applying your laminte and trimming it with the router, be aware that "trimmed out" laminate leaves a very sharp edge. It can cut you badly. I take a bastard file and rake it down the lenght of the laminate (at a 45 degree angle to the edge) to remove the sharp corner. You don't have to file it, just one rake down it will take the edge off and solve the problem. Also, if you happen to get any glue on the finished side of the laminate, it removes easily with lacquor thinner.
I hope this was helpful to anybody that has considered doing laminate, but didn't know where to start. This is how I do mine. Some of you may have a far better way of doing it, so don't accept this as gospel by any means. It's a simpe way to do it, without a lot of expensive tools.
|
|
|
|
|
|
 Posting Rules
|
You may not post new threads
You may not post replies
You may not post attachments
You may not edit your posts
HTML code is Off
|
|
|
|
 » Recent Threads
 |
|
|
|
|
|
|
|
|
|
|
|
|
|
|
|
|
|
|
|
|
|
|
|
|
|
|
|
|
|
|
|
|
|
|
|
|
|


 Linear Mode

