 |
|
 05-08-2020, 06:09 PM
|
#1
|
|
Mini-Skoolie
Join Date: Feb 2020
Location: Calgary
Posts: 51
Chassis: GMC B7 T042
Engine: GM 454 7.4L Gas
Rated Cap: 66pas
|
The Brum Bus
Hi everyone!
I'm Ben from Australia, and I have recently moved to Canada on a working holiday and started on my bus build. Perfect timing... arriving about month before the Corona Virus lockdown went down! Currently living in Calgary (although my bus is near Edmonton while I sort out insurance/registration).
2000 GMC B7 Bluebird
Gas 7.4L 8 Cylinder with Eaton Transmission
66 passenger, 36"
So far I've spent about 5 days physically working on it at the sellers yard (hes been kind enough to let me stay in my van and use his electricity and bathroom). Ive managed to give it a full mechanical service + minor repairs, and 80% done stripping it down to a shell.
Now I'm away from the bus working on design, planning and procurement (as well as the shitstorm that is insurance) in preparation for the upcoming build
I'f you want to follow the process I'll be posting pics along the way on: https://www.instagram.com/the.brum.bus/?r=nametag
|

|

|
|
05-08-2020, 06:39 PM
|
#2
|
|
Mini-Skoolie
Join Date: Feb 2020
Location: Calgary
Posts: 51
Chassis: GMC B7 T042
Engine: GM 454 7.4L Gas
Rated Cap: 66pas
|
Floor Plan
heres my conceptual floorplan and water system plan. I welcome any constructive criticism and tips from people who have done this before!
My main goals of the build are:
1. Be able to stay in long term including during canadian winter
2. Comfortably sleep up to 6 people.
3. Minimal reliance on shore power/campground facilities.
4. Comfortable living area and large kitchen.
Ive tried to make the sleeping area in the back as compact as possible to maximise the space in the front. The queen mattress will be directly on the floor, and the master bed above it at 90 degrees at approximately window height.
For the water system I am planning on mounting tanks on the available space of the underbody. Planning on doing so with steel flat bar straps bolted onto the joists. Once I'm on the road and winters approaching i plan to enclose the tanks in insulation/sealed covers and add 12v heat mats to get through winter
|
|
|
|
|
05-08-2020, 08:24 PM
|
#3
|
|
Bus Geek
Join Date: Sep 2014
Location: Eustis FLORIDA
Posts: 23,764
Year: 1999
Coachwork: Thomas
Chassis: Freighliner FS65
Engine: Cat 3126
Rated Cap: 15
|
Welcome!
I sure wish I were up there in Canada or in Australia right now!
|
|
|
|
|
05-08-2020, 09:39 PM
|
#4
|
|
Skoolie
Join Date: Oct 2019
Location: NE Oregon
Posts: 148
Year: 1998
Coachwork: Thomas
Engine: 8.3 Cummins
|
You seem to have made good time while getting it stripped, especially if you're working alone.
|
|
|
|
|
05-09-2020, 12:54 AM
|
#5
|
|
Mini-Skoolie
Join Date: Feb 2020
Location: Calgary
Posts: 51
Chassis: GMC B7 T042
Engine: GM 454 7.4L Gas
Rated Cap: 66pas
|
ha thanks... and all with minimal tools coming from australia too.. Hammer and wood chisel for most of the roof rivets after I spent hours on a grinder/drill
|
|
|
|
|
05-09-2020, 01:47 AM
|
#6
|
|
Bus Geek
Join Date: Sep 2015
Posts: 3,856
Year: 2002
Coachwork: Thomas Built Bus
Chassis: Freightliner FS65
Engine: Caterpillar 3126E Diesel
Rated Cap: 71 Passenger- 30,000 lbs.
|
Quote:
Originally Posted by the.brum.bus

ha thanks... and all with minimal tools coming from australia too.. Hammer and wood chisel for most of the roof rivets after I spent hours on a grinder/drill
|
I sure hope you have acquired at least a cold chisel by now! 
Welcome to the site.
|
|
|
|
|
05-12-2020, 11:30 PM
|
#7
|
|
Mini-Skoolie
Join Date: Feb 2020
Location: Calgary
Posts: 51
Chassis: GMC B7 T042
Engine: GM 454 7.4L Gas
Rated Cap: 66pas
|
welcoming any constructive critism, questions or tips for my attached design
Any thoughts on hot water recirculating into insulated fresh tanks on a timer to prevent freezing?
Electrical plan to come.
|
|
|
|
|
06-12-2020, 11:02 PM
|
#8
|
|
Mini-Skoolie
Join Date: Feb 2020
Location: Calgary
Posts: 51
Chassis: GMC B7 T042
Engine: GM 454 7.4L Gas
Rated Cap: 66pas
|
progress
Just updating with progress with the build so far:
-seats removed, floor ripped up
-removed ceiling and wall panels and fibreglass insulation. Had to use the old hammer and chisel for most of the roof rivets and drill for most of the wall rivets
-remove lower section by cutting along bottom with a grinder and grinding off rivet heads
-rust treat floor. Spent 2 days using the grinder with wire brush/40 grit flap disk as well as krud kutter rust remover and degreaser. Couldnt find any respirators/dust masks for sale, made do with the 1 mask my friend got for me from his work. Rinse down then Corroseal rust converter - goes on white, converts purple then dries black. Finally a coat of rustoleum oil based rust paint.
-reuse ceiling panel sheet metal to cut out window covers with the trusty grinder. sand and cold galvanise the edges, rivet to frame with butyll sealant
-Remove windows, clean and reinstall with butyl sealant. Swap out any faulty/leaking windows (three double pane windows at the front)
-glue (PL Pro polyurethane) 2x3 studs to the walls. At the rear of the bus these studs also support the bed frame
|
|
|
|
|
06-12-2020, 11:06 PM
|
#9
|
|
Mini-Skoolie
Join Date: Feb 2020
Location: Calgary
Posts: 51
Chassis: GMC B7 T042
Engine: GM 454 7.4L Gas
Rated Cap: 66pas
|
more photos...
|
|
|
|
|
06-12-2020, 11:48 PM
|
#10
|
|
Mini-Skoolie
Join Date: Feb 2020
Location: Calgary
Posts: 51
Chassis: GMC B7 T042
Engine: GM 454 7.4L Gas
Rated Cap: 66pas
|
Upcoming work planned sequence below. Any feedback appreciated!
0. Install icon bubble skylights. will need to cut 1x roof rib to install the large one between the solar panels. Should I reinforce around this hole to make up for cutting a rib?
1. Spray foam walls, ceiling and wheel wells
2. Construct stud walls mostly using 2x3 pine. PL professional polyurethane to glue to floor and roof, pocket hole jig to assemble. Walls for bedroom area, toilet and shower.
3. Water lines install - PEX with crimp connections, run in walls, cabinets and floor
4. Electrical system, mostly running above the windows (with the 12v cables) behind a removeable panel. Undecided on whether I should hang conduits prior to foaming, or cut out grooves with router/grinder.
5. 1" rigid closed cell foam insulation on floor. I am battling for headspace so I'm thinking of trialling without a plywood subfloor, or at most 1/4in plywood. Click together vinyl plank flooring on top.
|
|
|
|
|
06-13-2020, 12:09 AM
|
#11
|
|
Skoolie
Join Date: Oct 2019
Location: NE Oregon
Posts: 148
Year: 1998
Coachwork: Thomas
Engine: 8.3 Cummins
|
Thanks for posting. Your floor looks good.
|
|
|
|
|
06-13-2020, 09:26 AM
|
#12
|
|
Bus Crazy
Join Date: Aug 2019
Location: Moved to Zealand!
Posts: 1,517
Year: 2002
Coachwork: Thomas
Chassis: Freightliner FS-65
Engine: 7.2L Cat 3126 turbo diesel
Rated Cap: 71 passenger 30,000 gvwr
|
Quote:
Originally Posted by the.brum.bus
Upcoming work planned sequence below. Any feedback appreciated!
0. Install icon bubble skylights. will need to cut 1x roof rib to install the large one between the solar panels. Should I reinforce around this hole to make up for cutting a rib?
SNIP...
5. 1" rigid closed cell foam insulation on floor. I am battling for headspace so I'm thinking of trialling without a plywood subfloor, or at most 1/4in plywood. Click together vinyl plank flooring on top.
|
RE:
0) I would -- will you be adding a deck in the future? At a minimum, will you be walking on the roof to service, clean, the skylights or other roof mount items? Any flexing around the skylight could lead to future leaks...
5) Are their any "floor joists" in this plan? At a minimum I would add 1" wood joists to support the flooring in your heavy traffic areas. What level of support does the vinyl planking maker say it requires?
|
|
|
|
|
06-13-2020, 04:31 PM
|
#13
|
|
Mini-Skoolie
Join Date: Feb 2020
Location: Calgary
Posts: 51
Chassis: GMC B7 T042
Engine: GM 454 7.4L Gas
Rated Cap: 66pas
|
Quote:
Originally Posted by banman
RE:
0) I would -- will you be adding a deck in the future? At a minimum, will you be walking on the roof to service, clean, the skylights or other roof mount items? Any flexing around the skylight could lead to future leaks...
5) Are their any "floor joists" in this plan? At a minimum I would add 1" wood joists to support the flooring in your heavy traffic areas. What level of support does the vinyl planking maker say it requires?
|
0) Yes I will have a deck only at the back of the bus. no walking where the skylight is as the solar panels take up the rest of the space. I'll need to clean panels from a ladder, or a mop on extension pole from the deck.
5) Yeh 1" joists probably are a good idea... slightly reduce. I was thinking that the closed cell foam has some resonable strength to it, with flooring above to spread the load. And this floor is made to often sit on a foam underlay so it can handle a little flex. As you said, hallways may depress in the middle over time causing the flooring to come apart? I might do a trial.
For the deck, internally I will have some structural columns directly below the spacer(?) stud which run front to back. Externally, there will be 2x beams attached to the bus directly above the internal supports. Then a semi-floating deck above. Removing the sheet metal ceiling definitely reduces capacity so I want most roof load to be supported by new supports
|
|
|
|
|
08-18-2020, 11:04 AM
|
#14
|
|
Mini-Skoolie
Join Date: Feb 2020
Location: Calgary
Posts: 51
Chassis: GMC B7 T042
Engine: GM 454 7.4L Gas
Rated Cap: 66pas
|
Progress since last post:
Framing - bedrooms, shower, toilet
2in spray foam insulation
Ladder to fire escape/rooftop deck
Electrical 120V wiring rough in
Plumbing - PEX
Propane water heater mounted
Shower base and walls prepped for tiling
|
|
|
|
|
08-18-2020, 11:13 AM
|
#15
|
|
Mini-Skoolie
Join Date: Feb 2020
Location: Calgary
Posts: 51
Chassis: GMC B7 T042
Engine: GM 454 7.4L Gas
Rated Cap: 66pas
|
fresh water tank mounted with hot water return to prevent freezing in winter (insulation to be added)
|
|
|
|
|
08-18-2020, 11:26 AM
|
#16
|
|
Mini-Skoolie
Join Date: Feb 2020
Location: Calgary
Posts: 51
Chassis: GMC B7 T042
Engine: GM 454 7.4L Gas
Rated Cap: 66pas
|
Shower prep for tiling:
I installed the drain in the centre to minimise space lost due to the ramps for drainage (2x small ramps either side of the drain rather than 1x double size ramp). Vapour barrier installed as a backup for the waterproof membrane.
I used Wonderboard Lite cement board for the walls and ceiling and joints sealed with Sikabond polyurethane flexible adhesive.
Now working on the waterproof membrane using Redguard, then to start on tiling.
Follow my instagram for more current updates https://www.instagram.com/the.brum.bus/?r=nametag
|
|
|
|
|
08-18-2020, 05:44 PM
|
#17
|
|
Bus Geek
Join Date: Sep 2015
Posts: 3,856
Year: 2002
Coachwork: Thomas Built Bus
Chassis: Freightliner FS65
Engine: Caterpillar 3126E Diesel
Rated Cap: 71 Passenger- 30,000 lbs.
|
That was a busy two months. Nice work.
|
|
|
|
|
08-22-2020, 06:26 PM
|
#18
|
|
Mini-Skoolie
Join Date: Feb 2020
Location: Calgary
Posts: 51
Chassis: GMC B7 T042
Engine: GM 454 7.4L Gas
Rated Cap: 66pas
|
Quote:
Originally Posted by Native
That was a busy two months. Nice work.
|
Thanks! Yup been pretty full on trying to have it useable before summer ends!
|
|
|
|
|
08-22-2020, 09:12 PM
|
#19
|
|
Bus Geek
Join Date: Apr 2012
Location: So Cal
Posts: 3,231
Year: 1935
Coachwork: Superior
Chassis: Chevy
Engine: 317 ci/tid / Isuzu
|
Very nice work. It's clear you know your way around wood work.
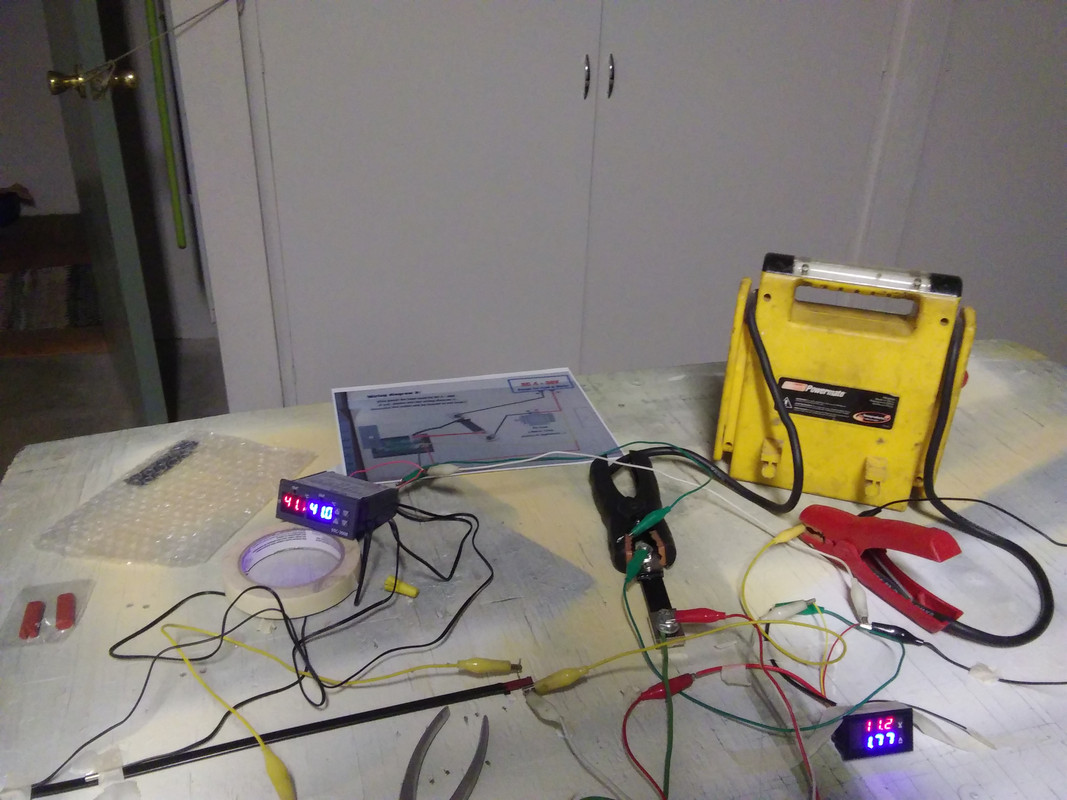
Even with my fresh and grey water tanks inside the bus I very nearly had a pipe freeze--missed it by a couple of degrees. There is about a 4 ft section under the rear door sill plate where the hot and cold lines cross from side to side with no or little insulation. I read up on how heat tape works and decided that was the way to go. The tape itself is very inexpensive and easy to install. It comes in various lengths and voltages, I installed an adjustable thermocouple switch to turn the tape on when things get cold. Tape is probably not a good name for this stuff. It is more like the form of a flat extension cord. I secured the tape to the "V" between the two water pipes with plastic ties and plugged it into my 12V system.
Take away for you: Put a couple lengths of heat tape (thermostatically controlled) around your water tank. Next loosely cover your tank with chicken wire and spray foam the tank. The wire will hold the foam in place and the heat tape will keep your water from freezing.
Jack 
P.S. I wanted to know just how much energy I would need to dedicate to the tape but since the specifications info was presented in furlongs per fort night or something I did my own testing. Of course now that I want the exact results I can't find them. Suffice it to say the power draw for my 2, four foot strips was next to nothing. According to the pic, each 4" strip required 1.77 amps.
Jack
 .
|
|
|
|
|
08-25-2020, 10:09 AM
|
#20
|
|
Mini-Skoolie
Join Date: Feb 2020
Location: Calgary
Posts: 51
Chassis: GMC B7 T042
Engine: GM 454 7.4L Gas
Rated Cap: 66pas
|
thanks!
I was hoping that the hot water return would be worthwhile to avoid draw on my solar/batteries, but I'm struggling to find any timer valves rated to hotter temperatures. heat tape may be worth looking into!
I have some leftover ceiling panel sheet metal which i had planned on making into boxes to protect insulation & tanks. But chicken wire and foam with truck bed lining spray would be a much simpler/faster solution!
|
|
|
|
|
|
 Posting Rules
|
You may not post new threads
You may not post replies
You may not post attachments
You may not edit your posts
HTML code is Off
|
|
|
|
 » Recent Threads
 |
|
|
|
|
|
|
|
|
|
|
|
|
|
|
|
|
|
|
|
|
|
|
|
|
|
|
|
|
|
|
|
|
|
|
|
|
|


 Linear Mode

