 |
|
 08-25-2013, 08:18 PM
|
#241
|
|
Bus Nut
Join Date: Jun 2013
Location: West Lafayette, IN
Posts: 832
Year: 1999
Coachwork: Thomas
Engine: 3126
Rated Cap: 72
|
Re: The Journey Visvi 1999 Thomas MVP ER
Ran into a snag today and almost through in the towel. I spent the morning not doing much, because I could not figure how to hold the sheet metal in place to re-skin where the windows were. I did get out the air compressor that was given to me a couple years ago and hook up the pneumatic riveter I got from Harbor Freight
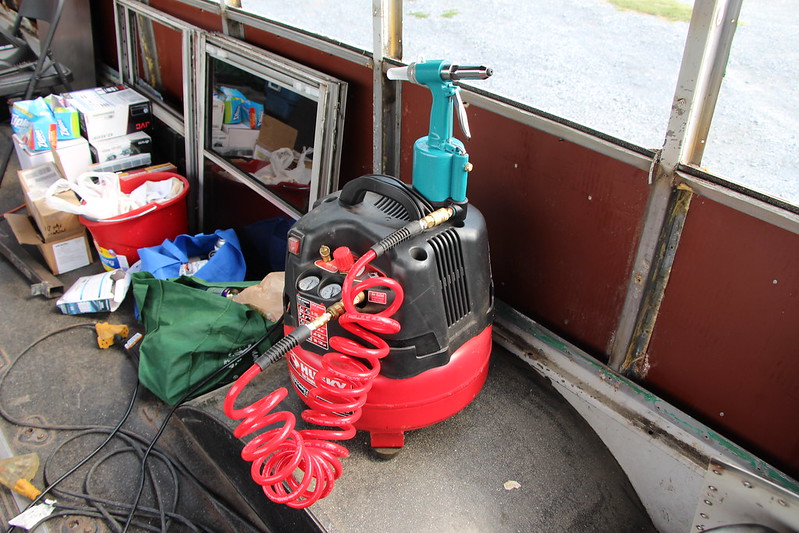
A six gallon air compressor is not much,but for free... I can get thirteen rivets before it start up to re fill the tank. At my speed that will work. I'm using 3/16 steel structural rivets. The pneumatic riveter works good. here is a demo rivet.
After lunch I said I have to try something. I held the first piece up and wedged it under the gutter and was able to get a clamp on it to hold in place long enough to drill and rivet the first hole. It took several tries because it kept sliding around after I put on the silicone to seal up between the sheet metal.
Finally got the first piece up. When I tried the other side it did not go so well. For one thing I now have to operate the clamp with my left had, and that did not work. After about an half hour of frustration and knowing the rest of the sheet metal cover two windows. They are 5' long and 10" taller. there is no way I will be able to get them up.
I set and moped in the bus for an hour wondering what to do. Like I said , I almost through the towel in for the day and gave up. The a plan started to form. I grabbed some paper and started drawing.
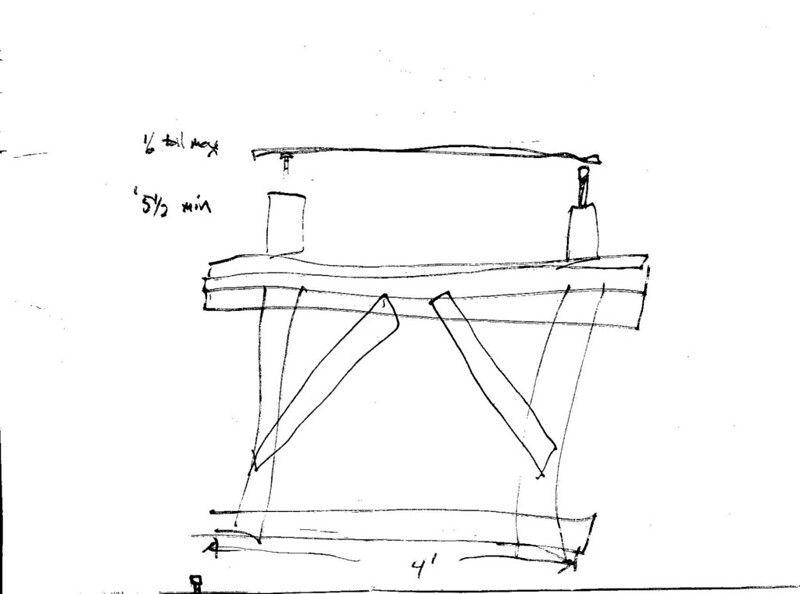
I know cool isn't it.
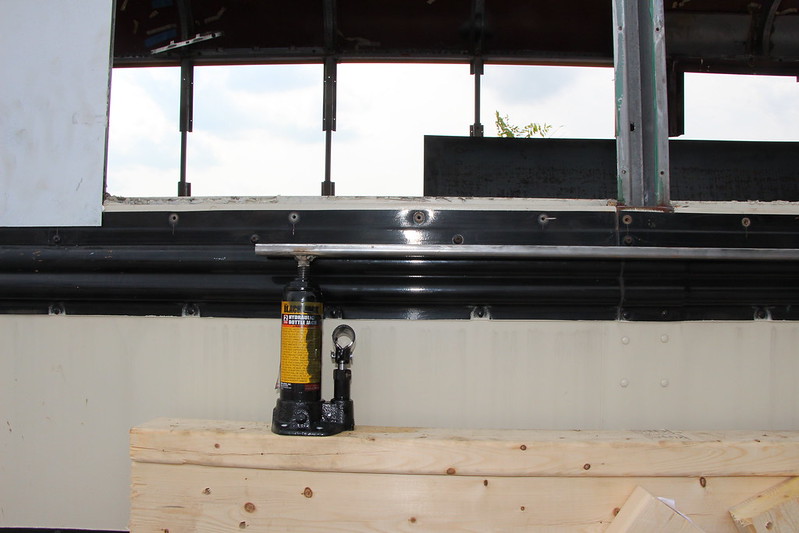
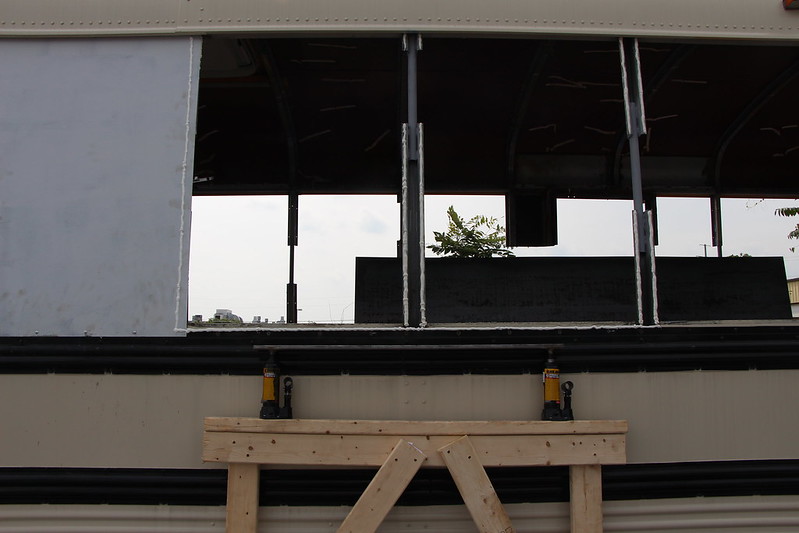
First I needed to find tow small bottle jacks on a Sunday evening. I went to both home depot and lowes, all they had was the 20 ton for about $60.00. I pulled out my smart phone and did a search and found that the Walmart around the corner had 2 ton jacks fro $12.00. It showed three in stock, so I placed my order online and headed over to pick them up. A quick trip back to home depot for some 2 x 4's. Half hour later and $50.00 poorer. I screwed the 2 x 4's mostly square together. Used my drill press to drill two holes in the jacks to secure to the top 2 x 4's. Them welded a 4' piece of steel that had a 1/4 ' lip on it to the jacks. Here it is.
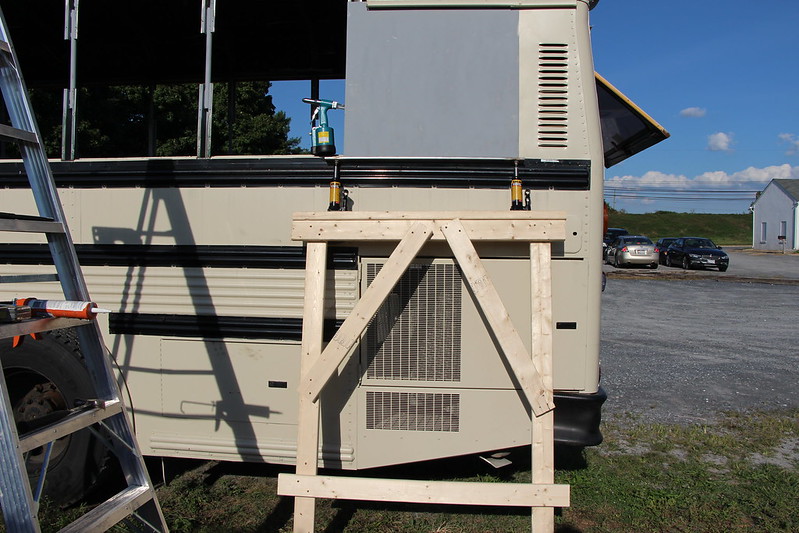
I'm glad I used two jacks, it makes up for the unevenness of the ground. It also wedges the sheat metal under the gutter further. I'm also able to walk around with a hammer to align it up with the U channel.
|

|

|
|
08-25-2013, 08:20 PM
|
#242
|
|
Bus Nut
Join Date: Jun 2013
Location: West Lafayette, IN
Posts: 832
Year: 1999
Coachwork: Thomas
Engine: 3126
Rated Cap: 72
|
Re: The Journey Visvi 1999 Thomas MVP ER
Quote:
|
Originally Posted by NilesSkoolie
Looking really good!!! I wish Ontario was more lenient on customization. If i did this i would never get it insured here.. Great job!!!
|
I can't get it insured other than liability. They will only insure professionally built buses. So hey what the heck.
|
|
|
|
|
08-26-2013, 04:04 AM
|
#243
|
|
Bus Geek
Join Date: Nov 2011
Location: MNT CITY TN
Posts: 5,158
|
Re: The Journey Visvi 1999 Thomas MVP ER
Very clever....good show!!
__________________
Our build La Tortuga
Accept the challenges so that you can feel the exhilaration of victory.
George S. Patton
|
|
|
|
|
08-26-2013, 08:06 AM
|
#244
|
|
Bus Nut
Join Date: Dec 2009
Location: MN
Posts: 732
Year: 1991
Coachwork: Wayne
Chassis: International 3800
Engine: DT466
Rated Cap: 72
|
Re: The Journey Visvi 1999 Thomas MVP ER
Awesome!! When I did mine, I just managed to wreak havok on my back :/ I was using butyl rubber tape, though, so that did make it a little easier.
__________________
The journey is the destination...
Brutus
|
|
|
|
|
08-26-2013, 08:30 AM
|
#245
|
|
Bus Nut
Join Date: Jun 2013
Location: West Lafayette, IN
Posts: 832
Year: 1999
Coachwork: Thomas
Engine: 3126
Rated Cap: 72
|
Re: The Journey Visvi 1999 Thomas MVP ER
Quote:
|
Originally Posted by JakeC
Awesome!! When I did mine, I just managed to wreak havok on my back :/ I was using butyl rubber tape, though, so that did make it a little easier.
|
I tweaked my back a little, on that second piece. I thought about butyl tape, I will use it around the windows. I read where several people just used silicone between the sheet metal and I have five tubes of indoor-outdoor, so why not use it up. On the first panel that goes on the U channel, I will use adhesive, the silicone on the overlap.
|
|
|
|
|
08-26-2013, 08:54 AM
|
#246
|
|
Bus Nut
Join Date: Dec 2009
Location: MN
Posts: 732
Year: 1991
Coachwork: Wayne
Chassis: International 3800
Engine: DT466
Rated Cap: 72
|
Re: The Journey Visvi 1999 Thomas MVP ER
I love being able to use up stuff I have sitting around. Makes me feel efficient, lol 
__________________
The journey is the destination...
Brutus
|
|
|
|
|
08-26-2013, 07:22 PM
|
#247
|
|
Bus Nut
Join Date: Jun 2013
Location: West Lafayette, IN
Posts: 832
Year: 1999
Coachwork: Thomas
Engine: 3126
Rated Cap: 72
|
Re: The Journey Visvi 1999 Thomas MVP ER
House cleaning time, I can't find anything.
Now this is much better.
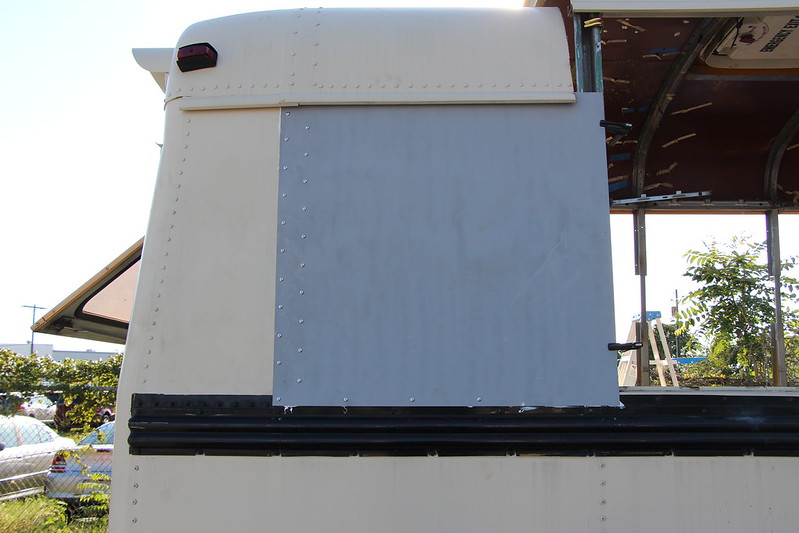
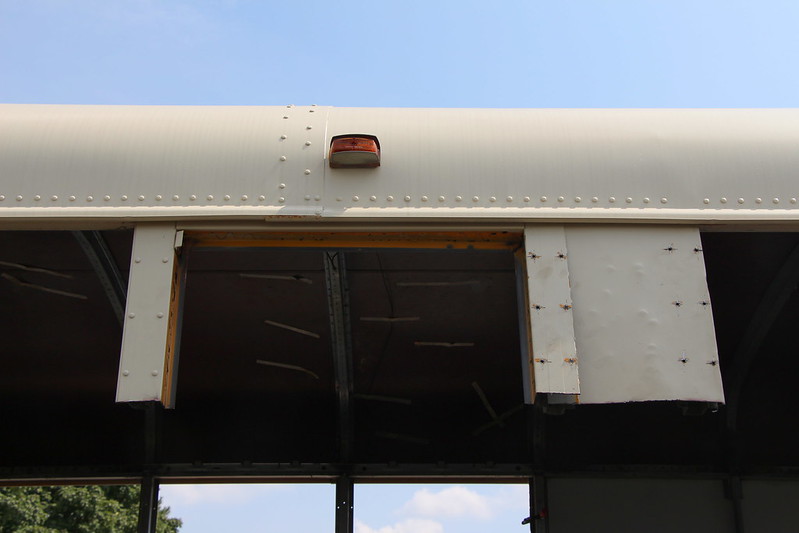
Before I can finish re-skinning the bus, there are some things I need to get done first.
1) re-weld the rear of the raised roof to the old roof. I also need to do this in the front, but that can wait until I get there.
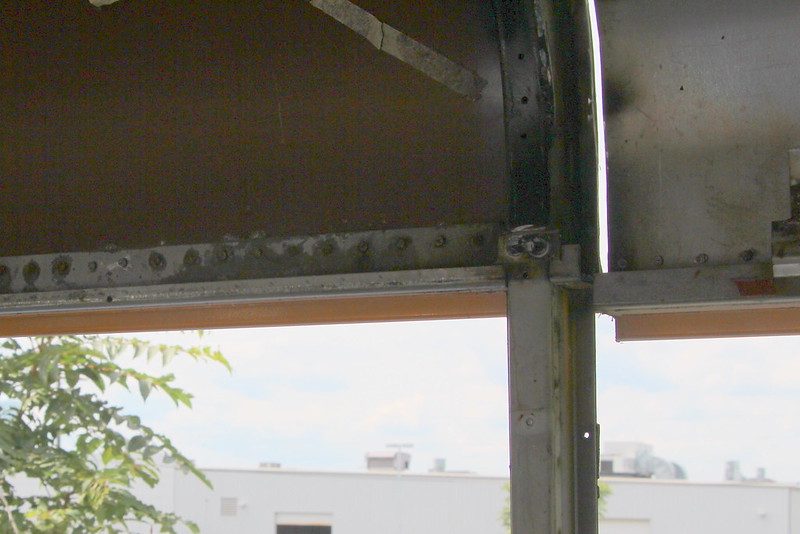
This is where I cut the roof apart.

Now after the roof raise. I re-cut this area square and used a piece of support steel that I cut out of the front of the roof to do the raise. I cut the steel to fit and clamped it in to weld.

Welded it in, forgive the welding. I have many excuses, but I beat it with a hammer and it holds.

I know this is one of my worst welds. The sun was setting behind me and kept triggering my face shield. I released the ratchet strap I used to pull the sides back in and beat it some more with a hammer and it is still holding. I may touch it up next time I'm out.
2) I need to clean and primer the steel before I put it up.
3) I want to make a jig for drilling the holes to rivet. That will make it easier to drill and make them all look consistent.
Then I get to try the "Re-Skinning Steel Raising Machine" or the RSSRM on the big pieces. Us Navy people need acronyms, but doesn't that sound like restroom? 
|
|
|
|
|
08-26-2013, 09:39 PM
|
#248
|
|
Bus Crazy
Join Date: May 2010
Location: Farmington Hills, Mi (Detroit area)
Posts: 1,968
Year: 2000
Coachwork: Eldorado Aerotech 24'
Chassis: Ford E-450 Cutaway Bus
Engine: 7.3L Powerstroke
Rated Cap: 19
|
Re: The Journey Visvi 1999 Thomas MVP ER
Your sheet metal jack is a stroke of genius!
|
|
|
|
|
08-27-2013, 08:13 AM
|
#249
|
|
Skoolie
Join Date: Sep 2012
Location: Massachusetts.
Posts: 196
Year: 1999
Coachwork: Thomas
Chassis: Saf-t-liner
Engine: Cat 3126 - MD 3060
Rated Cap: 72
|
Re: The Journey Visvi 1999 Thomas MVP ER
Any welds that look awful are most likely enough structurally, but there is nothing wrong with hitting them with a grinder and doing another pass if you want to be sure they will hold.
I just got my welder extension cable, I'm finally welding too, most fun I've had so far with the bus is cutting out rusty spots and plating over them. The day before I removed the foam from the back seat.  that was a nightmare. Thomas has crazy strong glue.
Going good over there!
|
|
|
|
|
08-27-2013, 12:10 PM
|
#250
|
|
Bus Geek
Join Date: Apr 2012
Location: So Cal
Posts: 3,231
Year: 1935
Coachwork: Superior
Chassis: Chevy
Engine: 317 ci/tid / Isuzu
|
Re: The Journey Visvi 1999 Thomas MVP ER
I'm reluctant to tell others what to do or how to do it--especially on this forum where there so many knowledeable folks but I detected a bit of concern on your part about that last weld and I thought I'd venture my two cents worth. If the bit you just welded in is just a space filler then I'd agree that you are good to go. If on the other hand it is somewhat structural I'd recommend grinding it out for a re-do. The material appears to be fairly thick (1/4" or more?) and would lend itself to being ground back at a 45 degree angle along the weld lines. This allows for better penetration of the weld and is especially important if the material can't be welded from both sides. Jack
|
|
|
|
|
08-27-2013, 01:33 PM
|
#251
|
|
Bus Nut
Join Date: Jun 2013
Location: West Lafayette, IN
Posts: 832
Year: 1999
Coachwork: Thomas
Engine: 3126
Rated Cap: 72
|
Re: The Journey Visvi 1999 Thomas MVP ER
Quote:
|
Originally Posted by ol trunt
I'm reluctant to tell others what to do or how to do it--especially on this forum where there so many knowledeable folks but I detected a bit of concern on your part about that last weld and I thought I'd venture my two cents worth. If the bit you just welded in is just a space filler then I'd agree that you are good to go. If on the other hand it is somewhat structural I'd recommend grinding it out for a re-do. The material appears to be fairly thick (1/4" or more?) and would lend itself to being ground back at a 45 degree angle along the weld lines. This allows for better penetration of the weld and is especially important if the material can't be welded from both sides. Jack
|
I agree and it is structural, but only 14 ga. I plan to grind it and reweld when i can see what I'm doing. The right hand weld looks the way it does, because the first weld missed the gap. That weld looks good, it is the left weld I'm concered about. I don't think it penetrated the upright support enough.
|
|
|
|
|
08-27-2013, 03:01 PM
|
#252
|
|
Bus Crazy
Join Date: Feb 2009
Location: Austin, TX
Posts: 1,489
Year: 1996
Coachwork: Thomas
Chassis: International
Engine: DT466/AT545
|
Re: The Journey Visvi 1999 Thomas MVP ER
I wonder how often people accidentally weld their clamp onto the work piece...
I just borrowed a cheap MIG welder from a friend to play with before taking the plunge and buying one for myself. I have pretty much no experience welding, so I'm really excited to learn! 
|
|
|
|
|
08-27-2013, 04:03 PM
|
#253
|
|
Bus Nut
Join Date: Dec 2009
Location: MN
Posts: 732
Year: 1991
Coachwork: Wayne
Chassis: International 3800
Engine: DT466
Rated Cap: 72
|
Re: The Journey Visvi 1999 Thomas MVP ER
Quote:
|
Originally Posted by wmkbailey
I agree and it is structural, but only 14 ga. I plan to grind it and reweld when i can see what I'm doing. The right hand weld looks the way it does, because the first weld missed the gap. That weld looks good, it is the left weld I'm concered about. I don't think it penetrated the upright support enough. |
The left one looks a little to the right of the gap, but it could just be the pic.
Quote:
|
Originally Posted by Diesel Dan
I wonder how often people accidentally weld their clamp onto the work piece...
I just borrowed a cheap MIG welder from a friend to play with before taking the plunge and buying one for myself. I have pretty much no experience welding, so I'm really excited to learn! |
I have, lol...
Have fun!!
__________________
The journey is the destination...
Brutus
|
|
|
|
|
08-30-2013, 06:56 PM
|
#254
|
|
Bus Nut
Join Date: Jun 2013
Location: West Lafayette, IN
Posts: 832
Year: 1999
Coachwork: Thomas
Engine: 3126
Rated Cap: 72
|
Re: The Journey Visvi 1999 Thomas MVP ER
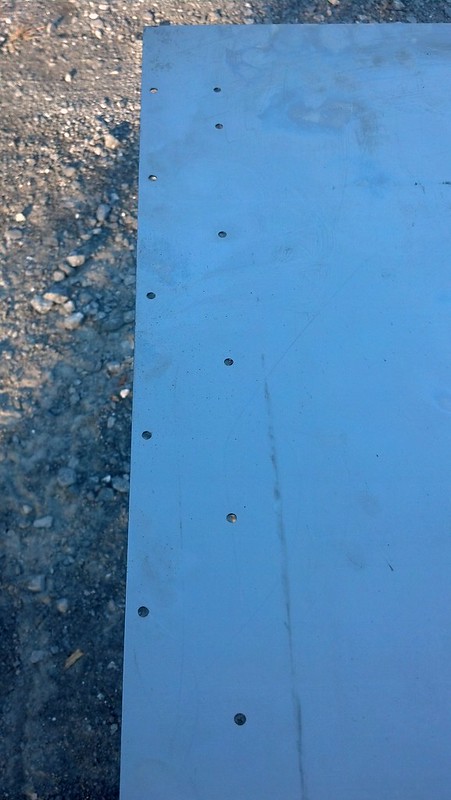
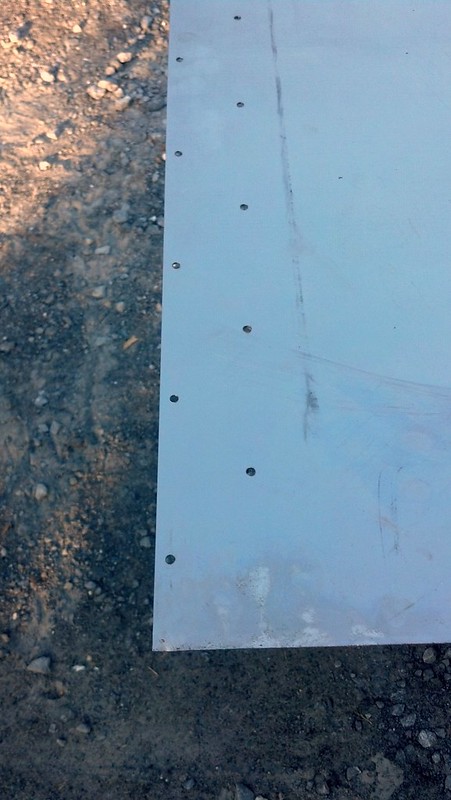
I got item 3 done;
3) I want to make a jig for drilling the holes to rivet. That will make it easier to drill and make them all look consistent.
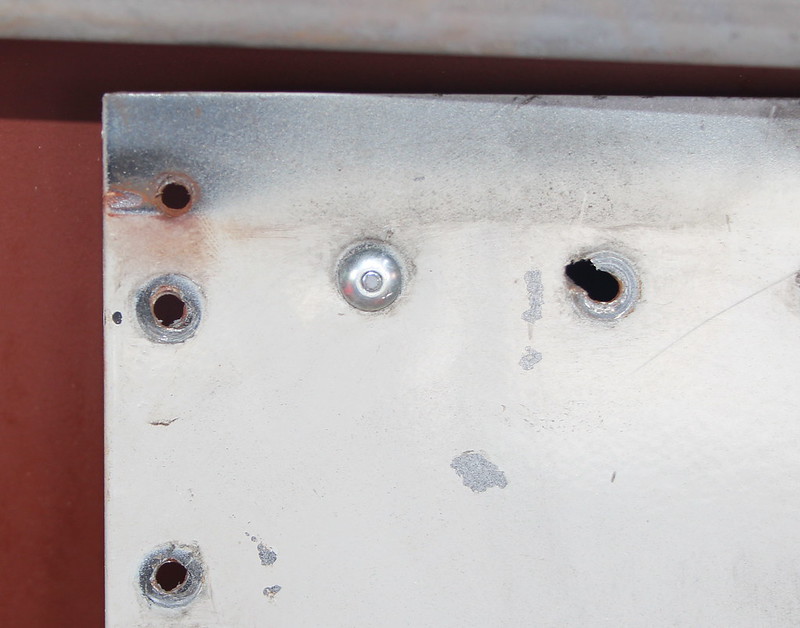
I decided to drill the holes first then paint. I used the piece of steel that used to trim around the side emergency door. I measured about six times to make sure I had everything in alignment. I can slide it on the end of the new skin, clamp and drill.
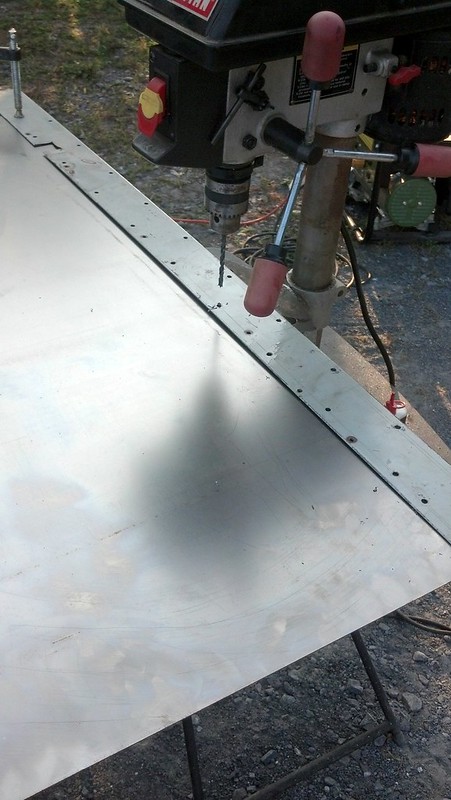
Now all my holes will be uniform.
Top
Bottom
Once I get this in place, it will be my guide to drill the under-lap? steel (the piece that goes under the overlap) and the u-channel.
|
|
|
|
|
08-31-2013, 06:19 PM
|
#255
|
|
Bus Nut
Join Date: Jun 2013
Location: West Lafayette, IN
Posts: 832
Year: 1999
Coachwork: Thomas
Engine: 3126
Rated Cap: 72
|
Re: The Journey Visvi 1999 Thomas MVP ER
Man what a hot day. I worked in direct sunlight in 92 degrees. The steel cooked me well done. I don't care if my new skin oil cans, I'm doing the rest in the shade.
I drilled, cleaned the oil off and primed the first three sheets. I decided to stop and install some to make sure my holes line up.
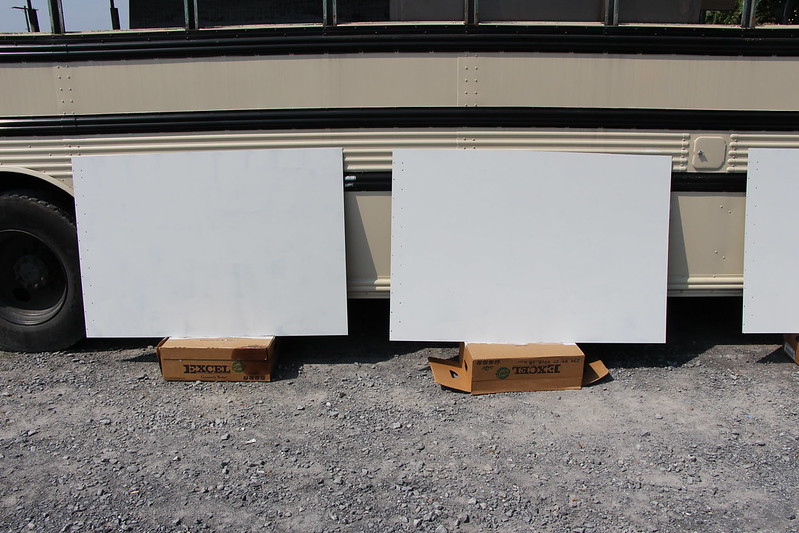
More screws to take out.
Then put on the adhesive.
Line up and start drilling some more.
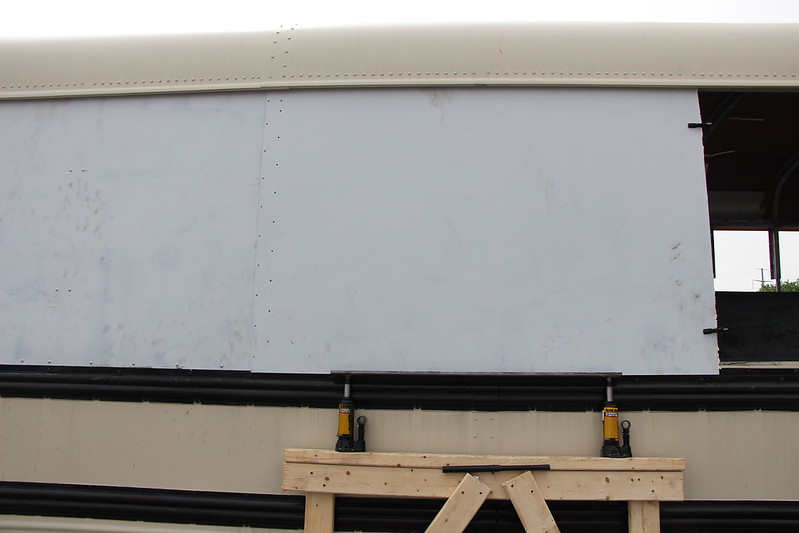
Where the two pieces over lap I can not get the outside piece wedged under the gutter as far. But I can live with it.

Two down eight more to go. Working in the heat wore me down. Right after I got these done it started to rain. I should make faster progress tomorrow now that I have it worked out.
|
|
|
|
|
09-01-2013, 04:57 AM
|
#256
|
|
Bus Geek
Join Date: Nov 2011
Location: MNT CITY TN
Posts: 5,158
|
Re: The Journey Visvi 1999 Thomas MVP ER
Good luck today
__________________
Our build La Tortuga
Accept the challenges so that you can feel the exhilaration of victory.
George S. Patton
|
|
|
|
|
09-01-2013, 10:56 AM
|
#257
|
|
Bus Nut
Join Date: Jul 2012
Location: Olympia, Washington
Posts: 557
Year: 87
Coachwork: Wayne
Chassis: International s1700
Engine: 6.9 internatiional
Rated Cap: 65
|
Re: The Journey Visvi 1999 Thomas MVP ER
the skinning is going well
|
|
|
|
|
09-01-2013, 10:56 AM
|
#258
|
|
Bus Nut
Join Date: Jul 2012
Location: Olympia, Washington
Posts: 557
Year: 87
Coachwork: Wayne
Chassis: International s1700
Engine: 6.9 internatiional
Rated Cap: 65
|
Re: The Journey Visvi 1999 Thomas MVP ER
the skinning is going well
|
|
|
|
|
09-01-2013, 07:45 PM
|
#259
|
|
Bus Nut
Join Date: Jun 2013
Location: West Lafayette, IN
Posts: 832
Year: 1999
Coachwork: Thomas
Engine: 3126
Rated Cap: 72
|
Re: The Journey Visvi 1999 Thomas MVP ER
Uncle, the bus wins. It looks like my limit is two sheets a day. By the time I pre-drill the one side, clean and paint. Then remove the next set of screws, put on the adhesive, I'm tired. Getting the sheet in place with the hydraulic lift is the east part. Then while standing on a ladder with no purchase I have to drill 35 holes through and rivet. This 90 degree heat with 110% humidity wares you out.
Then I ran into this.
The steel around the emergency door. I need to remove this to put up my next sheet. After removing the rivets and beating the heck out of it, I realize it is riveted to the roof. 31 stink-en, sweaty, I'm not going to do today, rivets. This will have to wait for a nice cool day.
Oh, I forgot. I also have to weld in the supports.
|
|
|
|
|
09-01-2013, 08:19 PM
|
#260
|
|
Bus Geek
Join Date: Apr 2012
Location: So Cal
Posts: 3,231
Year: 1935
Coachwork: Superior
Chassis: Chevy
Engine: 317 ci/tid / Isuzu
|
Re: The Journey Visvi 1999 Thomas MVP ER
I feel for you. It is never hot or humid here--except for the last two days. 90 degrees, 90% humidity (I measured) inside the garage, inside the bus , welding. I love it when a plan comes together like that. Don't you?  Jack
|
|
|
|
|
|
 Posting Rules
|
You may not post new threads
You may not post replies
You may not post attachments
You may not edit your posts
HTML code is Off
|
|
|
|
 » Recent Threads
 |
|
|
|
|
|
|
|
|
|
|
|
|
|
|
|
|
|
|
|
|
|
|
|
|
|
|
|
|
|
|
|
|
|
|
|
|
|


 Linear Mode

