 |
|
 04-03-2017, 06:26 PM
|
#21
|
|
Bus Geek
Join Date: Feb 2016
Location: Willamina, Oregon
Posts: 6,409
Coachwork: 97 Bluebird TC1000 5.9
|
Kind of hard to weigh a roof in the middle of a raise.
__________________
Robin
Nobody's Business
|

|

|
|
04-03-2017, 06:50 PM
|
#22
|
|
Skoolie
Join Date: Apr 2016
Location: Marietta, GA
Posts: 192
|
Quote:
Originally Posted by Robin97396

Kind of hard to weigh a roof in the middle of a raise.
|
Or while it's still attached to the rest of the bus! I think he wants to insure that everything is stucturally sound with all the cutting and welding back together. I made a wild guess based on the total weight of the bus, but who knows how close that actually is. 
|
|
|
|
|
04-03-2017, 07:26 PM
|
#23
|
|
Bus Geek
Join Date: Sep 2014
Location: Eustis FLORIDA
Posts: 23,764
Year: 1999
Coachwork: Thomas
Chassis: Freighliner FS65
Engine: Cat 3126
Rated Cap: 15
|
Quote:
Originally Posted by mysty
Looks really good! It sounds like you had some great folks to help, too. 
I did have a few questions - from the pictures, it looks like you used c channels to fill in the ribs, but then suddenly there were flanges on them to match the hat channel. Did you weld another piece of metal on, or did I just miss seeing the flanges in the first picture and it was hat channel the whole time?
I'm not sure if I could get new hat channel fabricated, but I've seen video of someone using square tubing instead and then attaching a flat piece of metal to the outside to rivet the skin to.
Also, how did you actually lift the bus? You mentioned bottle jacks, but where were they positioned? How did you keep everything level? Any idea how much the roof weighed? (My welder asked about the roof weight and I'm not even sure how to find something like that out!) |
The flanges that magically appeared on my rib extension pieces are just some 1/8" angle welded on to rivet to.
Any decent steel fabrication shop can make you the channel like mine. Its better than square tubing because it fits 100% perfect and snug. If you can find sq tubing that fits like a glove, go that route.
We didn't really "lift" the bus. Just threw bottle jacks under the left rear and left front, and then lifted em a little till the bus was level. To level, we used a big cheap level from Harbor Freight. a 6 or 7 footer. You just wanna put a jack under the low side and jack till its level. Doesn't have to be PERFECT. But we got close enought.
The roof isn't terrifically heavy. I don't really know what it weighs, as it was supported the whole time. Maybe 500 lbs or so? IDK just a guess. Its super strong and rigid. Once you clamp everything down it lines up REAL nice.
I'd definitely do it again!
|
|
|
|
|
04-04-2017, 12:03 PM
|
#24
|
|
Bus Crazy
Join Date: Feb 2012
Location: Salt Lake City Utah
Posts: 1,635
Year: 2000
Chassis: Blue Bird
Engine: ISC 8.3
|
I concur with the "several hundred pounds" estimate for roof weight. Per Engineering Toolbox, 18 gauge steel weighs 2 pounds per square foot. I don't recall whether I measured my roof to be 18 or 20 gauge.. Anyway, suppose there's about 12 feet of metal wrapped around from the top of one window to the top of the other side and the roof is a full 40 feet long. That's 40*12=480 square feet at 2 pounds each, 960 pounds, plus the weight of about 13 ribs (maybe another 100 pounds?). But this is all probably erring on the side of conservative: the roof probably is thinner than 18 gauge, it's probably not really 12 feet of metal from one side to the other, probably not fully 40 feet long, etc.
If somehow the roof were terribly unbalanced you might see 1000 pounds at one corner. If it were perfectly balanced you might see up to 250 pounds at each corner. I doubt it could be so unbalanced as to see more than 500 pounds at any one corner, and that only briefly if a person was jacking one corner at a time. We've seen threaded rod, bottle jacks, farm "Hi-Lift" jacks, scaffolding with leveling feet, etc. All of it handles the load fine, each requiring its own slightly unique approach to keeping the roof safe from falling onto those working below.
|
|
|
|
|
04-04-2017, 04:31 PM
|
#25
|
|
Bus Crazy
Join Date: Jan 2017
Location: Massachusetts
Posts: 1,497
Year: 2002
Coachwork: Bluebird
Chassis: Bluebird
Engine: 5.9 Cummins 24v
Rated Cap: 72 pax
|
Still waiting for the hulk video. ;)
Sent from my XT1254 using Tapatalk
|
|
|
|
|
04-06-2017, 09:37 PM
|
#26
|
|
Skoolie
Join Date: Apr 2016
Location: Marietta, GA
Posts: 192
|
Quote:
Originally Posted by Njsurf73
Still waiting for the hulk video. ;)
|
Oh yeah! Here we go:
Rawr!

|
|
|
|
|
04-06-2017, 10:12 PM
|
#27
|
|
Skoolie
Join Date: Apr 2016
Location: Marietta, GA
Posts: 192
|
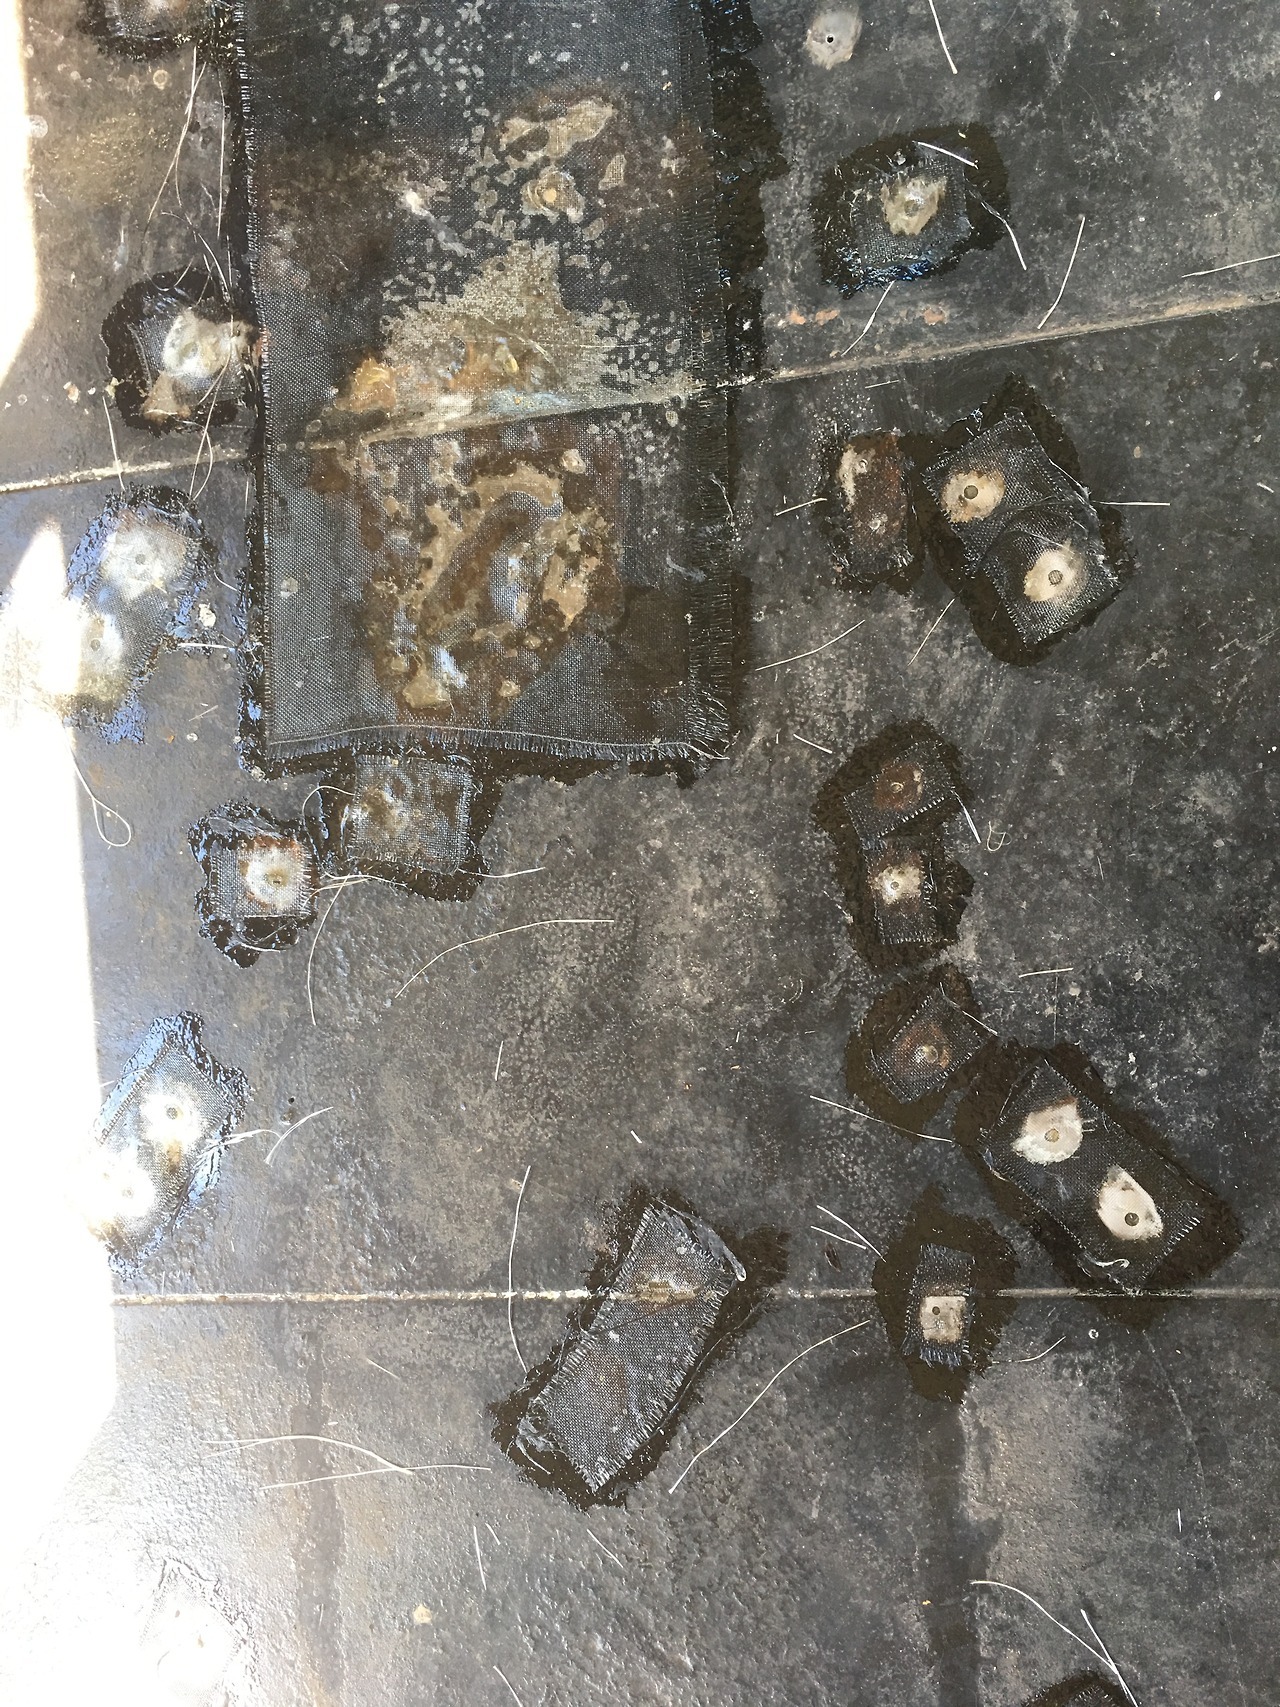
On Tuesday, I fiberglassed over all the screw holes and rusted out areas in the floor of the bus. I still need to go back and do another coat or two over the large rusted area at the front of the bus (the top of this image) for some added strength, but for the little screw holes, I think one layer will be sufficient.
This was my first time working with fiberglass, and it was actually pretty easy. Figuring out the ratio of resin to hardener without a good way of measuring ounces was... interesting, so I was relieved to see that after a couple of hours the fiberglass had set up nice and hard.
|
|
|
|
|
04-06-2017, 10:47 PM
|
#28
|
|
Skoolie
Join Date: Apr 2016
Location: Marietta, GA
Posts: 192
|
While the fiberglass was setting, my friend Jonathan and I built the prettiest little composting toilet I've ever seen (ok, technically, it's the only composting toilet I've ever seen aside from the latrines we used to dig at girl scout camp, but that's beside the point!)
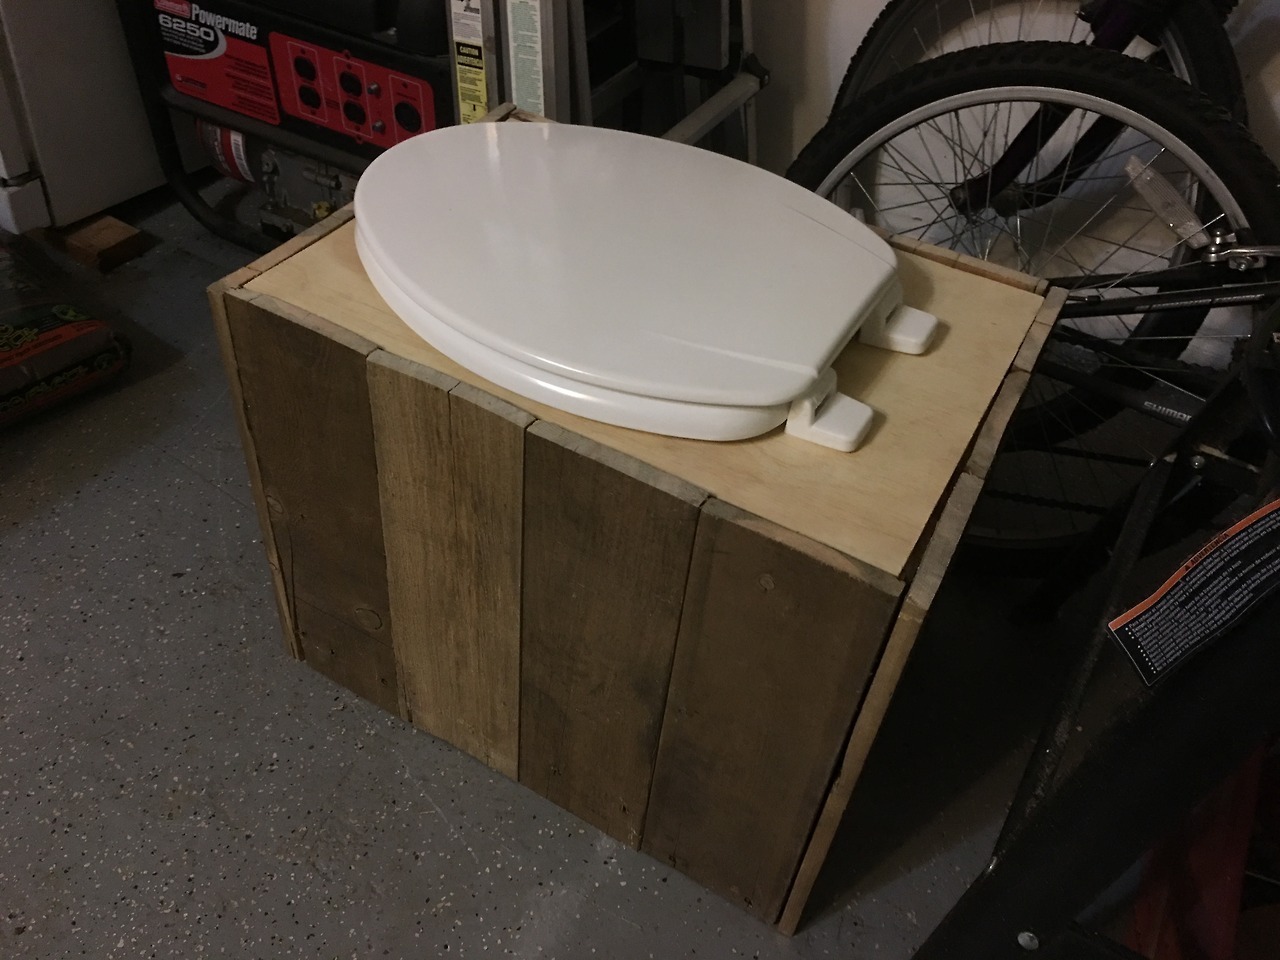
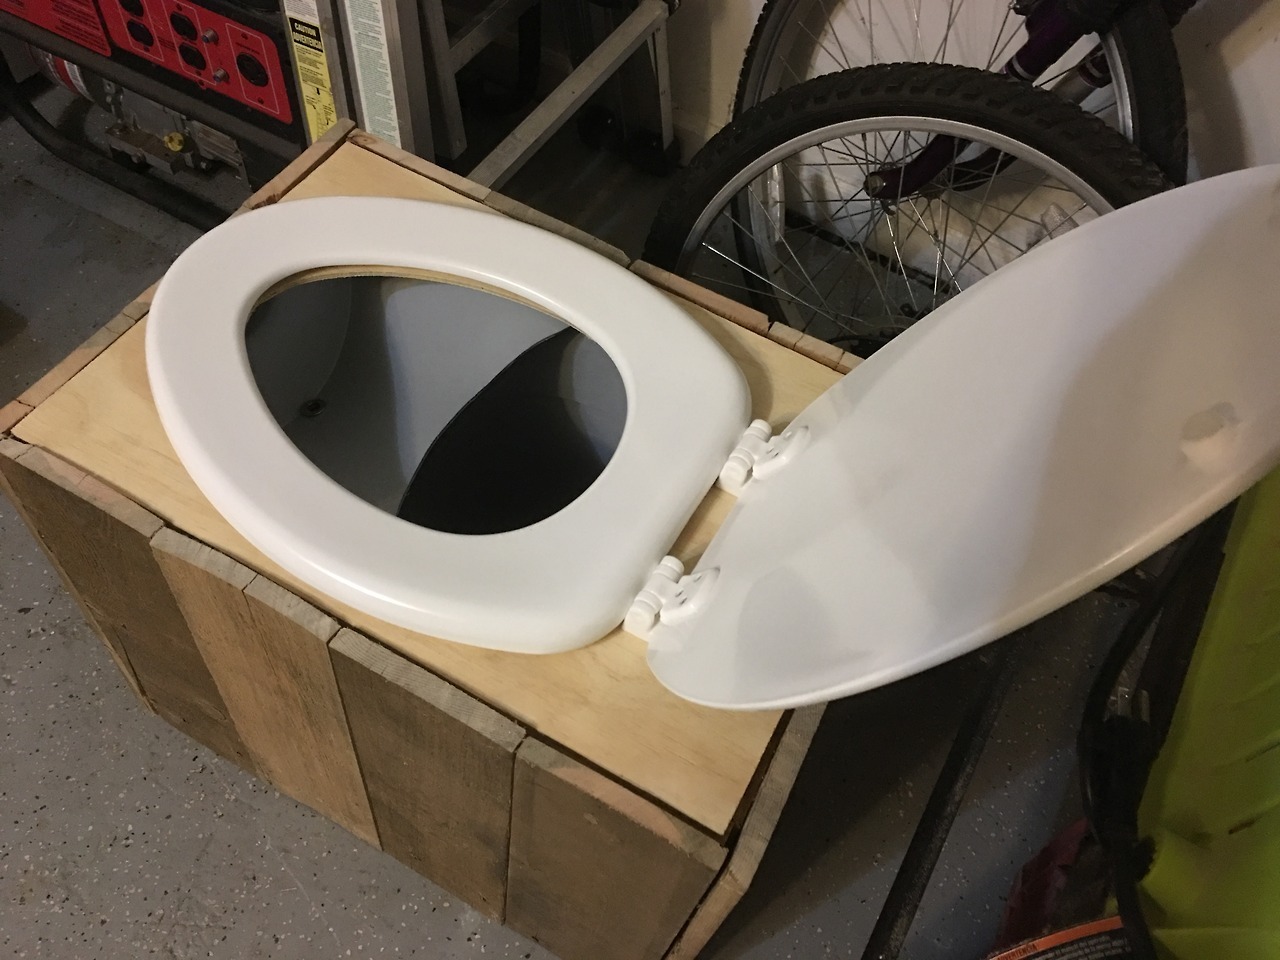
We used some of the pallet wood I've been collecting to create the housing for the toilet. A 5 gallon paint bucket was sacrificed to create the urine diverter, and another one serves as the main receptacle. We really stumped the poor guy in the plumbing section of Home Depot who offered to help us find whatever it was we were looking for. Once we explained what we were building, he looked very sorry that he had offered to help (LOL), but I managed to find a flanged metal toilet supply line that seemed like it would be low profile enough to serve as a drain, and once we trimmed the length a bit, the tube goes right down into the neck of my collection jug.
From my research I've learned that many composting toilet users prefer a coconut based composting material. A memory of my sister buying some "dirt made from coconuts" for her frog's aquarium was tugging at the back of my mind, so I figured the pet store seemed like a reasonable place to look. The poor girl working there was at a loss - does such a thing exist? But we checked the reptile section and there it was! The pet store lady thanked me for showing her something new, and now we're ALMOST ready to go. 
I still need to glue my makeshift drain to the diverter so there aren't any leaks, and I also need to pick up some bolts to secure the toilet seat to the plywood cover. Once that's done, we can start beta testing to see if a composting toilet is really feasible for our family or if we need to find a nice RV toilet and blackwater tank.
|
|
|
|
|
04-07-2017, 07:27 AM
|
#29
|
|
Mini-Skoolie
Join Date: Apr 2017
Location: Columbus, OH
Posts: 37
|
Nice looking sh*tter! The folks at Nature's Head composting toilets recommend using "Coco Coir" (essentially the same thing you're talking about, but that's the "true name" of it ). They said on the video that you can purchase it at hydroponics shops or online.
|
|
|
|
|
04-07-2017, 07:31 AM
|
#30
|
|
Bus Crazy
Join Date: Jan 2017
Location: Massachusetts
Posts: 1,497
Year: 2002
Coachwork: Bluebird
Chassis: Bluebird
Engine: 5.9 Cummins 24v
Rated Cap: 72 pax
|
Beta testing... LMAO.
I have heard nothing but good things about them. Looks like a great start!
Sent from my XT1254 using Tapatalk
|
|
|
|
|
04-09-2017, 10:15 AM
|
#31
|
|
Skoolie
Join Date: Apr 2016
Location: Marietta, GA
Posts: 192
|
We're trying to plan out the roof raise, and are a little confused about the front of the bus. There are some extra panels of metal welded to the front and we're not sure if it would be a good idea to cut through them. Has anyone else encountered this? Does anyone know why they're there?
Sent from my iPhone using Tapatalk
|
|
|
|
|
04-09-2017, 10:17 AM
|
#32
|
|
Skoolie
Join Date: Apr 2016
Location: Marietta, GA
Posts: 192
|

Hopefully this pic works! Trying to figure out how to post from my phone. ;)
Sent from my iPhone using Tapatalk
|
|
|
|
|
04-09-2017, 10:17 AM
|
#33
|
|
Bus Geek
Join Date: Sep 2014
Location: Eustis FLORIDA
Posts: 23,764
Year: 1999
Coachwork: Thomas
Chassis: Freighliner FS65
Engine: Cat 3126
Rated Cap: 15
|
Quote:
Originally Posted by mysty
We're trying to plan out the roof raise, and are a little confused about the front of the bus. There are some extra panels of metal welded to the front and we're not sure if it would be a good idea to cut through them. Has anyone else encountered this? Does anyone know why they're there?
Sent from my iPhone using Tapatalk
|
where are you wanting to cut? If you're doing anything similar to mine, I'd say go straight across at the first window behind the door. You can always replicate/rebuild whatever you need to.
|
|
|
|
|
04-09-2017, 10:23 AM
|
#34
|
|
Bus Geek
Join Date: Sep 2014
Location: Eustis FLORIDA
Posts: 23,764
Year: 1999
Coachwork: Thomas
Chassis: Freighliner FS65
Engine: Cat 3126
Rated Cap: 15
|
If you go between the partial rib in the back, the transition would be steep but super easy.

That's where I'd cut.
How high you planning to raise it?
|
|
|
|
|
04-09-2017, 10:56 AM
|
#35
|
|
Skoolie
Join Date: Apr 2016
Location: Marietta, GA
Posts: 192
|
How hard would it be to cut across the top of the door frame and then raise it right at the front? Ideally, I want to put a sleeping loft over the cab for my 8 year old.
Sent from my iPhone using Tapatalk
|
|
|
|
|
04-09-2017, 11:30 AM
|
#36
|
|
Bus Geek
Join Date: Sep 2014
Location: Eustis FLORIDA
Posts: 23,764
Year: 1999
Coachwork: Thomas
Chassis: Freighliner FS65
Engine: Cat 3126
Rated Cap: 15
|
IDK, but if you can dream it you can build it.
|
|
|
|
|
04-09-2017, 11:39 AM
|
#37
|
|
Bus Crazy
Join Date: Jun 2016
Location: N.C.
Posts: 1,136
Year: 1997
Coachwork: Bluebird
Engine: DT466E
Rated Cap: 34
|
Quote:
Originally Posted by EastCoastCB
If you go between the partial rib in the back, the transition would be steep but super easy.
|
Is there any reason you couldn't make your cut right up against the backside of a rib, which would make the transition piece perpendicular to the roof? Seems like all I've seen are sloping transitions, and was just wondering why that was the case (unless it's purely for aesthetic reasons). I can't picture how a straight up-and-down transition would make your aerodynamic profile any worse than it already is, or weaker from a structural standpoint.
|
|
|
|
|
04-09-2017, 12:35 PM
|
#38
|
|
Skoolie
Join Date: Apr 2016
Location: Marietta, GA
Posts: 192
|
Quote:
Originally Posted by plfking
Is there any reason you couldn't make your cut right up against the backside of a rib, which would make the transition piece perpendicular to the roof? Seems like all I've seen are sloping transitions, and was just wondering why that was the case (unless it's purely for aesthetic reasons). I can't picture how a straight up-and-down transition would make your aerodynamic profile any worse than it already is, or weaker from a structural standpoint.
|
You mean like this?

Sent from my iPhone using Tapatalk
|
|
|
|
|
04-09-2017, 12:51 PM
|
#39
|
|
Bus Crazy
Join Date: Jun 2016
Location: N.C.
Posts: 1,136
Year: 1997
Coachwork: Bluebird
Engine: DT466E
Rated Cap: 34
|
Quote:
Originally Posted by mysty
You mean like this?
|
Just like that....except I'd put a skylight in it. I think that looks as good as a sloped panel.
Thanks for the pic.
|
|
|
|
|
04-09-2017, 02:42 PM
|
#40
|
|
Bus Nut
Join Date: Oct 2014
Location: Kent, WA (Seattle)
Posts: 414
Year: 1987
Engine: 6.9L Diesel
|
Cool composting toilet, AWESOME Diverter! Would you be willing to show a few more pictures of your diverter and how it rests in the toilet? I'd like to copy exactly how you did it.
|
|
|
|
|
|
 Posting Rules
|
You may not post new threads
You may not post replies
You may not post attachments
You may not edit your posts
HTML code is Off
|
|
|
|
 » Recent Threads
 |
|
|
|
|
|
|
|
|
|
|
|
|
|
|
|
|
|
|
|
|
|
|
|
|
|
|
|
|
|
|
|
|
|
|
|
|
|


 Linear Mode

