 |
|
 10-17-2017, 01:08 PM
|
#2701
|
|
Bus Geek
Join Date: May 2009
Location: Columbus Ohio
Posts: 18,830
Year: 1991
Coachwork: Carpenter
Chassis: International 3800
Engine: DTA360 / MT643
Rated Cap: 7 Row Handicap
|
I thought the same thing it wasnt super tight.. if you look at the grommet, it is tapered.. you shove the stick down till the flange on it goes down into the grommet to where the grommet outer edge is spreading over that flange.. I put the grommet in the trans then pushed the stick in.. I used al ittle trans fluid on it so it would slide easier.. then yeah the stick is floppy unless you mount it up higher.. the little bracket i made keeps it uo against the side of the tranny so it cant move side to side. and also hasnt popped out... if it wasnt in tight you would leak fluid out of it.. as the fluid level when parked and shut off is over that point.. when running and hot the fluid level will be right about the point of where that inserts..
-Christopher
|

|
|
|
10-18-2017, 08:57 AM
|
#2702
|
|
Bus Geek
Join Date: Mar 2011
Location: Houston, Texas
Posts: 8,462
Year: 1946
Coachwork: Chevrolet/Wayne
Chassis: 1- 1/2 ton
Engine: Cummins 4BT
Rated Cap: 15
|
Sounds like what I have here. Just hard to believe that such a possible entry point for water and dust does not have a better seal. Gotta have another look to see what I can do to create more comfort with it.
|
|
|
|
|
10-18-2017, 09:43 AM
|
#2703
|
|
Bus Geek
Join Date: May 2009
Location: Columbus Ohio
Posts: 18,830
Year: 1991
Coachwork: Carpenter
Chassis: International 3800
Engine: DTA360 / MT643
Rated Cap: 7 Row Handicap
|
since the fluid level is above that you would have more likelyhood of leaking fluid out before getting dirt in. any dirt you might get in wold be if you disassembled it there.. and the in-pan filter will pick that up.
-Christopher
|
|
|
|
|
10-18-2017, 11:00 PM
|
#2704
|
|
Traveling
Join Date: Nov 2015
Location: Midwest
Posts: 2,573
Year: 2003
Coachwork: BlueBird
Chassis: TC2000
Engine: 5.9L Cummins
Rated Cap: '00
|
Ya know, Tango-
Your build thread has a quarter million views.
You are going to have to have someone video the start-up so we can watch.
I wouldn't sweat the dipstick tube exterior allowing gunk in, but you can always place another cone-shaped grommet higher-up on the tube to shed water (drip collar). They do this on chimneys and kayak paddles: drip rings.

|
|
|
|
|
10-18-2017, 11:11 PM
|
#2705
|
|
Bus Geek
Join Date: Mar 2011
Location: Houston, Texas
Posts: 8,462
Year: 1946
Coachwork: Chevrolet/Wayne
Chassis: 1- 1/2 ton
Engine: Cummins 4BT
Rated Cap: 15
|
Ahhh...I think I'll just goop on some seam sealer...but thanx.
|
|
|
|
|
10-20-2017, 09:29 PM
|
#2706
|
|
Bus Geek
Join Date: Mar 2011
Location: Houston, Texas
Posts: 8,462
Year: 1946
Coachwork: Chevrolet/Wayne
Chassis: 1- 1/2 ton
Engine: Cummins 4BT
Rated Cap: 15
|
Whoa!!! --- Dang Rusty...I hadn't even noticed the count! --- Not that my build is all that interesting...it's just been going on way longer than it should.
And it's details like this that keep dragging it out...
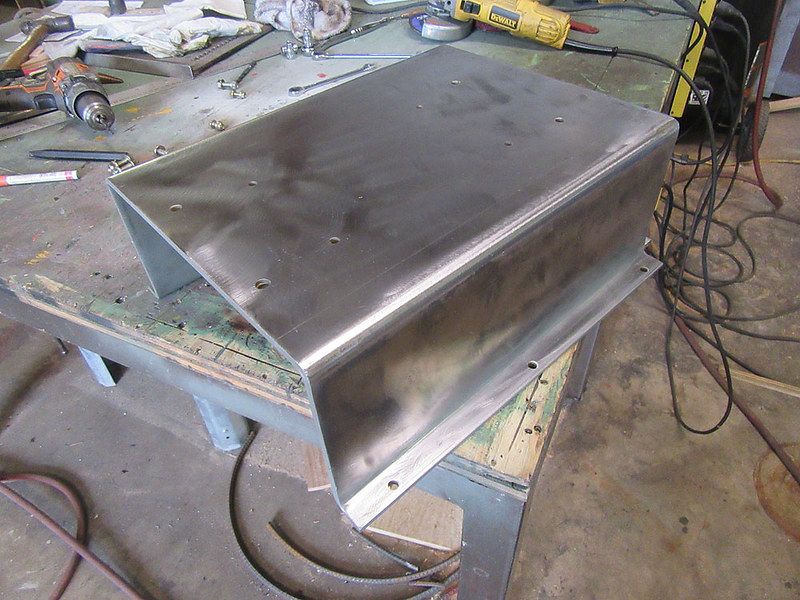
My seat base mount. One of those things most Skoolie folks take for granted. Not so here. Oh HELL no. Me...I had to build it all from scratch. Above is just the 1/4" hot rolled iron box I had to make to sit the seat on. Naturally it came covered in a nice thick layer of oxidation known as "Mill Scale". A beotch to clean up but you don't want to paint over it. A 30 minute bath in muriatic acid softened it up enough to get clean with a stripping pad. Nice shiny steel under there that will take a few coats of paint nicely. My dual sliding, swiveling base will mount on top of this hunk.
Drilling the mounting holes was...stressful, believe it or not. Trying to position them so they would not be in conflict with anything UNDER the floor was tricky. I will find out tomorrow if I got them right or not.
ONWARD!
|
|
|
|
|
10-21-2017, 05:15 PM
|
#2707
|
|
Bus Geek
Join Date: Mar 2011
Location: Houston, Texas
Posts: 8,462
Year: 1946
Coachwork: Chevrolet/Wayne
Chassis: 1- 1/2 ton
Engine: Cummins 4BT
Rated Cap: 15
|
Another day, another baby step --- Finally have my pilot's seat bolted down! After much ado drilling lots of holes and fitting stray bits and pieces together I can actually sit in it without fear of it falling over.
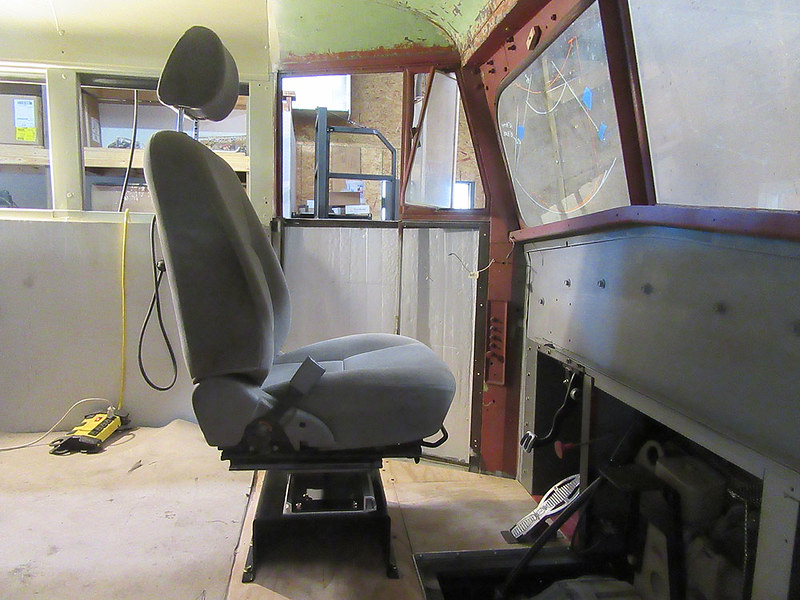
Side view in the "driving" position...
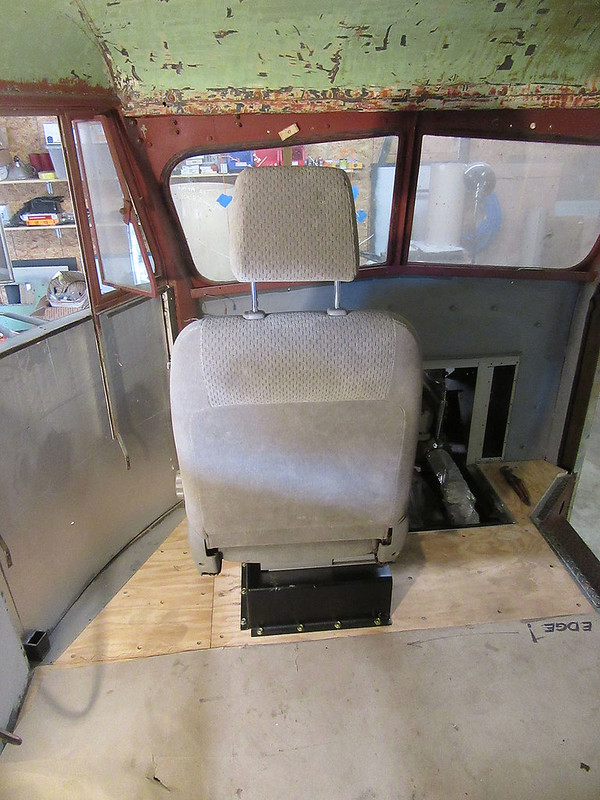
...same position from the rear.
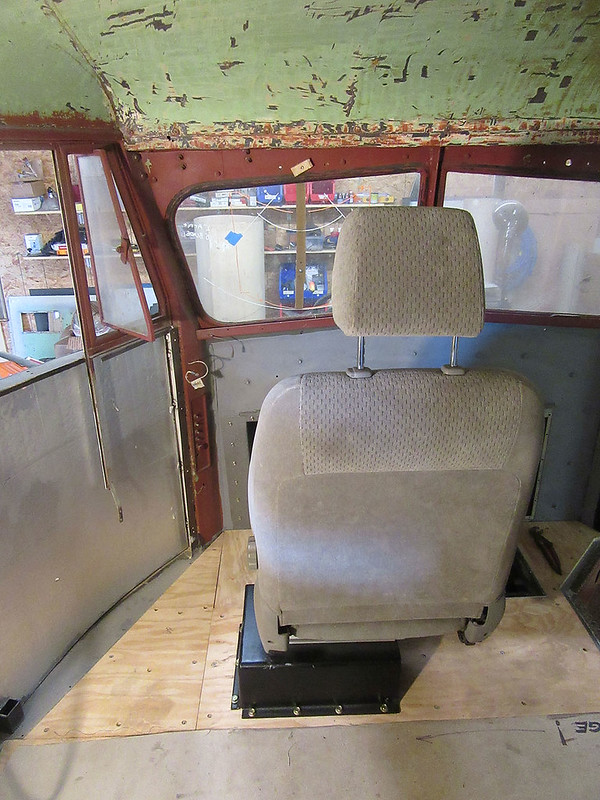
Slide it to the right...then...
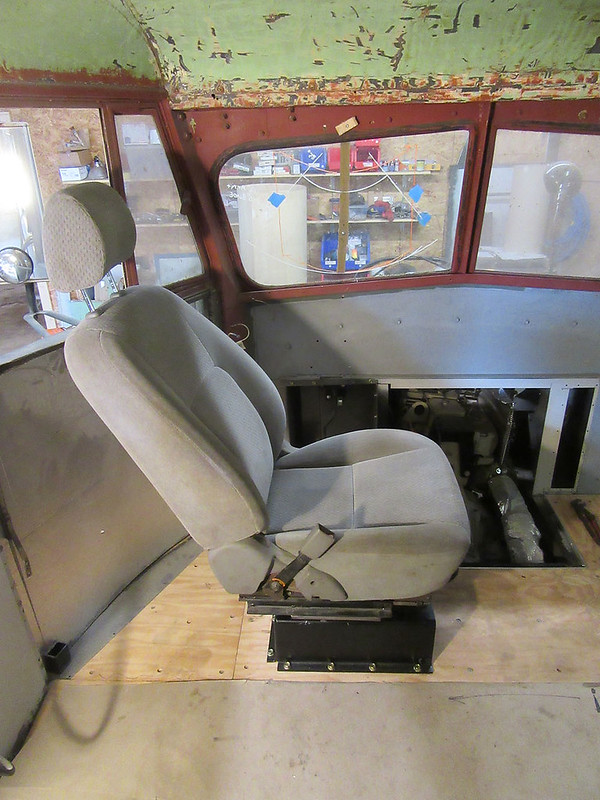
...you can rotate it into the "Lazy Boy" position...or...
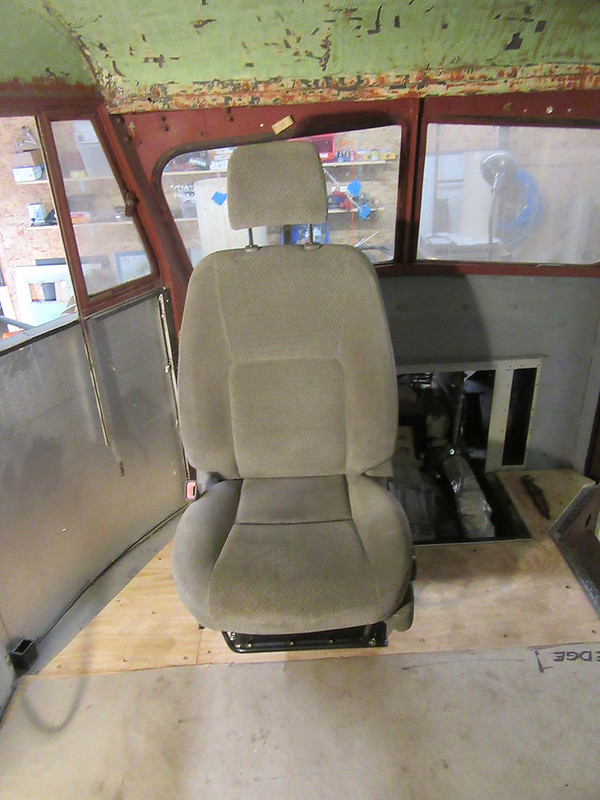
swing it all the way around.
I just hope it will do all this once the steering wheel is in place.
Till then...
ONWARD!
|
|
|
|
|
10-21-2017, 10:00 PM
|
#2708
|
|
Skoolie
Join Date: Jun 2017
Posts: 105
|
How close is your back rest to your dash when reversed? 12 Inches or so? Less than that 10 will be tight most likely. Looking good none the less.
__________________
2002 E450 Thomas/ U-JOINT 4X4, family hauler
1954 Crown 35 foot RV conversion, guest house
1945? City Bus (unknown manufacture), yard art
1940s 'Binder 7 window, man cave
|
|
|
|
|
10-22-2017, 09:43 AM
|
#2709
|
|
Bus Geek
Join Date: Mar 2011
Location: Houston, Texas
Posts: 8,462
Year: 1946
Coachwork: Chevrolet/Wayne
Chassis: 1- 1/2 ton
Engine: Cummins 4BT
Rated Cap: 15
|
My adjustable tilt steering wheel (and all of the steering for that matter) is from an Isuzu NPR so the actual wheel is fairly small. Way smaller than the original Chevy. But it will be close. Very close. Won't really know until the steering is hard mounted. And I have to wait on some dash work before I can do that so it will be a while before I know for sure.
The suspense is killing me!
|
|
|
|
|
10-23-2017, 10:06 AM
|
#2710
|
|
Bus Geek
Join Date: Mar 2011
Location: Houston, Texas
Posts: 8,462
Year: 1946
Coachwork: Chevrolet/Wayne
Chassis: 1- 1/2 ton
Engine: Cummins 4BT
Rated Cap: 15
|
Well crap --- I may have painted (welded/bolted) myself into a corner. I'm trying to make/install new oil lines from the filter to the remote plate on this Cummins 4BT and cannot access the danged fittings. Really do NOT want to have to remove a ton of stuff to get to them but may. Worse yet...lift the whole engine an inch or so. The Jeep engine mounts I adapted are really close to the fittings and so far I have not found a 1-1/8" wrench that I can squeeze in there. Might try fabricating some kind of custom wrench thingie before I start taking things apart.
Wish me luck.
|
|
|
|
|
10-23-2017, 11:07 AM
|
#2711
|
|
Bus Geek
Join Date: May 2009
Location: Columbus Ohio
Posts: 18,830
Year: 1991
Coachwork: Carpenter
Chassis: International 3800
Engine: DTA360 / MT643
Rated Cap: 7 Row Handicap
|
always think about future service.. I have had to mod things I did previously because i looked at it and thought "well dayum what if I have to change that in a walmart parking lot"...
-Christopher
|
|
|
|
|
10-23-2017, 12:07 PM
|
#2712
|
|
Bus Geek
Join Date: Mar 2011
Location: Houston, Texas
Posts: 8,462
Year: 1946
Coachwork: Chevrolet/Wayne
Chassis: 1- 1/2 ton
Engine: Cummins 4BT
Rated Cap: 15
|
Yeah...there are no doubt any number of "well dayums" that will arise over time. Just hopefully not in too many WallyWorld parking lots or too far out in the boonies. The reality is I simply crammed too much stuff in this five pound sack. I have tried to keep things accessible but when you only have so much room to work with...well...that tilt-front end idea is gaining traction.
|
|
|
|
|
10-23-2017, 12:18 PM
|
#2713
|
|
Traveling
Join Date: Nov 2015
Location: Midwest
Posts: 2,573
Year: 2003
Coachwork: BlueBird
Chassis: TC2000
Engine: 5.9L Cummins
Rated Cap: '00
|
Quote:
Originally Posted by Tango

Might try fabricating some kind of custom wrench thingie before I start taking things apart.
Wish me luck.
|
Luck !!! 
I have a box of crappy garage sale tools I cut/grind/bend/weld to make single-purposed tools. It isn't pretty, but gets me to step "B" on the diagram.
|
|
|
|
|
10-23-2017, 01:20 PM
|
#2714
|
|
Bus Geek
Join Date: May 2009
Location: Columbus Ohio
Posts: 18,830
Year: 1991
Coachwork: Carpenter
Chassis: International 3800
Engine: DTA360 / MT643
Rated Cap: 7 Row Handicap
|
Quote:
Originally Posted by Rusty
Luck !!!
I have a box of crappy garage sale tools I cut/grind/bend/weld to make single-purposed tools. It isn't pretty, but gets me to step "B" on the diagram. |
thats the box of tools you shove somewhere in a cubby in your bus when you take a trip
-Christopher
|
|
|
|
|
10-23-2017, 04:05 PM
|
#2715
|
|
Bus Geek
Join Date: Apr 2012
Location: So Cal
Posts: 3,231
Year: 1935
Coachwork: Superior
Chassis: Chevy
Engine: 317 ci/tid / Isuzu
|
The tilt front end sure helps with access though it doesn't add much to the looks of the bus.
[IMG]  [/IMG].
|
|
|
|
|
10-23-2017, 07:21 PM
|
#2716
|
|
Bus Geek
Join Date: Mar 2011
Location: Houston, Texas
Posts: 8,462
Year: 1946
Coachwork: Chevrolet/Wayne
Chassis: 1- 1/2 ton
Engine: Cummins 4BT
Rated Cap: 15
|
I would LOVE to do the tilt front end. Especially since dealing with access issues of late. On mine, it would have to lift straight up about 6-8 inches...then flip forward so it may be a challenge but I am getting with a local hot rodder/builder in the next day or so to see what we can come up with.
Course, there's always that nasty "budget" thing to deal with too.
|
|
|
|
|
10-23-2017, 08:56 PM
|
#2717
|
|
Bus Geek
Join Date: Apr 2012
Location: So Cal
Posts: 3,231
Year: 1935
Coachwork: Superior
Chassis: Chevy
Engine: 317 ci/tid / Isuzu
|
Hey Tango. I'll save you some time. The mechanical answer lies in a pair of different length arms which result in the up and then forward motion. I played with various "hinge" ideas until coming up with this one--blew off about a month figuring it out. As you look into the tilt idea you will see that most truck designs call for cutting a lower corner off the bottom of the "hood" where it must pass the cowl. The dissimilar length arms remove that requirement. I mounted the arms on short shafts with sealed bearings at each pivot--12 in all. Jack
|
|
|
|
|
10-24-2017, 08:58 AM
|
#2718
|
|
Bus Geek
Join Date: Mar 2011
Location: Houston, Texas
Posts: 8,462
Year: 1946
Coachwork: Chevrolet/Wayne
Chassis: 1- 1/2 ton
Engine: Cummins 4BT
Rated Cap: 15
|
Howdy Jack --- I need to go back and re-read your build thread. The tilt would make a HUGE difference.
Spent nearly $300 bucks yesterday on getting oil lines and fittings put together. But it's looking like only one of them will work. The remote oil filter plate is so close to the motor mount that now I'm looking at having to get another offset adapter made just to squeeze it all in. If there is such a thing.
What fun.
|
|
|
|
|
10-24-2017, 10:58 AM
|
#2719
|
|
Bus Geek
Join Date: Apr 2012
Location: So Cal
Posts: 3,231
Year: 1935
Coachwork: Superior
Chassis: Chevy
Engine: 317 ci/tid / Isuzu
|
Hey Tango. The build thread is still there but since I won't pay photofu--er bucket $300 none of the pics are. let me know if you would like me to post a few salient pics here or try to email 'em to you. I suspect you'd get more out of seeing pics than reading my blather. Jack
|
|
|
|
|
10-24-2017, 10:59 AM
|
#2720
|
|
Bus Crazy
Join Date: Feb 2012
Location: Salt Lake City Utah
Posts: 1,635
Year: 2000
Chassis: Blue Bird
Engine: ISC 8.3
|
Quote:
Originally Posted by ol trunt
Hey Tango. I'll save you some time. The mechanical answer lies in a pair of different length arms which result in the up and then forward motion.
|
Mechanical engineers call that a 4-bar linkage. I wish I knew any more about it beyond just the name! I want to use such a linkage on a bunk bed. After you've got the hood thing worked out and you're an expert on linkage design, maybe you'll help me work out mine.  I understand there are books and conventional methods/techniques for the design of such things, but haven't made it a priority to edumacate myself on it yet. Hopefully knowing the term the ME's call it by will help you find design ideas.
|
|
|
|
|
|
| Thread Tools |
|
|
| Display Modes |
 Linear Mode Linear Mode
|
 Posting Rules
|
You may not post new threads
You may not post replies
You may not post attachments
You may not edit your posts
HTML code is Off
|
|
|
|
 » Recent Threads
 |
|
|
|
|
|
|
|
|
|
|
|
|
|
|
|
|
|
|
|
|
|
|
|
|
|
|
|
|
|
|
|
|
|
|
|
|
|


