 |
|
 04-19-2016, 06:59 PM
|
#1561
|
|
Bus Geek
Join Date: May 2009
Location: Columbus Ohio
Posts: 18,848
Year: 1991
Coachwork: Carpenter
Chassis: International 3800
Engine: DTA360 / MT643
Rated Cap: 7 Row Handicap
|
and after seemingly 3 endless years of COLD AND RAIN AND SNOW in ohio.. here the ast 2 weeks its been sunny and WARM.. too bad my bus is still at the shop getting body work and painted.. or I couldve been Building on it!
-Christopher
|

|
|
|
04-19-2016, 07:21 PM
|
#1562
|
|
Bus Geek
Join Date: Feb 2016
Location: Willamina, Oregon
Posts: 6,409
Coachwork: 97 Bluebird TC1000 5.9
|
Yeah, that paint job is sure taking a long time. Did you get fancy with it?
|

|
|
|
04-19-2016, 08:11 PM
|
#1563
|
|
Bus Geek
Join Date: May 2009
Location: Columbus Ohio
Posts: 18,848
Year: 1991
Coachwork: Carpenter
Chassis: International 3800
Engine: DTA360 / MT643
Rated Cap: 7 Row Handicap
|
Quote:
Originally Posted by Robin97396

Yeah, that paint job is sure taking a long time. Did you get fancy with it?
|
yeah had some little spots of rust removed as well as a nice job to remove the school lights and also replace all of the other rear marker lights since the sockets were looking like they had spent 25 years in ohio...
they also did an oil change / chassis lube and such.. after all it does have 1050 mile ride in what will likely be warm weather.. (unless I drive it only at night home since i wont have air-conditioning)..
wait maybe I should be starting my own thread instead of hijacking this one about a really COOL bus project!
-Christopher
|
|
|
|
|
04-19-2016, 09:12 PM
|
#1564
|
|
Bus Nut
Join Date: Feb 2015
Location: Houston, Tx.
Posts: 403
Year: 1999
Coachwork: AmTran
Chassis: International
Engine: DT466E
Rated Cap: 84
|
Quote:
Originally Posted by Tango
Hey Flyboy...glad to hear you are still above water. Try and stay that way bud. I narrowly missed losing two cars (my block always floods badly) but I got'em out just in time. The good news is...my neighborhood bar came through fine.
|
Wow, glad you were able to save both of your cars. Thank goodness the bar didn't get damaged, gotta save the beer 
Hopefully M1031 is doing ok out in Katy?
|
|
|
|
|
04-19-2016, 09:19 PM
|
#1565
|
|
Bus Geek
Join Date: Mar 2011
Location: Houston, Texas
Posts: 8,462
Year: 1946
Coachwork: Chevrolet/Wayne
Chassis: 1- 1/2 ton
Engine: Cummins 4BT
Rated Cap: 15
|
Ya...I haven't heard from him since the Biblical deluge. And it hit that area pretty hard.
How'za'bout it M1031A1...you still above water ?
|
|
|
|
|
04-19-2016, 10:50 PM
|
#1566
|
|
Bus Crazy
Join Date: Dec 2014
Location: Dowdy Lakes, Colorado
Posts: 1,444
Year: 1989
Coachwork: Thomas
Chassis: Saf-T-Liner ER
Engine: 3208 CAT/MT643 tranny
Rated Cap: 87
|
We all live in a yellow submarine, yellow submarine, yellow submarine. Ok, EVERYBODY NOW! We all live in a yellow submarine..........
Our place was FOUR inches from flooding. With a new job starting next week, cashing in my retirement from Katy ISD, selling our '88 Ford to a good friend, and this near miss on the flooding, we're super-motivated to get building "Heavy" out sooner rather than later. My computer was moved to the upper shelves for safe-keeping during the rains, thus the reason why I've been a.f.k. Got on about three hours ago.
Fly/Tango, thanks for checking in on me. Some close friends out by Sealy nearly got washed out. I was getting ready for a rescue mission just in case. I did check on "Heavy" today, she has one small leak that is an easy fix in the roof.
M1031
__________________
Firearms stand next in importance to the Constitution itself. They are the American peoples liberty teeth and keystone under independence. George Washington
|
|
|
|
|
04-20-2016, 09:38 AM
|
#1567
|
|
Bus Geek
Join Date: Mar 2011
Location: Houston, Texas
Posts: 8,462
Year: 1946
Coachwork: Chevrolet/Wayne
Chassis: 1- 1/2 ton
Engine: Cummins 4BT
Rated Cap: 15
|
So far so good. But do keep an eye out as the creeks & bayous are still rising and there is another, big multi-colored mass on radar headed your way as we speak.
|
|
|
|
|
04-22-2016, 11:39 PM
|
#1568
|
|
Bus Geek
Join Date: Mar 2011
Location: Houston, Texas
Posts: 8,462
Year: 1946
Coachwork: Chevrolet/Wayne
Chassis: 1- 1/2 ton
Engine: Cummins 4BT
Rated Cap: 15
|
More minor movement --- ...in spite of the weather.
Howdy All...not much to shout about. STILL waiting on my machine shop to complete some major steering & engine related parts that have me hung up.
Meanwhile...back at the ranch house...
If you are wondering why this thread is so dadblamed long...it is stuff like this. I had to make a socket wrench the other day. Never mind what is available at Northern Tool or any such supply...there is simply no such thing as what I needed to pull up the new U-Bolts I installed as part of the re-alignment of my rear axle pinion angle. Been fabbing bus parts since the get go, but it has become a fairly common practice that when working on a 70+ year old bus, one simply has to stop and make some of the tools necessary to keep moving forward.
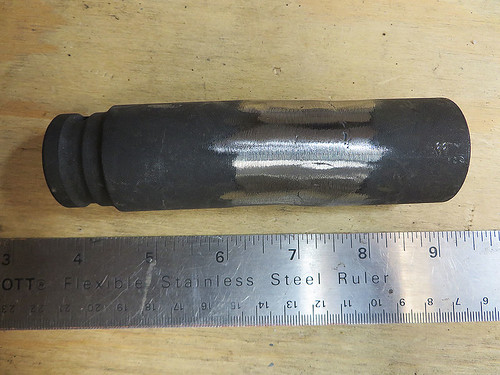
Axle U-Bolts are long. REALLY long. And no one makes a 15/16" socket deep enough to use with a Milwaukee, 1/2" electric impact wrench. And while I could have spent a couple of days taking up all the threads with an open end, it seemed easier going in to stretch an existing socket. Just take two, cut at the right spot and weld them together. Made the task slightly less painful, but it was still a chore that killed my back and probably added a pound of new scar tissue to the foot long surgical hernias in my abdomen.
That was yesterday. Today I wrapped up installing the rear axle and getting the shims in place to align the pinion angle. Locktited and torqued the u-joint caps so now the driveline is where it should be and complete except for fabbing the park brake cable mechanism. All in all, getting a little closer to going mobile but still a lot to do.
Advice to anyone considering converting an antique skoolie into a modern, road worthy RV... start young!
More pix soon.
ONWARD!
|
|
|
|
|
04-23-2016, 07:13 AM
|
#1569
|
|
Bus Geek
Join Date: May 2009
Location: Columbus Ohio
Posts: 18,848
Year: 1991
Coachwork: Carpenter
Chassis: International 3800
Engine: DTA360 / MT643
Rated Cap: 7 Row Handicap
|
Quote:
Originally Posted by Tango
More minor movement --- ...in spite of the weather.
Howdy All...not much to shout about. STILL waiting on my machine shop to complete some major steering & engine related parts that have me hung up.
Meanwhile...back at the ranch house...
If you are wondering why this thread is so dadblamed long...it is stuff like this. I had to make a socket wrench the other day. Never mind what is available at Northern Tool or any such supply...there is simply no such thing as what I needed to pull up the new U-Bolts I installed as part of the re-alignment of my rear axle pinion angle. Been fabbing bus parts since the get go, but it has become a fairly common practice that when working on a 70+ year old bus, one simply has to stop and make some of the tools necessary to keep moving forward.
Axle U-Bolts are long. REALLY long. And no one makes a 15/16" socket deep enough to use with a Milwaukee, 1/2" electric impact wrench. And while I could have spent a couple of days taking up all the threads with an open end, it seemed easier going in to stretch an existing socket. Just take two, cut at the right spot and weld them together. Made the task slightly less painful, but it was still a chore that killed my back and probably added a pound of new scar tissue to the foot long surgical hernias in my abdomen.
That was yesterday. Today I wrapped up installing the rear axle and getting the shims in place to align the pinion angle. Locktited and torqued the u-joint caps so now the driveline is where it should be and complete except for fabbing the park brake cable mechanism. All in all, getting a little closer to going mobile but still a lot to do.
Advice to anyone considering converting an antique skoolie into a modern, road worthy RV... start young!
More pix soon.
ONWARD!
|
this rocks!!! I have a whole drawer of such tools.. most of them i'll probably never use again as ive sold the car that i made them for..
your project is really unique in that not only are you into building a bus into an RV, you are also Street-Rodding.. Much of what you are doing to get your bus a modern drive-train is the same stuff that I did when Hot-rodding.. you are buulding a Vehicle as well as a home..
yours is a really neat project because of that aspect of it.. keep on doin it because this project is one of my favorites to watch!
-Christopher
|
|
|
|
|
04-23-2016, 10:02 AM
|
#1570
|
|
Bus Geek
Join Date: Mar 2011
Location: Houston, Texas
Posts: 8,462
Year: 1946
Coachwork: Chevrolet/Wayne
Chassis: 1- 1/2 ton
Engine: Cummins 4BT
Rated Cap: 15
|
Thanks for the kind words Cadillac --- This project has definitely been a "learning experience" so far. Good thing I enjoy learning new things, eh?
In fact, anyone considering diving into a skoolie conversion should look at it just that way. Rather than being intimidated by the many new skills necessary to tackle such a project ...embrace the opportunity! Look...I'm an old fart who has been and done a lot over the years, and yet the list of things on this build, just to date, that I had never done before is long and still growing. So you youngsters dive in. Be fearless. Read, read, read and then read some more. Ask questions, get opinions...then do it your way. Just maybe the best parts of this whole adventure are developing your own processes for solving problems...and letting go of the fear of making mistakes. You WILL make mistakes. But those are usually what you learn the most from. I routinely "undo" any number of things I have completed, back up, take another look, than have an "aha" moment in which I (hopefully) gain a little clarity.
Will my rig be perfect? Not hardly. But it will be mine, built by my own hands, my own way and will have provided me a wealth of new understanding on many levels. Not the least of which include patience and persistence.
Well...probably more persistence than patience. But hey...I am working on that one too.
ONWARD!
|
|
|
|
|
04-23-2016, 10:34 AM
|
#1571
|
|
Bus Geek
Join Date: May 2009
Location: Columbus Ohio
Posts: 18,848
Year: 1991
Coachwork: Carpenter
Chassis: International 3800
Engine: DTA360 / MT643
Rated Cap: 7 Row Handicap
|
Quote:
Originally Posted by Tango
Thanks for the kind words Cadillac --- This project has definitely been a "learning experience" so far. Good thing I enjoy learning new things, eh?
In fact, anyone considering diving into a skoolie conversion should look at it just that way. Rather than being intimidated by the many new skills necessary to tackle such a project ...embrace the opportunity! Look...I'm an old fart who has been and done a lot over the years, and yet the list of things on this build, just to date, that I had never done before is long and still growing. So you youngsters dive in. Be fearless. Read, read, read and then read some more. Ask questions, get opinions...then do it your way. Just maybe the best parts of this whole adventure are developing your own processes for solving problems...and letting go of the fear of making mistakes. You WILL make mistakes. But those are usually what you learn the most from. I routinely "undo" any number of things I have completed, back up, take another look, than have an "aha" moment in which I (hopefully) gain a little clarity.
Will my rig be perfect? Not hardly. But it will be mine, built by my own hands, my own way and will have provided me a wealth of new understanding on many levels. Not the least of which include patience and persistence.
Well...probably more persistence than patience. But hey...I am working on that one too.
ONWARD!
|
I think people going to shows or watching the TV shows can automatically get discouraged because they see the "ONE SUPER BUILD... oh wait the one build made super by way of TV cameras and editors..."... and think theirs has to be the same way...
I myself also take a different approach.. I look at it for me building it is fun.. and also building it is at least half if not more of the enjoyment I get out of a project.. sure it was nice to build a hot-rod and get the kudos at the gas station, and the neighborhood kids with big grins when I layed strips of rubber.. but alot of it for me was getting to that point..
for me, I had a bus, got into it a bit.. but the timing was wrong, I did some really cool stuff to it, then I got engrossed in starting a business, and I lost it to fire..
But I look at any project like it may not be the last.. so esp for the young ones out there.. maybe you wish you had a bigger bus, or a different engine, etc.. or you build your kitchen and see someone;s else and like it better.. think about the fact your build is yours, and guess what you can make another one later if you want.. nothing stops you..
and there are those on here that have done just that, and each time they get smarter and more efficient at it..
the first time i ever took an engine apart I thought "holy crap what do I do with all these pieces??".. after I did it a few times, i got quicker and better.. to the point I could sit down on a saturday morning with a bunch of pistons and rings and lifters and stuff .. and then be out on the town squealign the tires that night....
and yeah I blew stuff up.. I put bearing caps on backwards.. or dropped lifters into the oilpan,
wiped out more than one A/C compressor trying to get my "closed loop" system perfected
AND everyone has limitations.. and thats when its OK to ask for help.. like me and body work.. I just dont have "what it takes" to do the finish work on a body.. so in my case I ask for help.. in the form of a shop..
and those here can trade skill-sets with each other.. over the years in my hotrod days.. more than once i built an engine or installed an Air conditioner for someone.. and turn, they welded in a set of rockers, or floor-pans for me..
Skoolies are less common than hot-rods but a lot of times if your city or town has a local hotrod garage. (just drive around in the spring and look for the classic cars on the bay lifts).. those guys can do a lot of things at often reasonable prices, or can point you to people who can...
-Christopher
|
|
|
|
|
04-23-2016, 10:57 AM
|
#1572
|
|
Bus Crazy
Join Date: Feb 2012
Location: Salt Lake City Utah
Posts: 1,635
Year: 2000
Chassis: Blue Bird
Engine: ISC 8.3
|
I can't say I've ever see a 5 inch deep socket on any retail shelf before. Holy cow! I'm curious, though: do you really have foot-long U-bolts? I've been around axle U-bolts a few times replacing trailer axles and springs, doing a spring-over lift on a Suzuki Samurai, and so on.. I never encountered a U-bolt that was more than about an inch longer than it needed to be to wrap around the axle, past the spring pack, and through the clamp plate. If it were that much oversize, I'd have cut some off. What's different about yours that requires spinning a nut 4-5 inches up the bolt?
|
|
|
|
|
04-23-2016, 04:03 PM
|
#1573
|
|
Bus Geek
Join Date: Mar 2011
Location: Houston, Texas
Posts: 8,462
Year: 1946
Coachwork: Chevrolet/Wayne
Chassis: 1- 1/2 ton
Engine: Cummins 4BT
Rated Cap: 15
|
Back Again --- Hey FW...yep...those puppies are 12" on the inside. The original spring stack was about 2" thicker than what is there now (I reduced the rate by 50% and added shocks for a softer ride)...but the new mongo Dana 80 axle and much modified spring perches put it back to being close to the stock depth of a foot. I did trim 1" off after pulling them up just for ground clearance.
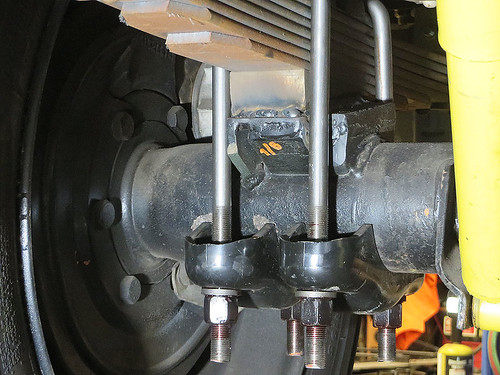
Here is the passenger side. As you can see, the 13 degree shims I had to fab to get the pinion angle correct are almost two inches thick on the big end. They are actually 3 degree and 10 degree shims welded together then welded onto the original perch. Have I mentioned how much I just love welding upside down in tight quarters?
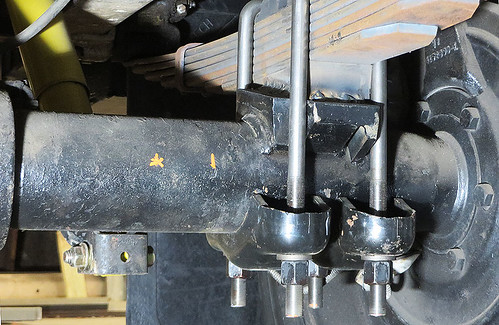
Here is the driver side. Both are now in their final position and the shims have become a permanent part of the perches thanks to the good folks at Miller Welding Equipment. (I really do love my little 140 Mig.)
The wrench was worth the effort because I had to put all eight nuts on & off several times while getting the rear axle straight with the front. Thank goodness, one of my Art Car Museum buddies came by to lend a hand as the measurements are as critical as they are tricky.

Other than making a bracket for the park/emergency brake, the driveline is ready to go.
"That's one small step for man......"
ONWARD!
|
|
|
|
|
04-23-2016, 05:56 PM
|
#1574
|
|
Bus Geek
Join Date: May 2009
Location: Columbus Ohio
Posts: 18,848
Year: 1991
Coachwork: Carpenter
Chassis: International 3800
Engine: DTA360 / MT643
Rated Cap: 7 Row Handicap
|
wow those are some serious U-bolts and some serious pinion angle shims! wow!!
-Christopher
|
|
|
|
|
04-23-2016, 05:58 PM
|
#1575
|
|
Bus Geek
Join Date: May 2009
Location: Columbus Ohio
Posts: 18,848
Year: 1991
Coachwork: Carpenter
Chassis: International 3800
Engine: DTA360 / MT643
Rated Cap: 7 Row Handicap
|
im surprised you didnt go with CV's on that driveshaft.. unless my angle from the pic is off.. it just looks like its quite a bit of slope in that driveshaft to not get quite a bit of driveline vibration... but then it is a bus so its not as big of deal to have a little u-joint vibration.
-Christopher
|
|
|
|
|
04-23-2016, 06:17 PM
|
#1576
|
|
Bus Crazy
Join Date: Feb 2012
Location: Salt Lake City Utah
Posts: 1,635
Year: 2000
Chassis: Blue Bird
Engine: ISC 8.3
|
That's some good-looking undercarriage. The tires still have the red and blue stripes on them, even. Gotta get that thing out for a road trip before the rubber rots! 
|
|
|
|
|
04-23-2016, 06:58 PM
|
#1577
|
|
Bus Geek
Join Date: Apr 2012
Location: So Cal
Posts: 3,231
Year: 1935
Coachwork: Superior
Chassis: Chevy
Engine: 317 ci/tid / Isuzu
|
Tango, FW got me to wondering about the U bolts on HR. Like yours, they are 12" long though I could cut an inch off of them to make up for the two leaves I removed.
I suppose a CV joint would have been OK, but with our short wheel bases and two part drive shafts, neither section would be long enough to need one. Jack
|
|
|
|
|
04-23-2016, 07:02 PM
|
#1578
|
|
Bus Crazy
Join Date: Oct 2015
Location: Spring Valley AZ
Posts: 1,343
Year: 2000
Coachwork: Bluebird
Engine: 5.9 Cummins
Rated Cap: 2 elderly children, 1 cat
|
Question... Shouldn't the entire driveshaft be inline rather than (it appears) the front section level, then the rear section drops to the diff?? Or does it not make a difference.
Novice builder here. 
__________________
Don, Mary and Spooky the cat.
|
|
|
|
|
04-23-2016, 10:27 PM
|
#1579
|
|
Bus Geek
Join Date: Mar 2011
Location: Houston, Texas
Posts: 8,462
Year: 1946
Coachwork: Chevrolet/Wayne
Chassis: 1- 1/2 ton
Engine: Cummins 4BT
Rated Cap: 15
|
The driveline gurus at Spicer and at my local shop outlined the process for a two part drive shaft. The trick is to get the angle on the jackshaft (front portion) the same as the pinion angle at the axle with an extra one to three degrees down at the axle. The extra is to compensate for torque which effectively raises the angle on the rear. When running, as long as the front and rear are the same they are offsetting and eliminate vibration. Mine took more shimming than most to get there but is on within about a half degree.
There is a great read on the topic at the link below. See page 14, figure 10
http://www2.dana.com/pdf/J3311-1-HVTSS.PDF
And I agree Jack. If I don't get this thing moving soon, it will be time for new tires!
|
|
|
|
|
04-24-2016, 01:48 AM
|
#1580
|
|
Bus Crazy
Join Date: Dec 2014
Location: Dowdy Lakes, Colorado
Posts: 1,444
Year: 1989
Coachwork: Thomas
Chassis: Saf-T-Liner ER
Engine: 3208 CAT/MT643 tranny
Rated Cap: 87
|
Yep, because the condition is summed up in two words:
Dry rot!
__________________
Firearms stand next in importance to the Constitution itself. They are the American peoples liberty teeth and keystone under independence. George Washington
|
|
|
|
|
|
 Posting Rules
|
You may not post new threads
You may not post replies
You may not post attachments
You may not edit your posts
HTML code is Off
|
|
|
|
 » Recent Threads
 |
|
|
|
|
|
|
|
|
|
|
|
|
|
|
|
|
|
|
|
|
|
|
|
|
|
|
|
|
|
|
|
|
|
|
|
|
|


 Linear Mode

