 |
|
 08-10-2018, 08:12 AM
|
#3421
|
|
Bus Geek
Join Date: May 2009
Location: Columbus Ohio
Posts: 18,827
Year: 1991
Coachwork: Carpenter
Chassis: International 3800
Engine: DTA360 / MT643
Rated Cap: 7 Row Handicap
|
sorry ive been trekking the country in a 40 year old bus and working 8 hours / day also.. so havent seen this thread as much..
they are called window sweeps... these are the ones i used on my G-body rest-mods..
83-88 Monte Carlo SS 4 pc Window Sweeps Felts Kit
-Christopher
|

|
|
|
08-10-2018, 09:08 AM
|
#3422
|
|
Bus Geek
Join Date: Mar 2011
Location: Houston, Texas
Posts: 8,462
Year: 1946
Coachwork: Chevrolet/Wayne
Chassis: 1- 1/2 ton
Engine: Cummins 4BT
Rated Cap: 15
|
Thanks Chris --- I will take a look at that one. And glad to hear you are getting lots of "bus time" in the saddle.
Jack --- I discovered that the rattlecan chrome paint is all rated "indoor" and most say they are NOT compatible with clear coat so I am running some tests of my own. Seems to me that "chrome paint's" #1 application just might be on the outside of vehicles...i.e., exterior...but that's just me I guess. There are even a bunch of YouTube vids comparing them and such and a couple of folks noted that some turn brown when clear coated. We'll see.
2martins --- ya...something like gas or even hydraulics would definitely make raising & lowering a lot easier. More complicated yes, but easier on the back for a big array.
|
|
|
|
|
08-10-2018, 10:46 AM
|
#3423
|
|
Bus Geek
Join Date: Apr 2012
Location: So Cal
Posts: 3,231
Year: 1935
Coachwork: Superior
Chassis: Chevy
Engine: 317 ci/tid / Isuzu
|
Hey Tango. The product I used is made by Plasti-Kote and is called Bumper Chrome (product #615). I am surprised to hear that others have had paint reactions related to clear coats. I've used many brands of automotive clear coat over the years and I have never had the slightest bit of trouble. I wonder if those who have experienced problems weren't using rattle can clear--that stuff is often very chemically hot and I have seen it wrinkle "fresh" base. I'll be interested to hear what your clear coat trials turn up. Jack
|
|
|
|
|
08-10-2018, 02:41 PM
|
#3425
|
|
Bus Geek
Join Date: Mar 2011
Location: Houston, Texas
Posts: 8,462
Year: 1946
Coachwork: Chevrolet/Wayne
Chassis: 1- 1/2 ton
Engine: Cummins 4BT
Rated Cap: 15
|
I will check that one out Jack. And I will update with results of this little chemistry experiment.
|
|
|
|
|
08-10-2018, 02:50 PM
|
#3426
|
|
Bus Geek
Join Date: May 2009
Location: Columbus Ohio
Posts: 18,827
Year: 1991
Coachwork: Carpenter
Chassis: International 3800
Engine: DTA360 / MT643
Rated Cap: 7 Row Handicap
|
the only issues ive had were clear coating plastic pieces were some yellowing after a couple years.. I usually painted the plastic pieces with SEM brand paints and then clear coated over the top.. seems the sun turned things yellow after a couple years.. these were filler panels on a cadillac i did so they were out in the rain and sun... never saw road salt as i garaged that car in the winter.. the parts in question were white so the yellowing was easy to spot.
honestly i never looked for a date on the can.. but most likely it was probably stuff I had in the garage for awhile.. and being in ohio my garage temperatures fluctuate a lot from season to season.. and whether I turn on the heat in winter or not..
-Christopher
|
|
|
|
|
08-10-2018, 02:56 PM
|
#3427
|
|
Bus Geek
Join Date: Mar 2011
Location: Houston, Texas
Posts: 8,462
Year: 1946
Coachwork: Chevrolet/Wayne
Chassis: 1- 1/2 ton
Engine: Cummins 4BT
Rated Cap: 15
|
BTW...just learned a nifty little rattlecan trick (tell me if you've heard this before)...
Set the can in a pan of very warm water for about five minutes before using. It increases the pressure and makes a much finer mist. Worked for me.
Do NOT...repeat NOT...even think about boiling it! Just good and warm will do.
|
|
|
|
|
08-11-2018, 08:52 PM
|
#3428
|
|
Bus Geek
Join Date: Mar 2011
Location: Houston, Texas
Posts: 8,462
Year: 1946
Coachwork: Chevrolet/Wayne
Chassis: 1- 1/2 ton
Engine: Cummins 4BT
Rated Cap: 15
|
Chrome paint test --- Meh. As previously noted, not exactly "chrome" but should be a definite improvement over the rusty bases I now have. Made no effort to work on a super smooth surface and wound up with lots of sanding dust in the wet paint, but...not that bad.
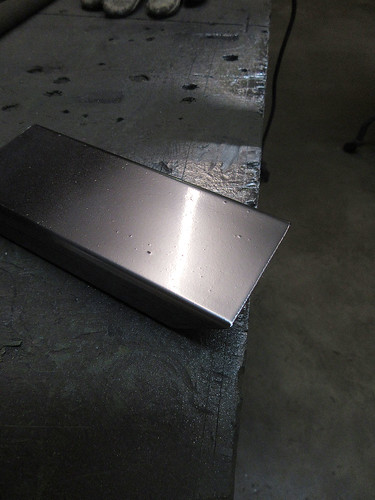
This is on a chunk of scrap rectangular tube steel. Two light coats come up much better than multiple or any heavy coats. This is Rustoleum brand "Chrome" and also has a final finish of Krylon gloss clear over it as a sealer. NOTE...as with all the other paints I found that were remotely chrome-like...the Rustoleum is clearly noted as for "Indoor Use". No discoloration so far, but who know what the sun will do to it.
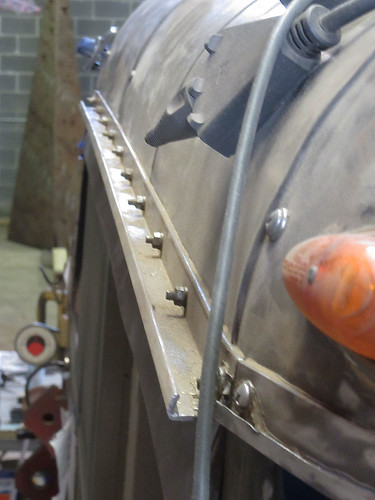
The heavy duty (3/16" steel) rain gutter over my windows. These have been a real bear to try and clean up. A plague upon the dimwit who put a heavy coat of crappy, water-based latex paint all over this thing!!! Nice, fine layer of rust everywhere the water met the steel. And a monster to clean up. So far I have gone through a half dozen wire wheels...and I still have a long ways to go. Sandpaper is useless (plugs up)...flapwheels eat into the metal too much...and stripping discs are expensive and wont get into tight spots.
Ain't we got fun!?
ONWARD!
|
|
|
|
|
08-12-2018, 02:50 AM
|
#3429
|
|
Bus Crazy
Join Date: May 2018
Location: topeka kansas
Posts: 1,778
Year: 1954
Coachwork: wayne
Chassis: old f500- new 2005 f-450
Engine: cummins 12 valve
Rated Cap: 20? five rows of 4?
|
mine seems very similar
The '54 wayne I have is built in a similar fashion. I am planning on unbolting, the "gutter" on mine and unscrewing all those phillips head screws and take off these bits to clean/derust. and then put on primer/paint... dry then seam sealer of some sort then bolt/screw back together. Mine is bolted/screwed from across the front windshield all the way back to the rear-side quarter windows.Just have to start spraying PB blaster now and wait for a couple of weeks. I wonder if I will drop those screw/ bolts down into the walls when I take the nuts off, or if I will have to take out inner walls just so I can take the nuts off.
william
|
|
|
|
|
08-12-2018, 09:04 AM
|
#3430
|
|
Bus Geek
Join Date: Mar 2011
Location: Houston, Texas
Posts: 8,462
Year: 1946
Coachwork: Chevrolet/Wayne
Chassis: 1- 1/2 ton
Engine: Cummins 4BT
Rated Cap: 15
|
Wayne did some weird engineering from time to time. On mine, the rail is bolted on...with the bolts coming from the inside...nuts on the outside. The bolts were installed during construction from in between the inner & outer skin. Mine will not get removed. The rest of the body is indeed held together by large sheetmetal screws.
At the moment, I am trying to find window channel felt that is the right size. One more item that seems to different from everything else made during that time.
|
|
|
|
|
08-12-2018, 09:15 AM
|
#3431
|
|
Bus Geek
Join Date: Apr 2012
Location: So Cal
Posts: 3,231
Year: 1935
Coachwork: Superior
Chassis: Chevy
Engine: 317 ci/tid / Isuzu
|
The drip rails over the door and driver's window look the same as your's with a s---load of screws. Happily (for me) the drip rails over the kiddies windows are a stamped extension of the roof panels and with the exception of a few rivets were easy to clean up. Jack
|
|
|
|
|
08-12-2018, 11:08 AM
|
#3432
|
|
Bus Geek
Join Date: May 2009
Location: Columbus Ohio
Posts: 18,827
Year: 1991
Coachwork: Carpenter
Chassis: International 3800
Engine: DTA360 / MT643
Rated Cap: 7 Row Handicap
|
Tango you can cut that window felt.. the ones i used i cut them for use on other cars that I couldnt find the exact ones for..
-Christopher
|
|
|
|
|
08-12-2018, 06:10 PM
|
#3433
|
|
Bus Geek
Join Date: Mar 2011
Location: Houston, Texas
Posts: 8,462
Year: 1946
Coachwork: Chevrolet/Wayne
Chassis: 1- 1/2 ton
Engine: Cummins 4BT
Rated Cap: 15
|
Jack --- I can see them being pretty similar. Mine are bolted through from the inside and it's the bolts have been eating all my wire brushes!
Cadillac --- Having fits finding an "exact" fit but just ordered nine feet of something I hope is close enough to work. Will indeed cut to fit.
Meanwhile...
Man, this latex paint is eating my lunch. Spent most of a day wire wheeling and have little to show for it. Naturally, I am finding more "mystery holes" hiding under all this crap. Time to break out the Bondo again.
Actually...I started by stuffing the holes with JB Weld first, then glass fiber Bondo over that. The holes above were also surrounded by a small depression that had to be filled and smoothed out as well.
Have I mentioned how much I HATE body work? (Mostly cause I really suck at it.)
Still a half acre of crappy paint to remove. Then I can hit all the seams with seam sealer...then weld the deck supports...then cover it all with some self etching primer...then a coat of paint...then a thick layer of white rubberized roof coating with some magic pixie dust added in (aka; Insuladd beads). I'm hoping that between the shade from a deck and the insulating paint, I might have a reasonably tolerable environment. Even out around Big Bend.
ONWARD!
|
|
|
|
|
08-12-2018, 07:57 PM
|
#3434
|
|
Bus Geek
Join Date: Apr 2012
Location: So Cal
Posts: 3,231
Year: 1935
Coachwork: Superior
Chassis: Chevy
Engine: 317 ci/tid / Isuzu
|
Tango, I'm just a "Bondoing" fool. I've been spreading the stuff like peanut butter ever since I discovered it back in the '50"s. I did learn how to slather lead but once Bondo came along I've been trying to make an art form of ever since. You are doing the right thing using the kitty hair Bondo but let me complicate things---- . Try using Evercoat Z-grip filler over the kitty hair. It is fairly cheap and cures without the sticky finish of most other fillers. It sands very easily and doesn't load up the sand paper. It is easiest to work with just as it cures but it is still pretty easy to deal with even after a long cure time. Another thing I like about it is that it feather edges effortlessly.
Think I'll send a copy of this post to EC in the hopes they will send me a case of gallon cans to express their appreciation for my plug! Jack
|
|
|
|
|
08-12-2018, 10:15 PM
|
#3435
|
|
Bus Geek
Join Date: Mar 2011
Location: Houston, Texas
Posts: 8,462
Year: 1946
Coachwork: Chevrolet/Wayne
Chassis: 1- 1/2 ton
Engine: Cummins 4BT
Rated Cap: 15
|
Thanks Jack...I will hunt some down and give it a go. Now if I only had your skills to go with it. You'd think all these years of sculpting would give me an edge but...NOT. I am, however, getting more practice lately. Much more than I ever wanted.
Ya, the kitty hair variety seems be a big improvement over the old original Bondo as far as toughness, flex and holding power but it does need something lighter to finish it off.
And I like your thinking regarding the post going to EC...but I think you should hold out for a bunch of the 5-gallon cans I just saw online.
|
|
|
|
|
08-13-2018, 08:18 AM
|
#3436
|
|
Bus Geek
Join Date: May 2009
Location: Columbus Ohio
Posts: 18,827
Year: 1991
Coachwork: Carpenter
Chassis: International 3800
Engine: DTA360 / MT643
Rated Cap: 7 Row Handicap
|
Tango - *EVERYTHING* on your bus is a Cut-to-fit project lolol..
-Christopher
|
|
|
|
|
08-13-2018, 08:47 AM
|
#3437
|
|
Bus Geek
Join Date: Mar 2011
Location: Houston, Texas
Posts: 8,462
Year: 1946
Coachwork: Chevrolet/Wayne
Chassis: 1- 1/2 ton
Engine: Cummins 4BT
Rated Cap: 15
|
 ...Roger that!
|
|
|
|
|
08-13-2018, 10:46 AM
|
#3438
|
|
Bus Nut
Join Date: Jan 2015
Location: ...little north of Toronto Ontario
Posts: 606
Year: 2000
Coachwork: Thomsass
Chassis: FreightShaker
Engine: 5.9 Cummins 5 speed
Rated Cap: 2 ATV's and friends
|
This project is really taking shape! Lookin' good Tango!
|
|
|
|
|
08-15-2018, 08:41 AM
|
#3439
|
|
Bus Geek
Join Date: Mar 2011
Location: Houston, Texas
Posts: 8,462
Year: 1946
Coachwork: Chevrolet/Wayne
Chassis: 1- 1/2 ton
Engine: Cummins 4BT
Rated Cap: 15
|
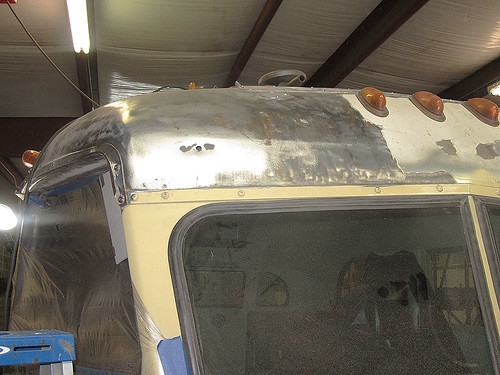
Mornin' All --- Still removing paint by wearing out wire brushes. And still finding little surprises here and there. More "mystery holes" and yesterday a couple of fairly large areas of old Bondo. Oh joy. That means I get to re-do them!
The ONE benefit of the old, dead flat, crappy latex paint I am taking off is that it will hide most anything. Lumps, bumps, dents, holes, wrinkles, creases...they all disappear when covered up in an eighth inch of the stuff.
ONWARD!
|
|
|
|
|
08-15-2018, 05:20 PM
|
#3440
|
|
Bus Geek
Join Date: Mar 2011
Location: Houston, Texas
Posts: 8,462
Year: 1946
Coachwork: Chevrolet/Wayne
Chassis: 1- 1/2 ton
Engine: Cummins 4BT
Rated Cap: 15
|
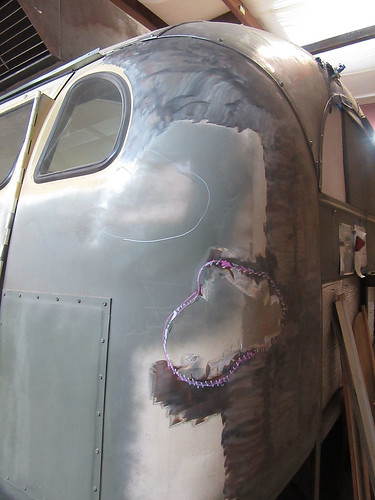
More "finds" today ---For some silly reason, I thought my rear door was gonna be easy-peazy to clean up. Hey...it's fairly flat...no big nuts and bolts sticking out...and it LOOKED pretty smooth. That is until I striped off the 1/4" of latex. Once again...mystery holes...Bondo filled dents...and one more surprise...one that Jack will appreciate. A bonafide patch of old school lead!
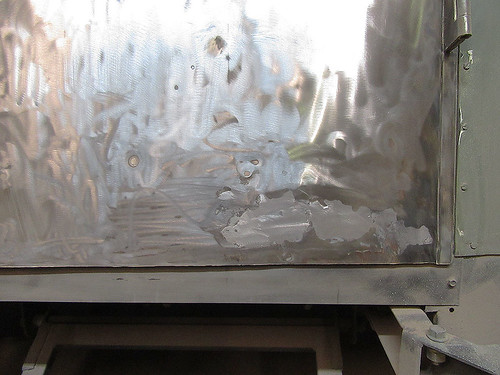
Here ya go Jack...real men use LEAD!

Had no idea these were there. One looks like someone took a pick ax to it. But...since I can't find proper body lead anywhere...
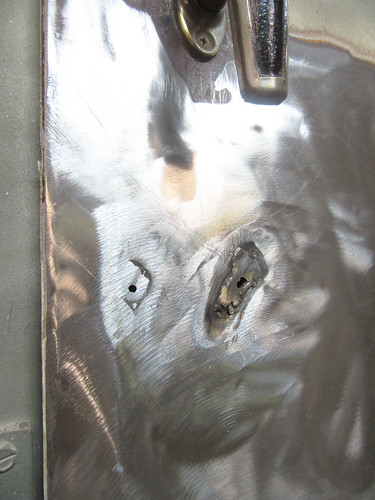
...I just melted a little steel in them. Left smallish openings to push cat-hair Bondo into.
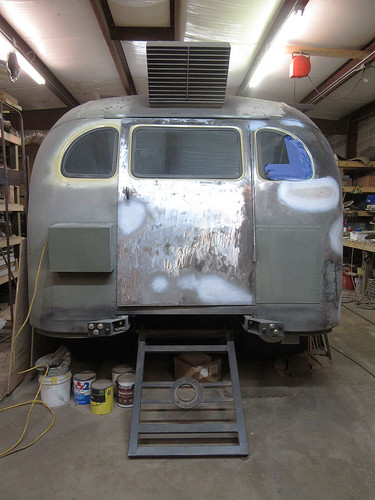
the (eight) white spots are where I found either Bondo or lead. Will have to go back and smooth them out just a bit. But not today.
ONWARD!
|
|
|
|
|
|
| Thread Tools |
|
|
| Display Modes |
 Linear Mode Linear Mode
|
 Posting Rules
|
You may not post new threads
You may not post replies
You may not post attachments
You may not edit your posts
HTML code is Off
|
|
|
|
 » Recent Threads
 |
|
|
|
|
|
|
|
|
|
|
|
|
|
|
|
|
|
|
|
|
|
|
|
|
|
|
|
|
|
|
|
|
|
|
|
|
|


