 |
|
 10-11-2018, 02:03 PM
|
#1
|
|
Mini-Skoolie
Join Date: Mar 2018
Location: Upstate NY
Posts: 61
Year: 1990
Coachwork: Wayne Lifeguard
Chassis: International
|
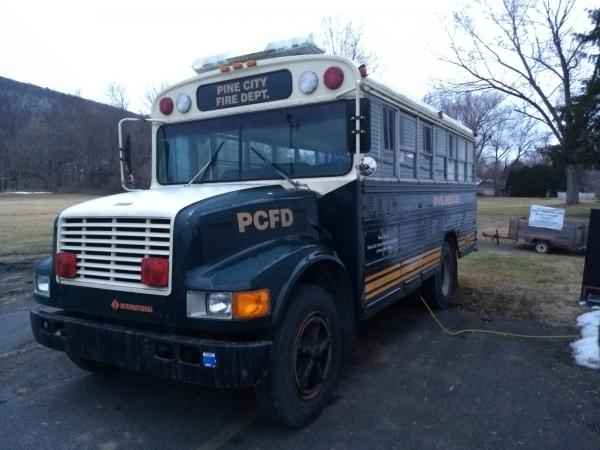
Li'l Trickster: six-window adventure bus for six people
Hi everyone -- starting the long-overdue thread for a bus I posted about awhile back. Here's the thread where I first introduced myself and the bus: http://www.skoolie.net/forums/f6/six...ily-22841.html
If you don't feel like reading the stuff back there, here's the basic info: It's a six-window 1990 Wayne Lifeguard/International 3700. It has lived all its life in upstate NY, first as a school bus, then as the dive rescue bus for a volunteer fire department, and now as an adventure rig for me, my wife, and our four kids. I offered the fire department half of what they were asking, and had the thing bought and titled as a home-on-wheels (basically an RV in NY) for under $2000.
I've done a fair amount with it since I first posted. I don't know if this can be called a "build thread," since a fair amount of it is review. But we can start here, how the bus first looked when I got it last spring:
|

|

|
|
10-11-2018, 02:38 PM
|
#2
|
|
Mini-Skoolie
Join Date: Mar 2018
Location: Upstate NY
Posts: 61
Year: 1990
Coachwork: Wayne Lifeguard
Chassis: International
|
This all started in March 2018. When I first test-drove the bus, it had six seats up front, and cabinets in the back for dive gear. There was a lot I didn't know about buying buses, and I'd only just started reading things here. Bringing the kids along for the test drive was probably a mistake, because they fell in love with it immediately, and made it pretty much impossible for me to walk away.
The fire department guys were really cool and agreed to take out the scuba gear cabinets, and to remove the big emergency lights up top. That was all taken care of when I went back to pick it up, and I had no problems on the hour-long drive home.
After getting it home, I didn't waste time. The seat bolts were too rusty to spin with wrenches, so I just used a reciprocating saw to cut the legs off the seats so I could clear out the interior.

Then I used a grinder to cut the heads off the bolts, but it took forever -- it was more like cutting the top 3/4 of each bolt head off, because the metal plates on the bottom of each seat leg had sort of a rim around them, and I couldn't get the grinder to cut the heads off flush. So I had to remove as much bolt metal as possible, and then pry up the plates with a crowbar and pop the remaining pieces of the bolt heads off. It worked, though. You can see some of the plates still attached in this photo:

|
|
|
|
|
10-11-2018, 02:57 PM
|
#3
|
|
Mini-Skoolie
Join Date: Mar 2018
Location: Upstate NY
Posts: 61
Year: 1990
Coachwork: Wayne Lifeguard
Chassis: International
|
You know what I wish? I wish I'd found a way to get some of the seats out intact, because I think I could have used them. Or at the very least, I could have used some of the raw materials, like the high-density foam inside, for upholstery on furniture I'd build later. And since this is NY, all the seats had lap belts attached, and I totally could have taken those off for later use. But as it was, I made a big pile of seats at the end of my driveway, threw them on the Craigslist free page, and they were gone within a couple of hours.
Oh well. But for people who aren't building a bus to live in, and want to do a camping/adventure rig on a budget, my advice would be not to throw anything away. OK, you might not want to just use a bus seat, because maybe you don't like the look of bus seats. But you might want to keep the old frames of the seats, in case you want to modify them later and bolt them back down to the floor as dinette seats, side-facing benches, whatever. I'm thinking now that there were all kinds of things I could have done with them.
Meanwhile, I kept soldiering on. I tore out the rubber floor, pried up all the aluminum trim, and got down to the wood underneath. Before making the decision about whether to tear out the floor or not and get it all down to bare metal, I went ahead and got a can of oil-based paint and made the interior white.
Part of the reason I started painting the interior was because, first, it was too cold in April in upstate NY to start painting the exterior. But I needed to make some visible headway. My wife was being super-cool about the whole thing, but the bus was taking up valuable driveway space, and the neighbors were wondering what was going on, and people in the community were driving by our house and asking questions. Even my parents were like, I don't know, man, who buys a bus? I was dealing with some hardcore skepticism. I felt like Noah, with the ark. So I painted the inside and made it look like maybe it could eventually become something, and texted people the photos to try to get them to catch the vision.

I don't know if it worked, but it boosted my morale to see the interior looking cleaner and brighter. It gave my wife and kids the energy, too, to imagine this thing as something more than just a metal box.
|
|
|
|
|
10-11-2018, 03:16 PM
|
#4
|
|
Mini-Skoolie
Join Date: Mar 2018
Location: Upstate NY
Posts: 61
Year: 1990
Coachwork: Wayne Lifeguard
Chassis: International
|
Then I had this whole series of unfortunate events. Amazingly, I had no trouble at all with insurance; I called my State Farm agent on the day I picked up the bus, and by the time I was driving it home, they'd emailed me the documents I needed in case I got stopped by cops. But where I ran into trouble was title and inspection.
I went to get the bus registered at the DMV, and didn't even think about the details of the title. I described it in the other thread, I think, but in a nutshell, the fire department that sold me the bus had gotten it from a school district. When they got it from the school district, they never changed the title over. So I ended up with the title looking like it went from the school district to me, and I had a bill of sale showing it going from the fire department to me. In other words, the bill of sale didn't match the title.
The FD had given me a bunch of documents with the bus, including the minutes of the school district meeting in which the bus had been donated to the fire department. If anyone at the DMV had cared about that, they could have seen how the whole thing worked, but the clerks just need everything to match, you know? So I went home with no title, and had to let the FD know about the problem so they could start clearing up the issue.
Meanwhile, I went to get the bus inspected, because I thought I might as well knock that out. I took it to an International dealership because I figured they'd have whatever parts I needed. The bus had passed inspection in 2016, but hadn't been on the road much since then, so I didn't know what to expect, even though the FD guys said everything was in working order.
Long story short, the International dealership guys totally tried to hose me. Technically, the only things that didn't pass inspection were the brake rotors, which were corroded. But the estimate they gave me for the work necessary to pass inspection included replacement of the entire brake system. All in all, it added up to nearly $7000, mostly in expensive labor and brand-new International parts shipped from the factory.
At that point, I was thinking, OK, this thing isn't even titled in my name, and maybe I need to just go back to the FD and ask for my money back. But while the title issue was still being resolved, I asked around locally where I could get a second opinion, and my buddy recommended a guy who fixed landscaping trucks.
It took awhile, but he took a look at it and said, yeah, the rotors had some light corrosion on them, but he didn't think they even needed to be resurfaced. He did recommend replacing the calipers, doing general PM stuff, changing the oil, etc., to the tune of a few hundred bucks, inspection included.
When the clean title finally came back from the FD, I just had to get a weight slip so the DMV could title it as a house-on-wheels or whatever, which is what they call RVs in NY. I just described it from the get-go as a school bus that had been converted into an RV, even though at that point it was still basically an empty box with a driver's seat.
So at this point in the story, it's June, and I've done very little on the bus. I have a clean title, and it's registered with plates, and it has passed inspection. And I have two days to get it ready for a campout that I signed up for forever ago.
|
|
|
|
|
10-11-2018, 03:23 PM
|
#5
|
|
Bus Crazy
Join Date: May 2018
Location: topeka kansas
Posts: 1,778
Year: 1954
Coachwork: wayne
Chassis: old f500- new 2005 f-450
Engine: cummins 12 valve
Rated Cap: 20? five rows of 4?
|
that bus...
I like your bus. I might have an idea for seats, go to a ford dealer, look at the big "transit " vans. not the transit connect. find one with seats in the back. That is what I am using in my bus for the kids, three point belts, cloth, they recline a little, and are removable.
william
|
|
|
|
|
10-11-2018, 03:52 PM
|
#6
|
|
Mini-Skoolie
Join Date: Mar 2018
Location: Upstate NY
Posts: 61
Year: 1990
Coachwork: Wayne Lifeguard
Chassis: International
|
Like I said, I felt like I was kind of doing this under a microscope. All my friends had heard about this bus, and were asking me all the time about how it was working out. Meanwhile, all these people from my church had planned this big campout months earlier, and I'd signed me and my family up for a spot in the RV section of the park, thinking we'd take our skoolie. Surely, I'd thought, after having the bus for several months, it would at least be campground-worthy, right?
So yeah, it's two days till campout time, and I'm pretty much committed to that, and all I have is this empty box with the original plywood on the floor. The first thing I have to figure out is what I'm going to do with the floor. Am I going to tear it all out and "do it right," and kill any rust, insulate it, and put down new flooring?
Maybe this is a good time to explain my thought process with this bus. In the beginning, I thought a bus would be a great alternative to tent camping, or pulling a trailer, for long road trips. My wife and I both have family in the Midwest and Central Plains. But as we got to know the bus better, we realized this isn't going to be a long-haul road warrior, probably. It's bumpy. It's loud. The engine and transmission seem to be reliable (the bus only has 144,000 miles on it), but it's not geared for high speeds. If you want to go 60 mph, you have to do it at 3000 rpm. I'm no diesel mechanic, but I'm thinking trying to do that for a long time is...bad.
Plus, it's small. I've got about 14 feet of space from the back of the driver's seat to the back wall. So the interior clocks in at, what, about 100 square feet, so it's not like we'll ever live in this thing, either. This is not a tiny house we'll try to live in someday, and it's not something we'll drive to Yellowstone. It's an adventure bus, a camping rig that we'll use as much as possible for drives down into the Endless Mountains in Pennsylvania, up to Ithaca and the waterfalls, the Catskills, maybe the Adirondacks. Within a few-hour radius of our home, we have all kinds of cool places we can see.
With that decided, the overall aesthetic of the bus took shape in my mind. I mean, I'd had months to stare at the inside while all the title and inspection issues were happening, so I'd kind of figured it out. I didn't want it to look like an RV or a living room. I wanted it to be spare and clean and bright and utilitarian, with wood floors, wooden bunks, decent shelves and storage space, and lots of attachment points where you could hang things from rings or carabiners. I wanted it to be a mobile basecamp that would still be warm and cozy when we wanted it to, and open enough that it would feel spacious even when we were all inside.
So I made the fateful decision -- and y'all can hate on me for it if you want -- to not tear everything out, and not treat it like a showroom piece or a bus that needs to last us for the next thirty years. The wheel wells were immaculate under the rubber, but I have no clue how things look under the wood. I'm pretty sure there's surface rust. I'm reasonably sure, though, that the bottom isn't about to fall out of the thing, and like I said earlier, the supports underneath are solid.
Anyway, I cast the dice, crossed the Rubicon, etc., with less than 24 hours to go before the campout I'd set as a deadline for having a usable interior. I cut up a bunch of pallets I had gotten for free, and nailed the boards down onto the existing plywood, so the space would at least look semi-respectable. It looked...semi-respectable.

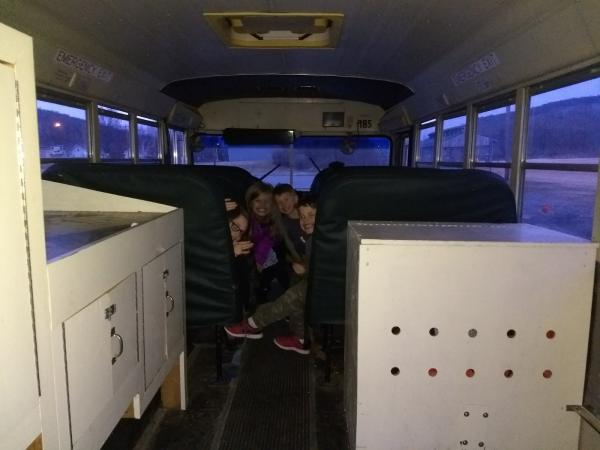
The interior ended up being all free-floating stuff the first time we used it, and everyone followed me in the minivan when we drove out to the campground, for obvious safety reasons. I brought along a mini-fridge and a window-unit A/C that we could plug into 110v once we got there, set up a small table I'd pulled out of a pop-up camper, and had everything else in duffel bags. The floor was the sleeping area. The whole rig looked pretty shady once we showed up at the campground and took our reserved spot between the more normal trailers and RVs.
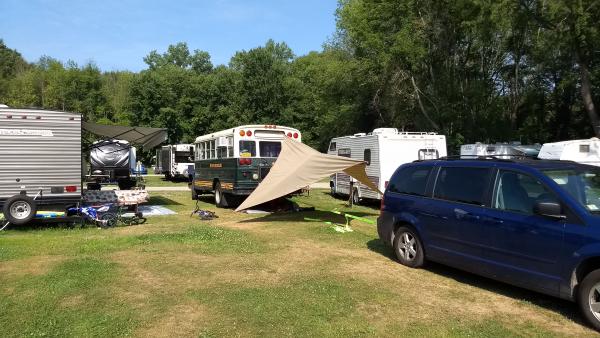
So sketchy. In the photo above, you can see the bus, the MSR shade awning I strung up over the back of it, and the slackline I attached from the tow hooks under the bus to the trailer ball on my minivan. The kids totally dug it -- it ended up raining like crazy one night, and a lot of our friends were soaked in their tents and suffering in the humidity, while we were dry in our bus, and comfortable with our redneck A/C and mini-fridge.
In all seriousness, we tried to be cool with the campground owners and with our neighbors, and explained that our bus was very much a work in progress. And people were actually really nice! They were really interested in the bus, if a bit disappointed that there still wasn't much going on inside.
My little guy had the right attitude:

All right, more on the unfolding saga tonight or tomorrow. Spoiler alert, though: so far, I've managed to paint the outside of the bus and build a decent interior. Looking forward to showing the rest of the progress, getting up to the present, and getting thoughts on where to go from here!
|
|
|
|
|
10-11-2018, 03:58 PM
|
#7
|
|
Mini-Skoolie
Join Date: Mar 2018
Location: Upstate NY
Posts: 61
Year: 1990
Coachwork: Wayne Lifeguard
Chassis: International
|
Quote:
Originally Posted by magnakansas

I like your bus. I might have an idea for seats, go to a ford dealer, look at the big "transit " vans. not the transit connect. find one with seats in the back. That is what I am using in my bus for the kids, three point belts, cloth, they recline a little, and are removable.
|
Thanks, man! I hadn't thought of that at all. I've kind of moved in a different direction interior-wise, and have basically gone ahead and started building in my own seating, with the plan of bolting seat belts to the chair rails, through the floor, etc. But seats like that sound like a good alternative, and could be a good direction if I make replacements and alterations.
Or for the inevitable second bus. 
|
|
|
|
|
10-12-2018, 08:55 AM
|
#8
|
|
Mini-Skoolie
Join Date: Mar 2018
Location: Upstate NY
Posts: 61
Year: 1990
Coachwork: Wayne Lifeguard
Chassis: International
|
We had a good time on our campout, but we definitely weren't happy with the sleeping situation without any furniture in the bus (surprise). We used what we had: two cots for the grownups, and a futon pad and miscellaneous foam pads for the kids. Our two small dogs came with us, too, so they were in a crate underneath the fold-up table in the front. All the real estate in the bus was taken up by sleeping people at night, and everything had to be picked up, stacked up, etc., in the daytime. Seating was a bunch of camp chairs. It worked, but it wasn't much fun.
So I spent most of the month of July making sketches of the interior and planning things out. I played with a lot of ideas, looked at floor plans here on this website, and read about how people had built their interiors. Eventually I landed on a setup I liked. This is how I sketched it out:

I sort of measured it out according to windows, in the interior space of the six-window bus. The entry way and steps inside the front door would be the mud room. The front 2.5 windows behind the driver's seat area would be the "living room" area, with a loveseat-sized couch that could flip out to extend into the aisle, and a table across the way that could drop down to make one big bed platform at night for the grownups. The next 2.5 windows (and then some) would be the kids' bedroom area, with double bunks on each side, and that would be where all their stuff would be contained. Behind the bunks, the back window area would be floor-to-ceiling shelving, with space underneath one of the shelves for a port-a-potty if necessary.
You can see most of it in the drawing, I guess. It's worth pointing out here that the interior design was basically defined by how I expected to use the bus: mostly in campgrounds, or maybe in friends' back acreages, and maybe the occasional boondocking setup. The goal for me and my family wouldn't be to just be in the bus all the time; it's supposed to be a basecamp for hiking trips, climbing trips, fishing trips, and stuff like that. Ideally, we would do most of our cooking and eating outside, but there would be enough space inside the bus for that, in case of bad weather.
In order to maximize the space, I also planned an awning on one side of the bus, and a roof deck up top. That would give us a lot of ways to use the bus, and space outside to spread out and still feel like we were connected to what was going on inside.
So then I started building stuff.
|
|
|
|
|
10-12-2018, 09:43 AM
|
#9
|
|
Mini-Skoolie
Join Date: Mar 2018
Location: Upstate NY
Posts: 61
Year: 1990
Coachwork: Wayne Lifeguard
Chassis: International
|
I started building bunks first.
Maybe it goes without saying, but I realized that to make bunkbeds that make sense in a skoolie, you have to build them low. I actually made mine so that the frame that would support the bottom bunk would be *under* the chair rail. That would make the beds really low, to the point that there wouldn't be much storage space underneath, but in my case, most of the space would be taken up by the wheel wells (and on one side, the rear heater, which I left in place) anyway.

I went with a simple build, using 2x4s. Doing this wasn't too complicated, but since I wanted the actual platform of the bed (made from plywood/OSB) to lie right on the chair rail, I had to notch the end boards with a jigsaw so they'd fit nicely under the rail. You can sort of see it in the picture above. So the bottom bunks actually don't have a wood piece running along the wall; the platform of the bed just rests on the chair rail. End rails have holes drilled through them so they can be bolted into the chair rail.
The top bunks are exactly halfway up the windows, which I find gives just enough room for the people on top and bottom to be able to move around with some degree of comfort. The top bunks *do* have a wooden rail running along the windows, and that rail is screwed into the ribs between the windows.
For the outer long wooden rails of the bunks, I had this nicer wood that I'd gotten for free awhile back on Craigslist, so I used that stuff. Along the inner edge of those, and along the window-side top bunk rails, I screwed in 2x2s that would support the actual plywood platforms that the mattresses would rest on.
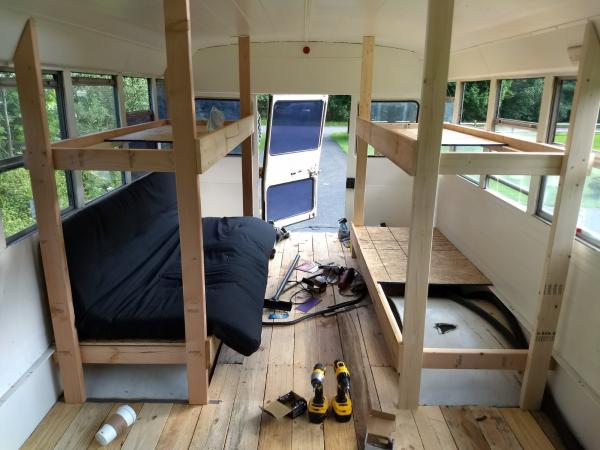
I used OSB for the actual platforms of the beds, since I'm on a budget and am doing as much as possible using free/secondhand stuff. Some good, thick plywood would have been nicer, but the bunks turned out well and I just left the windows open for a few sunny days to let any fumes out from the OSB. I attached the high posts to the ceiling using right-angle brackets that I slightly bent to fit. I just ran sheet metal screws through the posts closest to the windows, since they were cut at a sharp angle anyway and I could go right through them into the ceiling. Anyway, in the end, it all turned out pretty well:

Oh, I should mention the dimensions, because they relate to the mattresses I want to use. I built the bunks so that the platform space is 26.5 x 75 inches. Combined with the outer bunk rails, the beds end up coming about 28 inches out from the wall of the bus. Why these numbers? Well, a full-size mattress measures 53 x 75 inches, so I figured I'd make the bunks the right size so that I could cut a full-size foam pad in half, and have two bunk mattresses.
Those are narrow bunks -- considerably narrower than twin-size mattresses. But they're wider than the Coleman cots we've used for a long time (those are probably 23 inches wide or so), and we're not big people. I'm the biggest in our family, and I'm 5'11" and 155 pounds, and I can sleep on the bunks totally comfortably. At any rate, these are mainly for the kids, and our oldest is 11, so even if they grew up to need bigger beds, it would be awhile.
So the plan was to get hold of two thick full-size foam/memory foam pads, and cut 'em lengthwise to have four bunk mattresses. Those are pretty expensive, though. So the temporary solution is what you see in the picture above: top bunks just use the old Coleman cot pads; one bottom bunk has the old futon pad, folded so part of it goes up the wall, and the other bottom bunk has a twin-size foam pad I found, currently wrapped in a big old IKEA rug I had lying around, which makes it a little more kid-proof. I also found a bunch of throw pillows in the basement that we weren't using anymore, and voila, the result is couch-like seating/bedding on both sides.
Honestly, now I'm considering just getting one foam mattress to use for the top bunks, and keeping an eye on Craigslist for the free futon mattresses that pop up from time to time, and use them on the bottom bunks. They're good and thick, and it's nice to be able to sit down there and lean comfortably against the wall.
|
|
|
|
|
10-12-2018, 09:57 AM
|
#10
|
|
Bus Geek
Join Date: Mar 2011
Location: Houston, Texas
Posts: 8,462
Year: 1946
Coachwork: Chevrolet/Wayne
Chassis: 1- 1/2 ton
Engine: Cummins 4BT
Rated Cap: 15
|
Doing it "your way" and designed to fit your needs is what building a Skoolie is all about. Great start and please do keep the pix coming.
Excellent art on the sketch BTW.
|
|
|
|
|
10-12-2018, 10:43 AM
|
#11
|
|
Mini-Skoolie
Join Date: Mar 2018
Location: Upstate NY
Posts: 61
Year: 1990
Coachwork: Wayne Lifeguard
Chassis: International
|
With the bunks in, I wanted to start using this thing. That was kind of the tradeoff, for me, of doing a quick build. As much as I respect, and am amazed by, the people who really do it right to create beautiful builds that will last a lifetime (Tango, TAOFIK, I'm looking at you guys...your threads are inspiring!), time is of the essence for me. Up here, winter sets in early, and my oldest kid is already in middle school, and I don't want to kill a whole year getting this thing up to speed. I want to start using it ASAP, and using it as much as possible.
But as of August, after the bunks were built, the outside of Li'l Trickster needed some serious work. The original paint job was a fifty-foot sort of job. It looked OK on one side, but on the other, the clear coat was peeling all over the place. Earlier, I'd started some of the prep work by pressure-washing it, grinding down some of the rust spots, scuffing it all up, etc. And on a hot day, I'd managed to peel off most of the yellow reflective decals, with help from my kids. But I hadn't gone on to actually paint it, so if anything, it looked a lot worse than it did when I'd originally bought it.
Look at this thing. It's a post-apocalyptic kind of awesome:

Ah, but on closer inspection, it's pretty rough:


The big challenge of painting a bus up here, though, and especially this summer, is that you hardly get a break from the rain. We get so much rain in the Southern Tier of NY, it's ridiculous. Sometimes I wonder why we moved here. Oh yeah, because there was work here and I needed a job. But still.
I did more prep work and started to get my materials around. Spraying the bus wasn't really an option for me; I knew I'd have go to the brush-and-roller route, but I was cool with that, because with the pallet wood floor and the utilitarian bunks, I figured I'd just own the "rustic basecamp" aesthetic. Color-wise, I liked the look of safari-looking off-road vehicles I'd seen on advrider, and was leaning heavily toward the Rustoleum "Sand" color.
But by the time I was ready to pull the trigger on that, I found that you can't buy that stuff in gallon cans around here; don't know if it's some state law, some environmental thing, or what, but you can only get that color of Rusto in quarts, which is way more expensive. Even ordering it online was a challenge; every site I saw said they didn't ship it to NY. But did I try to solve the problem by doing the smart thing and asking people around here? No. In typical fashion I just changed the plan and charged ahead with something else. The weather forecast predicted a break in the precipitation soon and I needed to get my ducks in a row, fast.
I went to Tractor Supply and bought a can of Majic Brand implement paint, in International Harvester White. I'd seen that on some other buses and thought it looked all right, and would keep the bus cooler while getting me toward that safari vibe I liked. Since it was a short bus, I figured a gallon can would get me there, since I'd do the roof in flat white and therefore only needed to paint the front, back, and sides right now. I bought a can of the Majic enamel hardener, too, since again, rain, and I wanted the paint to cure as fast as possible.
So I had the paint, hardener, rollers and trays, brushes, thinner, drop cloths, etc. I had to work till 5, so I did that, got home, ate, and then told the kids, all right, we have to do this quick, because the sun's going to set soon, and we need to get the bus coated before it gets dark.
Well, it was all horrible timing. First, it took way longer than I thought it would take. Second, it was a hot day, and it was humid, but I didn't really notice how incredibly humid it was until the air started cooling off. So if I were able to do it all over again, I'd definitely take off work, start earlier in the day, and not paint once the dew started falling. Had I read advice online about this? Yes. Should I have known better? Yes. But I started painting the bus anyway. I figured anything would be better than the corroded, scuffed, rusty green, and even more important than looks, I wanted the bus to be sealed in a nice, clean, hard shell of paint, even if the paint didn't look perfect.
8:00 PM rolled around and the sun was setting and it was time for the kids to go in, so I kept working. I had to do a lot of brushwork along the rub rails, around the bumpers, etc. A small roller worked best on most of it, rather than a big roller. But it was slow going. I realized once the sun was down that I'd need a lot more time, so I fired up my car and my wife's minivan, parked one on each side of the bus, and lit it up with headlights.
10:00 PM rolled around and I was still working. I don't know if it was the nap of the roller, or the humidity, but I just couldn't get the paint to lay nicely on any flat surface. I was getting some serious orange-peel effects. I tried thinning the paint a little in the roller tray, and that helped, but then I started worrying that the paint would look all patchy, depending on which parts were thinned and which weren't.
At 12:00 AM I totally quit caring about things like that and just worked on getting everything coated as evenly as possible. And it's totally ridiculous; my wife is coming out and being really nice while also reminding me that it was really late and the neighbors were probably annoyed by the headlights and that she was going to bed; the shine of the headlights on the now-white surface of the bus is attracting all kinds of little insects and moths, which are landing on said white surface and getting stuck in the paint; I'm shaky from working like crazy on very little food, and probably getting a little loopy from smelling paint fumes for too long.
Finally, at like 12:30 AM, I pack it up and have a beer alone in the kitchen and wonder how it's all going to look in the morning.
Turns out, the next morning, it's not too bad. Could be better, but not too bad.


Check it out -- in the picture above, you can definitely see some weird stuff going on. The finish of the paint varies according to (I think) the temperature the metal underneath had been when I was painting it. You can see that the finish is shinier where the ribs run underneath, and I think the mass of the metal retained its warmth longer there, and enabled the paint to do better against the humidity and condensation. Similar things occurred on the hood, around the engine.
I came back into the house feeling pretty disappointed, and was kicking myself a fair amount for not waiting for a better time to paint. But my wife was like, "What did you want, a factory paint job? And did you want to have to wait forever to be able to do it? It's out of the way now, the bus looks pretty good, and we look a lot less like hillbillies now." And I realized that here I am, with a significant other who has no complaints about how the big school bus in our driveway looks. I chalked it up as a win, and even now, I feel pretty good about having a ten-foot paint job rather than a fifty-foot paint job.
Eventually I painted the wheels, painted the bumpers, and did other little things. There's still plenty to do, but now when I drive it around, I think it looks pretty cool.

|
|
|
|
|
10-12-2018, 11:38 AM
|
#12
|
|
Bus Crazy
Join Date: Oct 2017
Posts: 1,222
Year: 1999
Coachwork: BlueBird
Chassis: TC1000 HandyBus
Engine: 5.9L 24V-L6 Cummins ISB
Rated Cap: 26 foot
|
Quote:
Originally Posted by desertfather
I came back into the house feeling pretty disappointed, and was kicking myself a fair amount for not waiting for a better time to paint. But my wife was like, "What did you want, a factory paint job? And did you want to have to wait forever to be able to do it? It's out of the way now, the bus looks pretty good, and we look a lot less like hillbillies now."
|
hey now! I'm a hillbilly, and proud of it. Someone tried to use that term as an insult to me once. I was highly offended. She was a self-described princess-in-recovery from Australia. After a while her subtle insults ("take off your sunglasses, you look like a criminal with them on" was a final strraw) turned me off to hanging with her.
But I'll give your wife another chance. 
|
|
|
|
|
10-12-2018, 12:05 PM
|
#13
|
|
Mini-Skoolie
Join Date: Mar 2018
Location: Upstate NY
Posts: 61
Year: 1990
Coachwork: Wayne Lifeguard
Chassis: International
|
Quote:
Originally Posted by Tango
Doing it "your way" and designed to fit your needs is what building a Skoolie is all about. Great start and please do keep the pix coming.
Excellent art on the sketch BTW.
|
Thanks for that, Tango! It works better for me to draw stuff on paper than to try to model it on a computer. And yeah, one of the coolest things about this community is how people can support each other across such so many different approaches to bus conversion.
|
|
|
|
|
10-12-2018, 12:11 PM
|
#14
|
|
Mini-Skoolie
Join Date: Mar 2018
Location: Upstate NY
Posts: 61
Year: 1990
Coachwork: Wayne Lifeguard
Chassis: International
|
Quote:
Originally Posted by Mountain Gnome
hey now! I'm a hillbilly, and proud of it. Someone tried to use that term as an insult to me once. I was highly offended. She was a self-described princess-in-recovery from Australia. After a while her subtle insults ("take off your sunglasses, you look like a criminal with them on" was a final strraw) turned me off to hanging with her.
But I'll give your wife another chance. |
Hahaha, no offense intended, Mountain Gnome! With a name like that, you have every right to proudly own the title of "hillbilly."
My wife comes from a long line of mountain outlaws, so I don't think she has a problem with being a hillbilly...it's more about looking respectable enough to avoid being hassled by local authorities or judgmental neighbors
|
|
|
|
|
10-12-2018, 12:44 PM
|
#15
|
|
Mini-Skoolie
Join Date: Mar 2018
Location: Upstate NY
Posts: 61
Year: 1990
Coachwork: Wayne Lifeguard
Chassis: International
|
Since building the bunks and painting the outside, I've been doing a lot of experimenting. I got an old loveseat from a university dumpster when they were replacing furniture in some dorms, and strapped it tight against the chair rail in the front, just to see how it filled the space and if it might somehow be viable as seating, and maybe part of a larger bed area.
At the same time, on the other side, I set up this old RV dinette table I took out of my old pop-up camper, and strapped it to the chair rail too. It made the whole front area of the bus really functional, which was nice, but made me thinking dropping a dinette table down as part of a bed would be impractical. Flat spaces tend to get used for things, and when it's time for bed, it's no fun to have to find spaces for all that stuff so you can sleep on the table.
But this is how I've been doing things: just testing different things while generally trying to get as much use out of the bus as possible. In September, my wife was doing something with our oldest daughters, and I was on dinner duty. I'd started storing most of our camping gear in the bus so we'd be able to head out in a moment's notice, so the two-burner propane stove and a big water jug were already on board. We grabbed some pasta, sauce, veggies, etc., and hopped in the bus. I drove everyone over to a big park near where we live, and let the kids play on the playground while I cooked.

It was awesome! The kids love going out in the bus because it always draws a crowd. They get to show their friends around and brag about owning a bus. I've even driven them to school sometimes, and they think it's hilarious that ours is the only family-owned bus among all the yellow buses.
But what I liked about it was that it really was a rolling basecamp. For me, it's not just about camping, but about having a big room on wheels that enables you to do stuff you wouldn't ordinarily be able to do. So, dinner out in the park at sunset is just the beginning. In the wintertime I want to take it to the same park, where there's a big sledding hill, and park it at the top with the propane heater on and the propane stove fired up, and let the kids and their friends warm up and drink hot chocolate in the bus between sled runs.
It's also cool to be able to make dinner and have a totally different view out the window than you normally have.

|
|
|
|
|
10-14-2018, 09:26 PM
|
#16
|
|
Bus Crazy
Join Date: Jun 2016
Location: N.C.
Posts: 1,136
Year: 1997
Coachwork: Bluebird
Engine: DT466E
Rated Cap: 34
|
Great start! Looking forward to following your progress.
And ignore the naysayers.....you're building it how you want, your kids are loving it, and you're making memories.
|
|
|
|
|
10-14-2018, 10:02 PM
|
#17
|
|
Bus Nut
Join Date: Jan 2016
Location: Greater Boston
Posts: 504
|
Glad to see its still a viable project - I was starting to wonder where you'd gone for a while.
It's VERY hard to convince someone their camping plan is bad when you're soaking wet (and so is everything else that spent the night in the tent.) I mean, I just /can't/ take someone seriously when their sneakers squish with each step. 
Looks like its coming along really well, too.
|
|
|
|
|
10-14-2018, 11:05 PM
|
#18
|
|
Bus Geek
Join Date: Apr 2012
Location: So Cal
Posts: 3,231
Year: 1935
Coachwork: Superior
Chassis: Chevy
Engine: 317 ci/tid / Isuzu
|
I have very much enjoyed your well written post! I must say that your endeavor reminds me of another kind of similar tale that had you been there in the "time" you surly would have been up for. While all this happened 50 years ago it is clear to me that you-all are made of the same stuff. I hope you will take the time to enjoy this trek from days long gone. Jack
https://www.hemmings.com/blog/2014/0...huff-and-puff/.
|
|
|
|
|
10-14-2018, 11:35 PM
|
#19
|
|
Bus Geek
Join Date: Mar 2011
Location: Houston, Texas
Posts: 8,462
Year: 1946
Coachwork: Chevrolet/Wayne
Chassis: 1- 1/2 ton
Engine: Cummins 4BT
Rated Cap: 15
|
Great write up and even better adventure. Yes...the neighborhood park can count as an "adventure". It's very much a state of mind. And one that kids figure out in a heartbeat. Keep it going.
Thanks for sharing!
|
|
|
|
|
10-19-2018, 08:52 AM
|
#20
|
|
Bus Crazy
Join Date: Oct 2017
Posts: 1,222
Year: 1999
Coachwork: BlueBird
Chassis: TC1000 HandyBus
Engine: 5.9L 24V-L6 Cummins ISB
Rated Cap: 26 foot
|
Quote:
Originally Posted by desertfather
Hahaha, no offense intended, Mountain Gnome! With a name like that, you have every right to proudly own the title of "hillbilly."
My wife comes from a long line of mountain outlaws, so I don't think she has a problem with being a hillbilly...it's more about looking respectable enough to avoid being hassled by local authorities or judgmental neighbors |
Mountain outlaws 
local authorities 
judgemental neighbors   
If she were a real hillbilly, she wouldn't care about the neighbors!
The snobby guy (named "Dick"  ) who lives up the street from my mom and has gotten a new car every 2 years for the last 40 years makes a point to go out of his way and drive by our house regularly. We live in a col-de-sac, so he doesn't need to drive by....
Saw him eyeballing my bus two days ago as I drove out of our driveway; my car blocked his view. Saw him parked at an angle at the top of our driveway yesterday, positioned to take a pic from the driver's window. REquired him to literally back-up into the spot, so I know he went out of his way. I expect a letter from the city or HOA soon.... Might have to take a trip to visit my sister's family in NC, so I am out-of state for a while and will not be "required" to get a GA plate.
When I was 10 in the 1970's, he was the only guy with metric tools to adjust the handlebar on my Mongoose BMX bike. He was always unfriendly, living up to his name.... His wife seems sweet, and his kids are nice, though.
Peace, love, and Aloha to y'all!
|
|
|
|
|
|
| Thread Tools |
|
|
| Display Modes |
 Linear Mode Linear Mode
|
 Posting Rules
|
You may not post new threads
You may not post replies
You may not post attachments
You may not edit your posts
HTML code is Off
|
|
|
|
 » Recent Threads
 |
|
|
|
|
|
|
|
|
|
|
|
|
|
|
|
|
|
|
|
|
|
|
|
|
|
|
|
|
|
|
|
|
|
|
|
|
|


